Canon Pixma MX720 Handleiding
Bekijk gratis de handleiding van Canon Pixma MX720 (4 pagina’s), behorend tot de categorie Printer. Deze gids werd als nuttig beoordeeld door 105 mensen en kreeg gemiddeld 4.3 sterren uit 53 reviews. Heb je een vraag over Canon Pixma MX720 of wil je andere gebruikers van dit product iets vragen? Stel een vraag
Pagina 1/4

XXXXXXXX © CANON INC. 2013
ΕΛΛΗΝΙΚΑESPAÑOL
PORT DO BRASIL
ITALIANO
NEDERLANDS
DEUTSCHFRANÇAIS
Pour obtenir des détails sur d'autres paramètres, reportez-vous au .Manuel en ligne
Conguration pour la réception de fax
Lisez ce manuel une fois l'étape terminée.Démarrage
Pour utiliser les fonctionnalités de fax de la machine, vous pouvez entrer les paramètres
via .Conguration facile
Conguration facile démarre.
Suivez les instructions à l'écran pour dénir le paramétrage en fonction de
l'environnement de fonctionnement.
Utilisez le bouton pour sélectionner l'élément, puis appuyez sur le bouton .{}[] OK
Appuyez sur le bouton , puis sélectionnez successivement > MENU Cong.
Paramètres périphérique Paramètres fax Lancer conguration rapide > > ou
Conguration facile Lancer conguration > bouton ou OK .
Utilisation de Conguration facile
Informations complémentaires sur le paramétrage du
fax à l'aide de Conguration facile
Branchez la machine à une prise de ligne téléphonique avec le câble de téléphone
fourni.
Le connecteur se nomme à l'arrière de la machine.
Une méthode de connexion de base est illustrée dans cette figure. Pour d'autres
méthodes de connexion, reportez-vous au .Manuel en ligne
Pour les utilisateurs en Europe : si vous utilisez votre propre câble téléphonique,
assurez-vous que celui-ci comporte 6 fils.
•
•
Branchement à une prise de ligne téléphonique
Lorsque vous branchez un téléphone ou un répondeur, retirez le capuchon, puis
branchez un téléphone ou un répondeur avec un câble de ligne téléphonique.
Le connecteur se nomme à l'arrière de la machine.
N'utilisez pas de duplexeur de prise téléphonique.
Pour les utilisateurs du Royaume-Uni : utilisez un adaptateur B.T. pour la connexion si
nécessaire.
•
•
Branchement à un téléphone
Reportez-vous au pour entrer les paramètres.Manuel en ligne
Entrer les Paramètres infos utilisateur et le Paramètre date/
heure
Reportez-vous au pour entrer les paramètres.Manuel en ligne
DRPD est disponible uniquement aux États-Unis et au Canada.
Network switch peut ne pas être disponible suivant la région ou le pays où vous
résidez.
•
•
Entrer les paramètres DRPD ou Network switch
1
2
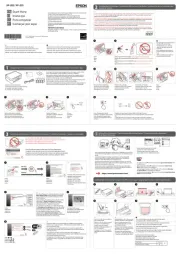
For the details of other settings, refer to the Online Manual.
Setup for Fax Reception
Read this manual after nishing the operation of Getting Started.
To use the fax features of the machine, you can enter the fax settings through the Easy
setup.
Easy setup starts up.
Follow the on-screen instruction to complete the settings in accordance with the
operating environment.
Use the button to select the item, then press the button.{}[] OK
Press the MENU button, then select in the order of > > Setup Device settings
FAX settings Start Easy setup Easy setup Start setup > or > button or OK .
Using Easy setup
Complementary Information about Fax Setting Using
Easy setup
Connect the machine to a telephone jack with the supplied telephone line cable.
The connector is labeled on the back of the machine.
A basic connection method is shown in this figure. For other connection methods, refer
to the .Online Manual
Users in Europe: If you prepare your own telephone line cable, be sure it is a 6-wire
telephone line cable.
•
•
Connect to a Telephone Jack
When connecting a telephone or an answering machine, remove the Cap, then
connect a telephone or an answering machine with a telephone line cable.
The connector is labeled on the back of the machine.
Do not use a telephone jack line duplexer.
Users in UK: Use a B.T. adapter for connection as required.
•
•
Connect to a Telephone
Refer to the Online Manual to enter the settings.
Enter the User information settings and Date/time setting
Refer to the Online Manual to enter the settings.
DRPD is available only in US and Canada.
Network switch may not be available depending on the region or country.
•
•
Enter the DRPD or Network switch settings
ENGLISH
1
2
QT5-6258-V01 PRINTED IN XXXXXXXX
IMPRIME XX XXXXXXXX

Raadpleeg de voor meer informatie over andere instellingen.Online handleiding
Conguratie voor faxontvangst
Lees deze handleiding nadat u de instructies in de hebt uitgevoerd.Aan de Slag-gids
Als u de faxfuncties van het apparaat wilt gebruiken, kunt u de faxinstellingen invoeren via
de .Handmatige instelling (Easy setup)
Handmatige instelling (Easy setup) wordt gestart.
Volg de instructies op het scherm om de instellingen overeenkomstig de
gebruiksomgeving te voltooien.
Gebruik de knop {}[] om het onderdeel te selecteren en druk vervolgens op de
knop .OK
Druk op de knop MENU en selecteer in deze volgorde: Instellen (Setup) >
Apparaatinstellingen (Device settings) FAX-instellingen (FAX settings) > >
Handmatige instelling starten (Start Easy setup) Handmatige instelling (Easy of
setup) Instelling starten (Start setup) > knop of OK .
Handmatige instelling (Easy setup) gebruiken
Aanvullende informatie over fax instellen met behulp
van Handmatige instelling (Easy setup)
Sluit het apparaat op een telefoonaansluiting aan met de bijgeleverde telefoonkabel.
De aansluiting heeft de aanduiding aan de achterzijde van het apparaat.
In deze afbeelding wordt een basisaansluitmethode weergegeven. Raadpleeg de
Online handleiding voor andere aansluitmethoden.
Gebruikers in Europa: als u uw eigen telefoonkabel voorbereidt, moet dit een 6-aderige
telefoonkabel zijn.
•
•
Aansluiten op een telefoonaansluiting
Als u een telefoon of antwoordapparaat aansluit, verwijdert u het kapje en sluit u
vervolgens een telefoon of antwoordapparaat aan met behulp van een telefoonkabel.
De aansluiting heeft de aanduiding aan de achterzijde van het apparaat.
Gebruik geen telefoonkabelsplitter.
Gebruikers in Verenigd Koninkrijk: gebruik zo nodig een B.T.-adapter voor de
aansluiting.
•
•
Aansluiten op een telefoon
Raadpleeg de om de instellingen in te voeren.Online handleiding
Voer de Gebruikersgegevens instellen (User information
settings) en Instelling datum/tijd (Date/time setting) in
Raadpleeg de om de instellingen in te voeren.Online handleiding
DRPD is alleen beschikbaar in de V.S. en Canada.
Netwerkschakelaar (Network switch) is mogelijk niet beschikbaar, afhankelijk van de
regio of het land.
•
•
Voer de instellingen voor de DRPD of de
Netwerkschakelaar (Network switch) in
1
2
Einzelheiten zu anderen Einstellungen nden Sie im Online-Handbuch.
Einrichtung für den Faxempfang
Lesen Sie diese Anleitung, nachdem Sie die Vorgehensweisen in Inbetriebnahme
abgeschlossen haben.
Zur Verwendung der Faxfunktionen des Geräts können Sie die Faxeinstellungen über die
Option Einfache Einrichtung (Easy setup) eingeben.
Einfache Einrichtung (Easy setup) wird gestartet.
Folgen Sie der Anleitung auf dem Bildschirm, und schließen Sie die Einrichtung
entsprechend der Betriebsumgebung ab.
Verwenden Sie die Taste , um das Element auszuwählen, und drücken Sie die {}[]
Taste .OK
Drücken Sie die Taste , und wählen Sie dann MENÜ (MENU) Einrichtg (Setup)
> > Geräteeinstellungen (Device settings) Fax-Einstellungen (FAX settings) >
Einfache Einrichtung starten (Start Easy setup) Einfache Einrichtung (Easy oder
setup) > Taste oder .OK Einrichtung starten (Start setup)
Verwenden von Einfache Einrichtung (Easy setup)
Zusätzliche Informationen zur Faxeinstellung mithilfe
von Einfache Einrichtung (Easy setup)
Schließen Sie das Gerät mit dem im Lieferumfang enthaltenen Telefonkabel an eine
Buchse für Telefonkabel an.
Der Anschluss ist auf der Geräterückseite mit gekennzeichnet.
In dieser Abbildung ist eine standardmäßige Verbindungsmethode dargestellt.
Informationen zu anderen Verbindungsmethoden finden Sie im Online-Handbuch.
Benutzer in Europa: Falls Sie ein eigenes Telefonkabel verwenden möchten, achten
Sie darauf, dass es sich um ein 6-adriges Telefonkabel handelt.
•
•
Anschluss an eine Buchse für Telefonkabel
Bei Anschluss eines Telefons oder Anrufbeantworters entfernen Sie zunächst die
Kappe, und schließen dann das Telefon bzw. den Anrufbeantworter mit einem
Telefonkabel an.
Der Anschluss ist auf der Geräterückseite mit gekennzeichnet.
Verwenden Sie keine Weiche an der Buchse für Telefonkabel.
Benutzer in GB: Verwenden Sie für den Anschluss je nach Bedarf einen BT-Adapter.
•
•
Anschluss an ein Telefon
Informationen zur Eingabe der Einstellungen nden Sie im Online-Handbuch.
Eingabe von Benutzerinformationseinstellung (User information
settings) und Datum/Uhrzeit einstellen (Date/time setting)
Informationen zur Eingabe der Einstellungen nden Sie im Online-Handbuch.
DRPD ist nur in den Vereinigten Staaten und Kanada verfügbar.
Network switch ist je nach Land oder Region möglicherweise nicht verfügbar.
•
•
Eingabe von DRPD- oder Network switch-Einstellungen
1
2

Para obter detalhes sobre outras congurações, consulte o Manual On-line.
Conguração para receber fax
Leia este manual depois de concluir a operação de Para Começar.
Para usar os recursos de fax da máquina, você pode entrar nas congurações de fax
através de .Conguração fácil (Easy setup)
A é iniciada.Conguração fácil (Easy setup)
Siga a instrução exibida na tela para concluir as congurações de acordo com
o ambiente operacional.
Use o botão para selecionar o item e pressione o botão {}[] OK.
Pressione o botão , então selecione, na ordem, MENU Congurar (Setup) >
Congurações do dispositivo (Device settings) Congurações de FAX (FAX >
settings) Iniciar conguração fácil (Start Easy setup) Conguração fácil > ou
(Easy setup) Iniciar conguração (Start setup) > botão OK ou .
Usando a Conguração fácil (Easy setup)
Informações Complementares Sobre a Conguração
de Fax Usando a Conguração fácil (Easy setup)
Conecte a máquina com uma tomada de linha telefônica usando o cabo de linha
telefônica fornecido.
O conector está com a etiqueta na parte traseira da máquina.
Um método de conexão básico é mostrado nesta figura. Para obter informações sobre
outros métodos de conexão, consulte o Manual On-line.
Usuários na Europa: se você preparar seu próprio cabo de linha telefônica, ele deverá
ser um cabo de 6 fios.
•
•
Conectar-se com uma Tomada da Linha Telefônica
Ao fazer a conexão com um telefone ou uma secretária eletrônica, remova a Tampa
e conecte um telefone ou uma secretária eletrônica usando um cabo de linha
telefônica.
O conector está com a etiqueta na parte traseira da máquina.
Não utilize um duplexador de linha de tomada telefônica.
Usuários do Reino Unido: utilizem um adaptador B.T. para a conexão, quando
necessário.
•
•
Conectar-se com um Telefone
Consulte o Manual On-line para entrar nas congurações.
Entre nas Cong. Informações do Usuário (User information
settings) e em Conguração data/hora (Date/time setting)
Consulte o Manual On-line para entrar nas congurações.
DRPD está disponível somente nos Estados Unidos e no Canadá.
O Comutador de rede (Network switch) talvez não esteja disponível dependendo da
região ou do país.
•
•
Entre nas congurações de DRPD ou Comutador de rede
(Network switch)
1
2
Per ulteriori informazioni su altre impostazioni, consultare il .Manuale online
Congurazione per la ricezione di fax
Leggere il presente manuale al termine delle operazioni della Guida Rapida.
Per utilizzare le funzioni fax della macchina, è possibile selezionare le impostazioni fax
tramite .Impostazione facile (Easy setup)
Impostazione facile (Easy setup) viene avviato.
Seguire le istruzioni visualizzate per completare le impostazioni in base all'ambiente
operativo.
Premere il pulsante .{}[] per selezionare la voce, quindi premere il pulsante OK
Premere il pulsante MENU , quindi selezionare nell’ordine Imposta- zione (Setup)
> > Impostazioni periferica (Device settings) Impostazioni FAX (FAX settings) >
Avvia Impostazione facile (Start Easy setup) Impostazione facile (Easy setup) o
> pulsante oppure OK Avvia impostazione (Start setup).
Utilizzo di Impostazione facile (Easy setup)
Informazioni complementari sull'impostazione del fax
tramite Impostazione facile (Easy setup)
Collegare la macchina a una presa telefonica con il cavo della linea telefonica in
dotazione.
Il connettore è contrassegnato da sulla parte posteriore della macchina.
In questa figura è mostrato un metodo di collegamento di base. Per informazioni su
altri metodi di collegamento, consultare il Manuale online.
Utenti in Europa: se si predispone autonomamente un cavo telefonico, assicurarsi che
sia a 6 conduttori.
•
•
Collegamento a una presa telefonica
Quando si effettua il collegamento a un telefono o a una segreteria telefonica,
rimuovere il coperchietto, quindi collegare un telefono o una segreteria telefonica
mediante un cavo della linea telefonica.
Il connettore è contrassegnato da sulla parte posteriore della macchina.
Non utilizzare un duplexer della linea della presa telefonica.
Utenti nel Regno Unito: utilizzare un adattatore B.T. per il collegamento.
•
•
Collegamento a un telefono
Per immettere le impostazioni, consultare il .Manuale online
Immissione delle Impostazioni informazioni utente (User
information settings) e Impostazioni data/ora (Date/time setting)
Per immettere le impostazioni, consultare il .Manuale online
DRPD è disponibile solo negli Stati Uniti e in Canada.
Network switch potrebbe non essere disponibile in base al paese o alla regione.
•
•
Immissione delle impostazioni DRPD o Network switch
1
2
Product specificaties
| Merk: | Canon |
| Categorie: | Printer |
| Model: | Pixma MX720 |
Heb je hulp nodig?
Als je hulp nodig hebt met Canon Pixma MX720 stel dan hieronder een vraag en andere gebruikers zullen je antwoorden
Handleiding Printer Canon
7 September 2025
6 September 2025
5 September 2025

1 September 2025
1 September 2025

1 September 2025
1 September 2025
15 Augustus 2025
14 Augustus 2025
29 Juli 2025
Handleiding Printer
- Intermec
- UTAX
- HP
- Digitus
- Custom
- Kern
- Xiaomi
- Sawgrass
- Middle Atlantic
- GoDEX
- Honeywell
- Olympia
- Plustek
- Vupoint Solutions
- Dymo
Nieuwste handleidingen voor Printer
9 September 2025
9 September 2025
9 September 2025
8 September 2025
8 September 2025

8 September 2025

7 September 2025
7 September 2025
7 September 2025

7 September 2025