Canon Pixma MP230 Handleiding
Bekijk gratis de handleiding van Canon Pixma MP230 (4 pagina’s), behorend tot de categorie Printer. Deze gids werd als nuttig beoordeeld door 165 mensen en kreeg gemiddeld 4.2 sterren uit 83 reviews. Heb je een vraag over Canon Pixma MP230 of wil je andere gebruikers van dit product iets vragen? Stel een vraag
Pagina 1/4

1
XXXXXXXX © CANON INC. 2012
4
2
3
2
1
1
5
1
2
1
2
3
series
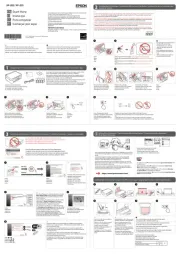
Compruebe que se le han suministrado los siguientes elementos.
Es necesario un cable USB
(no suministrado).
Elementos
suministrados
No conecte aún el cable USB.
Conecte el cable de alimentación.
4
Pulse el botón ACTIVADO (ON).
5
Retire la cinta naranja y el material de protección.
2
Cierre la cubierta/unidad de escaneado.
3
Levante la cubierta/unidad de escaneado, y sujétela con el soporte de la unidad de escaneado.
¡La cubierta de documentos debe estar cerrada para levantar la cubierta/unidad de escaneado!
1
Evite que caigan objetos dentro del equipo. Podrían provocar fallos en el funcionamiento.
¡Léame en primer lugar!
Consérvelo a mano para utilizarlo
como referencia en el futuro.
Windows es una marca comercial o una marca comercial registrada de Microsoft
Corporation en EE. UU. y/u otros países.
Windows Vista es una marca comercial o una marca comercial registrada de Microsoft
Corporation en EE. UU. y/u otros países.
Mac y Mac OS son marcas comerciales de Apple Inc., registradas en EE. UU. y en
otros países.
•
•
•
Número de modelo: K10379
Para llevar a cabo la instalación, coloque el equipo cerca del ordenador.
Guía de inicio
ESPAÑOL
Equipo multifunción fotográco Canon Inkjet
Ayuda de Canon
Asistencia técnica por correo electrónico:
www.usa.canon.com/support
Asistencia técnica gratuita: 1-800-OK-CANON
Esta opción proporciona asistencia telefónica técnica personal,
sin cargo por servicio, de lunes a viernes (excepto festivos),
durante el periodo de garantía.
Se dispone de un dispositivo telefónico auxiliar para sordos (TDD)
en 1-866-251-3752.
Check the included items.
A USB cable (not included) is
required.
Included Items
Do not connect the USB cable yet.
Connect the power cord.
4
Press the button.ON
5
Remove the orange tape and protective material.
2
Close the Scanning Unit / Cover.
3
Lift the Scanning Unit / Cover, then x it with the Scanning Unit Support.
Document Cover must be closed to lift Scanning Unit / Cover!
1
Do not allow objects to fall inside the machine. These could cause malfunction.
Getting Started Read me rst!
Keep me handy for future reference.
Windows is a trademark or registered trademark of Microsoft Corporation in the U.S.
and/or other countries.
Windows Vista is a trademark or registered trademark of Microsoft Corporation in the
U.S. and/or other countries.
Mac and Mac OS are trademarks of Apple Inc., registered in the U.S. and other
countries.
•
•
•
Model Number: K10379
To perform setup, place the machine near the computer.
ENGLISH
Canon Inkjet Photo All-In-One
Getting Help from Canon
Email Tech Support — www.usa.canon.com/support
Toll-Free Tech Support— 1-800-OK-CANON
This option provides live telephone technical support, free of
service charges, Monday-Friday (excluding holidays), during the
warranty period.
Telephone Device for the Deaf (TDD) support is available at
1-866-251-3752.
QT5-5746-V01 PRINTED IN XXXXXXXX

2
1
5
36
6
4
2
Introduzca el cartucho FINE (FINE
Cartridge) negro en la ranura
derecha.
¡No lo golpee contra los lados!
4
Tenga cuidado con la tinta de la cinta
protectora.
Desembale el cartucho FINE
(FINE Cartridge) y retire la cinta
protectora.
3
Abra la tapa de bloqueo del cartucho de tinta del lado derecho.
2
Para cerrar completamente la tapa
de bloqueo del cartucho de tinta,
presione en hasta que oiga un
clic.
Compruebe que la tapa de bloqueo
del cartucho de tinta esté derecha y
correctamente cerrada, es decir, que no
esté inclinada.
5
¡No tocar!
Repita de a para instalar
el otro cartucho FINE (FINE
Cartridge).
6
A la izquierda debe instalarse el cartucho FINE (FINE Cartridge) de color y a la derecha debe instalarse el
cartucho FINE (FINE Cartridge) negro.
Si la luz de se ilumina Alarma (Alarm)
en naranja, pulse el botón ACTIVADO
(ON) para apagar el equipo y repita
desde .
Compruebe que la luz de
ENCENDIDO (POWER) se ilumina
en verde.
6
Abra la cubierta/unidad de escaneado.
Consulte en .
1
Aquí deben instalarse los cartuchos FINE
(FINE Cartridges).
No toque hasta que se detenga.
Sujete rmemente y levante la tapa.
Insert the Black FINE Cartridge
into the right slot .
Do not knock it against the sides!
4
Be careful of ink on the protective tape.
Unpack the FINE Cartridge, then
remove the protective tape.
3
Open the Ink Cartridge Locking Cover on the right side.
2
Push down of the Ink Cartridge
Locking Cover until you hear a
click to close it completely.
View the Ink Cartridge Locking Cover
straight on and check that it is locked
correctly (not at an angle).
5
Do not touch!
Repeat to to install the other
FINE Cartridge.
6
The left is where the Color FINE Cartridge is to be installed and the right is where the Black FINE Cartridge is to
be installed.
If the Alarm lamp ashes orange,
press the button to turn OFF the ON
machine, then redo from .
Check that the POWER lamp lights
green.
6
Open the Scanning Unit / Cover.
Refer to in .
1
This is where the FINE Cartridges are to be
installed.
Do not touch it until it stops.
Pinch rmly and pull up the cover.

4
3
1
3
4
2
1
7
Cargar papel
fotográfico
Abra el soporte del papel.
1
Deslice la guía del papel a ambos
lados.
2
Cargue el papel en la bandeja
posterior.
3
Ajuste la guía del papel a la
anchura del papel.
4
Para obtener más información sobre el
papel, consulte el Manual en pantalla
que se instalará posteriormente.
Introduzca el CD-ROM en el
ordenador.
1
Si el cable USB p3-ya está conectado,
desconéctelo. Si aparece un mensaje
en el ordenador, haga clic en Cancelar
(Cancel).
Cuando use papel fotográco, deberá ajustar la conguración del equipo al tipo y al tamaño del soporte.
Para obtener más detalles, consulte el que se instalará posteriormente.Manual en pantalla
Si la luz de parpadea Alarma (Alarm)
en naranja, compruebe que los
cartuchos FINE (FINE Cartridges)
estén instalados correctamente.
Cierre la cubierta/unidad de
escaneado como en - .
La luz de ENCENDIDO (POWER)
parpadea en verde durante
aproximadamente 20 segundos. Espere
a que se encienda y continúe.
7
Loading Photo
Paper
Open the Paper Support.
1
Slide the Paper Guide to both
ends.
2
Load the paper in the Rear Tray.
3
Adjust the Paper Guide to t the
paper width.
4
For information about paper, refer to
the which will be On-screen Manual
installed later.
Insert the CD-ROM into the
computer.
1
If the USB cable is already connected,
unplug it. If a message appears on the
computer, click Cancel.
When using photo paper, machine settings for media type and size should be adjusted. For details, refer to
the which will be installed later.On-screen Manual
If the Alarm lamp ashes orange,
check that the FINE Cartridges are
installed correctly.
Close the Scanning Unit / Cover as
in - .
The POWER lamp blinks green for
about 20 seconds. Wait until it is lit, then
proceed.
7
Product specificaties
| Merk: | Canon |
| Categorie: | Printer |
| Model: | Pixma MP230 |
Heb je hulp nodig?
Als je hulp nodig hebt met Canon Pixma MP230 stel dan hieronder een vraag en andere gebruikers zullen je antwoorden
Handleiding Printer Canon
7 September 2025

6 September 2025
5 September 2025

1 September 2025

1 September 2025

1 September 2025

1 September 2025
15 Augustus 2025
14 Augustus 2025

29 Juli 2025
Handleiding Printer
- Unitech
- Ibm
- Builder
- Metapace
- Evolis
- Toshiba
- Kern
- TSC
- DTRONIC
- Colop
- Roland
- Middle Atlantic
- Seiko
- Renkforce
- Panduit
Nieuwste handleidingen voor Printer
9 September 2025
9 September 2025

9 September 2025

8 September 2025
8 September 2025

8 September 2025

7 September 2025

7 September 2025
7 September 2025

7 September 2025