Canon Pixma MG7120 Handleiding
Bekijk gratis de handleiding van Canon Pixma MG7120 (4 pagina’s), behorend tot de categorie Printer. Deze gids werd als nuttig beoordeeld door 62 mensen en kreeg gemiddeld 4.3 sterren uit 31.5 reviews. Heb je een vraag over Canon Pixma MG7120 of wil je andere gebruikers van dit product iets vragen? Stel een vraag
Pagina 1/4

2
1
XXXXXXXX © CANON INC. 2013
2
1
5
3
6
4
2
3
7
1
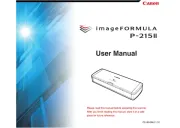
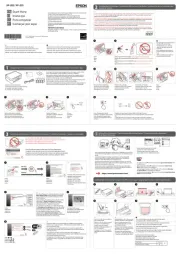
Guía de inicio
La bandeja de salida del papel se abre automáticamente al comenzar la impresión. Mantenga la
parte frontal del equipo libre de obstáculos.
Toque el botón ACTIVADO
(ON).
Conecte el cable de alimentación.
No conecte aún el cable USB o Ethernet.
Abra la bandeja de salida
del papel.
La extensión de la bandeja de
salida se abre automáticamente.
Abra el panel de control. Retire la cinta naranja y el material de protección.
Cierre el panel de control.
Para seleccionar un idioma,
arrastre* la pantalla táctil
verticalmente y puntee**
en el idioma.
* Arrastrar signica tocar y
deslizar la pantalla.
** Puntear signica tocar
ligeramente la pantalla.
Botón Atrás (Back)
Para cambiar el ajuste de
idioma, toque el botón Atrás
(Back).
Retire la cinta y los
materiales de protección.
ESPAÑOL
Se dispone de tutoriales
en vídeo
The Paper Output Tray opens automatically as printing starts. Keep the front of the machine clear
of any obstacles.
Touch the button.ON
Connect the power cord.
Do not connect the USB or Ethernet cable yet.
Open the Paper Output
Tray.
The Output Tray Extension
opens automatically.
Open the Operation Panel. Remove the orange tape and protective material.
Close the Operation
Panel.
To select a language,
drag* the Touch Screen
vertically and tap** the
language.
* To drag means to touch and
slide the screen.
** To tap means to lightly touch
the screen.
Back button
To change the language
setting, touch the Back
button.
Remove the tape and
packing materials.
ENGLISH
Video Tutorials Available
Getting Started
EN
ES
EN
ES
EN
EN
ES
ES
EN
ES
EN
ES
EN
ES
EN
ES
EN
ES
QT5-6533-V01 PRINTED IN XXXXXXXX
3
8
1
2
1
2
2
1
(B)
2
3
4
5
6
8
1
2
7
(A)
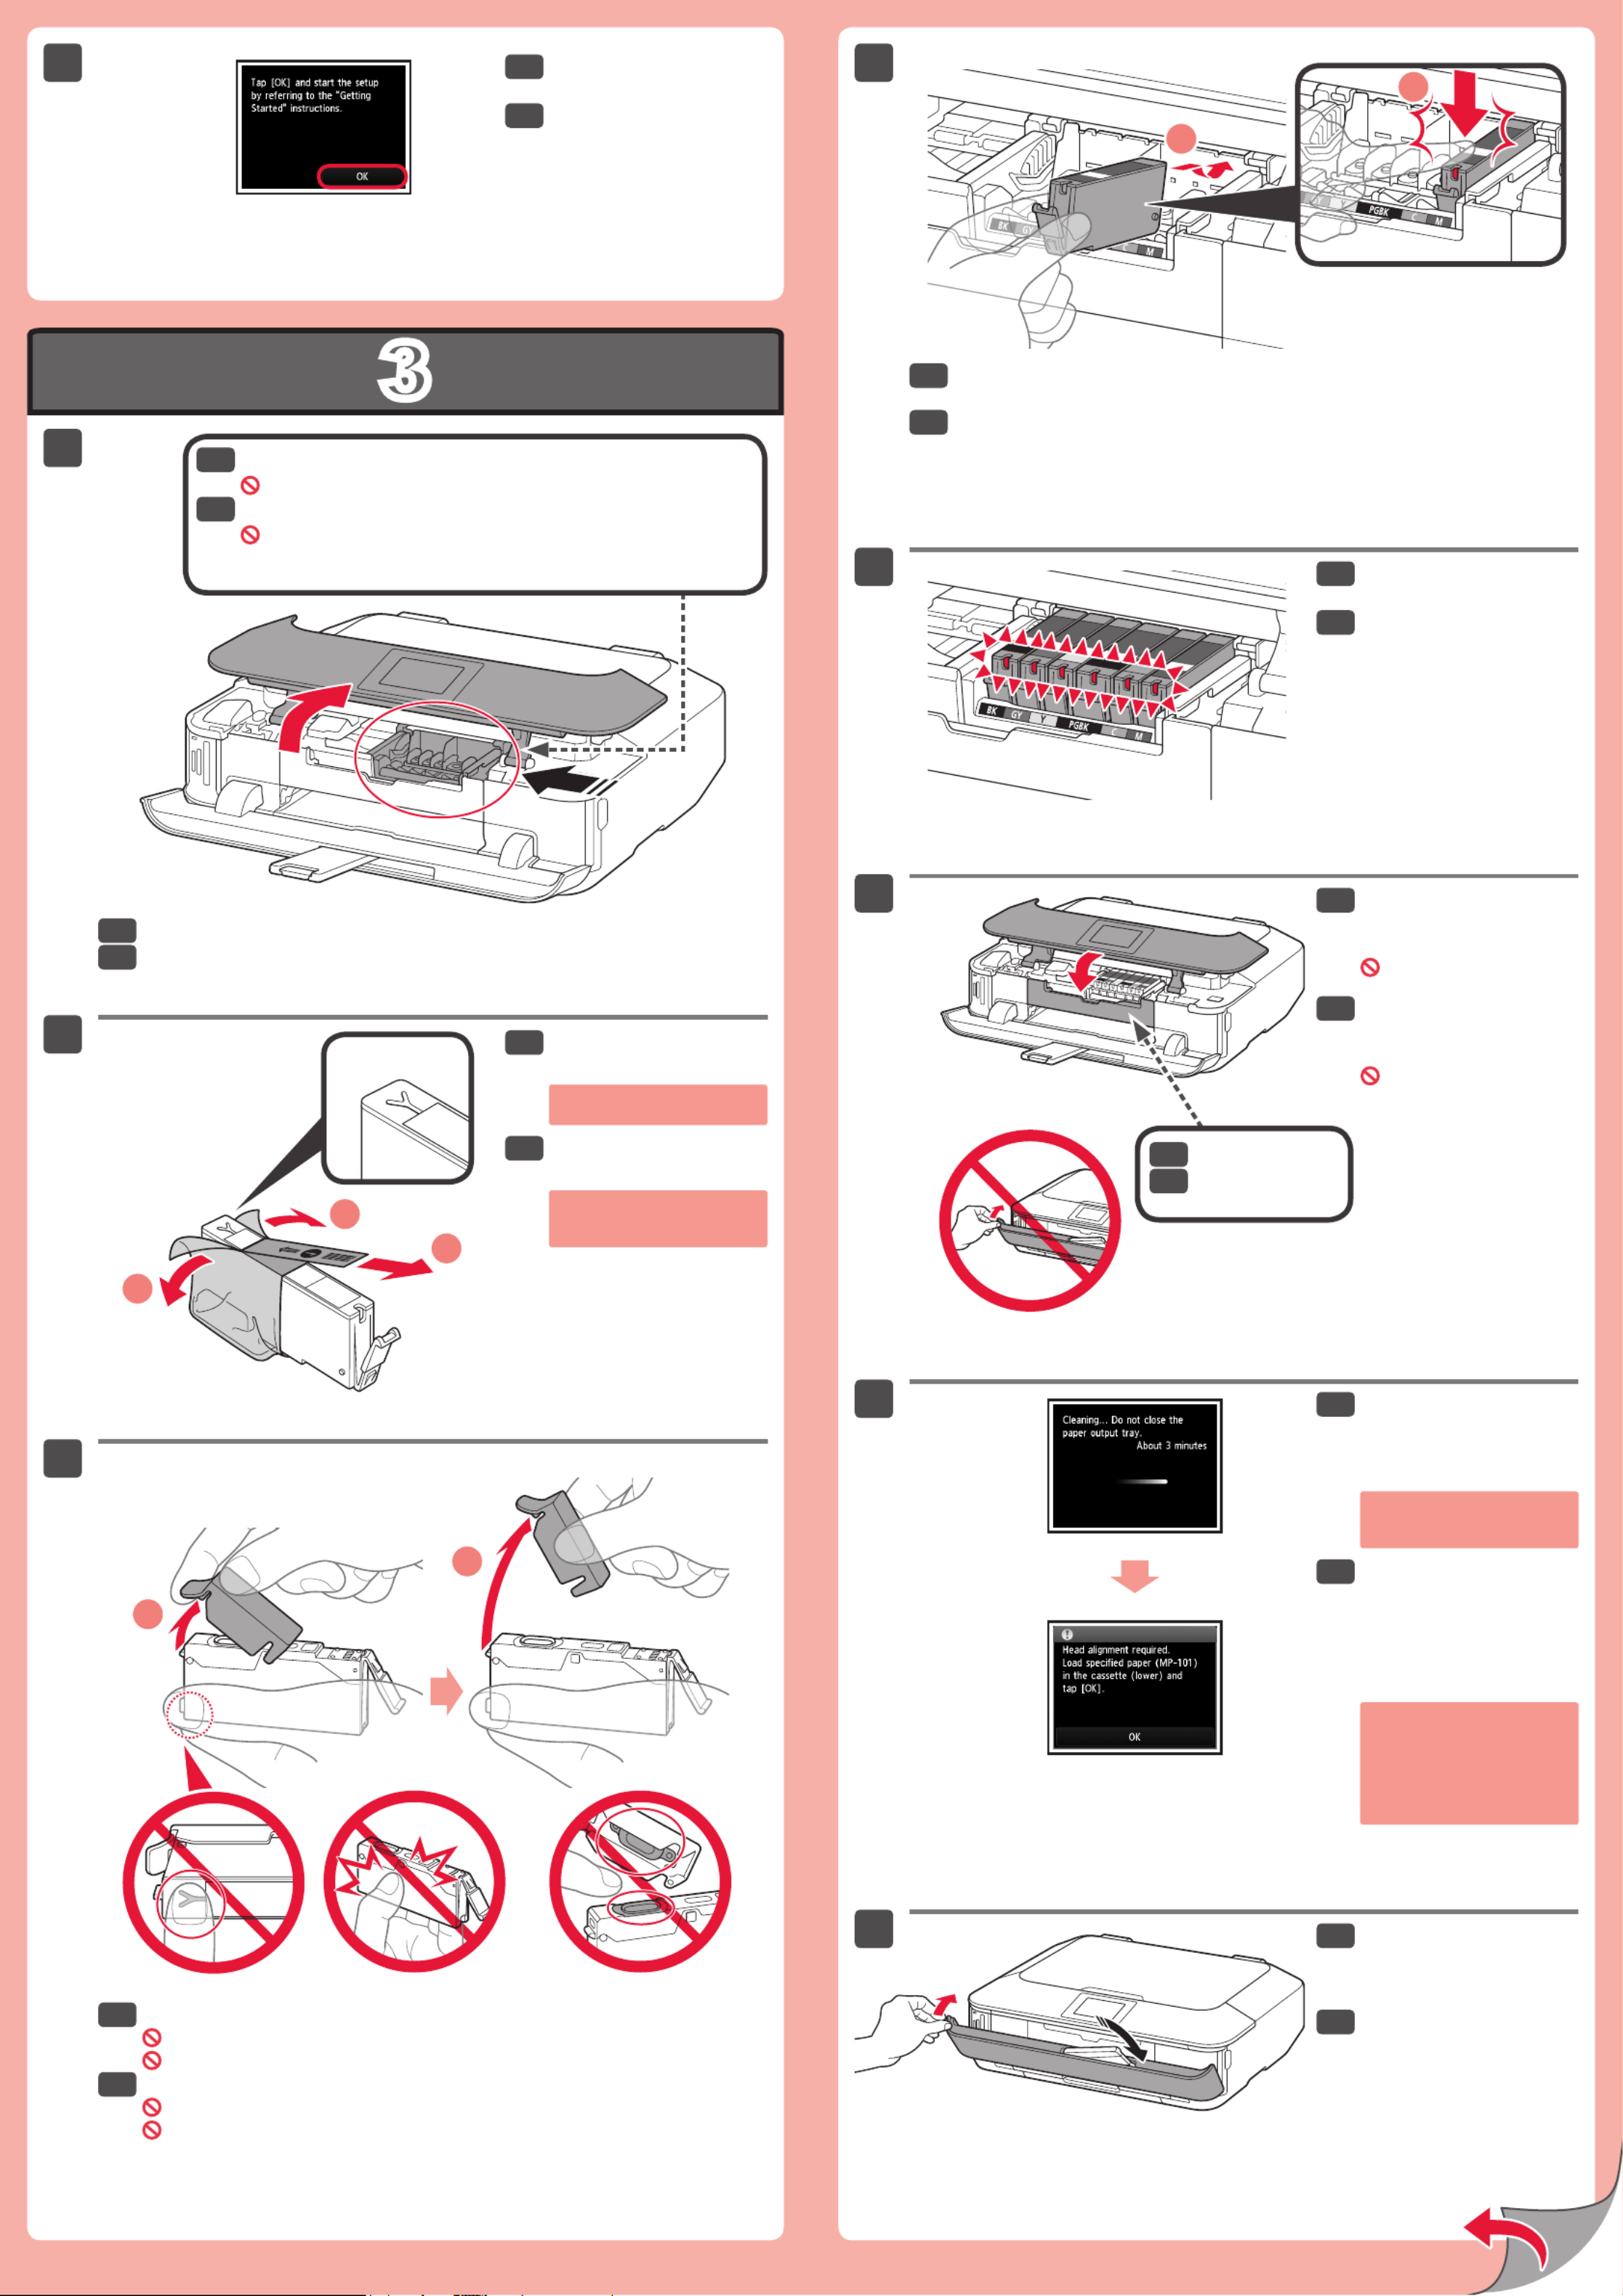
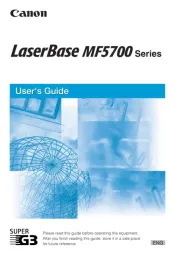
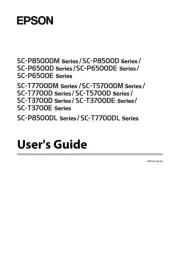
Cuando aparezca esta
pantalla, puntee en .OK
Sujete la tapa naranja con los dedos y tire de ella suavemente.
(A) No presione los laterales si la ranura en forma de Y está bloqueada.
(B) ¡No tocar!
Abra el panel de control.
Retire el envoltorio
protector.
Retire totalmente la cinta
naranja.
Introduzca y empuje hacia abajo el depósito de tinta rmemente hasta que
encaje en su sitio.
Compruebe que la lámpara de tinta está encendida y coloque el siguiente depósito de tinta.
Compruebe que todas las
lámparas están encendidas.
Compruebe que la cubierta
interior está cerrada y
cierre el panel de control.
¡No cierre aún la bandeja de
salida del papel!
Si aparece un mensaje de
error, compruebe que los
depósitos de tinta están
instalados correctamente.
Cierre la bandeja de salida
del papel.
La extensión de la bandeja de
salida se cierra automáticamente.
Al cabo de
aproximadamente 3 o 4
minutos, compruebe que
la pantalla p2-ha cambiado tal
como se muestra en la
gura.
Cubierta interior
Los depósitos de tinta deberán instalarse en este soporte.
No toque el interior hasta que cese el movimiento.
When this screen is
displayed, tap .OK
Hook your ngers under the orange cap and slowly pull it out.
(A) Do not press the sides when the Y-shaped groove is blocked.
(B) Do not touch!
Open the Operation Panel.
Remove the protective
wrap.
Remove the orange tape
completely.
Insert and push down the ink tank rmly until it snaps into place.
Check that the ink lamp is lit, then install the next ink tank.
Check that all lamps are
lit.
Check that the Inner Cover
is closed, then close the
Operation Panel.
Don't close the Paper
Output Tray yet!
If an error message appears,
check that the ink tanks are
installed correctly.
Close the Paper Output
Tray.
The Output Tray Extension
closes automatically.
After about 3 to 4 minutes,
check that the screen
changes as shown in the
gure.
Inner Cover
The ink tanks will be installed into this holder.
Do not touch inside until the movement stops.
EN
ES
EN
ES
EN
ES
EN
ES
EN
ES
EN
ES
EN
ES
EN
ES
EN
ES
EN
ES
EN
ES
4
5
1
2
3
4
5
6
1
2
2
1
1
2
8
7
2
1
3
2
1
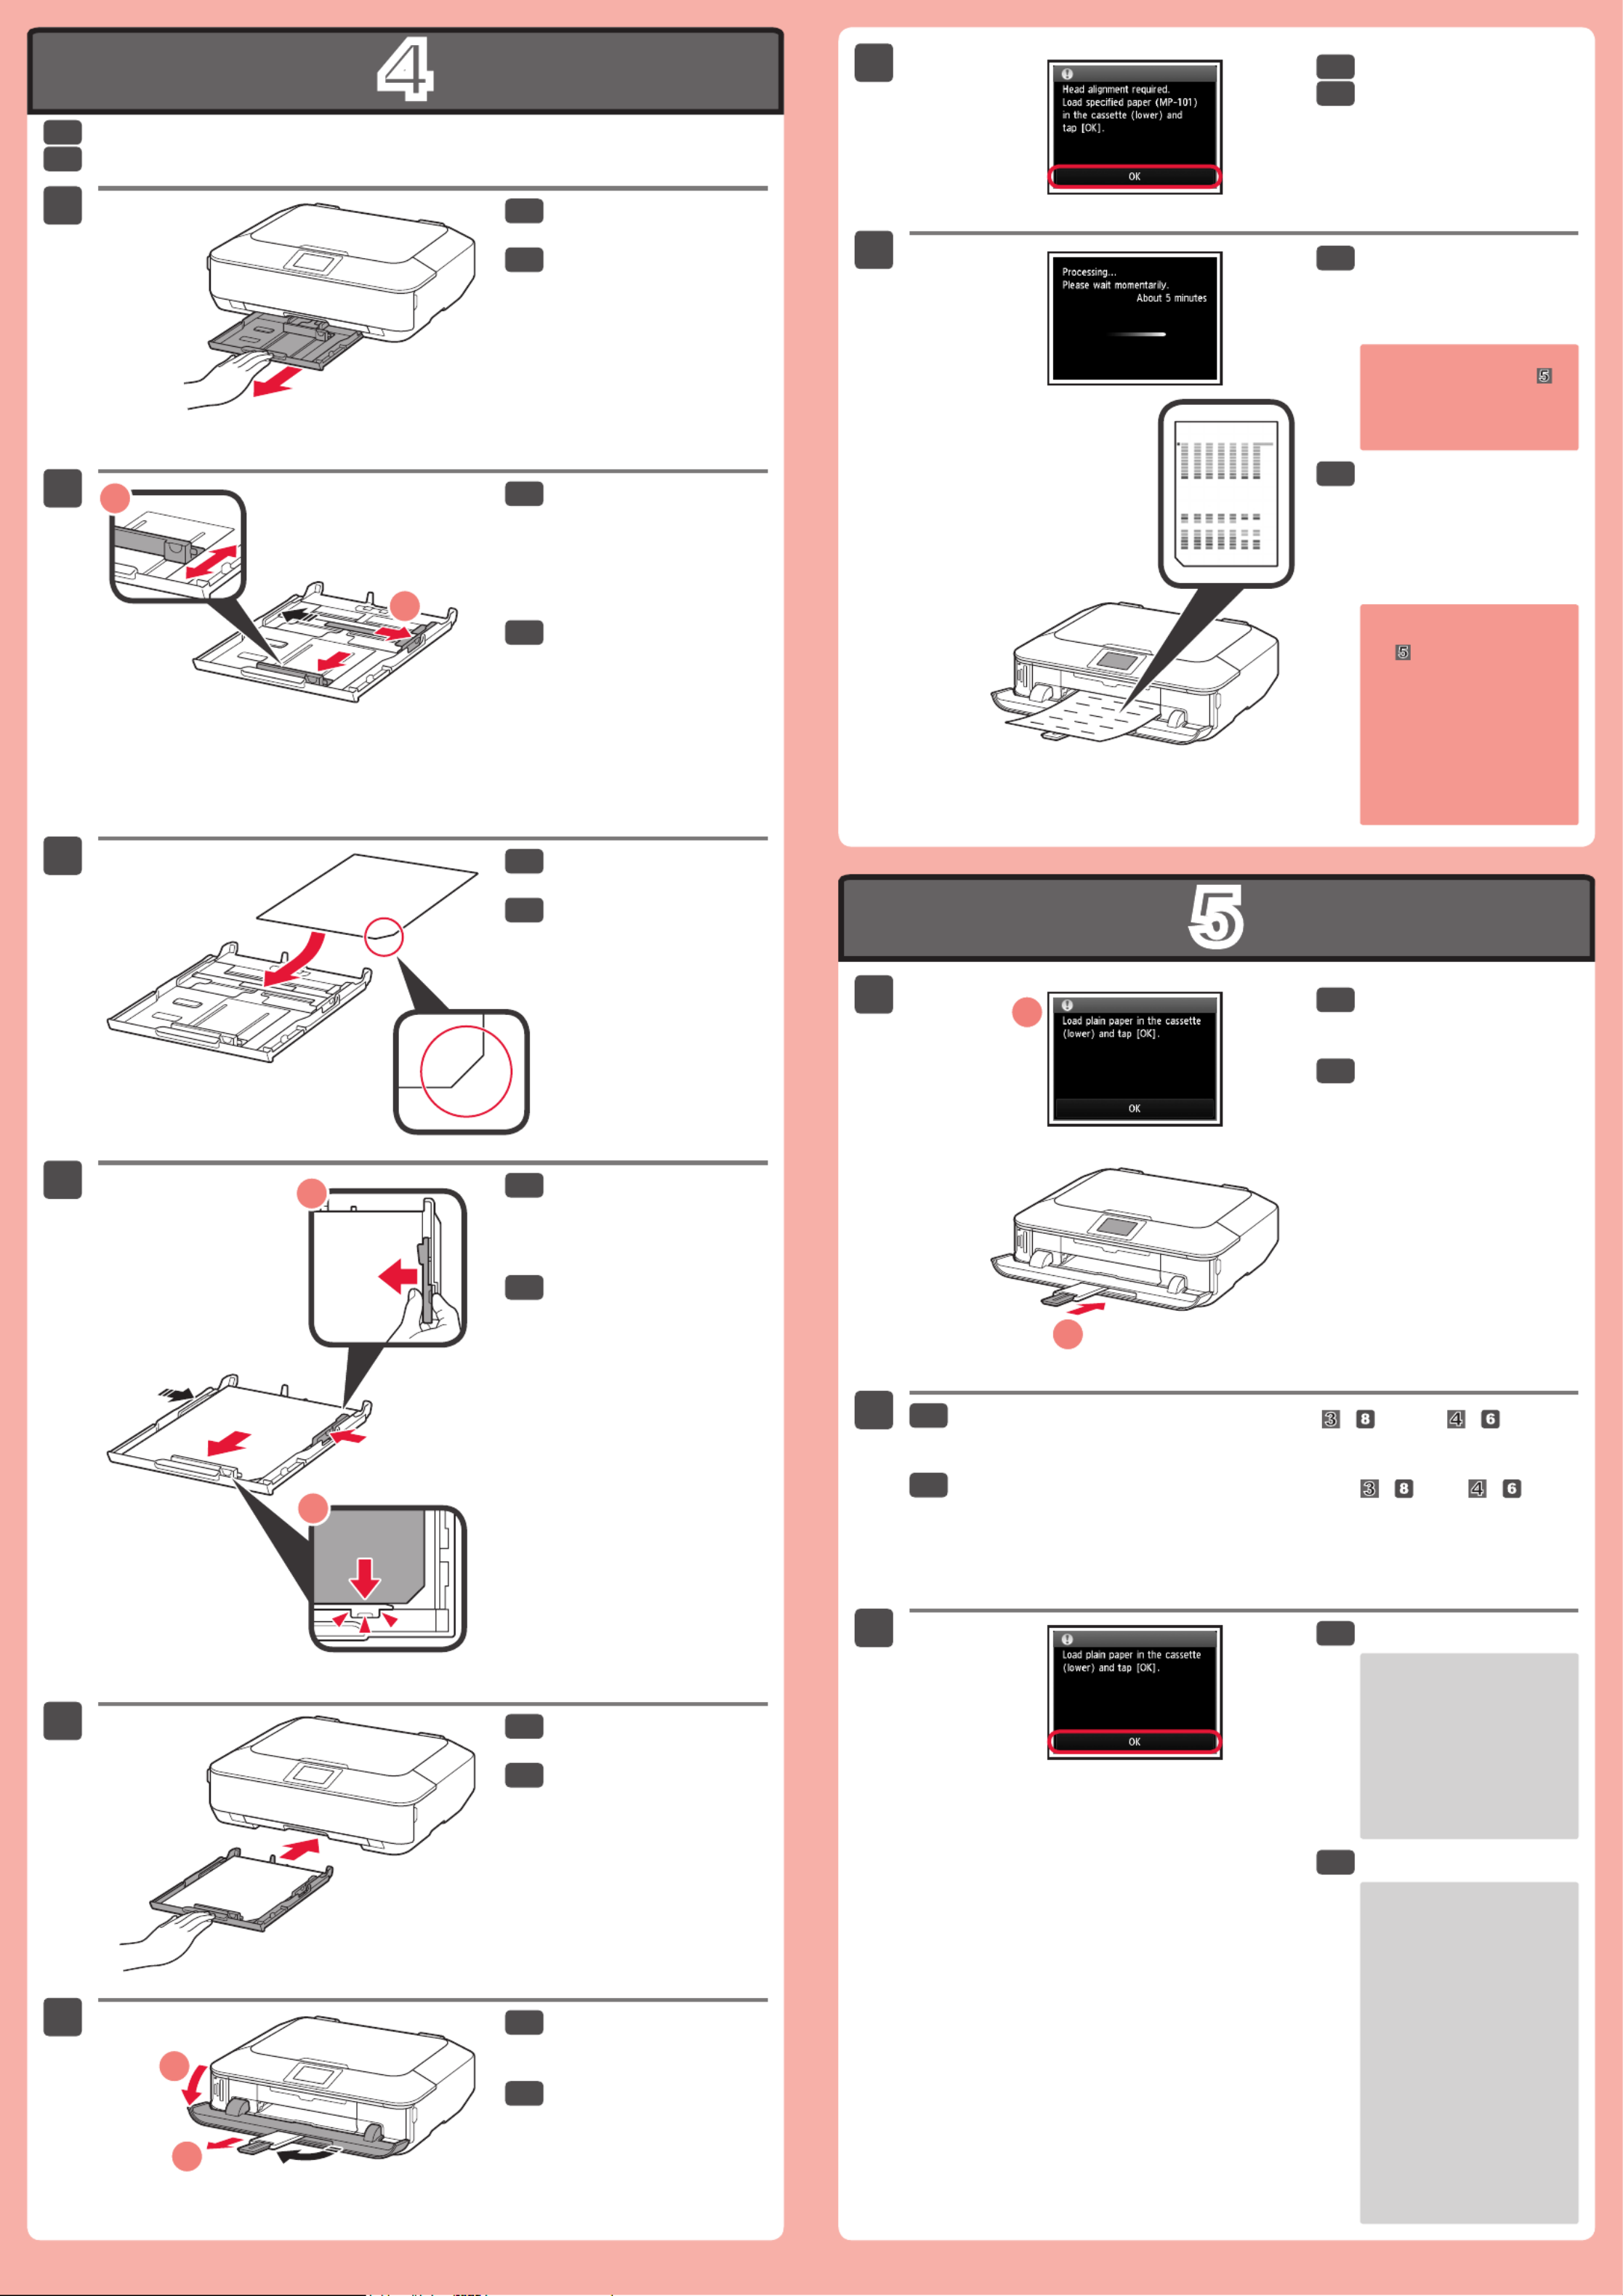
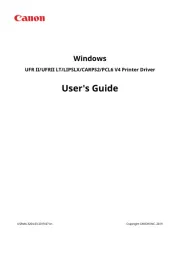
Realice la Alineación de los cabezales de impresión (Print Head Alignment).
Extraiga el cassette
(inferior).
Ajuste la guía del papel
frontal al tamaño A4.
Deslice la guía del papel
derecha hacia el lado.
Las guías del papel izquierda y
derecha se mueven al mismo
tiempo.
Deslice el cassette (inferior)
hacia atrás.
Cargue el papel MP-101
suministrado en el cassette.
Ajuste la guía del papel
derecha al tamaño del
papel.
Deslice el papel contra la
guía frontal.
Abra la bandeja de salida
del papel. Extraiga el
soporte de la salida del
papel.
Puntee en .OK
Al cabo de 6 minutos, se
imprime un patrón en
negro y azul. La Alineación
de los cabezales de
impresión (Print Head
Alignment) naliza.
Si aparece un mensaje de
error, puntee en OK y continúe
con . Cuando nalice la
instalación, consulte el
Manual en pantalla o el
Manual en línea para repetir
la Alineación de los cabezales
de impresión (Print Head
Alignment).
Cuando aparezca esta
pantalla, cierre el soporte
de la salida del papel.
Puntee en .OK
Cargue papel en el cassette como se describe en
- hasta - .
Coloque el papel con la cara que va a imprimir hacia abajo.
Ajuste las guías del papel al tamaño del papel.
Para obtener más
información sobre el papel,
consulte el Manual en
pantalla Manual en o el
línea que se instalará
posteriormente.
Cuando el equipo no se
utiliza durante unos 5
minutos, la pantalla se
desconecta. Para
reactivarla, puntee en la
pantalla táctil.
•
•
Perform the Print Head Alignment.
Pull out the Cassette
(Lower).
Adjust the front Paper
Guide to A4 size.
Slide the right Paper
Guide to the side.
The left and right Paper Guide
move together.
Slide the Cassette (Lower)
back.
Load the supplied MP-101
paper into the Cassette.
Adjust the right guide to t
the paper size.
Slide the paper against the
front guide.
Open the Paper Output
Tray. Pull out the Paper
Output Support.
Tap .OK
In about 6 minutes, a blue-
black pattern is printed.
Print Head Alignment is
complete.
If an error message appears,
tap , then proceed toOK .
After installation is complete,
refer to the On-screen
Manual Online Manual or to
redo Print Head Alignment.
When this screen is
displayed, close the Paper
Output Support.
Tap .OK
Load paper into the Cassette as described in
- through - .
Set the paper with the print side down.
Adjust the Paper Guides to t the paper size.
For information about
paper, refer to the On-
screen Manual Online or
Manual which will be
installed later.
The screen turns off if the
machine is not operated
for about 5 minutes. To
restore the display, tap the
Touch Screen.
•
•
EN
ES
EN
ES
EN
ES
EN
ES
EN
ES
EN
ES
EN
ES
EN
ES
EN
ES
EN
ES
EN
ES
EN
ES
Product specificaties
| Merk: | Canon |
| Categorie: | Printer |
| Model: | Pixma MG7120 |
| Soort bediening: | Touch |
| Kleur van het product: | Bruin |
| Ingebouwd display: | Ja |
| Gewicht: | 8210 g |
| Breedte: | 467 mm |
| Diepte: | 371 mm |
| Hoogte: | 150 mm |
| Beeldscherm: | LCD |
| Touchscreen: | Ja |
| Wi-Fi-standaarden: | 802.11b, 802.11g, Wi-Fi 4 (802.11n) |
| USB-poort: | Ja |
| Ethernet LAN: | Ja |
| Geïntegreerde geheugenkaartlezer: | Ja |
| Compatibele geheugenkaarten: | CF, MicroDrive, MS Duo, MS PRO Duo, SD, SDHC |
| Markt positionering: | Thuis & kantoor |
| Aantal USB 2.0-poorten: | 1 |
| Stroomverbruik (in standby): | 1 W |
| Stroomverbruik (indien uit): | 0.2 W |
| Intern geheugen: | - MB |
| Ondersteunde beveiligingsalgoritmen: | WEP, WPA-PSK, WPA2-PSK |
| Ondersteunt Mac-besturingssysteem: | Mac OS X 10.6 Snow Leopard, Mac OS X 10.7 Lion, Mac OS X 10.8 Mountain Lion |
| Maximale resolutie: | 9600 x 2400 DPI |
| Printkleuren: | Black, Cyan, Magenta, Yellow |
| Papierlade mediatypen: | Envelopes, Glossy paper, High resolution paper, Matte paper, Photo paper, Plain paper, Semi-glossy paper |
| Andere ondersteundende systemen: | Android |
| Printtechnologie: | Inkjet |
| Standaard interfaces: | Ethernet, USB 2.0, Wireless LAN |
| Printsnelheid (zwart, standaardkwaliteit, A4/US Letter): | - ppm |
| Printen: | Afdrukken in kleur |
| Duplex printen: | Ja |
| Gebruiksindicatie (maximaal): | - pagina's per maand |
| Kopieën vergroten/verkleinen: | 25 - 400 procent |
| Maximale kopieerresolutie: | - DPI |
| Kopiëren: | Kopiëren in kleur |
| Scannen: | Scannen in kleur |
| Soort scanner: | Flatbed scanner |
| Scantechnologie: | CIS |
| Optische scanresolutie: | 2400 x 4800 DPI |
| Max. scangebied: | 216 x 297 mm |
| Faxen: | Nee |
| Totale invoercapaciteit: | - vel |
| Totale uitvoercapaciteit: | 125 vel |
| Maximale ISO A-series papierformaat: | A4 |
| ISO A-series afmetingen (A0...A9): | A4, A5 |
| Gemiddeld stroomverbruik ( bedrijfsresultaat ): | 17 W |
| Mobiele printing technologieën: | Apple AirPrint, Canon Easy-PhotoPrint, Google Cloud Print |
| Direct printen: | Ja |
| Geluidsdrukniveau (afdrukken): | 44.2 dB |
| ISO B-series afmetingen (B0...B9): | B5 |
| Afmetingen enveloppen: | 10 |
| PictBridge: | Ja |
| Non-ISO print papierafmetingen: | Legal |
| Maximum scanresolutie: | 19200 x 19200 DPI |
| Maximaal aantal kopieën: | 99 kopieën |
| Minimale opslag schijfruimte: | 1500 MB |
| Meegeleverde drivers: | Ja |
| Kleurdiepte invoer: | 48 Bit |
| Fotopapier afmetingen (imperial): | 4x6, 5x7 " |
| Scan naar: | E-mail, Memory Card |
| Media-afmetingen voor afdrukken zonder witrand: | 4x6 |
| Mediagewicht lade 1: | 64 - 105 gsm |
| Wifi: | Ja |
| AC-ingangsspanning: | 100 - 240 V |
| AC-ingangsfrequentie: | 50 - 60 Hz |
| Bedrijfstemperatuur (T-T): | 5 - 35 °C |
| Relatieve vochtigheid in bedrijf (V-V): | 10 - 90 procent |
| Geluidsdrukniveau (kopiëren): | 44.2 dB |
| Geluidsdrukniveau (scannen): | 44.2 dB |
| Kleurdiepte uitvoer: | 24 Bit |
| N-in-1 copy function (N=): | 2, 4 |
| Afdruksnelheid (ISO/IEC 24734) zwart-wit: | 15 ipm |
| Afdruksnelheid (ISO/IEC 24734) kleur: | 10 ipm |
| DVD's/CD's bedrukken: | Ja |
Heb je hulp nodig?
Als je hulp nodig hebt met Canon Pixma MG7120 stel dan hieronder een vraag en andere gebruikers zullen je antwoorden
Handleiding Printer Canon
7 September 2025
6 September 2025
5 September 2025
1 September 2025
1 September 2025
1 September 2025
1 September 2025
15 Augustus 2025
14 Augustus 2025
29 Juli 2025
Handleiding Printer
- AVM
- Argox
- Xerox
- Mutoh
- HP
- Videology
- Star Micronics
- Samsung
- Brother
- Visioneer
- Agfaphoto
- DTRONIC
- Lexmark
- GG Image
- Phoenix Contact
Nieuwste handleidingen voor Printer
9 September 2025
9 September 2025
9 September 2025
8 September 2025
8 September 2025
8 September 2025

7 September 2025
7 September 2025
7 September 2025

7 September 2025