Canon Pixma MG3522 Handleiding
Bekijk gratis de handleiding van Canon Pixma MG3522 (3 pagina’s), behorend tot de categorie Printer. Deze gids werd als nuttig beoordeeld door 54 mensen en kreeg gemiddeld 3.8 sterren uit 27.5 reviews. Heb je een vraag over Canon Pixma MG3522 of wil je andere gebruikers van dit product iets vragen? Stel een vraag
Pagina 1/3

2
1
XXXXXXXX © CANON INC. 2013
5
3
6
4
7
1
2
2
1
1
2
3
4
5
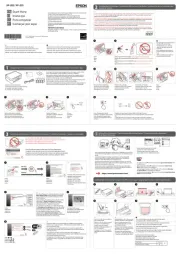
Guía de inicio
Cierre la tapa de salida del
papel.
Conecte el cable de alimentación.
No conecte aún el cable USB.
Retire la cinta naranja y el material de protección.
Abra la tapa de salida del
papel.
Pulse el botón ACTIVADO
(ON).
Retire la cinta naranja y el material de protección de la parte posterior del
equipo.
ESPAÑOL
Se dispone de tutoriales
en vídeo
Abra la cubierta delantera
y la bandeja de salida del
papel.
Close the Paper Output
Cover.
Connect the power cord.
Do not connect the USB cable yet.
Remove the orange tape and protective material.
Open the Paper Output
Cover.
Press the button.ON
Remove the orange tape and protective material on the back of the machine.
ENGLISH
Video Tutorials Available
Getting Started
Open the Front Cover and
the Paper Output Tray.
EN
ES
EN
EN
ES
ES
EN
ES
EN
ES
EN
ES
EN
ES
QT5-6423-V01 PRINTED IN XXXXXXXX
3
8
1
2
3
4
5
6
1
2
7
(B)
(A)
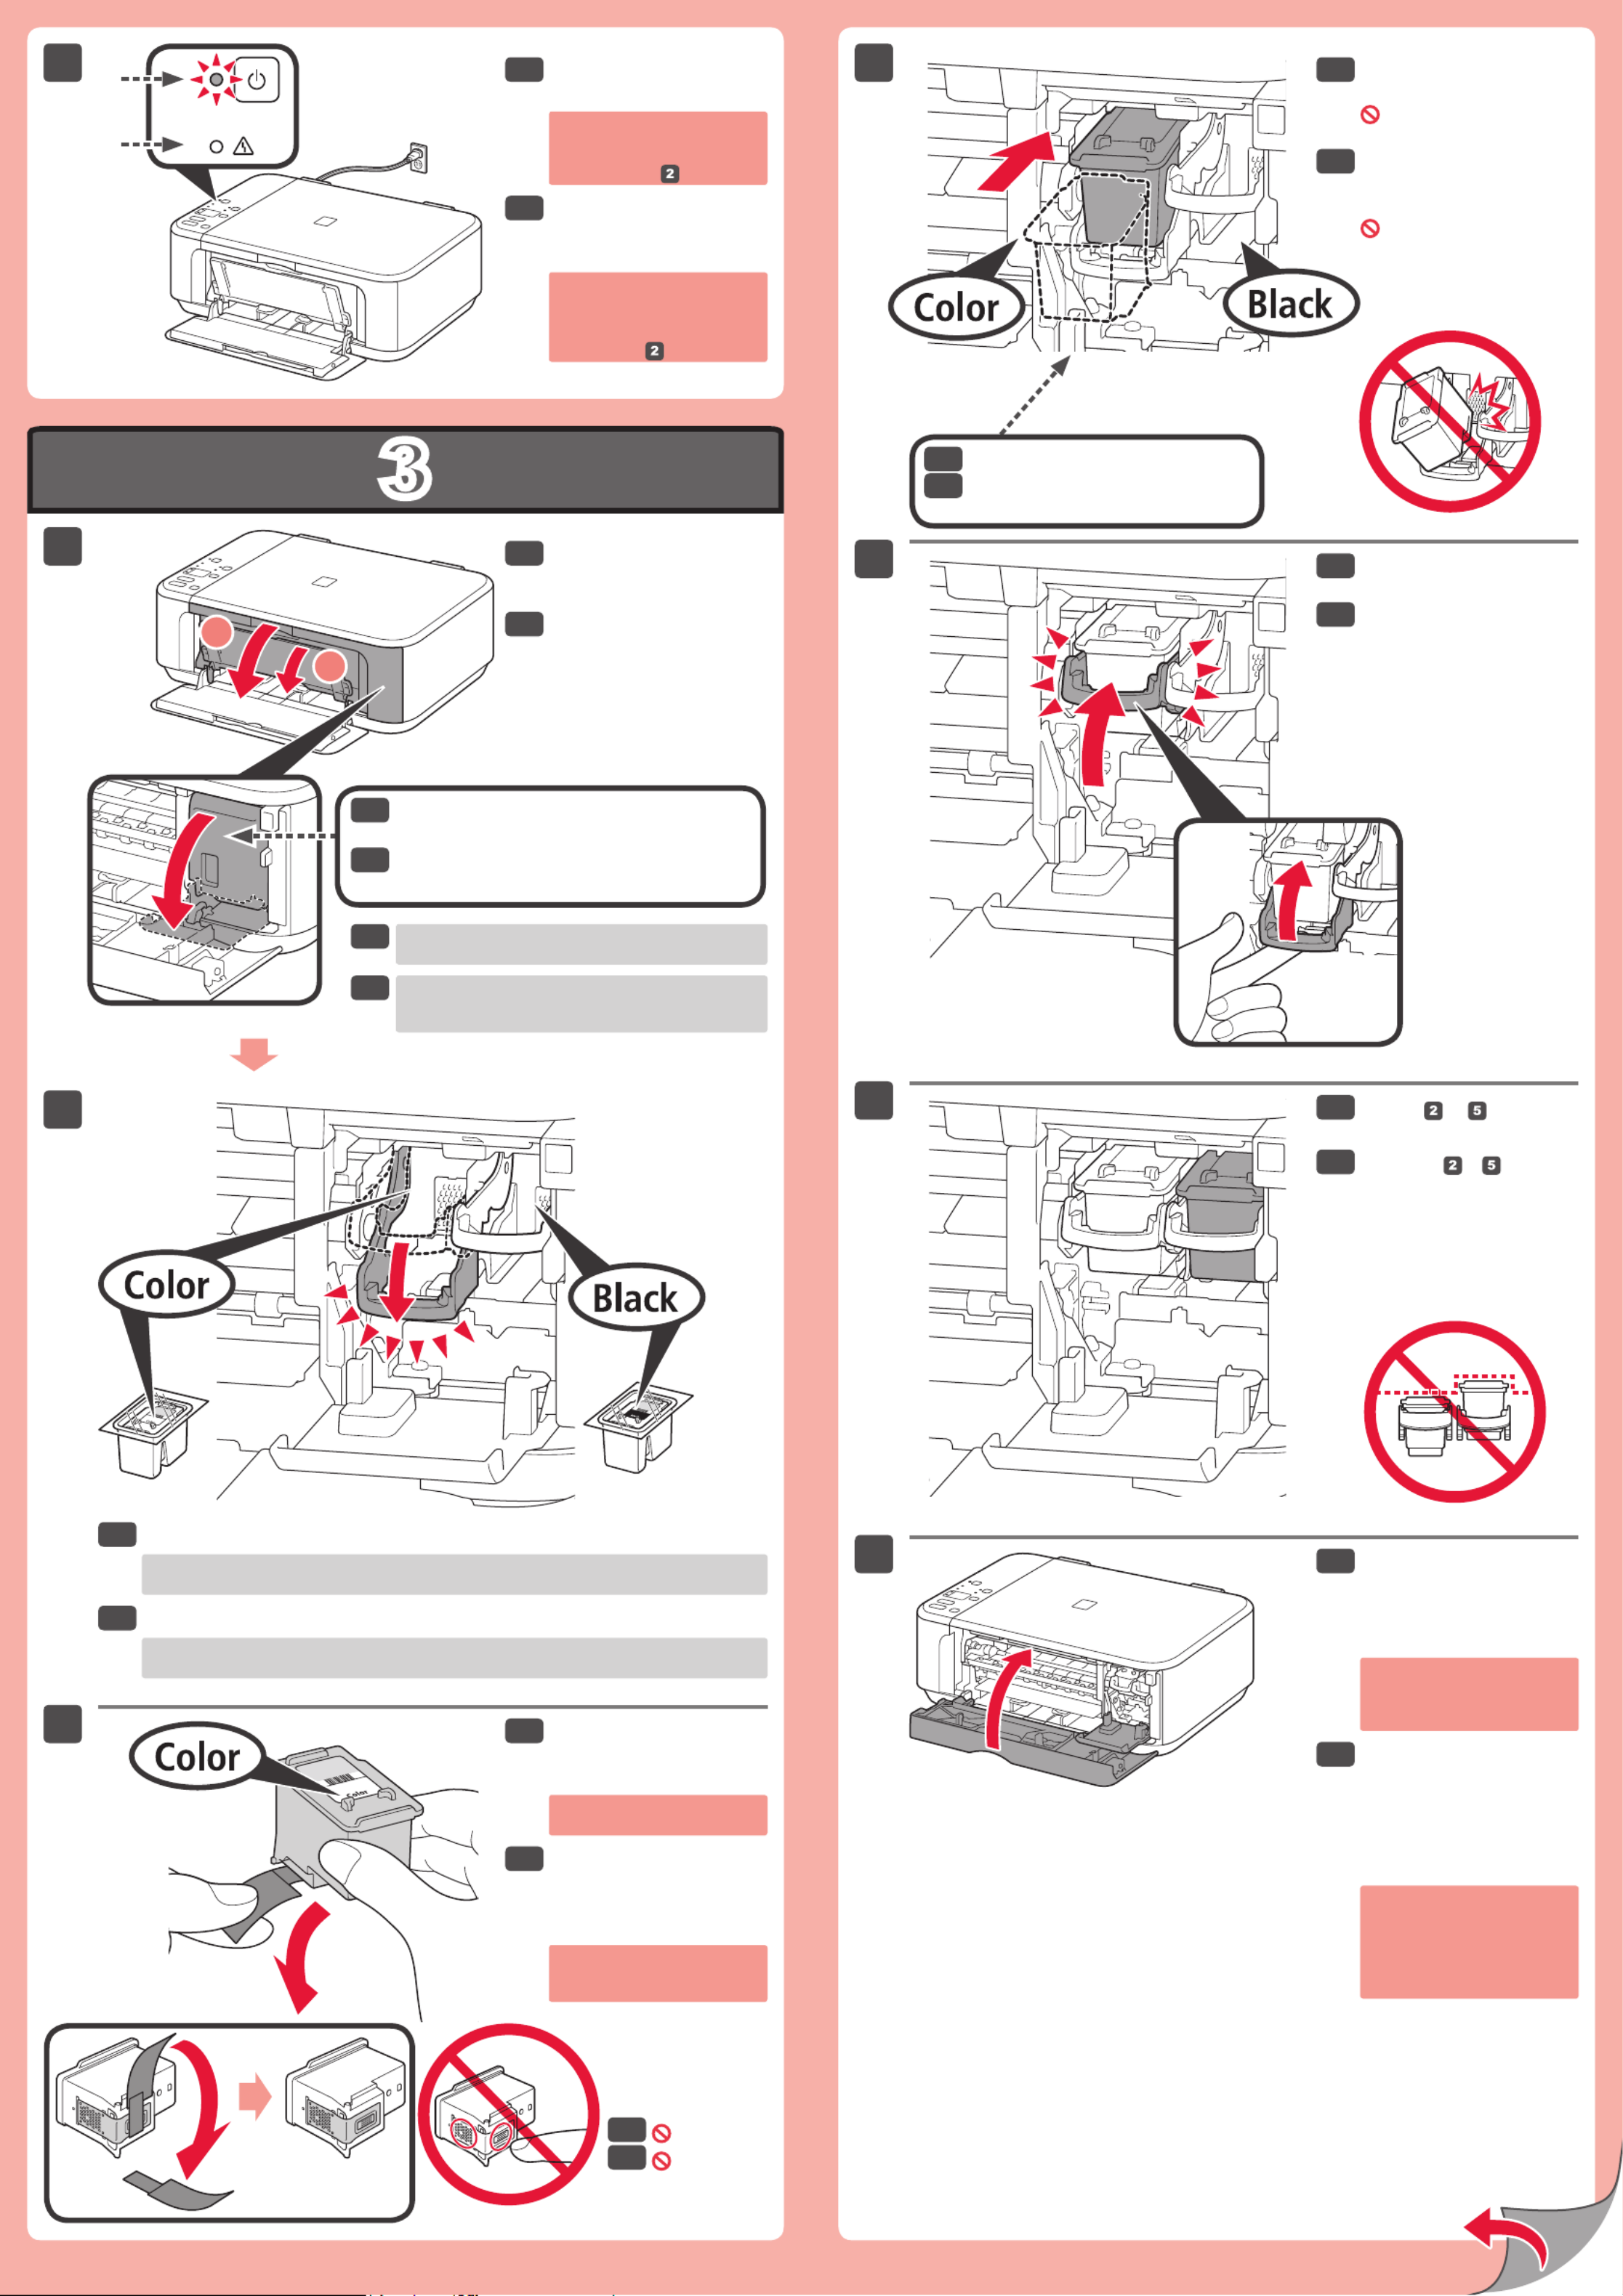
Compruebe que la luz de
ACTIVADO (ON) (A) se
ilumina en verde.
¡No tocar!
Baje la palanca de bloqueo del cartucho de tinta.
Abra la bandeja de salida
del papel y la tapa de
salida del papel.
Si la cubierta del cabezal está cerrada, cierre la tapa
de salida del papel y vuelva a abrirla para abrir la
cubierta del cabezal.
Levante la palanca de
bloqueo del cartucho de
tinta.
Repita de a para
instalar el otro cartucho
FINE (FINE Cartridge).
Si la luz de Alarma (Alarm)
parpadea en naranja,
compruebe que los cartuchos
FINE (FINE Cartridges) estén
instalados correctamente.
Cierre la tapa de salida del
papel.
La luz de ACTIVADO (ON)
parpadea en verde durante
aproximadamente 1 minuto.
Espere a que se encienda y
continúe.
Si la luz de Alarma (Alarm)
parpadea (B) en naranja,
pulse el botón ACTIVADO
(ON) para apagar el equipo y
repita desde .
A la izquierda debe instalarse el cartucho FINE (FINE Cartridge) de color y a la derecha
debe instalarse el cartucho FINE (FINE Cartridge) negro.
Desembale el cartucho
FINE (FINE Cartridge) y
retire la cinta protectora.
Tenga cuidado con la tinta de
la cinta protectora.
Inserte el cartucho FINE
(FINE Cartridge) hasta
que se detenga.
¡No lo golpee contra los
lados!
Compruebe que la cubierta del cabezal se
ha abierto automáticamente.
Insértelo recto hasta que se
detenga.
Check that the lamp ON
(A) lights green.
Do not touch!
Lower the Ink Cartridge Lock Lever.
Open the Paper Output
Tray and the Paper Output
Cover.
If the Head Cover is closed, close the Paper Output
Cover and open it again to open the Head Cover.
Lift the Ink Cartridge Lock
Lever.
Repeat to to install
the other FINE Cartridge.
If the Alarm lamp ashes
orange, check that the FINE
Cartridges are installed
correctly.
Close the Paper Output
Cover.
The ON lamp ashes green for
about 1 minute. Wait until it is
lit, then proceed.
If the Alarm lamp (B) ashes
orange, press the button ON
to turn OFF the machine,
then redo from .
The left is where the Color FINE Cartridge is to be installed and the right is where the
Black FINE Cartridge is to be installed.
Unpack the FINE
Cartridge, then remove the
protective tape.
Be careful of ink on the
protective tape.
Insert the FINE Cartridge
until it stops.
Do not knock it against the
sides!
Check that the Head Cover has opened
automatically.
Insert it straight until it stops.
EN
ES
EN
ES
EN
ES
EN
ES
EN
ES
EN
ES
EN
ES
EN
ES
EN
ES
EN
ES
EN
ES
EN
ES
4
5
1
2
3
4
5
1
2
1
2
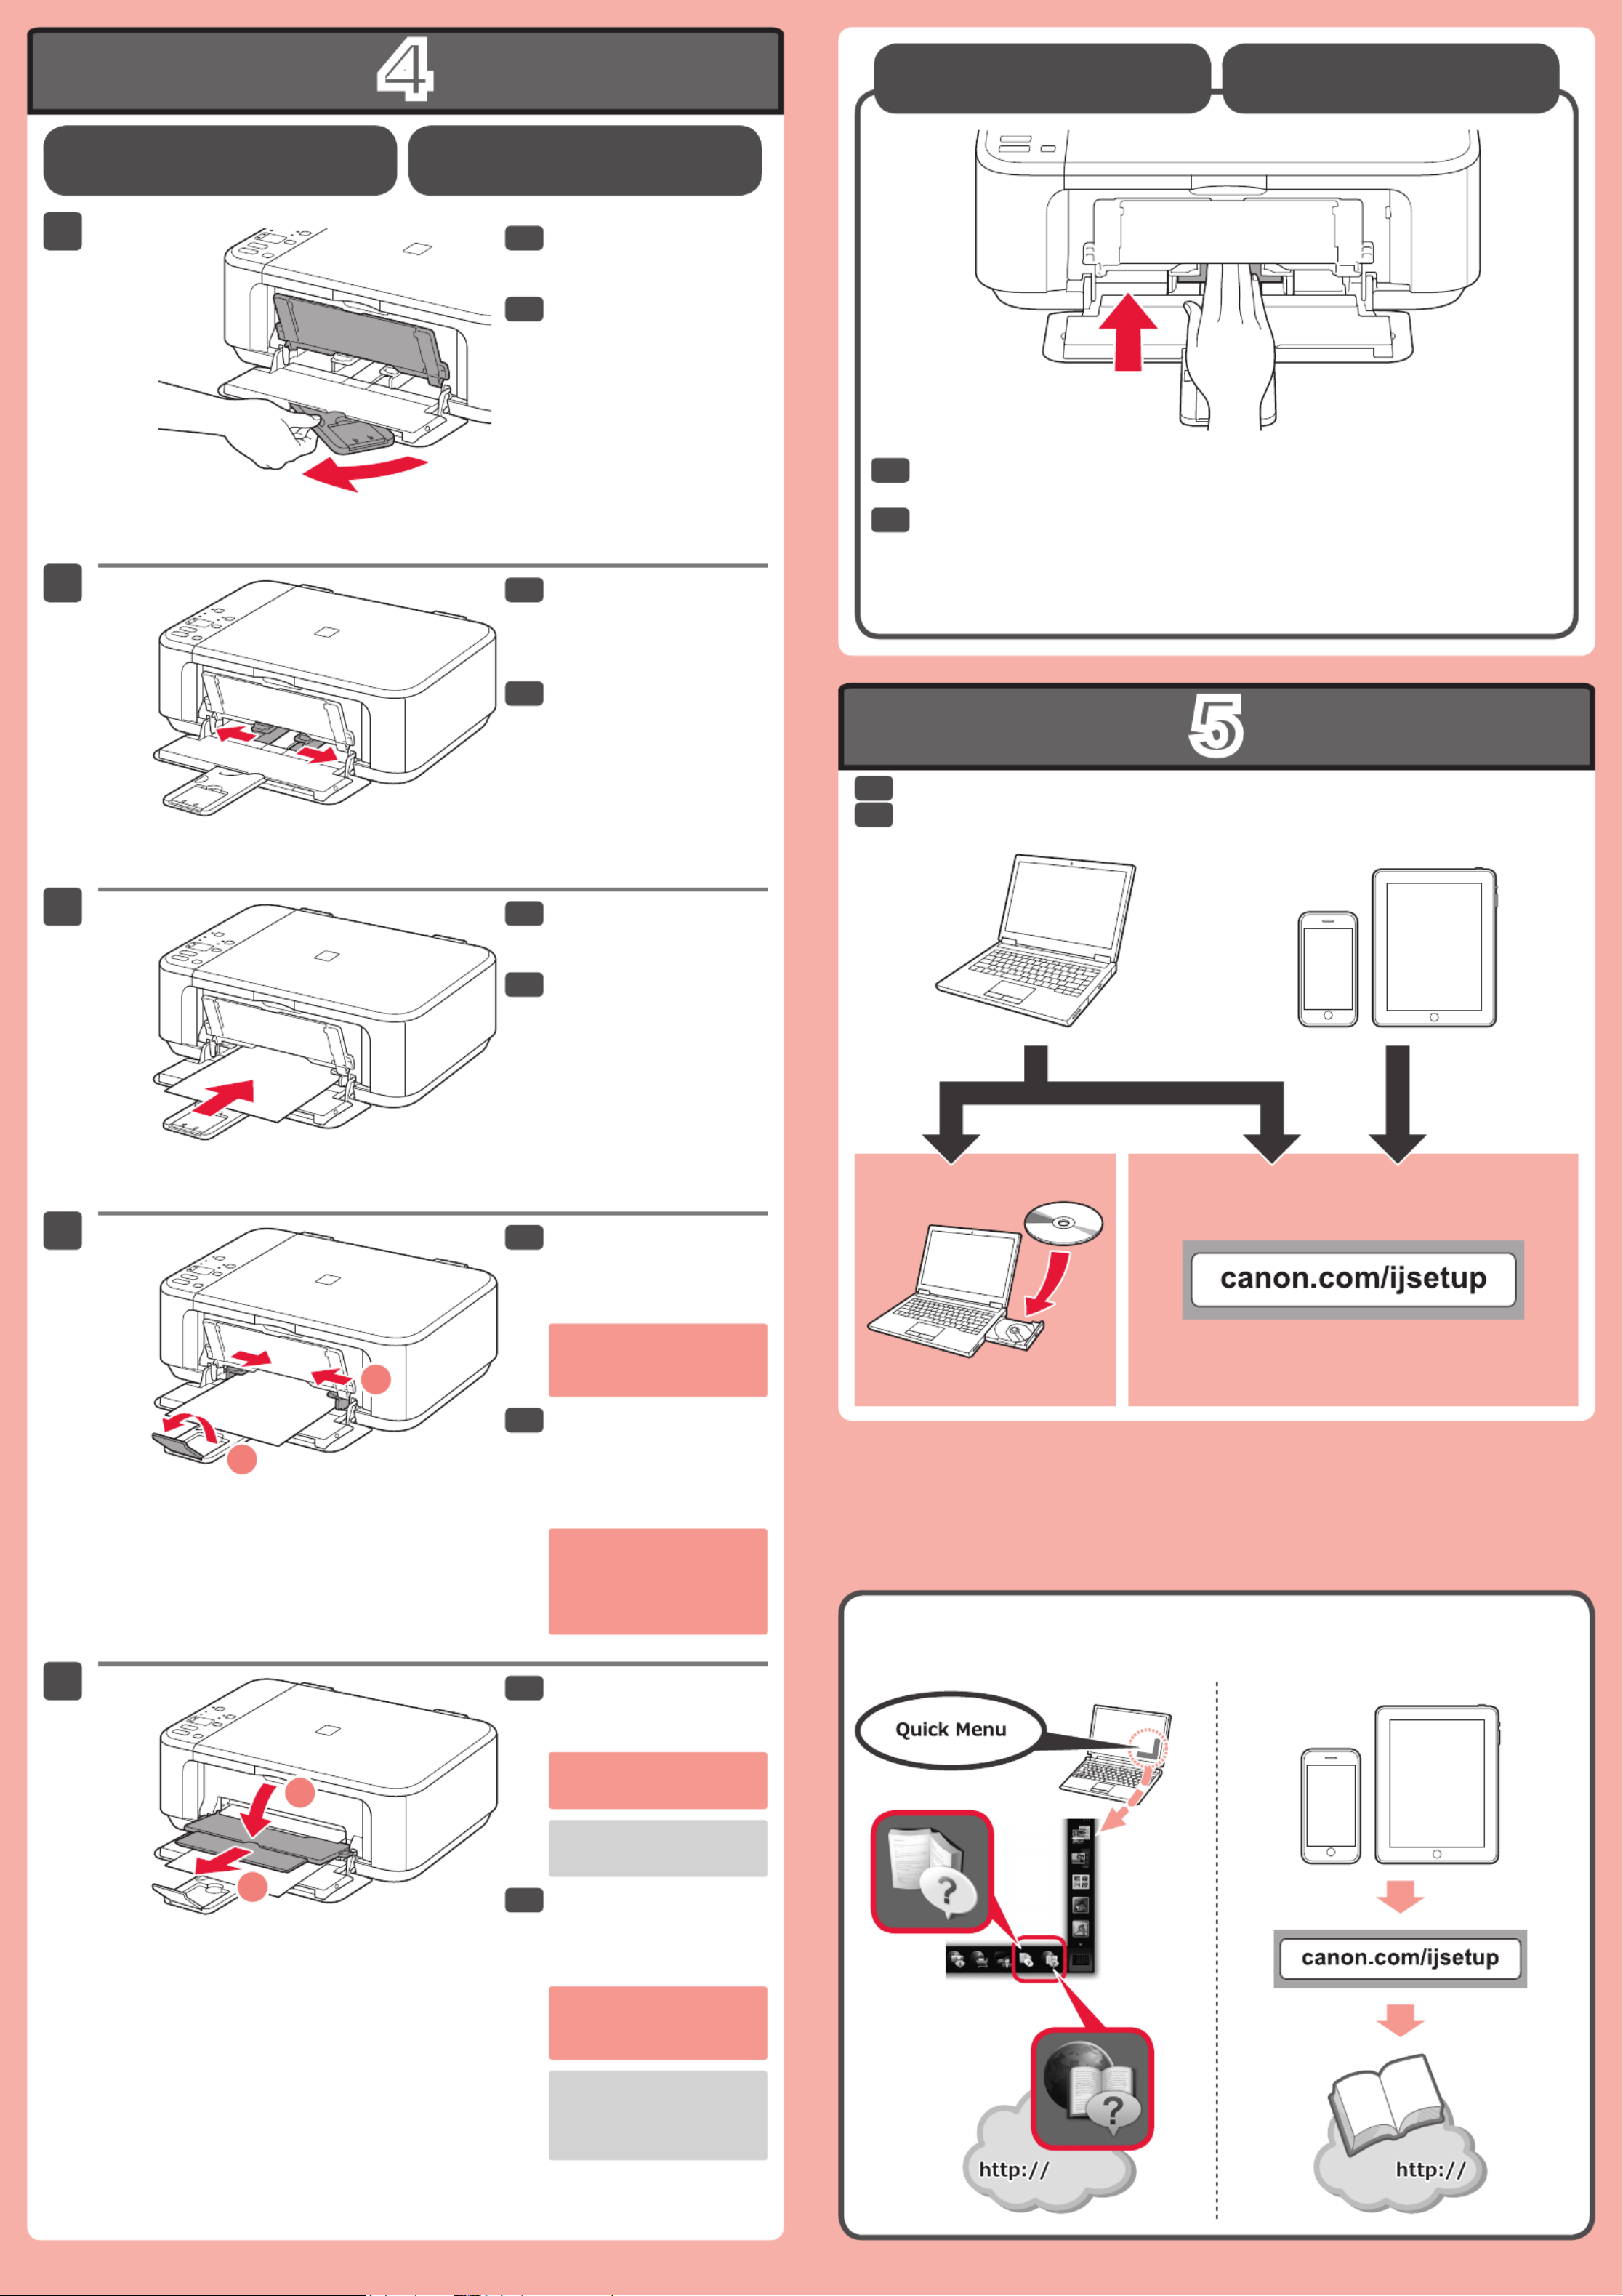
Compruebe que la bandeja
de salida del papel está
cerrada y extraiga el
soporte del papel.
Deslice la guía del papel
derecha hacia el lado.
La guía del papel izquierda se
mueve al mismo tiempo que la
derecha.
Abra la bandeja de salida
del papel y el soporte de
la salida del papel.
Inserte el papel con el
lado de impresión hacia
abajo hasta que se
detenga.
Ajuste la guía del papel al
tamaño del papel utilizado
y abra la extensión de la
bandeja de salida.
Manuales
Configuraci ón para papel
normal
Si imprime sin abrir la
bandeja de salida del papel,
provocará un error.
Para obtener más información
sobre el papel, consulte el
Manual en pantalla o el
Manual en línea.
Cargar papel
fotográfico
Cuando use papel fotográco, deberá ajustar la conguración del equipo al
tipo y al tamaño del soporte. Para obtener más detalles, consulte el Manual
en pantalla Manual en línea o el .
Instale el software en sus dispositivos.
No presione la guía del papel
demasiado contra el borde
del papel. Puede ocasionar
atascos de papel.
Check that the Paper
Output Tray is closed, then
pull out the Paper Support.
Slide the right Paper
Guide to the end.
The left Paper Guide moves
simultaneously with the right
guide.
Open the Paper Output
Tray and the Paper Output
Support.
Insert paper with the print
side facing down until it
stops.
Adjust the Paper Guide
to t the paper size used,
then open the Output Tray
Extension.
Manuals
Setting Plain Paper
Printing without opening the
Paper Output Tray causes
an error.
For information about paper,
refer to the On-screen
Manual Online Manual or .
Loading Photo Paper
When using photo paper, machine settings for media type and size should be
adjusted. For details, refer to the or .On-screen Manual Online Manual
Install the software on your devices.
Do not press the Paper
Guide too tightly against the
edge of the paper. It can
cause paper jams.
EN
ES
EN
ES
EN
ES
EN
ES
EN
ES
EN
ES
EN
ES
Product specificaties
| Merk: | Canon |
| Categorie: | Printer |
| Model: | Pixma MG3522 |
Heb je hulp nodig?
Als je hulp nodig hebt met Canon Pixma MG3522 stel dan hieronder een vraag en andere gebruikers zullen je antwoorden
Handleiding Printer Canon
7 September 2025

6 September 2025
5 September 2025

1 September 2025
1 September 2025

1 September 2025

1 September 2025
15 Augustus 2025
14 Augustus 2025

29 Juli 2025
Handleiding Printer
- Ricoh
- Konica Minolta
- Fujitsu
- Elite Screens
- Thomson
- Velleman
- Primera
- Tomy
- Nisca
- Xiaomi
- HiTi
- Mitsubishi
- Zebra
- Pantum
- Kodak
Nieuwste handleidingen voor Printer
9 September 2025
9 September 2025

9 September 2025
8 September 2025
8 September 2025

8 September 2025

7 September 2025

7 September 2025
7 September 2025

7 September 2025