Canon Pixma MG3022 Handleiding
Bekijk gratis de handleiding van Canon Pixma MG3022 (4 pagina’s), behorend tot de categorie Printer. Deze gids werd als nuttig beoordeeld door 10 mensen en kreeg gemiddeld 3.5 sterren uit 5.5 reviews. Heb je een vraag over Canon Pixma MG3022 of wil je andere gebruikers van dit product iets vragen? Stel een vraag
Pagina 1/4
23
4
1
XXXXXXXX © CANON INC. 2016
CD-ROM (Windows)
4
2
3
1
4
5
6
4
6
2
3
2
3
a
b
c
d
(A)
(B)
b
a
a
b
5
Movie
1
1
7
(B)
1
Movie Android iOS Movie Android iOS
Movie Android iOS
ES
EN
ES
EN
ES
ES
EN
EN
ES
EN
EN
ES
EN
ES
ES
EN
ES
EN
ES
EN
ES
EN
ES
EN
Manuales
ESPAÑOL
Guía de inicio 1
Tutoriales en vídeo
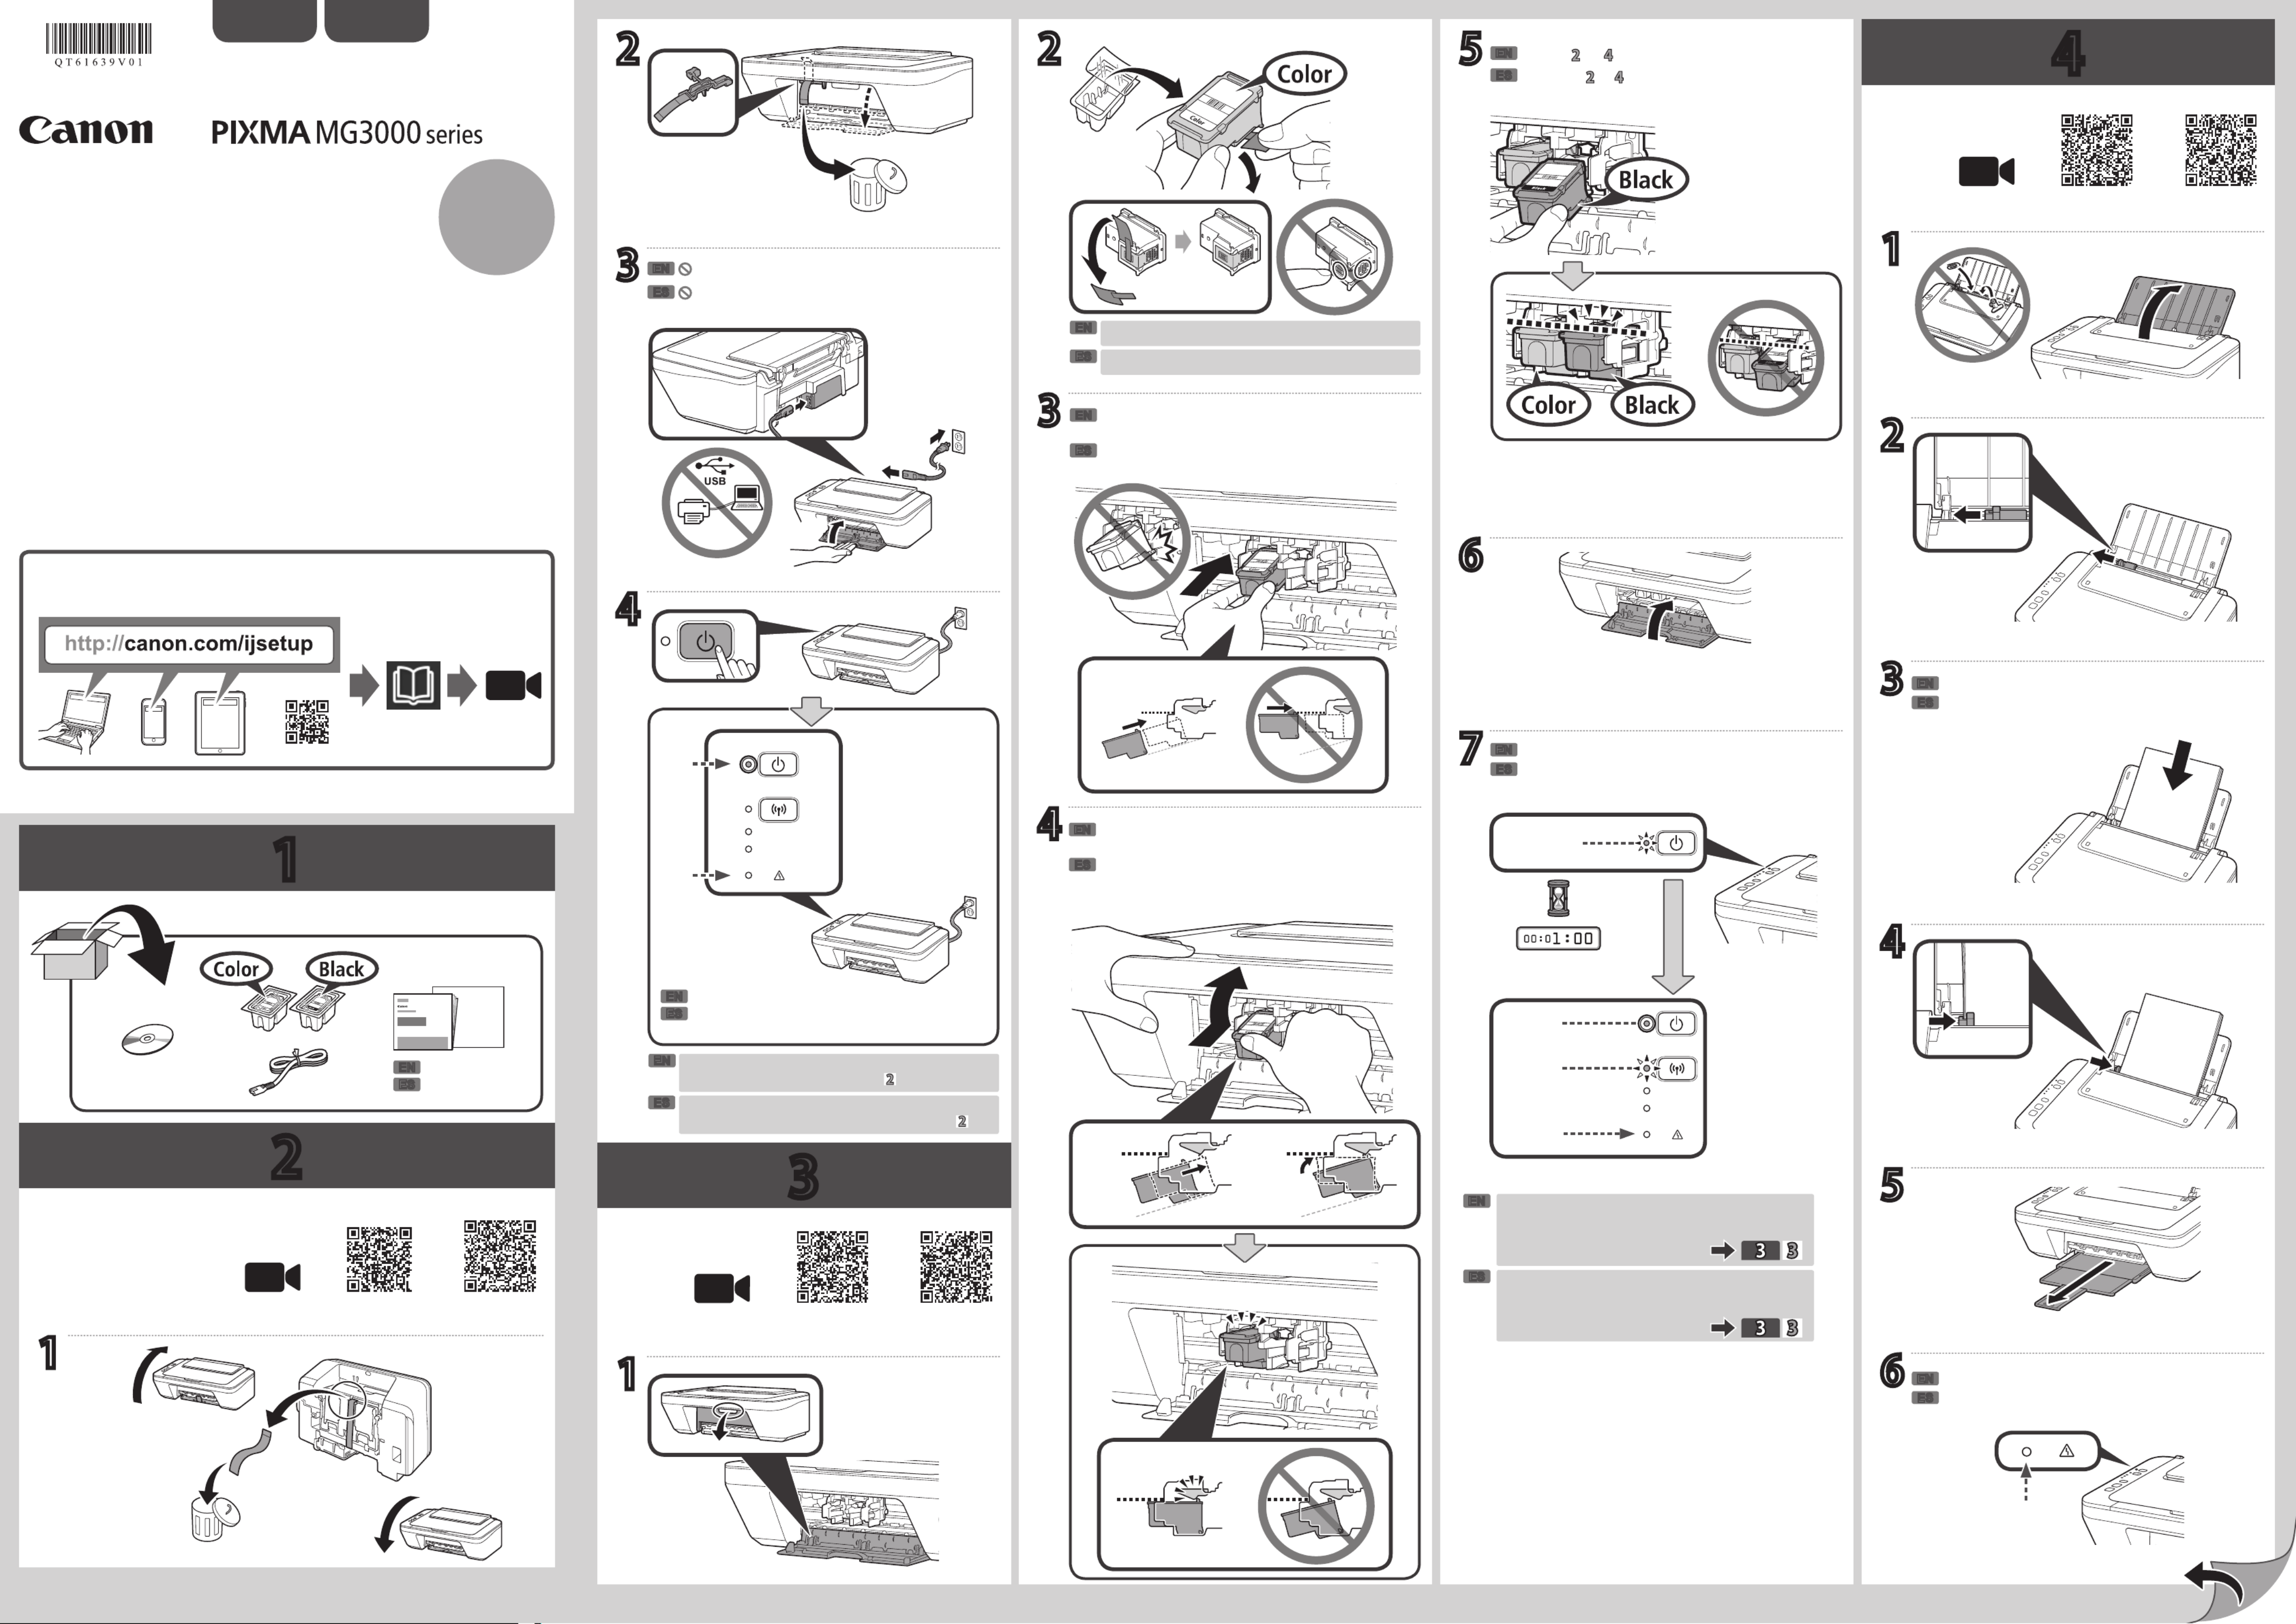
Compruebe que la luz de está Alarma (Alarm)
apagada.
Si la luz de parpadea, pulse el botón Alarma (Alarm) (B) ACTIVADO
(ON) para desactivar la impresora y vuelva a empezar desde .
Compruebe que la luz de ACTIVADO (ON) (A) se
enciende.
Tenga cuidado con la tinta de la cinta protectora.
Inserte el cartucho FINE en la ranura con un ángulo
ligeramente elevado.
Presione el cartucho FINE hacia adentro y hacia
arriba hasta que encaje en su posición.
Repita de a para instalar el otro cartucho FINE.
Cargue papel con la .cara imprimible hacia arriba
Apagada
No conecte el cable USB todavía.
Espere a que deje de parpadear la luz de
ACTIVADO (ON).
Parpadeando
Encendida
Parpadeando
Si la luz de (B) parpadea, compruebe Alarma (Alarm)
que se han instalado correctamente la tinta negra y de
color de los cartuchos FINE.
Manuals
ENGLISH
Getting Started 1
Video Tutorials
Check that the lamp is off.Alarm
If the lamp (B) button to Alarm ashes, press the ON
turn OFF the printer, then redo from .
Check that the lamp (A) lights.ON
Be careful of ink on the protective tape.
Insert the FINE Cartridge into the slot at a slight
upward angle.
Do not connect the USB cable yet.
Push the FINE Cartridge in and up rmly until it
snaps into place.
Repeat to to install the other FINE Cartridge.
Load paper with .the print side facing up
Off
Wait until the ON lamp stops ashing.
Flashing
Lit
If the lamp (B)Alarm ashes, check that the both black
and color FINE Cartridges are installed correctly.
Flashing
QT6-1639-V01 PRINTED IN XXXXXXXX
RMC (Regulatory Model Code): K10446

5
Windows PC
a
b
c
d
b
a
Windows PC *1
d
*1
ES
EN
ES
ES
ES
ES
EN
EN
EN
EN
ES
EN
ES
EN
ES
EN
ES
EN
ES
EN
ES
EN
ES
EN
ES
EN
ES
EN
Se puede acceder al desde el sitio web.Manual en línea
Si la luz de parpadea:Alarma (Alarm)
Seleccione el dispositivo al que desea conectar la impresora.
¿Utiliza su ordenador Windows o Mac OS?
¿Cómo conecta el ordenador a la impresora?
Sí
No
Apagada
Visite el sitio web para congurar la impresora.
Haga clic en la opción que se muestra en el sitio web.Congurar (Set Up)
Siga las instrucciones que aparecen en pantalla para congurar.
Haga clic en Descargar (Download) para descargar el archivo de conguración del sitio web.
Abra el archivo descargado y haga clic en .Iniciar conguración (Start Setup)
Siga las instrucciones en pantalla para continuar con la conguración.
Si sigue conectando su teléfono inteligente y tableta, consulte la .Guía de inicio 2
Método de conexión
Conexión LAN inalámbrica
(Conectar mediante router inalámbrico)
Conexión LAN inalámbrica
(Conexión directa)
Conexión USB
Guía de inicio 2
Conguración
Si aparece esta pantalla, habrá nalizado la conguración del ordenador.
Necesitará congurar la conexión de cada ordenador. Repita desde para congurar su ordenador, si procede.
Introduzca la URL en el navegador web de su ordenador y, a continuación, visite el sitio web.
Si no dispone de un router inalámbrico:
Método de conexión
No puede conectar su ordenador a Internet de forma
inalámbrica durante la Conexión directa.
Su ordenador p2-ya está conectado al router inalámbrico:
Ordenador y teléfono inteligente/
tableta
Ordenador Teléfono inteligente/
tableta
Cuando utilice Windows 10, Windows 8.1 o Windows 8, siga el
procedimiento que se indica a continuación para iniciar el archivo
de instalación tras insertar el CD de instalación.
a Haga clic en o en el Explorador de archivos (File Explorer)
en la barra de herramientas.
b Seleccione
Este PC (This PC) Equipo (Computer) u en el margen
izquierdo de la ventana abierta.
c Haga doble clic en el icono del CD-ROM que se encuentra
en el margen derecho de la ventana.
Si aparece el contenido del CD-ROM, haga doble clic
en .MSETUP4.EXE
The is accessible from the website.Online Manual
If the Alarm lamp is ashing:
Select the device to which you want to connect the printer.
Is your computer Windows or Mac OS?
How do you connect the printer to your computer?
Wireless LAN connection
(Connect via wireless router)
Wireless LAN connection
(Direct Connection)
USB Connection
Connection method
Yes
No
Visit the website to setup the printer.
Click displayed on the website.Set Up
Follow the on-screen instructions for setup.
Click Download to download the setup le from the website.
Open the downloaded le and click Start Setup.
Follow the on-screen instructions to proceed to the setup.
If you continue to connect your smartphone and tablet, refer to the .Getting Started 2
Off
Getting Started 2
Setup
If this screen appears, the computer setup is complete.
You need connection setup for each computer. Repeat from to setup your computer if needed.
Enter the URL on your computer web browser, and then visit the website.
Not having a wireless router:
Your computer has already connected to the wireless router:
Connection method
You cannot connect your computer to the Internet wirelessly
during the Direct Connection.
Computer and smartphone/tablet Computer Smartphone/tablet
When using Windows 10, Windows 8.1 or Windows 8, follow the
procedure below for start up the setup le after inserting the setup CD.
a Click or on the taskbar.File Explorer
b Select or on the left side of the opened window.This PC Computer
c Double-click the CD-ROM icon on the right side of the window.
If the contents of the CD-ROM appear, double-click .MSETUP4.EXE

XXXXXXXX © CANON INC. 2016
2
(A)
(C)
(B)
ESPAÑOL
Getting Started 2
Preparation
• Turn on Wi-Fi on your smartphone/tablet.
• If you have a wireless router, connect your smartphone/tablet to the wireless router.
• For operations, refer to manuals of your smartphone/tablet and the wireless router or contact
those manufacturers.
3. Tap PRINT which was installed.
4. If the following screen appears, the setup is complete.
1. Install Canon PRINT Inkjet/SELPHY to your smartphone/tablet.
: Search "Canon PRINT" in App Store.
: Search "Canon PRINT" in Google Play.
Follow the on-screen instructions to proceed to the setting.
Troubleshooting
a Press the Wi-Fi button (A) for 2 seconds.
The lamp (B)Wi-Fi ashes slowly.
b Press the Color button (C) twice.
c Return to - 3 to proceed with the setup.
• If the connection of your smartphone/tablet is complete in in the , there is Getting Started 1
no need for the setup using this manual.
• You need connection setup for each smartphone/tablet. Repeat the setting from step 1 for
another smartphone/tablet as necessary.
3. Tap Settings on the home screen of
your smartphone/tablet, and then tap
Canon_ij_XXXX on the Wi-Fi setting.
4. Tap PRINT which was installed.
Follow the on-screen instructions to
proceed to the setting.
If does not appear on Canon_ij_XXXX
the list, see "Troubleshooting" below to
operate the printer and wait until Canon_
ij_XXXX appears.
XXXX varies depending on your printer.
If the message "Printer is not registered.
Perform printer setup?" does not appear
for a while, see "Troubleshooting" below
to operate the printer and wait until the
message appears.
2. Wi-Fi Check the status of the lamp on the printer.
5. If the following screen appears, the
setup is complete.
3. Tap PRINT which was installed.
Follow the on-screen instructions to
proceed to the setting.
4. If the following screen appears, the
setup is complete.
The lamp is ashing or
turned off:
The lamp is lit:
ENGLISH
QT6-1650-V01 PRINTED IN XXXXXXXX
Product specificaties
| Merk: | Canon |
| Categorie: | Printer |
| Model: | Pixma MG3022 |
Heb je hulp nodig?
Als je hulp nodig hebt met Canon Pixma MG3022 stel dan hieronder een vraag en andere gebruikers zullen je antwoorden
Handleiding Printer Canon
7 September 2025

6 September 2025

5 September 2025

1 September 2025

1 September 2025

1 September 2025

1 September 2025
15 Augustus 2025
14 Augustus 2025

29 Juli 2025
Handleiding Printer
- Fujitsu
- Pantum
- Equip
- Sony
- Panduit
- Kogan
- D-Link
- Panasonic
- Velleman
- Ultimaker
- Fichero
- Dell
- Olympia
- Fargo
- Brady
Nieuwste handleidingen voor Printer
9 September 2025
9 September 2025

9 September 2025

8 September 2025
8 September 2025

8 September 2025

7 September 2025
7 September 2025
7 September 2025

7 September 2025