Canon Pixma MG2120 Handleiding
Bekijk gratis de handleiding van Canon Pixma MG2120 (4 pagina’s), behorend tot de categorie Printer. Deze gids werd als nuttig beoordeeld door 55 mensen en kreeg gemiddeld 4.5 sterren uit 28 reviews. Heb je een vraag over Canon Pixma MG2120 of wil je andere gebruikers van dit product iets vragen? Stel een vraag
Pagina 1/4

1
XXXXXXXX ©CANON INC.2011
5
6
(Color/Black)
1
3
4
2
1
2
series
Retire la cinta (tape).
Compruebe que se le han suministrado los siguientes elementos.
Cable de alimentación Cartuchos FINE (FINE Cartridges)
CD-ROM de instalación (Setup CD-ROM)Manuales y otros documentos
Es necesario un cable USB
(no suministrado).
Aún no conecte el cable USB.
Conecte el cable de alimentación.
55
Pulse el botón ACTIVADO (ON).
66
Abra la cubierta delantera (Front
Cover) y la bandeja de salida del
papel (Paper Output Tray).
11
Retire la cinta naranja (orange tape).
33
Cierre la tapa de salida del papel
(Paper Output Cover).
44
Preparación
Elementos
suministrados
Abra la tapa de salida del papel
(Paper Output Cover).
22
Si aparece > > en la pantalla E 4 0
LED, pulse el botón ACTIVADO (ON)
para apagar el equipo y repita desde
el paso 2.
ESPAÑOL
Guía de inicio Léame en primer lugar
Consérvelo a mano para utilizarlo
como referencia en el futuro.
Para llevar a cabo la instalación, coloque el equipo cerca
del ordenador.
Windows es una marca comercial o una marca comercial registrada de Microsoft
Corporation en EE. UU. y/u otros países.
Windows Vista es una marca comercial o una marca comercial registrada de Microsoft
Corporation en EE. UU. y/u otros países.
Macintosh, Mac y Mac OS son marcas registradas de Apple Inc, registradas en EE. UU.
y/u otros países.
•
•
•
Número de modelo: K10371 (MG2120)
Equipo multifunción fotográco Canon Inkjet
Solicitar ayuda a Canon
Correo electrónico del servicio técnico:
www.usa.canon.com/support
Teléfono gratuito del servicio técnico:
1-800-OK-CANON
Este servicio ofrece asistencia técnica telefónica gratuita, de lunes
a viernes (excepto festivos), .durante el período de garantía
El soporte mediante dispositivo telefónico para decientes
auditivos (TDD) está disponible en el 1-866-251-3752.
Remove the tape.
Check the included items.
A USB cable (not included) is
required.
Manuals and other documents
Power cord FINE Cartridges
Setup CD-ROM
Do not connect the USB cable yet.
Connect the power cord.
55
Press the button.ON
66
Open the Front Cover and the
Paper Output Tray.
11
Remove the orange tape.
33
Close the Paper Output Cover.
44
Preparation
Included Items
Open the Paper Output Cover.
22
If > > are displayed on the LED, E 4 0
press the button to turn OFF the ON
machine, then redo from step 2.
Getting Started Read me rst!
Keep me handy for future reference.
Windows is a trademark or registered trademark of Microsoft Corporation in the U.S.
and/or other countries.
Windows Vista is a trademark or registered trademark of Microsoft Corporation in the
U.S. and/or other countries.
Macintosh, Mac and Mac OS are trademarks of Apple Inc., registered in the U.S. and
other countries.
•
•
•
Model Number: K10371 (MG2120)
To perform setup, place the machine near the computer.
ENGLISH
Canon Inkjet Photo All-In-One
Getting Help from Canon
Email Tech Support — www.usa.canon.com/support
Toll-Free Tech Support— 1-800-OK-CANON
This option provides live telephone technical support, free of
service charges, Monday-Friday (excluding holidays), during the
warranty period.
Telephone Device for the Deaf (TDD) support is available at
1-866-251-3752.
QT5-4276-V01 PRINTED IN XXXXXXXX

2
1
2
7
1
3
4
6
7
1
2
5
2
Black: PG-240XXL 5204B001
Color: CL-241XL 5208B001
Black: PG-240XL 5206B001
Color: CL-241 5209B001
Black: PG-240 5207B001
Inserte el cartucho FINE (FINE
Cartridge) hasta que se detenga.
¡No lo golpee contra los lados!
44
Repita los pasos 2 a 5 para instalar
el otro cartucho FINE (FINE
Cartridge).
66
Si la luz de Alarma
(Alarm) está encendida
en naranja, compruebe
que el cartucho FINE
(FINE Cartridge) esté
instalado correctamente.
Cierre la tapa de salida del papel
(Paper Output Cover).
Al cabo de aproximadamente
20 segundos, compruebe que aparece
la pantalla 2 y continúe.
77
Tenga cuidado con la tinta de la cinta
protectora.
Desembale el cartucho FINE
(FINE Cartridge) y retire la cinta
protectora.
33
Asegúrese de que la cubierta
del cabezal (Head Cover) se
ha abierto automáticamente.
Asegúrese de que la lámpara de
Papel (Paper) está encendida.
77
Si la cubierta del cabezal (Head Cover)
está cerrada, cierre la tapa de salida
del papel (Paper Output Cover) y repita
el paso 1.
Abra la bandeja de salida del papel
(Paper Output Tray) y la tapa de
salida del papel (Paper Output
Cover).
11
Baje la palanca de bloqueo del cartucho de tinta (Ink Cartridge Lock Lever).
22
Instale el cartucho FINE (FINE Cartridge) de color a la izquierda y el negro a la derecha.
Insértelo recto hasta que se detenga.
Levante la palanca de bloqueo del
cartucho de tinta (Ink Cartridge
Lock Lever).
55
¡No tocar!
Cuando el equipo no
se utiliza durante unos
5 minutos, la pantalla
LED se desconecta.
Para reactivarla, pulse
cualquier botón (excepto
el botón ACTIVADO (ON)
en el panel de control
(Operation Panel).
Los cartuchos FINE (FINE Cartridges) siguientes son compatibles con este equipo.
Llame al 1-800-OK-CANON para localizar un distribuidor cercano o visite la tienda
en línea Canon en www.shop.usa.canon.com
N.º de referencia
Información
de pedidos
Insert the FINE Cartridge until it
stops.
Do not knock it against the sides!
44
Repeat step 2 to 5 to install the
other FINE Cartridge.
66
If the lamp is lit Alarm
orange, check that the
FINE Cartridge is installed
correctly.
Close the Paper Output Cover.
After about 20 seconds, check that
screen 2 is displayed, then proceed.
77
Be careful of ink on the protective tape.
Unpack the FINE Cartridge, then
remove the protective tape.
33
Check that the Head Cover has
opened automatically.
Check that the lamp is lit.Paper
77
If the Head Cover is closed, close the
Paper Output Cover, then redo step 1.
Open the Paper Output Tray and
the Paper Output Cover.
11
Lower the Ink Cartridge Lock Lever.
22
Install the Color FINE Cartridge to the left and Black to the right.
Insert it straight until it stops.
Lift the Ink Cartridge Lock Lever.
55
Do not touch!
The LED turns off if the
machine is not operated
for about 5 minutes. To
restore the display, press
any button (except the ON
button) on the Operation
Panel.
The following FINE Cartridges are compatible with this machine.
Call 1-800-OK-CANON to locate a dealer near you, or visit the Canon online store at
www.shop.usa.canon.com
Order #
Ordering
Information
4
3
1
1
2
3
1
2
4
5
1
2
Ya están disponibles la función de copia y otras funciones que no
requieren ordenador.
No conecte aún el cable USB.
El sistema le solicitará que lo conecte durante la instalación utilizando el CD-ROM de instalación
(Setup CD-ROM).
Cierre todas las aplicaciones antes de la instalación.
Inicie una sesión con una cuenta de administrador.
Durante la instalación, es posible que se tenga que conectar a Internet. Esto puede implicar gastos de conexión.
•
•
•
Las pantallas se basan en Windows 7 operating system Home Premium y Mac OS X v.10.6.x. Las pantallas
reales pueden diferir en función de la versión del sistema operativo.
Pulse el botón ACTIVADO (ON)
para apagar el equipo.
El ruido de funcionamiento se detiene al
cabo de aproximadamente 30 segundos.
11
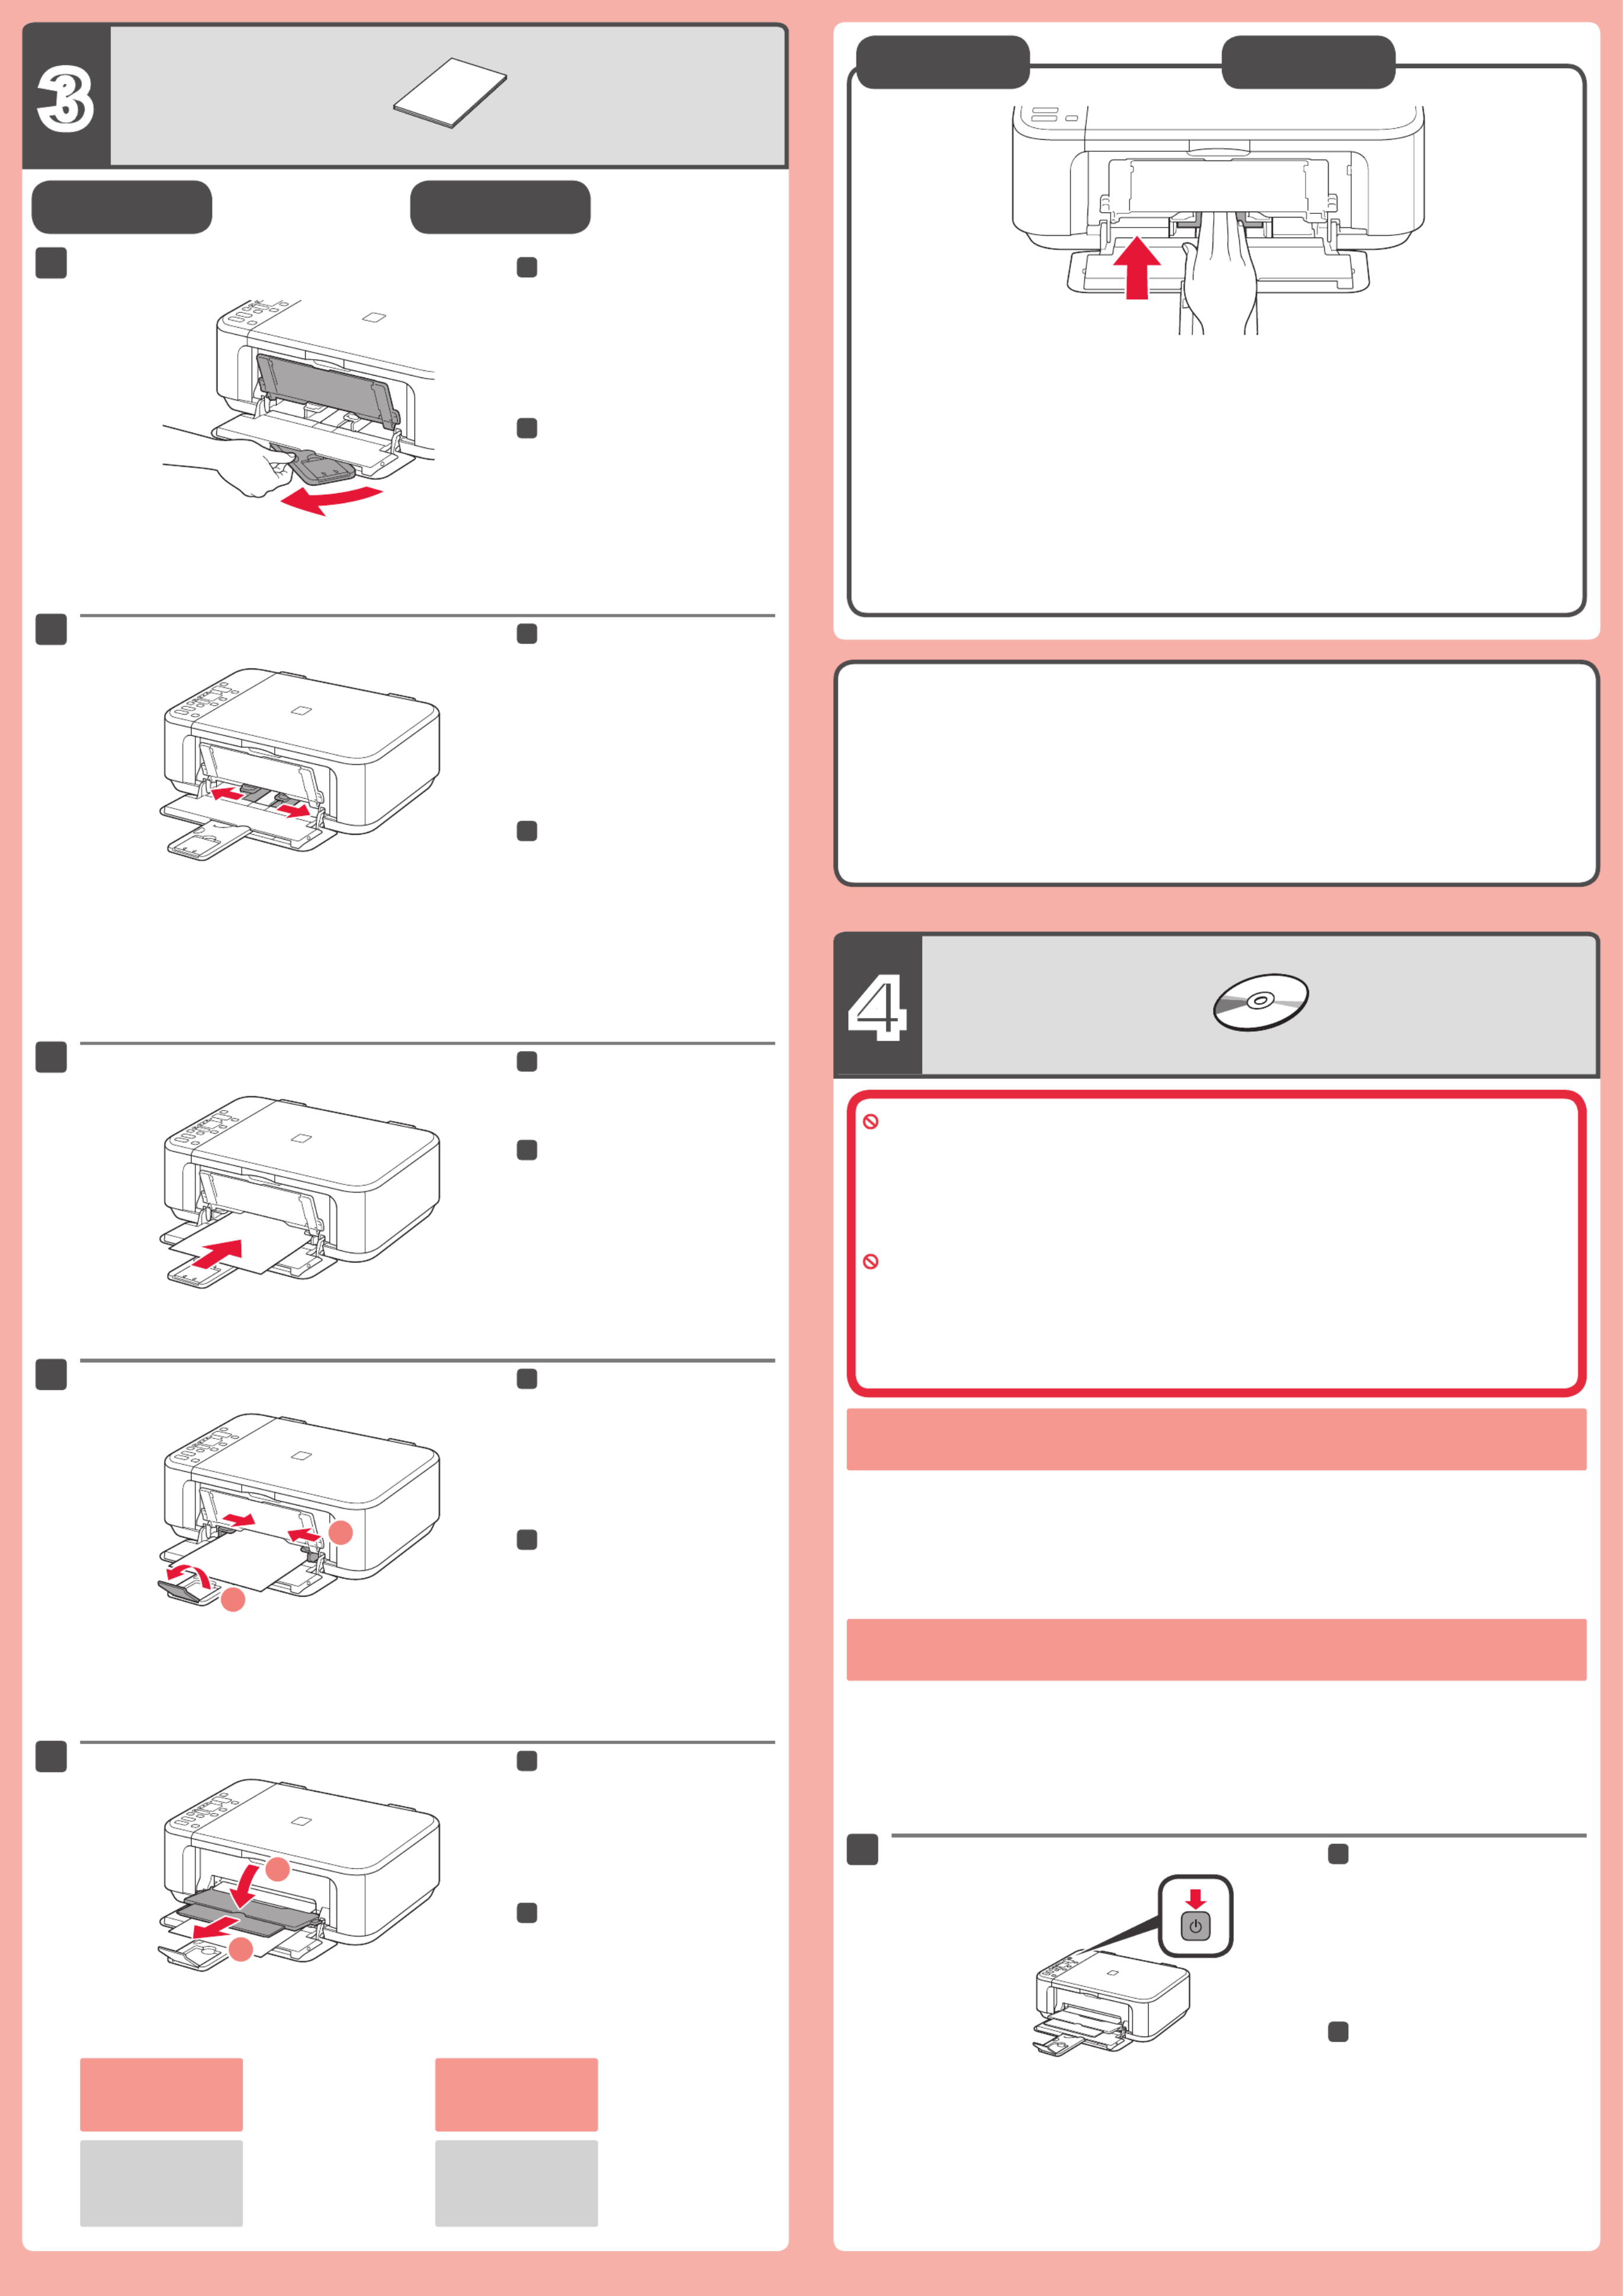
Inserte el papel con la cara imprimible hacia abajo hasta que se detenga. Cuando use papel fotográco,
deberá ajustar la conguración del equipo al tipo y al tamaño del soporte. Para obtener más detalles,
consulte el que se instalará posteriormente.Manual en pantalla
Conguración
para papel normal
Cargar papel
fotográfico
Asegúrese de que la bandeja de
salida del papel (Paper Output
Tray) está cerrada y extraiga el
soporte del papel (Paper Support).
11
Deslice la guía del papel (Paper
Guide) derecha hacia el lado.
La guía del papel (Paper Guide)
izquierda se mueve al mismo tiempo
que la derecha.
22
Inserte el papel hasta que
se detenga.
33
Ajuste la guía del papel (Paper
Guide) al tamaño del papel
utilizado y abra la extensión de
la bandeja de salida (Output Tray
Extension).
44
Abra la bandeja de salida del papel
(Paper Output Tray) y el soporte de
la salida del papel (Paper Output
Support).
55
Para obtener más
información sobre el
papel, consulte el Manual
en pantalla que se
instalará posteriormente.
Si imprime sin abrir la
bandeja de salida del
papel (Paper Output Tray),
provocará un error.
Check that the Paper Output Tray
is closed, then pull out the Paper
Support.
11
Slide the right Paper Guide to the
end.
The left Paper Guide moves
simultaneously with the right guide.
22
Insert paper until it stops.
33
Adjust the Paper Guide to t the
paper size used, then open the
Output Tray Extension.
44
Copy and other functions that do not require a computer are now
available.
Do not connect the USB cable yet.
You will be prompted to connect it during the installation using the .Setup CD-ROM
Quit all applications before installation.
Log on using an administrator account.
Internet connection may be required during the installation. Connection fees apply.
•
•
•
Screens are based on Windows 7 operating system Home Premium and Mac OS X v.10.6.x. Actual screens
may differ depending on the OS version.
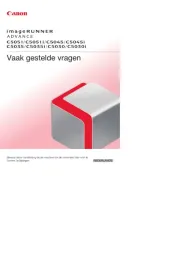
Press the button to turn off the ON
machine.
Operating noise stops after about 30
seconds.
11
Insert paper . When using photo paper, machine settings for with the printable side down until it stops
media type and size should be adjusted. For details, refer to the which will be installed On-screen Manual
later.
Setting Plai n
Paper
Loading Photo
Paper
Open the Paper Output Tray and
the Paper Output Support.
55
Printing without opening
the Paper Output Tray
causes an error.
For information about
paper, refer to the On-
screen Manual which will
be installed later.
Product specificaties
| Merk: | Canon |
| Categorie: | Printer |
| Model: | Pixma MG2120 |
| Ingebouwd display: | Ja |
| Gewicht: | 5300 g |
| Beeldscherm: | LED |
| Beeldschermdiagonaal: | 7 " |
| USB-poort: | Ja |
| Connectiviteitstechnologie: | Bedraad |
| Ethernet LAN: | Nee |
| Markt positionering: | Thuis & kantoor |
| Aantal USB 2.0-poorten: | 1 |
| Intern geheugen: | - MB |
| Duurzaamheidscertificaten: | ENERGY STAR |
| Ondersteunt Mac-besturingssysteem: | Mac OS X 10.4 Tiger, Mac OS X 10.5 Leopard, Mac OS X 10.6 Snow Leopard |
| Mac-compatibiliteit: | Ja |
| Maximale resolutie: | 4800 x 1200 DPI |
| Aantal printcartridges: | 2 |
| Papierlade mediatypen: | Fotopapier |
| Printtechnologie: | Inkjet |
| Standaard interfaces: | USB 2.0 |
| Printsnelheid (zwart, standaardkwaliteit, A4/US Letter): | - ppm |
| Printen: | Afdrukken in kleur |
| Duplex printen: | Nee |
| Gebruiksindicatie (maximaal): | - pagina's per maand |
| Digital Sender: | Nee |
| Kopieën vergroten/verkleinen: | 25 - 400 procent |
| Maximale kopieerresolutie: | 1200 x 2400 DPI |
| Kopiëren: | Kopiëren in kleur |
| Scannen: | Scannen in kleur |
| Soort scanner: | Flatbed scanner |
| Scantechnologie: | CIS |
| Optische scanresolutie: | 1200 x 2400 DPI |
| Max. scangebied: | A4 / Letter (216 x 297) mm |
| Faxen: | Nee |
| Totale invoercapaciteit: | - vel |
| Totale uitvoercapaciteit: | 100 vel |
| Maximale ISO A-series papierformaat: | A4 |
| ISO A-series afmetingen (A0...A9): | A4 |
| Gemiddeld stroomverbruik ( bedrijfsresultaat ): | - W |
| Maximale printafmetingen: | 216 x 297 mm |
| Afmetingen enveloppen: | 10 |
| Non-ISO print papierafmetingen: | Legal |
| Maximum scanresolutie: | 19200 x 19200 DPI |
| Duplex scannen: | Nee |
| Dubbelzijdig kopiëren: | Nee |
| Dubbelzijdig faxen: | Nee |
| All-In-One-multitasking: | Ja |
| Meegeleverde drivers: | Ja |
| Kleurdiepte invoer: | 48 Bit |
| Fotopapier afmetingen (imperial): | 4x6, 5x7, 8x10 " |
| Afmetingen (B x D x H): | 305 x 450 x 152 mm |
| Zuinig printen: | Ja |
| All-in-one-functies: | Copy, Print, Scan |
| Kleurenfuncties all-in-one: | copy, print, scan |
| AC-ingangsspanning: | 100 - 240 V |
| AC-ingangsfrequentie: | 50 - 60 Hz |
| Kleurdiepte uitvoer: | 24 Bit |
| N-in-1 copy function (N=): | 2, 4 |
Heb je hulp nodig?
Als je hulp nodig hebt met Canon Pixma MG2120 stel dan hieronder een vraag en andere gebruikers zullen je antwoorden
Handleiding Printer Canon
7 September 2025
6 September 2025
5 September 2025

1 September 2025
1 September 2025
1 September 2025
1 September 2025
15 Augustus 2025
14 Augustus 2025
29 Juli 2025
Handleiding Printer
- Frama
- Ricoh
- Epson
- Lexmark
- Sawgrass
- Visioneer
- Custom
- Kodak
- Argox
- Middle Atlantic
- HiTi
- Metapace
- HP
- Kyocera
- Velleman
Nieuwste handleidingen voor Printer
9 September 2025
9 September 2025
9 September 2025
8 September 2025
8 September 2025

8 September 2025

7 September 2025
7 September 2025
7 September 2025

7 September 2025