Bright Spark Flametastic Pro 514006 Handleiding
Bright Spark
Niet gecategoriseerd
Flametastic Pro 514006
Bekijk gratis de handleiding van Bright Spark Flametastic Pro 514006 (4 pagina’s), behorend tot de categorie Niet gecategoriseerd. Deze gids werd als nuttig beoordeeld door 24 mensen en kreeg gemiddeld 4.4 sterren uit 12.5 reviews. Heb je een vraag over Bright Spark Flametastic Pro 514006 of wil je andere gebruikers van dit product iets vragen? Stel een vraag
Pagina 1/4

514006 nl ma 2013.06
*514.006 FLAMETASTIC PRO - MANUAL
GEBRUIK UITSLUITEND IN GOED GEVENTILEERDE RUIMTES.
BELANGRIJK: Voordat u de gasvulling aansluit, lees de gebruiksaanwijzing zorgvuldig om met dit apparaat ver-
trouwd te worden. Bewaar deze instructies goed voor toekomstig gebruik.
Dit apparaat moet alleen gebruikt worden met Bright Spark® Catering Cartridge of Butane Battery® A4 gasvullingen.
Het zou gevaarlijk kunnen zijn om andere soorten gasvullingen proberen aan te sluiten. Sommige delen zullen tijdens en na gebruik heel
erg warm zijn. Houd jonge kinderen uit de buurt. Het apparaat moet ver van brandbare materialen gebruikt worden en minstens op 1
meter afstand van nabijgelegen oppervlakken (muur, plafond). Wees speciaal voorzichtig bij friteuses, elektrische kookplaten en bronnen
van open vuur.
OM UIT TE DOEN: 1. Sluit de gastoevoer volledig af door de Gas Controle Knop in de 'klok mee' richting te draaien.
WAARSCHUWING: Door het leidingwerk voor een constante vlam, blijft na gebruik het apparaat nog voor een korte periode doorbran-
den.
2. HAAL DE BRANDER NOOIT VAN DE GASVULLING WANNEER DEZE IN GEBRUIK IS.
NA GEBRUIK: 1. Controleer of het apparaat schoon en droog is.
2. Bewaar op een koele, goed geventileerde plaats na het verwijderen van de vulling van de brander en het terugzetten van de afsluit-
dop.
SCHOONMAKEN EN ONDERHOUD: 1. Schoon, stof· en vuilvrij houden wat gebruik kan beïnvloeden.
2. Schoonmaken met een vochtige doek met een mild schoonmaakmiddel Niet onderdompelen in een vloeistof of niet in de vaatwasser
zetten. Na het schoonmaken afdrogen. Voor het schoonmaken de gasvulling van het apparaat verwijderen.
3. Let op: er zijn geen onderdelen die de gebruiker moet onderhouden. Dit apparaat met veranderen. Indien defect,
breng het apparaat terug naar het aankooppunt.
GARANTIE VAN DE FABRIKANT: De garantie vervalt bil het volgende:
1. Als het apparaat door vervoer of door verkeerd gebruik beschadigd is.
2. Het niet·gebruiken volgens de Instructies.
3. Schade door verkeerd gebruik of zorg, of als de eenheid wordt ondergedompeld of op een vochtige plaats wordt bewaard.
4. Let op: er zijn geen onderdelen die de gebruiker moet onderhouden. Dit apparaat niet veranderen. Indien defect,
breng het apparaat terug naar het aankooppunt.
HET APPARAAT NIET GEBRUIKEN ALS HET BESCHADIGDE OF VERSLETEN AFSLUITINGEN HEEFT. GEBRUIK GEEN
APPARAAT DAT LEKT, BESCHADIGD IS OF DAT NIET GOED WERKT.
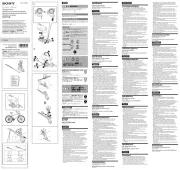
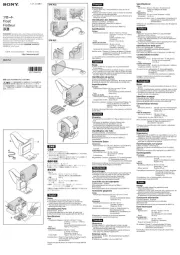
MONTAGE VAN HET APPARAAT: 1. Draai de Gas Controle Knop naar de gesloten '—' (uit) positie (Fig. 1).
Waarschuwing: Als de knop niet op UIT staat, komt het niet aangestoken gas onmiddellijk vrij bij aansluiting van de vulling.
2. Controleer of de Trekker Vergrendelingknop uit is (Fig. 2).
3. Controleer de '0' ringafdichtingen voor de gasvulling aan te sluiten op de brander (Fig. 3).
4. Verander of bevestig de gasvulling In de buitenlucht en op afstand van andere mensen.
5. Richt de kraaginkeping van de vulling op het plaatsingslipje op de brander en, terwijl u de vulling rechtop houdt,
drukt u voorzichtig naar beneden, dan het apparaat 35' naar rechts draaien (Fig. 4).
6. Vergeet met om te controleren dat er geen gas lekt. Als het gas uit uw apparaat lekt (ruikt naar gas), breng het onmiddellijk in de bu-
itenlucht naar een goed geventileerde, vlamvrije plaats waar het lek gevonden kan worden en gedicht. Als u uw apparaat wilt controle-
ren op lekken, doe het buiten. Probeer nooit lekken met een vlam op te sporen, gebruik zeepwater.
ONTSTEKING: 1. Draai de Gas Controle Knop langzaam in de 't' richting om het gas te laten stromen (Fig. 5), dan de trekker indruk-
ken om te ontsteken. Houd de trekker ingedrukt voor de ontsteking (Fig. 6) of druk op de Trekker Vergrendelingknop voor de aan positie.
(Fig. 7). Om de trekker vergrendelingknop uit te doen, druk erop en zet de trekker weer in de beginstand.
2. Herhaal als het apparaat niet aangaat.
GEBRUIK: Pas de vlam aan door de Gas Controle Knop tussen de '—' en '+' (weinig en veel hitte) positie te draaien zoals gewenst.
Om de vlam te concentreren, gebruik de Vlam Focus Controle. Deze eenheid fl akkert niet daar het gas voorverwarmd wordt voor het
verbrand wordt, echter wees beducht voor het fl akkeren dat zou kunnen gebeuren in de eerste vijf seconden van het opstarten en zorg
dat het apparaat niet meer dan een hoek van 15° van de verticale positie afwijkt (rechtop houden). Na twee minuten branden is het ap-
paraat voorverwarmd en kan in elke gewenste hoek gebruikt worden zonder te fl akkeren.
GAS VULLING ZORG: 1. Gebruik alleen Bright Spark® Catering Cartridge of Butane Battery® A4 gas cartridges.
Het kan schadelijk zijn om andere soorten gasvullingen te installeren.
2. Inspecteer voor gebruik de gasvulling op schade of roest.
3. Bewaar geen gasvullingen op plaatsen die warmer dan 40°C kunnen worden zoals in de kofferbak van een in de zon geparkeerde
auto, bij fornuizen, branders of friteuses of direct in de zon.
4. Wanneer niet in gebruik haal de brander en gasvulling van elkaar en bewaar op een koele, droge plaats.
5. Niet in het vuur werpen zelfs als de vulling leeg is.
MONTAGE EN ONTSTEKING VAN HET APPARAAT

514006 en ma 2013.06
*514.006 FLAMETASTIC PRO - MANUAL
ONLY USE IN WELL VENTILATED AREAS.
IMPORTANT: Read these instructions for use carefully so as to familiarise yourself with the appliance before
connecting it to its gas container. Keep these instructions for future use.
This appliance shall only be used with Bright Spark® Catering Cartridge or Butane Battery® A4 gas cartridge. It may be hazardous to
attempt to fi t other types of gas containers. Some parts will be very hot during and after use.
Keep young children away. Appliance shall be used away from fl ammable materials and at least 1 metre away from adjacent surfaces
(wall, ceiling). Be especially careful near fat fryers, electric hobs and sources of naked fl ame.
TO SHUT OFF: 1. Close gas supply off completely by turning Gas Control Knob in the ‘clockwise’ direction.
WARNING: Anti-fl are pipe work means the unit will continue la fl ame for a short period after use.
2. DO NOT SEPARATE GAS CARTRIDGE FROM TORCH WHEN IN USE.
AFTER USE: 1. Check the appliance is clean and dry.
2. Store in a cool, well ventilated place after separating the cartridge from the appliance and replacing cap.
CLEANING AND MAINTENANCE: 1. Keep clean and free of dust and dirt which may affect performance.
2. Clean with damp towel and mild detergent. Do not submerse in fl uids or put in dishwasher. Wipe dry after cleaning.
Separate appliance from gas cartridge before cleaning.
3. Please note there are no user serviceable parts. Do not modify this appliance. If faulty, return appliance to point of purchase.
MANUFACTURERS GUARANTEE: the following invalidates the guarantee
1. If appliance is damaged in transport or by mishandling.
2. Failure to use as instructed.
3. Damage due to improper use or care, or if unit is submersed or left in a damp place.
4. Please note that there are no user serviceable parts. Do not modify this appliance. If faulty return to point of purchase.
DO NOT USE THE APPLIANCE IF IT HAS DAMAGED OR WORN SEALS.
DO NOT USE AN APPLIANCE WHICH IS LEAKING, DAMAGED OR WHICH DOES NOT OPERATE PROPERLY.
APPLIANCE ASSEMBLY: 1. Turn Gas Control Knob to closed '—' (off) position (Fig. 1).
Warning: Failure to ensure knob is off will allow unignited gas to discharge immediately on connection to cartridge.
2. Check the Trigger Lock Button is off (Fig. 2).
3. Check the '0' ring seals before connecting a gas container to the appliance (Fig. 3)
4. Change or reconnect the gas container outside and away from other people.
5. Align cartridge collar notch with locator tab on the Blowlamp and, keeping cartridge upright, push down gently, then twist unit 35° to
the right (Fig. 4).
6. Be sure to check that no gas is leaking. If there is a gas leak on your appliance (smell of gas), take it outside immediately into a well
ventilated, fl ame-free location where the leak may be detected and stopped. If you wish la check for leaks on your appliance, do it
outside. Do not try to detect leaks with a fl ame, use soapy water.
IGNITION: 1. Turn the Gas Control Knob slowly in the '+' direction to start gas fl owing (Fig. 5) then operate the trigger to ignite.
Hold trigger to maintain ignition (Fig. 6) or push Trigger Lock Button to the on position (Fig. 7).
To turn Trigger Lock Button off, push and release trigger.
2. Repeat if unit fails to light
USE: Adjust fl ame by turning Gas Control Knob between '—' and '+' (low and high heat) position as required. To focus the fl ame adjust
Flame Focus Control. This unit is anti-fl are as gas is preheated before burning however be aware of the phenomenon of fl aring which
may occur during the fi ve second warm-up period during which the appliance should not be angled more than 15° from the vertical
(upright). After running for two minute’s the appliance is preheated and can be used at any angle without fl aring. Keeping tab to top
reduces fl aring.
GAS CARTRIDGE CARE: 1. Use only Bright Spark® Catering Cartridge or Butane Battery® A4 gas cartridges. It may be hazardous to
attempt to fi t other types of gas containers.
2. Inspect the gas cartridge for damage or rust before use.
3. Do not store gas cartridges in areas where temperatures may rise over 40°C such as inside the boot of a vehicle parked in hot sun,
near cookers, burners or fat fryers or in direct sunlight.
4. Detach blowtorch from gas cartridge when not in use and store in a cool dry place.
5. Do not incinerate even when empty.
APPLIANCE ASSEMBLY AND IGNITION

514006 fr ma 2013.06
*514.006 FLAMETASTIC PRO - MODE D'EMPLOI
A N'UTILISER QUE DANS DES ZONES CONVENABLEMENT AÉRÉES
IMPORTANT: Lisez attentivement ce mode d'emploi afi n de vous familiariser avec l'appareil avant de le connecter a la bonbonne de gaz.
Conservez le pour les utilisations ultérieures.
N'utiliser cet ustensile qu'avec Des cartouches de gaz Bright Spark® type catering cartridge ou Butane Battery® A4. Certains éléments
seront très chauds pendant et après usage.
Maintenir a distance des jeunes enfants. Cet appareil doit être utilise loin de matériaux infl ammables et a au moins 1 mètre des surfaces
adjacentes (mur, plafond). Soyez particulièrement prudents prés des friteuses, des plaques éclectiques et des sources de fl ammes nues.
FERMETURE: 1. Fermer complètement l'arrivée de gaz en tournant le bouton de contrôle du gaz dans le sens des aiguilles d'une
montre.
ATTENTION: à cause du conduit anti-brûlage, la fl amme va subsister pendant une courte période après usage
2.
ASSUREZ VOUS QUE LE GAZ EST BIEN ETEINT,PUIS DETACHEZ L'APPAREIL DE LA BOUTEILLE DE GAZ APRES USAGE.
APRES USAGE: 1. Vérifi ez que l‘appareil est propre et sec.
2. Conservez dans un
endroit frais et convenablement aéré après avoir détaché la bouteille de l'appareil et replace le bouchon.
NETTOYAGE ET MAINTENANCE: 1. L'appareil doit rester propre, la poussière et la saleté peuvent affecter sa performance.
2. Nettoyez avec un chiffon humide et un nettoyant doux. ne pas immerger dans du liquide ni mettre
dans le lave-vaisselle. Séchez l'appareil après le nettoyage. Détachez l'appareil de la bouteille de gaz avant le nettoyage.
3. Veuillez noter qu'il n'y a pas d'éléments remplaçables. Ne modifi ez pas cet appareil. S'il est défectueux, ramenez-le au point d'achat.
GARANTIE DES FABRICANTS: Les incidents suivants invalident la garantie.
1. Dégradation de l'appareil lors du transport ou a cause d'une mauvaise manipulation.
2. Manipulation contraire au mode d'emploi.
3. Dégradation due a un mauvais usage ou entretien, ou bien si l'appareil est immerge ou laissé dans un endroit humide.
4. Veuillez noter qu'il n'y a pas d'éléments remplaçables par l'utilisateur. Ne modifi ez pas cet appareil. S'il est défectueux, ramenez-le au
point d'achat.
N’UTILLSEZ PAS CET APPAREIL SI SES JOINTS SONT ENDOMMAGES OU USES. N’UTILISEZ PAS UN APPAREIL QUI
FUIT, EST ENDOMMAGE OU NE FONCTIONNE PAS CORRECTEMENT.
ASSEMBLAGE DE L’APPAREIL: 1. Tournez le bouton de contrôle en position Fermée '–'.
ATTENTION: l’absence de vérifi cation de la position du bouton permettra au gaz non allume de se décharger immédiatement après
connexion a la bouteille.
2. Vérifi er que le cran d’arrêt de la gâchette n’est pas enfoncé (fi g. 2).
3. Vérifi ez les joints annulaires en ‘0’ avant de connecter une bouteille de gaz a l’appareil.
4. Changez ou attachez a nouveau la bouteille de gaz a l‘extérieur et loin d’autres personnes.
5. Alignez l’encoche de la bouteille avec l’onglet rabatteur sur la lampe a souder et, en maintenant la bouteille a la verticale,
pressez doucement, puis tournez l’appareil a 35° vers la droite.
6. Vérifi ez bien qu’il n’ya aucune fuite de gaz. En cas de fuite sur l’appareil (odeur de gaz), sortez-le immédiatement dans un endroit
bien aéré, sans fl amme, où la fuite pourra être détectée et arrêtée. Si vous souhaitez vérifi ez les fuites sur votre appareil, faites-le à
l’extérieur. N’essayez pas de détecter les fuites avec une fl amme, utilisez de l’eau savonneuse.
ALLUMAGE: 1. Tourner lentement le bouton de commande vers le plus '+' pour laisser s’échapper du gaz (fi g. 5), puis appuyer sur la
gâchette pour allumer le gaz. Pour que la fl amme persiste, maintenir la gâchette enfoncée (fi g. 6) ou enclencher le cran d’arrêt (fi g. 7).
Pour libérer le cran d’arrêt, enfoncer puis relâcher la gâchette.
2. Si aucune fl amme n’apparait, recommencer l’opération.
UTILISATION: Pour ajuster la longueur de la fl amme, tourner le bouton de commande dans un sens ou dans l’autre (+/–). Pour
concentrer ou diffuser la fl amme, ajuster la bague de concentration de fl amme. L’ustensile est équipe d’un dispositif anti-embrasement qui
préchauffe le gaz avant sa combustion, cependant il demeure un risque d’embrasement pendant la période de préchauffage, notamment
au cours des 5 premières secondes d’utilisation, particulièrement si l’on incline l’ustensile de plus de 15° par rapport a la verticale
(debout). Apres deux minutes d’utilisation, l’ustensile est chaud et peut être utilise dans n’importe quelle position sans risque d’embrasement.
ENTRETIEN DE LA BOUTEILLE DE GAZ: 1. n’utiliser que des cartouches de gaz Bright Spark® type Catering Cartridge ou Butane
Battery® A4. L’utilisation de cartouches de gaz d’un autre type serait dangereuse.
2. Inspectez la bouteille de gaz avant utilisation pour détecter les dégradations ou la rouille.
3. Ne conservez pas les bouteilles de gaz dans des zones ou les températures peuvent monter jusqu’a 40°C, telles que l’intérieur d’un
véhicule garé en plein soleil, près d’une cuisinière, de brûleurs, de friteuses ou a la lumière directe du soleil.
4. Détachez la lampe a souder de la bouteille de gaz hors des périodes d’utilisation et conservez dans un endroit frais et sec.
5. Ne pas incinérer l’appareil, même vide
ASSEMBLAGE ET ALLUMAGE DE L’APPAREIL
Product specificaties
| Merk: | Bright Spark |
| Categorie: | Niet gecategoriseerd |
| Model: | Flametastic Pro 514006 |
Heb je hulp nodig?
Als je hulp nodig hebt met Bright Spark Flametastic Pro 514006 stel dan hieronder een vraag en andere gebruikers zullen je antwoorden
Handleiding Niet gecategoriseerd Bright Spark

7 Februari 2024

6 Februari 2024
Handleiding Niet gecategoriseerd
- DataVideo
- Renegade
- Masport
- Woods
- Delfield
- Monacor
- Saro
- RCS
- Amazon
- RectorSeal
- Twisper
- Batronix
- Needit
- King
- Audiovox
Nieuwste handleidingen voor Niet gecategoriseerd
16 September 2025
16 September 2025
16 September 2025

16 September 2025
16 September 2025
16 September 2025

16 September 2025

16 September 2025
16 September 2025

16 September 2025