Behringer 904A Handleiding
Bekijk gratis de handleiding van Behringer 904A (2 pagina’s), behorend tot de categorie Niet gecategoriseerd. Deze gids werd als nuttig beoordeeld door 253 mensen en kreeg gemiddeld 4.3 sterren uit 127 reviews. Heb je een vraag over Behringer 904A of wil je andere gebruikers van dit product iets vragen? Stel een vraag
Pagina 1/2

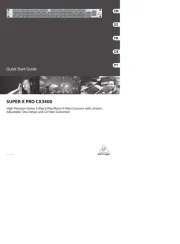
Quick Start Guide
904A VOLTAGE CONTROLLED
LOW PASS FILTER
Legendary Analog Low Pass VCF
Module for Eurorack
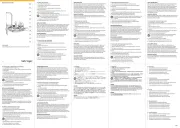
Controls
(1) FIXED CONTROL VOLTAGE – Also referred to as “cuto
frequency”, this knob manually determines the frequency
above which frequencies are attenuated. The resulting
frequency will depend on this knob’s setting as well as
voltage received from the control inputs.
(2) FREQUENCY RANGE – Select one of 3 frequency bands
in which the xed control voltage operates. Position 1 is
1 Hz to 5 kHz, position 2 is 4 Hz to 20 kHz, and position 3 is
16 Hz to 80 kHz.
(3) REGENERATION – This knob varies the amount of
internal feedback, creating a resonant peak at the cuto
frequency. At higher settings this becomes self-oscillation.
(4) SIGNAL INPUT – Connect the incoming signal via 3.5 mm
TS cable.
(5) SIGNAL OUTPUT – Send the processed signal to another
module via 3.5 mm TS cable.
(6) CONTROL INPUTS – Connect control voltage signals from
other modules to a ect the cuto frequency. The sum of
the voltage received doubles the frequency cuto point
for each 1 V increase.
Power Connection
The 904A comes with the required power cable for connecting
to a standard Eurorack power supply system. Follow these
steps to connect power to the module. It is easier to make
these connections before the module has been mounted into
a rack case.
1. Turn the power supply or rack case power o and
disconnect the power cable.
2. Insert the 16-pin connector on the power cable into the
socket on the power supply or rack case. The connector has
a tab that will align with the gap in the socket, so it cannot
be inserted incorrectly. If the power supply does not have
a keyed socket, be sure to orient pin 1 (-12 V) with the red
stripe on the cable.
3. Insert the 10-pin connector into the socket on the back of
the module. The connector has a tab that will align with the
socket for correct orientation.
4. After both ends of the power cable have been securely
attached, you may mount the module in a case and turn on
the power supply.
Installation
The necessary screws are included with the module for mounting
in a Eurorack case. Connect the power cable before mounting.
Depending on the rack case, there may be a series of xed holes
spaced 2 HP apart along the length of the case, or a track that
allows individual threaded plates to slide along the length
of the case. The free-moving threaded plates allow precise
positioning of the module, but each plate should be positioned in
the approximate relation to the mounting holes in your module
before attaching the screws.
Hold the module against the Eurorack rails so that each of the
mounting holes are aligned with a threaded rail or threaded
plate. Attach the screws part way to start, which will allow
small adjustments to the positioning while you get them all
aligned. After the nal position has been established, tighten the
screws down.
(1)
(3)
(4) (5)
(6
)
(2)

Speci cations
Controls
Fixed control voltage +/-6 V, summed with
CV inputs
Frequency range selector
1 = 1 Hz to 5 kHz,
24 dB per octave
2 = 4 Hz to 20 kHz,
24 dB per octave
3 = 16 Hz to 80 kHz,
24 dB per octave
Regeneration O to full feedback
Signal Input
Type 3.5 mm jack, DC coupled
Impedance 10 kΩ, unbalanced
Maximum input level +10 dBu
Signal Output
Type 3.5 mm jack, AC coupled
Impedance 1 kΩ, unbalanced
Maximum output level +10 dBu
Output noise <-78 dBu, 22 Hz - 22 kHz
Control Inputs
Type 3 x 3.5 mm jacks, summed
Impedance 100 kΩ, unbalanced
CV range 1 V / octave,
12-octave range
Power
Power supply Eurorack
Current draw 65 mA (+12 V),
50 mA (-12 V)
Physical
Dimensions 40 x 129 x 38 mm
(1.6 x 5.1 x 1.5")
Rack units 8 HP
Weight 0.10 kg (0.22 lbs)
LEGAL DISCLAIMER
Music Tribe accepts no liability for any loss which may be su ered by any
person who relies either wholly or in part upon any description, photograph,
or statement contained herein. Technical speci cations, appearances and
other information are subject to change without notice. All trademarks are the
property of their respective owners. Midas, Klark Teknik, Lab Gruppen, Lake,
Tannoy, Turbosound, TC Electronic, TC Helicon, Behringer, Bugera, Auratone
and Coolaudio are trademarks or registered trademarks of Music Tribe
Global Brands Ltd. © Music Tribe Global Brands Ltd. 2019 All rights reserved.
LIMITED WARRANTY
For the applicable warranty terms and conditions and additional information
regarding Music Tribe’s Limited Warranty, please see complete details online
at musictribe.com/warranty.
Zhongshan Eurotec Electronics Limited
No. 10 Wanmei Road, South China Modern Chinese Medicine Park,
Nanlang Town, 528451, Zhongshan City, Guangdong Province, China
Product specificaties
| Merk: | Behringer |
| Categorie: | Niet gecategoriseerd |
| Model: | 904A |
Heb je hulp nodig?
Als je hulp nodig hebt met Behringer 904A stel dan hieronder een vraag en andere gebruikers zullen je antwoorden
Handleiding Niet gecategoriseerd Behringer
16 Juni 2025

1 April 2025
1 April 2025
1 April 2025

6 Januari 2025

6 Januari 2025

6 Januari 2025

6 Januari 2025

6 Januari 2025

6 Januari 2025
Handleiding Niet gecategoriseerd
- Lingg & Janke
- MARTOR
- Gem Toys
- Cotech
- The T.bone
- HQ Power
- Robens
- Arendo
- Imperia
- Middle Atlantic
- Harder & Steenbeck
- Pro-Ject
- Vonroc
- Victor Technology
- Holland Electronics
Nieuwste handleidingen voor Niet gecategoriseerd

14 September 2025

13 September 2025

13 September 2025

13 September 2025

13 September 2025

13 September 2025

13 September 2025

13 September 2025

13 September 2025
13 September 2025