AVM FRITZ!Box 5491 Handleiding
AVM Niet gecategoriseerd FRITZ!Box 5491
Bekijk gratis de handleiding van AVM FRITZ!Box 5491 (3 pagina’s), behorend tot de categorie Niet gecategoriseerd. Deze gids werd als nuttig beoordeeld door 46 mensen en kreeg gemiddeld 4.2 sterren uit 4 reviews. Heb je een vraag over AVM FRITZ!Box 5491 of wil je andere gebruikers van dit product iets vragen? Stel een vraag
Pagina 1/3
PEFC
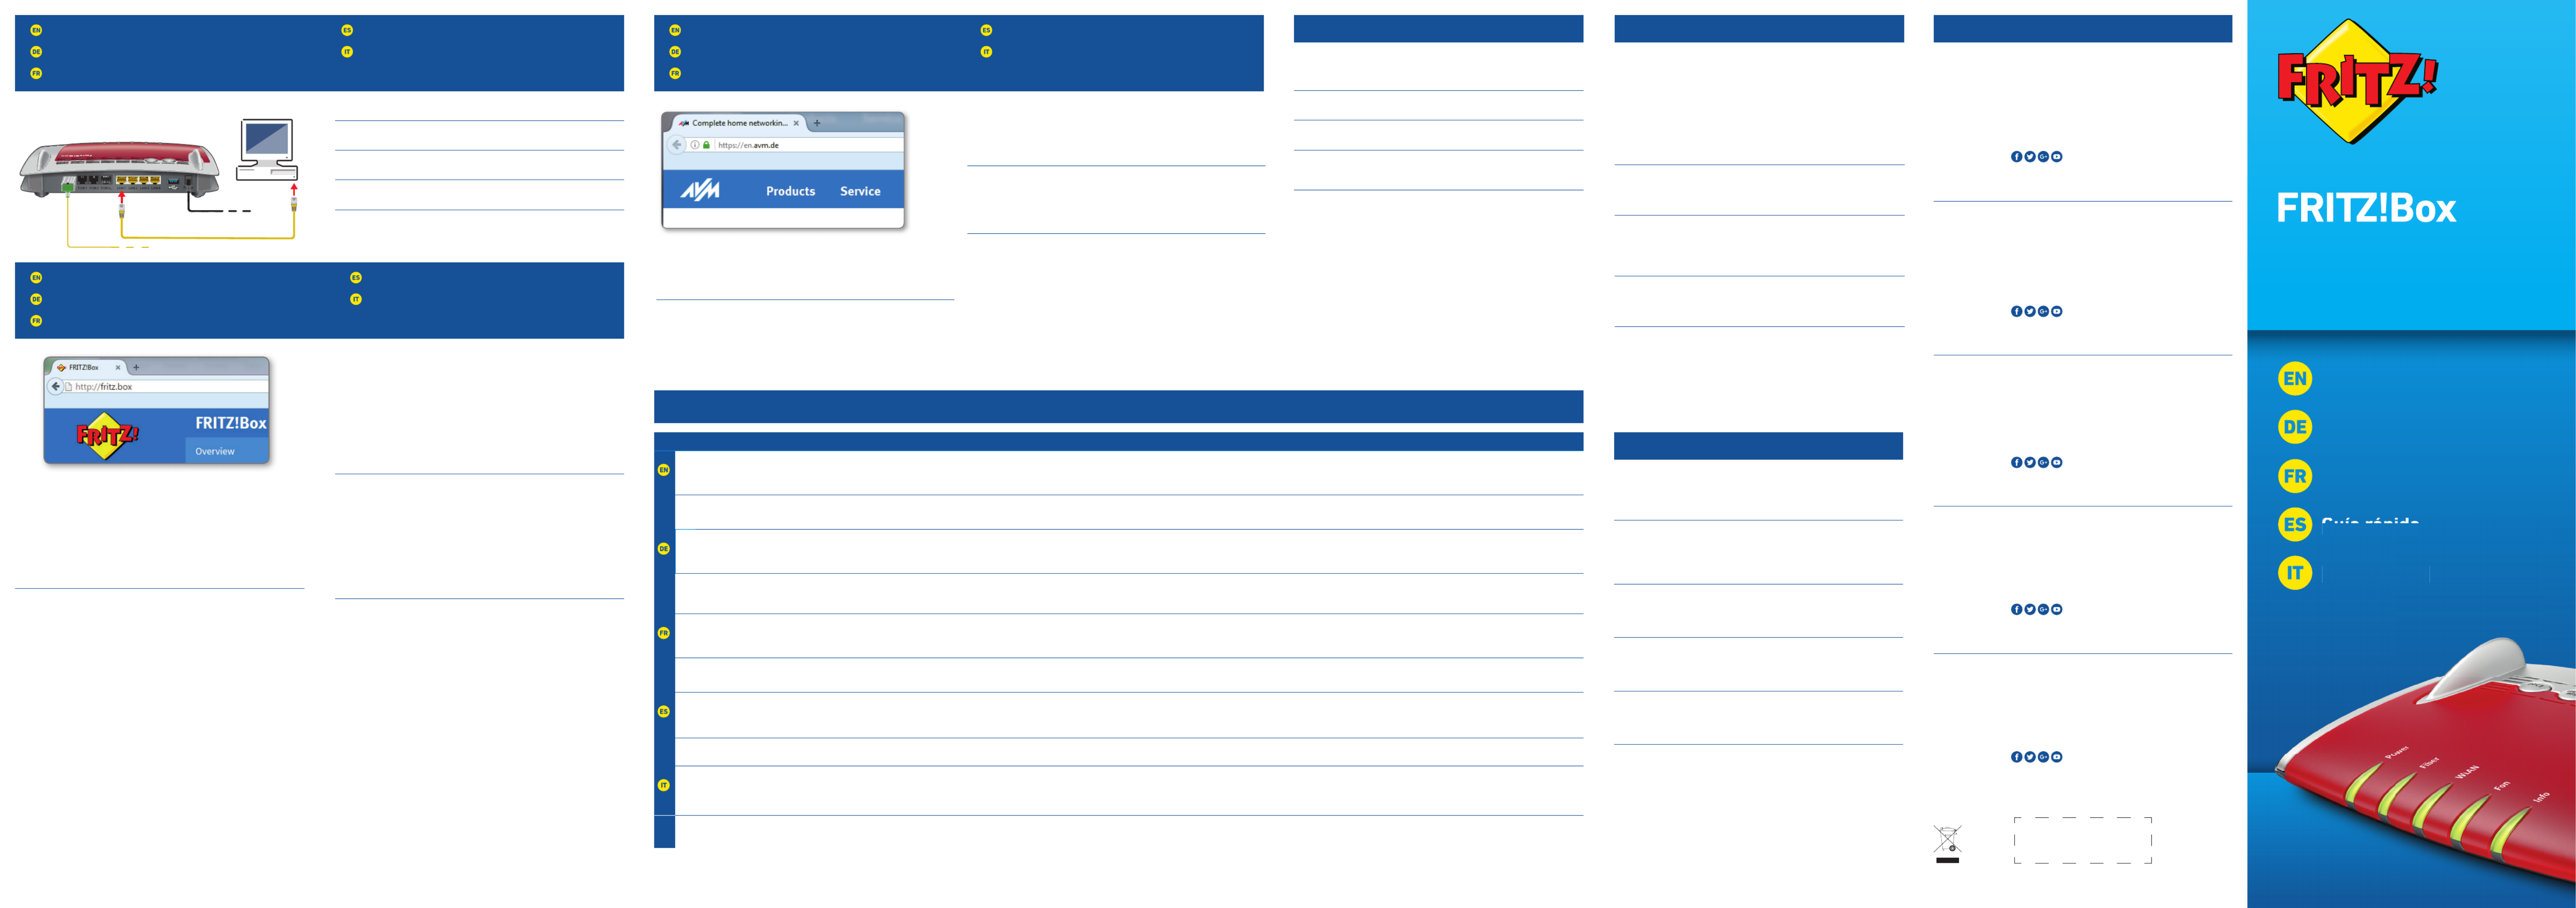
Connecting a Computer to the LAN Port
Computer an LAN anschließen
Connexion d’un ordinateur au réseau local
Conexión a través de LAN
Collegamento di un computer alla rete LAN
LED
USB
Quick Guide
Kurzanleitung
Notice abrégée
Guía rápida
5491
Guía
rápida
Guida rapid
a
Configuration with http://fritz.box
Einrichten mit http://fritz.box
Configurer avec http://fritz.box
Configurar en la interfaz web http://fritz.box
Configurazione con http://fritz.box
Surfing the Net
Im Internet surfen
Naviguer sur Internet
Navegar en Internet
Navigazione su Internet
© AVM Computersysteme Vertriebs GmbH • Documentation release 08/2018 • 521546002
You can connect computers to the FRITZ!Box using the yellow network cable.
Sie können Ihren Computer mit einem LAN-Kabel mit der FRITZ!Box
verbinden.
Vous pouvez raccorder votre ordinateur à FRITZ!Box à l’aide du câble réseau
jaune.
A su FRITZ!Box podrá conectar ordenadores con la ayuda del cable de red
amarillo.
Potete collegare i computer al FRITZ!Box con il cavo di rete giallo.
As soon as the FRITZ!Box has been configured with your account information,
you can surf the web using all connected computers.
• Start a web browser.
• Enter a web address.
Sobald die FRITZ!Box mit Ihren Zugangsdaten eingerichtet ist, können Sie mit
allen angeschlossenen Computern im Internet surfen.
• Starten Sie einen Internetbrowser.
• Geben Sie eine Internetadresse ein.
Dès que votre FRITZ!Box est configurée avec vos données d’accès, vous pouvez
commencer à naviguer sur Internet avec tous les ordinateurs connectés.
• Lancez un navigateur Internet.
• Saisissez une adresse Internet.
Una vez haya instalado e indicado en su FRITZ!Box los datos de acceso podrá
navegar de inmediato desde cualquiera de los ordenadores conectados.
• Inicie un navegador de Internet.
• Indique una dirección de Internet.
Non appena avete terminato la configurazione del FRITZ!Box con i vostri dati di
accesso, potete navigare in Internet con tutti i computer collegati.
• Avviate un browser web.
• Immettete un indirizzo Internet.
The FRITZ!Box has two USB ports to which you can connect various USB
devices. All computers in the network can use the USB devices that you
connect to these ports.
Die FRITZ!Box hat zwei USB-Anschlüsse. Alle Computer im Netzwerk können
die USB-Geräte verwenden, die Sie an diesen Anschlüssen anschließen.
FRITZ!Box a deux ports USB. Les périphériques USB reliés à ces deux ports
peuvent être utilisés par tous les ordinateurs connectés au sein du réseau.
Su FRITZ!Box tiene dos puertos de conexión USB. Los dispositivos USB que
conecte a estos puertos podrán ser utilizados por todos ordenadores que se
encuentren en su red.
Il FRITZ!Box è dotato di due porte USB. Tutti i computer della rete possono
usare i dispositivi USB collegati a queste porte.
Power FiberWLANFonInfo
flashing
Adopting the wireless LAN
settings, switching the radio
network on or off, performing
WPS
Flashes when voice messages are waiting in
the network
green: Updating FRITZ!OS, Stick & Surf procedure in progress, freely
configurable
red: An error occurred, open a web browser and enter http://fritz.box
on
FRITZ!Box is ready for operationAn internet connection is activeWireless LAN functionality activeA telephone connection is actiSurf procedure has been concluded, freely convegreen: The Stick &figurable
red: An error occurred, open a web browser and enter http://fritz.box
blinkt
WLAN-Einstellungen werden
übernommen, Funknetz wird ein-
oder ausgeschaltet, WPS wird
ausgeführt
Blinkt bei Sprachnachrichten im Netzgrün: FRITZ!OS wird aktualisiert, Stick & Surf läuft,
frei einstellbar
rot: Es ist ein Fehler aufgetreten: Öffnen Sie http://fritz.box im Browser
leuchtet
FRITZ!Box ist betriebsbereitEine Internetverbindung bestehtWLAN-Funktion ist aktivEine Telefonverbindung bestehtgrün: Stick & Surf ist abgeschlossen, frei einstellbar
rot: Es ist ein Fehler aufgetreten: Öffnen Sie http://fritz.box im Browser
clignote
Les paramètres sans fil vont être
acceptés, le réseau sans fil est en
cours de (dés)activation, le WPS
est en cours d’exécution
Clignote en cas de messages vocaux au sein
du réseau
vert: FRITZ!OS est en cours de mise à jour, l’opération Stick& Surf est en cours,
réglage libre
rouge : une erreur s’est produite. Ouvrez un navigateur Internet puis saisissez
l’adresse http://fritz.box
allumé
FRITZ!Box est en état de
fonctionner
Une liaison Internet est en coursLa fonction sans fil est activeUne communication téléphonique est en
cours
vert : l’opération Stick & Surf est terminée, réglage libre
rouge : une erreur s’est produite. Ouvrez un navigateur Internet puis saisissez
l’adresse http://fritz.box
parpadea
Se está ajustando la
configuración WiFi. Se está
activando/desactivando WiFi. Se
está ejecutando WPS
Parpadea si hay un mensaje de voz en la redverde: se está actualizando el FRITZ!OS, se está ejecutando Stick & Surf,
configurable
rojo: error. Abra http://fritz.box en el navegador
brilla
FRITZ!Box está funcionandoExiste una conexión a InternetLa red inalámbrica se encuentra
activa
Se está realizando una
conexión telefónica
verde: se p1-ha concluido Stick & Surf, configurable
rojo: error. Abra http://fritz.box en el navegador
lampeggia
Le impostazioni wireless vengono
applicate. La rete wireless viene
attivata o disattivata. È in corso
l’esecuzione di WPS
Lampeggia per i messaggi vocali in reteverde: l’aggiornamento di FRITZ!OS è in corso, il procedimento Stick & Surf è in
corso, impostabile
rosso: si è verificato un errore. Aprite un browser web e digitate http://fritz.box
acceso
Disponibilità del FRITZ!BoxÈ attiva una connessione InternetLa funzione wireless è attivaÈ attiva una connessione telefonicaverde: il procedimento Stick& Surf è concluso, impostabile
rosso: si è verificato un errore. Aprite un browser web e digitate http://fritz.box
Service
CE
Radio Frequency Specifications
AVM declares herewith that the device is compliant with the basic
requirements and the relevant rules in directives 2014/53/EU,
2009/125/EC and 2011/65/EU. The long version of the declaration of CE
conformity is available at http://en.avm.de/ce.
Hiermit erklärt AVM, dass sich das Gerät in Übereinstimmung mit den
grundlegenden Anforderungen und den anderen relevanten Vorschriften der
Richtlinien 2014/53/EU, 2009/125/EG sowie 2011/65/EU befindet.
Die Langfassung der CE-Konformitätserklärung fi nden Sie in englischer
Sprache unter http://en.avm.de/ce.
Hiermee verklaart AVM dat het apparaat overeenstemt met de fundamentele
vereisten en de andere relevante voorschriften van de richtlijnen 2014/53/EU,
2009/125/EG en 2011/65/EU. De EG-verklaring van overeenstemming vindt u
in het Engels op http://en.avm.de/ce.
AVM déclare par la présente que l’appareil est conforme aux exigences
essentielles et aux instructions pertinentes des directives 2014/53/UE,
2009/125/CE et 2011/65/UE. Vous trouverez la version longue de la déclaration
de conformité CE à l’adresse http://en.avm.de/ce(en langue anglaise).
Por la presente declara AVM, que el dispositivo cumple con los requisitos
esenciales y las disposiciones pertinentes de las Directivas 2014/53/UE,
2009/125/EC y 2011/65/UE. Podrá descargar la versión completa de la
declaración CE (en idioma inglés) en la página http://en.avm.de/ce.
AVM dichiara che il dispositivo è conforme ai requisiti fondamentali e alle
disposizioni inerenti delle direttive 2014/53/UE, 2009/125/CE e 2011/65/UE.
Il testo integrale della dichiarazione di conformità CE è disponibile in lingua
inglese all’indirizzo http://en.avm.de/ce.
WLAN /WiFi
2,4-GHz: 2,4 GHz – 2,483 GHz, max. 100 mW
5-GHz: 5,15 GHz – 5,35 GHz, max. 200 mW, 5,47 GHz – 5,725 GHz,
max. 1000mW
In the 5-GHz band for wireless LAN, the range from 5.15 GHz to 5.35 GHz is
intended only for indoor use. This restriction or requirement is effective in the
EU member states AT, BE, BG, CY, CZ, DE, DK, EE, EL, ES, FI, FR, HR, HU, IE, IT,
LT, LU, LV, MT, NL, PL, PT, RO, SE, SI, SK, UK
Der Bereich von 5,15 GHz bis 5,35GHz ist nur für den Betrieb in
geschlossenen Räumen bestimmt. Diese Beschränkung oder Anforderung gilt
in den EU-Mitgliedsstaaten AT, BE, BG, CY, CZ, DE, DK, EE, EL, ES, FI, FR, HR, HU,
IE, IT, LT, LU, LV, MT, NL, PL, PT, RO, SE, SI, SK, UK.
Dans la bande des 5GHz destinée aux réseaux sans fil, la plage comprise
entre 5,15 GHz et 5,35 GHz est réservée à une utilisation à l’intérieur. Cette
restriction ou exigence s’applique dans les États membres de l’UE suivants:
AT, BE, BG, CY, CZ, DE, DK, EE, EL, ES, FI, FR, HR, HU, IE, IT, LT, LU, LV, MT, NL, PL,
PT, RO, SE, SI, SK, UK.
En la banda de 5 GHz para la red inalámbrica, el rango de 5,15 GHz a 5,35 GHz
está destinado solo para uso en interiores. Esta restricción o requisito se
aplica en los estados miembros de la Unión Europea: AT, BE, BG, CY, CZ, DE,
DK, EE, EL, ES, FI, FR, HR, HU, IE, IT, LT, LU, LV, MT, NL, PL, PT, RO, SE, SI, SK, UK.
Nella banda a 5GHz il campo compreso tra 5,15GHz e 5,35 GHz è adatto solo
per l’utilizzo in ambienti chiusi. Questa restrizione o requisito si applica negli
stati membri dell’UE: AT, BE, BG, CY, CZ, DE, DK, EE, EL, ES, FI, FR, HR, HU, IE, IT,
LT, LU, LV, MT, NL, PL, PT, RO, SE, SI, SK, UK.
DECT
1880 MHz – 1900 MHz, max. 250 mW
• Set up the FRITZ!Box for internet connections in the user interface. Open
an internet browser and enter http://fritz.box.
• Follow the instructions on the screen and enter your FRITZ!Box
password. Your FRITZ!Box password is printed on a sticker on the base of
the FRITZ!Box and on your “FRITZ! Notice” service card.
• Follow the further instructions on the screen and enter your internet
account information that you received from your internet service provider
in a separate mailing.
Have fun surfing with your FRITZ!Box!
• Die FRITZ!Box hat eine Benutzeroberfläche, in der Sie die Verbindung zum
Internet einrichten. Geben Sie dazuin einem Internetbrowser http://fritz.
box ein.
• Folgen Sie den Anweisungen auf dem Bildschirm und geben Sie
Ihr FRITZ!Box-Kennwort ein. Ihr FRITZ!Box-Kennwort steht auf der
Unterseite der FRITZ!Box und auf Ihrer Servicekarte „FRITZ! Notiz“.
• Folgen Sie weiter den Anweisungen auf dem Bildschirm und geben Sie
Ihre Internetzugangsdaten ein, die Sie in einem separaten Schreiben von
Ihrem Internetanbieter erhalten haben.
Wir wünschen Ihnen viel Spaß beim Surfen mit Ihrer FRITZ!Box.
• Configurez les connexions Internet de FRITZ!Box sur l’interface utili-
sateur. Lancez un navigateur Internet puis saisissez http://fritz.box.
• Suivez les instructions qui apparaissent sur votre écran, et saisissez votre
mot de passe FRITZ!Box. Celui-ci figure sur la partie inférieure de votre
FRITZ!Box et sur la fiche d’information « FRITZ! Notice » .
• Continuez à suivre les instructions qui apparaissent sur votre écran,
et saisissez vos données daccès à Internet’ qui vous ont été envoyées
séparément par votre fournisseur d’accès à Internet.
Désormais, vous pourrez profiter pleinement de la navigation avec votre
FRITZ!Box.
• En la interfaz de usuario podrá configurar su FRITZ!Box para las
conexiones a Internet. Abra su navegador web e indique
http://fritz.box.
• Siga las instrucciones e indique la contraseña de su FRITZ!Box. La
contraseña se encuentra en la parte inferior de su FRITZ!Box y en la
tarjeta de servicio “FRITZ! Notice”.
• Continúe e indique los datos de acceso a Internetque habrá recibido en
una carta especial de su proveedor de Internet.
¡Esperamos que aproveche al máximo y disfrute todas las ventajas que le
ofrece su FRITZ!Box!
• Nell’interfaccia utente si configura il FRITZ!Box per le connessioni
Internet. Avviate un browser web e digitate http://fritz.box.
• Seguite le istruzioni dello schermo e immettete la vostra password per il
FRITZ!Box che si trova alla base del FRITZ!Box e nella scheda di servizio
„FRITZ! Notiz“.
• Seguite le istruzioni dello schermo e immettete i dati di accesso a
Internet, qui vi sono stati forniti in un’apposita lettera del vostro provider
di Internet.
Vi auguriamo buona navigazione con il FRITZ!Box!
Service information and help can be found on our website and in the social
networks:
Service en.avm.de/service
Manual en.avm.de/service/manuals
Guide en.avm.de/guide
Download en.avm.de/nc/service/downloads
Support requesten.avm.de/service/support-request/your-support-request
Social networks
Legal notices and technical specifications are presented in the FRITZ!Box help
and in the manual.
Service und Hilfe finden Sie auf unseren Internetseiten und in den sozialen
Netzwerken:
Service avm.de/service
Handbuch avm.de/handbuecher
Ratgeber avm.de/ratgeber
Updates avm.de/download
Support avm.de/support
Netzwerke
Rechtliche Hinweise und technische Daten finden Sie in der FRITZ!Box-Hilfe und
im Handbuch.
Vous trouverez nos services et notre aide sur notre site et dans les réseaux
sociaux :
Service be.avm.de/fr/service
Manuel be.avm.de/fr/service/manuels
Conseils be.avm.de/fr/conseils
Téléchargements be.avm.de/fr/nc/service/telechargements
Support techniquebe.avm.de/fr/service/ondersteuning/selection-de-produit
Réseaux sociaux
Vous trouverez nos mentions légales et spécifications techniques dans l’aide de
la FRITZ!Box et dans le manuel.
En nuestro sitio web y en las redes sociales podrá encontrar ayuda y asistencia:
Servicio es.avm.de/servicio
Manual es.avm.de/servicio/manuales-de-usuario
Consejos útileses.avm.de/consejos-utiles
Descargas es.avm.de/nc/servicio/descargas
Soporte técnicoes.avm.de/servicio/solicitud-de-soporte-tecnico/seleccion-
de-productos
Redes sociales
La información legal y los datos técnicos de su FRITZ!Box se encuentran en la
ayuda y en el manual de usuario.
Sul nostro sito web e sui social network potete trovare aiuto e assistenza:
Assistenza it.avm.de/assistenza
Manual it.avm.de/assistenza/manuali
Guida it.avm.de/guida
Download it.avm.de/nc/assistenza/download
Support requestit.avm.de/assistenza/richiesta-di-assistenza/selezione-
prodotti
Social networks
Nella guida del FRITZ!Box e nel manuale potete trovare le informazioni legali e i
dati tecnici.
Power
Fiber
WLAN
FON
Info
WLAN
WP
S
DECT
FON
1 FON
2 FON
S0LAN
1 LAN
2 LAN
3 LAN
4 Power
Product specificaties
| Merk: | AVM |
| Categorie: | Niet gecategoriseerd |
| Model: | FRITZ!Box 5491 |
Heb je hulp nodig?
Als je hulp nodig hebt met AVM FRITZ!Box 5491 stel dan hieronder een vraag en andere gebruikers zullen je antwoorden
Handleiding Niet gecategoriseerd AVM

18 Januari 2026
29 Oktober 2025
31 Augustus 2025
5 Augustus 2025
12 Juni 2025
10 Juni 2025
10 Juni 2025
10 Juni 2025
9 Juni 2025
12 April 2025
Handleiding Niet gecategoriseerd
Nieuwste handleidingen voor Niet gecategoriseerd
8 Juni 2026
8 Juni 2026
8 Juni 2026
8 Juni 2026
8 Juni 2026
8 Juni 2026
8 Juni 2026
8 Juni 2026
8 Juni 2026
8 Juni 2026