Audiovox Code Alarm ASCLBTLR Carlink Handleiding
Audiovox Afstandsbediening Code Alarm ASCLBTLR Carlink
Bekijk gratis de handleiding van Audiovox Code Alarm ASCLBTLR Carlink (8 pagina’s), behorend tot de categorie Afstandsbediening. Deze gids werd als nuttig beoordeeld door 87 mensen en kreeg gemiddeld 4.3 sterren uit 7 reviews. Heb je een vraag over Audiovox Code Alarm ASCLBTLR Carlink of wil je andere gebruikers van dit product iets vragen? Stel een vraag
Pagina 1/8
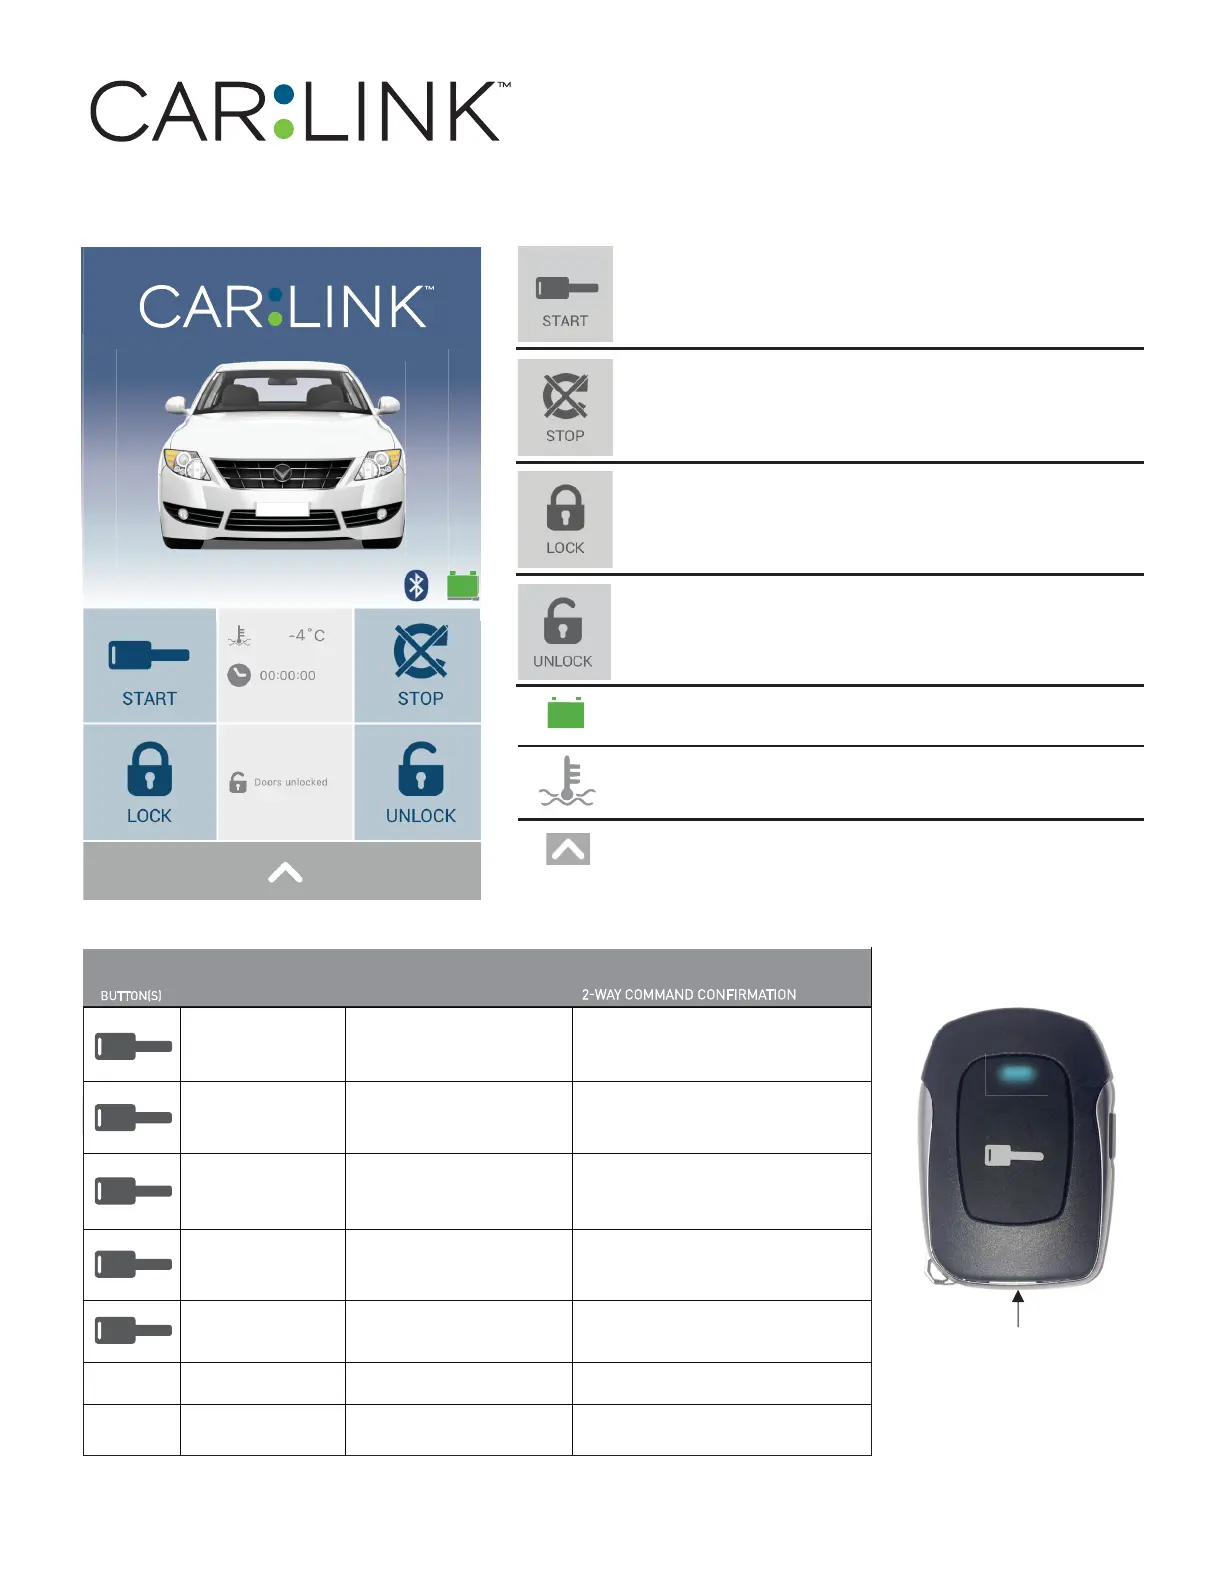
$6&/%7/5
8VHU*XLGH
)RUPRUHGHWDLOHGLQVWUXFWLRQVSOHDVHFRQVXOWWKH+(/3VHFWLRQRIWKH&DU/LQN$SS
%7/RQJ5DQJH
7KLVEXWWRQZLOOVHQGD67$57FRPPDQGWR\RXUYHKLFOH
UHPRWHVWDUWHU7KHYHKLFOHVHQJLQHZLOOVWDUWDQGUXQIRU
WKHSUHVHWWLPH7KHWLPHUZLOOEHJLQWRFRXQWGRZQIURP
WKHSUHVHWUXQWLPHRIWKHUHPRWHVWDUWHU
7KLVEXWWRQZLOOVHQGD6723FRPPDQGWR\RXUYHKLFOHV
UHPRWHVWDUWHU7KHYHKLFOHVHQJLQHZLOOVKXWGRZQDQGWKH
UXQWLPHVWDWXVZLOOFKDQJHWRRQFHWKHDFWLRQKDV
EHHQFRPSOHWHG
7KLVEXWWRQZLOO/2&.DQGRU$50\RXUYHKLFOH<RXU
YHKLFOH0867EHHTXLSSHGZLWKDSRZHUGRRUORFNV\VWHP
IRUWKLVIHDWXUHWRZRUN7KHGRRUORFNVWDWXVZLOOFKDQJH
RQFHWKLVDFWLRQLVFRPSOHWHG
7KLVEXWWRQZLOO81/2&.DQGRU',6$50\RXUYHKLFOH
<RXUYHKLFOH0867EHHTXLSSHGZLWKDSRZHUGRRU
ORFNLQJV\VWHPIRUWKLVIHDWXUHWRZRUN7KHGRRUXQORFN
VWDWXVZLOOFKDQJHRQFHWKLVDFWLRQLVFRPSOHWHG
7KLVLFRQZLOOGLVSOD\WKHYHKLFOHVEDWWHU\YROWDJH
7KLVEXWWRQZLOODOORZ\RXWRDFFHVVWKH$8;,/,$5<
IXQFWLRQV6RPHRIWKHIXQFWLRQVFRXOGEH0RWRUL]HG/LIW
*DWH7UXQN5HOHDVH3RZHU6OLGLQJ'RRUV5HDU'HIURVW
(7&6HH\RXUUHWDLOHUIRUPRUHGHWDLOV
'LVSOD\VWKHFXUUHQWWHPSHUDWXUHLQVLGH\RXUYHKLFOH
'(6&5,37,21
&200$1'
&200$1'
/RFN$UP
8QORFN'LVDUP
ORQJEHHSTXLFNFKLUSVWKHQ
IODVKHVRIWKHJUHHQ/('
6WRS
6WDUW
4XLFNFKLUSIODVKRIWKHJUHHQ/('
TXLFNFKLUSVIODVKHV
RIWKHJUHHQ/('
VKRUWEHHSTXLFNFKLUSVIODVKHV
RIWKHJUHHQ/('
ORQJEHHSTXLFNFKLUSVIODVKHV
RIWKHJUHHQ/('
&21),*85$7,2102'(
3UHVVDQGKROGIRUVHFRQGVXQWLOWKH
TXLFNFKLUSV
3UHVVDQGKROGWKHEXWWRQIRUVHFRQG
XQWLODORQJFKLUSLVKHDUGDQGUHOHDVH
3UHVVDQGKROGWKHEXWWRQIRUVHFRQG
XQWLODORQJFKLUSLVKHDUGDQG
UHOHDVH7KLVZLOOVHQGWKHFRPPDQGWR
VWDUWWKHHQJLQH
3UHVVDQGUHOHDVHEXWWRQWLPHV
ZLWKLQVHFRQGV3URYLGHVWKHDFFHVV
WR\RXUYHKLFOHE\XQORFNLQJWKHGRRUV
DQGGLVDUPLQJWKHIDFWRU\DODUP
4XLFN
SUHVVHV
([WHQGHG
UXQWLPH
3UHVVDQGUHOHDVHEXWWRQ6HFXUHV
\RXUYHKLFOHE\ORFNLQJWKHGRRUV
DQGDUPLQJWKHIDFWRU\DODUP
&RPPDQGQRWUHFHLYHG
ORQJFKLUS
7UDQVPLWFRPPDQG
%OXH/('EOLQNV
[
[
V
V
V
B
B
B
B
0LFUR86%EDWWHU\
FKDUJLQJSRUW
Product specificaties
| Merk: | Audiovox |
| Categorie: | Afstandsbediening |
| Model: | Code Alarm ASCLBTLR Carlink |
Heb je hulp nodig?
Als je hulp nodig hebt met Audiovox Code Alarm ASCLBTLR Carlink stel dan hieronder een vraag en andere gebruikers zullen je antwoorden
Handleiding Afstandsbediening Audiovox

7 Februari 2024
7 Februari 2024
7 Februari 2024
7 Februari 2024
7 Februari 2024
7 Februari 2024
7 Februari 2024
7 Februari 2024
7 Februari 2024
7 Februari 2024
Handleiding Afstandsbediening
Nieuwste handleidingen voor Afstandsbediening
9 Maart 2026
7 Maart 2026
3 Maart 2026
2 Maart 2026
27 Februari 2026
25 Februari 2026
12 Februari 2026
13 Januari 2026
13 Januari 2026
12 Januari 2026