Apc Power-Saving Back-UPS Pro 900 Handleiding
Lees hieronder de 📖 handleiding in het Nederlandse voor Apc Power-Saving Back-UPS Pro 900 (8 pagina's) in de categorie UPS. Deze handleiding was nuttig voor 19 personen en werd door 2 gebruikers gemiddeld met 4.5 sterren beoordeeld
Pagina 1/8

Back-UPS® Pro 900 Installation and Operation
Connect the battery
Install PowerChute® Personal Edition Software
APC PowerChute Personal Edition software provides automatic file saving and shutdown of
your computer in the event of a power failure. Use the cable supplied with the Back-UPS to
connect the data port on the Back-UPS to the USB port on your computer. Place the CD into
your computer, and follow the on-screen instructions.
Inventory Safety
Do not install the Back-UPS in direct
sunlight, in excessive heat, humidity, or
in contact with fluids.
bu00 1a
(2)
bu055a
bu057a
bu059a
bu058a
bu060a
Back-UPS Pro 900 Installation and Operation2
Connect the equipment
Battery Backup and Surge Protected outlets
When the Back-UPS is receiving input power, the
Battery Backup with Surge Protection outlets will
supply power to connected equipment. During a
power outage or other utility problems, the Battery
Backup outlets receive power for a limited time from
the Back-UPS.
Connect equipment such as printers, fax machines,
scanners, or other peripherals that do not need
battery backup power to the Surge Protection Only
outlets. These outlets provide full-time protection
from surges even if the Back-UPS is switched OFF.
Master and Controlled outlets
To conserve electricity, when the device connected
to Master Outlet goes into Sleep or Standby mode, or
turns Off, the Controlled device(s) will shut down as
well, saving electricity.
Connect a master device, such as a desktop
computer or audio/visual receiver to the Master
outlet. Connect peripheral devices such as a printer, speakers, or a scanner to the Controlled outlets.
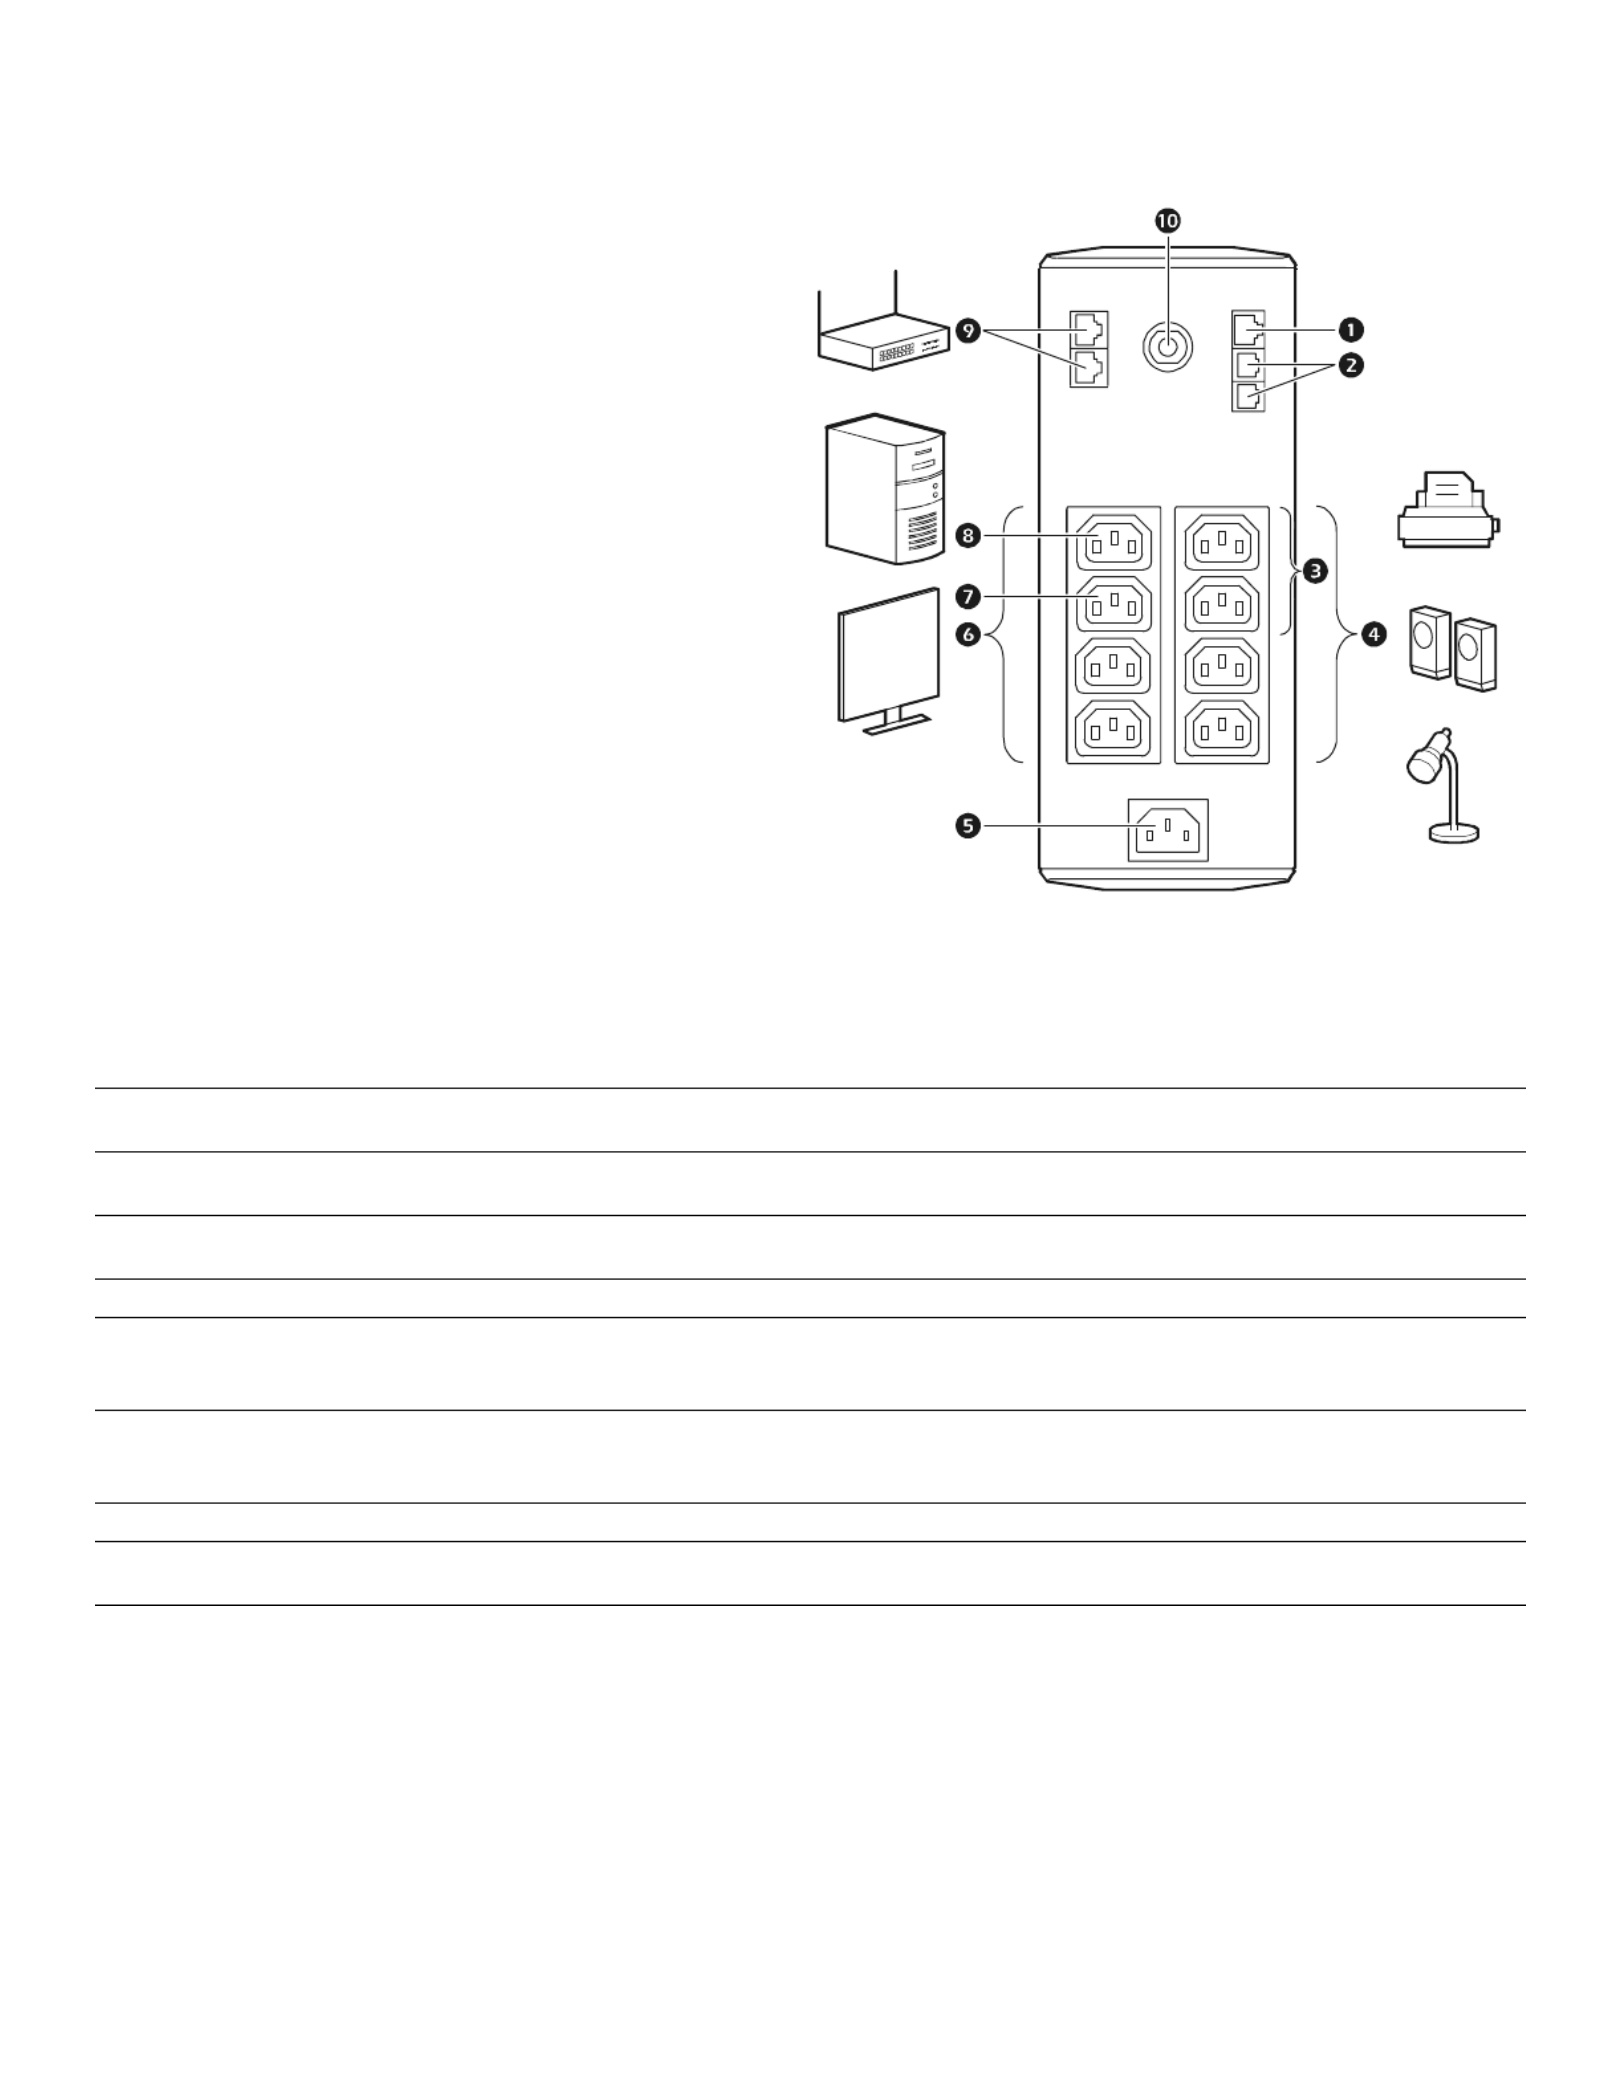
USB and Serial Data port To use PowerChute Personal Edition, connect the supplied USB software cable or optional serial
cable (not included).
Telephone cable surge-protected
ports
Connect a telephone cable to the IN port, and connect a modem to the OUT port.
Surge Protected outlets,
controlled by the Master outlet
These outlets are protected from electrical surges, and will disconnect from utility power during a
power outage, or if the Master device goes into Sleep or Standby mode.
Surge Protected outlets These outlets provide full-time surge protection, even when the unit is turned off. Connect
equipment such as printers and scanners that do not require battery backup protection.
AC power outlet Connect the unit to utility power, use the supplied power cord.
Battery Backup outlets with
Surge Protection
During a power outage or other utility problems, these outlets provide power from battery.
Connect critical equipment such as desktop computer, computer monitor, modem or other data
sensitive devices into these outlets.
Battery Backup outlet with Surge
Protection, controlled by the
Master outlet
These outlets will supply battery power to the connected equipment during a power outage.
Power will be disconnected to these outlets if the Master device goes into Sleep or Standby
mode. Connect equipment such as a computer monitor to these outlets.
Master outlet Connect the master device to this outlet, in most scenarios, this will be the main computer.
In & Out Ethernet surge-
protected ports
Use an Ethernet cable to connect a cable modem to the IN port, and connect a computer to the
OUT port.
Circuit breaker Use to reset the system after an overload or short circuit.
bu130a

Back-UPS Pro 900 Installation and Operation 3
Operation
Power-Saving Function
To conserve electricity, configure the Back-UPS to recognize a Master device, such as a desktop
computer or an A/V receiver, and Controlled peripheral devices, such as a printer, speakers, or a scanner.
When the Master device goes into Sleep or Standby mode, or is switched OFF, the Controlled device(s)
will be switched off as well, saving electricity.
Enable the Power-Saving function. Press and hold MUTE and DISPLAY simultaneously for two seconds. The
Back-UPS will beep to indicate that the feature is enabled. The leaf icon on the display will illuminate.
Disable the Power-Saving function. Press and hold M DUTE and ISPLAY simultaneously for two seconds. The
Back-UPS will beep to indicate that the feature is disabled. The leaf icon on the display will darken.
Setting the threshold. The amount of power used by a device in Sleep or Standby mode varies between devices. It
may be necessary to adjust the threshold at which the Master outlet signals the Controlled outlets to shut down.
1. Ensure a master device is connected to the Master outlet. Put that device into Sleep or Standby mode, or turn it
OFF.
2. Press DISPLAY and MUTE simultaneously and hold for six seconds, until the leaf icon flashes three times and the
Back-UPS beeps three times.
3. The Back-UPS will now recognize the threshold level of the Master device and save it as the new threshold setting.
Power-Saving Display
The display interface can be configured to be continuously illuminated, or to save energy, it can be configured to
darken after a period of inactivity.
1. Full Time Mode: Press and hold DISPLAY for two seconds. The display will illuminate and the Back-UPS will beep
to confirm the Full-Time mode.
2. Power-Saving Mode: Press and hold DISPLAY for two seconds. The display will darken and the Back-UPS will
beep to confirm the Power-Saving mode. While in Power-Saving Mode, the display will illuminate if a button is
pressed, it then darkens after 60 seconds of no activity.
Unit sensitivity
Adjust the sensitivity of the Back-UPS to control when it will switch to battery power; the higher the sensitivity, the
more often the Back-UPS will switch to battery power.
1. Ensure the Back-UPS is connected to utility power, but is OFF.
2. Press and hold the POWER button for six seconds. The LOAD CAPACITY bar will flash on and off, indicating that the
Back-UPS is in programming mode.
3. Press POWER again to rotate through the menu options. Stop at selected sensitivity. The Back-UPS will beep to
confirm the selection.
Low sensitivity Medium sensitivity (Default) High sensitivity
156-300 Vac 176-294 Vac 176-288 Vac
Input voltage is extremely low or
high. (Not recommended for
computer loads.)
The Back-UPS frequently switches to
battery power.
The connected equipment is
sensitive to voltage fluctuations.
Product specificaties
| Merk: | Apc |
| Categorie: | UPS |
| Model: | Power-Saving Back-UPS Pro 900 |
| Kleur van het product: | Zwart |
| Gewicht: | 11700 g |
| Breedte: | 100 mm |
| Diepte: | 382 mm |
| Hoogte: | 250 mm |
| Snoerlengte: | 1.8 m |
| Geluidsniveau: | 45 dB |
| Gewicht verpakking: | 12800 g |
| Afmetingen verpakking (BxDxH): | 225 x 489 x 333 mm |
| Aantal USB 2.0-poorten: | 1 |
| Aantal Ethernet LAN (RJ-45)-poorten: | 1 |
| Certificering: | NEMKO-GS, GOST, CE, C-Tick, KETI, TISI, A-Tick. |
| Interface: | USB |
| Geluidsalarm(en): | Ja |
| Uitgangsvermogen: | 540 W |
| Accu/Batterij oplaadtijd: | 8 uur |
| Temperatuur bij opslag: | -15 - 45 °C |
| Frequentie: | 50/60 Hz |
| Luchtvochtigheid bij opslag: | 0 - 95 procent |
| Hoogte, in bedrijf: | 0 - 3000 m |
| Hoogte bij opslag: | 0 - 15000 m |
| Afmetingen (B x D x H): | 100 x 382 x 250 mm |
| Modem (RJ-11) poort: | 1 |
| Bedrijfstemperatuur (T-T): | 0 - 40 °C |
| Relatieve vochtigheid in bedrijf (V-V): | 0 - 95 procent |
| Batterijtechnologie: | Sealed Lead Acid (VRLA) |
| Surge energy rating: | 680 J |
| Nominale input voltage: | 230 V |
| Stroom (max.): | 8 A |
| Input-connectietype: | IEC C13 |
| Output power capacity: | 0.9 kVA |
| Netspanning, in bedrijf: | 230 V |
| Spanningsbeveiliging: | Ja |
| Number of output IEC jumpers: | 2 |
Heb je hulp nodig?
Als je hulp nodig hebt met Apc Power-Saving Back-UPS Pro 900 stel dan hieronder een vraag en andere gebruikers zullen je antwoorden
Handleiding UPS Apc

9 April 2024
9 April 2024
9 April 2024
9 April 2024
9 April 2024
9 April 2024
9 April 2024
27 Februari 2024
27 November 2023
31 Augustus 2023
Handleiding UPS
- UPS HP
- UPS AEG
- UPS Siemens
- UPS Dell
- UPS Digitus
- UPS Eaton
- UPS Emerson
- UPS Furman
- UPS Gembird
- UPS Gys
- UPS Lenovo
- UPS Riello
- UPS Schneider
- UPS Voltcraft
- UPS Jung
- UPS Steren
- UPS Tripp Lite
- UPS Approx
- UPS Block
- UPS LC-Power
- UPS Energenie
- UPS CyberPower
- UPS Adj
- UPS East
- UPS Liebert
- UPS Avocent
- UPS Minute Man
- UPS Minuteman
- UPS Maruson
- UPS Phoenix Contact
- UPS Puls Dimension
- UPS Vanson
- UPS Salicru
- UPS SurgeX
- UPS Murr Elektronik
- UPS Altronix
- UPS Ditek
- UPS Bxterra
- UPS Middle Atlantic
- UPS FSP
- UPS Atlantis Land
- UPS PowerWalker
- UPS FSP/Fortron
Nieuwste handleidingen voor UPS
17 April 2024
17 April 2024
21 Maart 2024
21 Maart 2024
21 Maart 2024
21 Maart 2024
21 Maart 2024
21 Maart 2024
21 Maart 2024
21 Maart 2024