Alogic Illuminate ALCMILSLV Handleiding
Bekijk gratis de handleiding van Alogic Illuminate ALCMILSLV (2 pagina’s), behorend tot de categorie Webcam. Deze gids werd als nuttig beoordeeld door 16 mensen en kreeg gemiddeld 4.4 sterren uit 8.5 reviews. Heb je een vraag over Alogic Illuminate ALCMILSLV of wil je andere gebruikers van dit product iets vragen? Stel een vraag
Pagina 1/2

Illuminate
USB-C Light Bar with 4K Webcam
Benutzerhandbuch
User Manual
Manual de usuario
Manuel de l’utilisateur
Manuale d’uso
ユーザーマニュアル
Illuminate Light Bar Barra luminosa Illuminate
Barra de luz Illuminate
Illuminate Lichtleiste Illuminate ライトバー
Barre lumineuse Illuminate
1
2
3
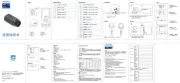
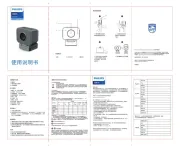
Package Contents | Packungsinhalt | Contenido del Paquete|
Contenu du Colis | Contenuto confezione | | パッケージ内容
Remote Control Dial
Quadrante del telecomando
Fernbedienungswählrad
リモコンダイヤル
Dial de control remoto
Cadran de la télécommande
USB-C Charging Cable
Scan the QR code
for Online Manual
Cavo da USB-C a USB-C
USB-C zu USB-C Kabel
USB-C - USB-Cケーブル
Cable USB-C a USB-C
USB-C
Câble USB-C à USB-C
1
2 3
1
2
9
8
4
5
6
7
10
3
1
2
3
4
Colour Temperature Button Pulsante temperatura colore
Farbtemperatur-Taste
Botón de temperatura de color
Bouton de température de couleur
色温度ボタン
Power & Brightness Button
Pulsante di accensione e luminosità
Botón de encendido y brillo
Power- und Helligkeitstaste
電源と明るさボタン
Bouton d’alimentation et de luminosité
4K Webcam
Webcam 4K
Cámara web 4K
4K
4K Webcam
4Kウェブカメラ
Webcam 4K
Microphone Microfono
Mikrofon
マイクロフォン
Micrófono
Microphone
6
7
8
9
10
LED Light
Luce LED
LED Licht LED ライト
Luz LED
Lumière LED
USB-C Port
Porta USB-C
USB-C-Anschluss
USB-C ポート
Puerto USB-C
Port USB-C
Magnetic Privacy Cover
Copertura magnetica per la privacy
Magnetische Sichtschutzabdeckung
磁気プライバシーカバー
Cubierta de privacidad magnética
Protection de confidentialité
magnétique
Support Feet
Piedi di supporto
Stützfüße
サポートフィート
Pies de apoyo
Pieds de support
Clamp Morsetto
Klemme
クランプ
Abrazadera
Serrer
5
Camera Status LED
LED di stato della fotocamera
Kamera-Status-LED
カメラステータスLED
LED de estado de la cámara
LED
Voyant d’état de la caméra
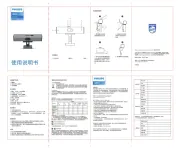
11
12
13
14
Pulsante di accensione
Botón de encendido
Powertaste
電源ボタン
Bouton d’alimentation
Mode Switch Button
Pulsante di commutazione
della modalità
Modus-Umschalttaste
モード切り替えボタン
Botón de cambio de modo
Bouton de changement de mode
Power Button
Adjustment Bar
Barra di regolazione
Einstellleiste
調整バー
Barra de ajuste
Barre de réglage
USB-C Charging Port
Porta di ricarica USB-C
USB-C-Ladeanschluss
USB-C充電ポート
Puerto de carga USB-C
USB-C
Port de chargement USB-C
11 12
13
14
1
2
3
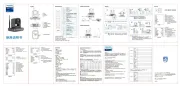
Part Code | Code de
la pièce | Código de
pieza | Teilenummer |
Codice parte |部品コー
ド |
ALCMILSLV - Silver
ALCMILSGR - Space Grey
Weight | Poids | Peso
| Gewicht | Peso | 重
さ |
Light Bar - 327g
Remote - 110g
Power Input | Puissance
d'entrée | Entrada de
potencia | Stromeingang
| Potenza in ingress | 電
源入力 |
5V 1A⎓
Sensor size | Taille du
capteur | Tamaño del
sensor | Sensorgröße |
Dimensioni del sensore
| センサーサイズ |
12MP 4:3 (4000x3000)
Resolutions |
Résolutions |
Resoluciones |
Auflösung | Risoluzioni |
決議 |
4k 30 FPS 16:9
1080p 60 FPS 16:9
1080p 30 FPS 16:9
720p 60 FPS 16:9
Field of View | Champ
de vision | Campo
de visión | Sichtfeld |
Campo visivo | 視野 |
80°
Flicker reduction
| Réduction du
scintillement |
Reducción de parpadeo
| Flimmerreduzierung |
Riduzione dello sfarfallio
| ちらつきの低減 |
50 Hz / 60 Hz
Device Compatibility
| Compatibilité
des appareils |
Compatibilidad
del dispositivo |
Gerätekompatibilität
| Compatibilità del
dispositivo | デバイスの
互換性 |
Windows®, macOS™, Android, Linux
Warranty | Garantie
| Garantía | Garantie
| Garanzia | | 保証
2 Years/Ans/Años/Jahre/Anni/年/
Specifications | Spezifikationen | Especificaciones | Caractéristiques
techniques | Specificazioni | | 仕様書

1. Open the Light Bar’s clamp
10
to allow for fitment over your monitor.
2. Position Illuminate’s Support Feet
9
at the front of your screen and fold the
Clamp
5
towards the monitor until the Light Bar is stable. Illuminate supports
screens 8-30mm thick.
3. Connect the Light Bar’s USB-C Port
7
to your monitor’s USB accessory ports
(with at least 5W power output) or your laptop.
4. Tap the Power Button
2
to switch the light on or o.
1. To adjust the brightness, tap and hold the Power/Brightness Button
2
.
2. To change the colour temperature of the light, tap the Colour Temperature Button
1
.
3. Press to adjust colour temperate between fixed levels 2800k - 4500k - 6500k.
4. Press & hold to ramp colour temperature up/down.
1. Connect the Remote Dial’s USB-C Input
14
to a USB power source to charge it.
2. Tap and hold the Power Button
11
and Mode Button
12
for a second to turn the
dial on. The dial will automatically go into standby after 20 seconds of inactivity.
3. Tap the Power Button
11
again to switch the Light Bar on or o.
4. Move your finger across the Adjustment Bar
3
to adjust the Brightness.
5. Tap the Mode Button
12
to switch the dial between colour mode and brightness
mode. The Adjustment Bar will now change the LED Light from Cool to Warm.
Note: Warmer light causes less eye-strain in dark environments.
1. Once connected to your computer via USB, Illuminate’s webcam should be
automatically available in any application that requires it.
2. Illuminate will auto focus on objects within 30cm-3m of the webcam.
3. For privacy, place the Magnetic Privacy Cover
8
on top of the webcam when
not in use.
4. The camera status LED will illuminate when the camera is currently in use.
Note: Remove protective film over webcam as this may aect image quality.
Light Bar Set Up
Adjusting the Light
Using the Remote Control Dial
Using the Webcam
Troubleshooting
Symptom Solution
The webcam
isn’t working
If Illuminate’s webcam “Alogic Illuminate Webcam” does not
appear in the list of connected cameras, ensure the USB port
you’ve connected Illuminate to supports USB 2 data.
The Light Bar
turns o at max
brightness
This indicates Illuminate is not receiving enough power. Ensure
the port can supply at least 5W of power.
EN
1. Abra la abrazadera de la barra de luces
10
para permitir su instalación sobre
su monitor.
2. Coloque las patas de soporte de Illuminate
9
en la parte frontal de la pantalla y
doble la abrazadera
5
hacia el monitor hasta que la barra de luces esté estable.
Illuminate admite pantallas de 8-30 mm de espesor.
3. Conecte el puerto USB-C de la barra de luces
7
a los puertos para accesorios
USB de su monitor (con al menos 5 W de potencia de salida) o a su computadora
portátil.
4. Toque el botón de encendido
2
para encender o apagar la luz.
1. Önen Sie die Klemme
10
der Lichtleiste, um sie über Ihrem Monitor zu befestigen.
2. Positionieren Sie die Stützfüße
9
von Illuminate an der Vorderseite Ihres Bildschirms
und klappen Sie die Klemme
5
in Richtung Monitor, bis die Lichtleiste stabil steht.
Illuminate unterstützt Bildschirme mit einer Dicke von 8–30 mm.
3. Verbinden Sie den USB-C-Anschluss
7
der Lichtleiste mit den USB-
Zubehöranschlüssen Ihres Monitors (mit mindestens 5 W Ausgangsleistung) oder
Ihres Laptops.
4. Tippen Sie auf die Power-Taste
2
, um das Licht ein- oder auszuschalten.
1. Para ajustar el brillo, mantenga presionado el botón de encendido/brillo
2
.
2. Para cambiar la temperatura de color de la luz, toque el botón de temperatura
de color
1
.
3. Presione para ajustar la temperatura del color entre niveles fijos 2800k - 4500k
- 6500k.
4. Mantenga presionado para aumentar o disminuir la temperatura del color.
1. Um die Helligkeit anzupassen, tippen und halten Sie die Ein-/Aus-/Helligkeitstaste
2
.
2. Um die Farbtemperatur des Lichts zu ändern, tippen Sie auf die Schaltfläche
‘‘Farbtemperatur’’
1
.
3. Drücken Sie diese Taste, um die Farbtemperatur zwischen festen Werten von 2800
K – 4500 K – 6500 K einzustellen.
4. Halten Sie die Taste gedrückt, um die Farbtemperatur zu erhöhen bzw. zu verringern.
1. Conecte la entrada USB-C
14
del Remote Dial a una fuente de alimentación USB
para cargarlo.
2. Mantenga presionado el botón de encendido
11
durante un segundo para
encender el dial. El dial se apagará automáticamente después de 20 segundos
de inactividad.
3. Toque el botón de encendido
11
nuevamente para encender o apagar la barra
de luces.
4. Mueva el dedo por la barra de ajuste
3
para ajustar el brillo.
5. Toque el botón Modo
12
para cambiar el dial entre el modo de color y el modo de
brillo. La barra de ajuste ahora cambiará la luz LED de fría a cálida.
Nota: La luz más cálida provoca menos fatiga visual en ambientes oscuros.
1. Verbinden Sie den USB-C-Eingang
14
des Remote Dial mit einer USB-Stromquelle,
um ihn aufzuladen.
2. Tippen Sie auf die Ein-/Aus-Taste
11
und halten Sie sie eine Sekunde lang gedrückt,
um den Drehknopf einzuschalten. Das Zierblatt schaltet sich nach 20 Sekunden
Inaktivität automatisch aus.
3. Tippen Sie erneut auf die Power-Taste
11
, um die Lichtleiste ein- oder
auszuschalten.
4. Bewegen Sie Ihren Finger über die Einstellleiste
3
, um die Helligkeit anzupassen.
5. Tippen Sie auf die Modustaste
12
, um das Einstellrad zwischen Farbmodus und
Helligkeitsmodus umzuschalten. Die Einstellleiste ändert nun das LED-Licht von
Kalt auf Warm.
Hinweis: Wärmeres Licht belastet die Augen in dunklen Umgebungen weniger.
1. Una vez conectada a su computadora a través de USB, la cámara web de
Illuminate debería estar disponible automáticamente en cualquier aplicación
que la requiera.
2. Illuminate enfocará automáticamente a cualquier persona que se encuentre a
una distancia de entre 30 cm y 3 m de la cámara web.
3. Para mayor privacidad, recomendamos colocar la cubierta de privacidad
magnética
8
encima de la cámara web cuando no esté en uso.
4. El LED de estado de la cámara se iluminará cuando la cámara esté actualmente
en uso.
Nota: Retire la película protectora sobre la cámara web, p2-ya que esto puede
afectar la calidad de la imagen.
1. Sobald Sie über USB mit Ihrem Computer verbunden sind, sollte die Webcam von
Illuminate automatisch in jeder Anwendung verfügbar sein, die sie benötigt.
2. Illuminate fokussiert automatisch alle Personen im Umkreis von 30 cm bis 3 m um
die Webcam.
3. Aus Datenschutzgründen empfehlen wir, die magnetische Datenschutzabdeckung
8
oben auf der Webcam zu platzieren, wenn diese nicht verwendet wird.
4. Die Kamerastatus-LED leuchtet, wenn die Kamera gerade verwendet wird.
Hinweis: Entfernen Sie die Schutzfolie über der Webcam, da dies die Bildqualität
beeinträchtigen kann.
Configuración de la barra de luces
Lichtleiste einrichten
Ajustando la luz
Anpassen des Lichts
Uso del dial del control remoto
Verwenden des Fernbedienungsrads
Usando la cámara web
Verwendung der Webcam
Solución de problemas
Fehlerbehebung
Síntoma Solución
La cámara web
no funciona
Si la cámara web de Illuminate “Alogic Illuminate Webcam”
no aparece en la lista de cámaras conectadas, asegúrese
de que el puerto USB al que p2-ha conectado Illuminate admita
datos USB 2.
La barra de
luces se apaga
con el brillo
máximo
Esto indica que Illuminate no está recibiendo suficiente
energía. Asegúrese de que el puerto pueda suministrar al
menos 5 W de potencia.
Symptom Lösung
Die Webcam
funktioniert
nicht
Wenn die Webcam „Alogic Illuminate Webcam“ von Illuminate
nicht in der Liste der angeschlossenen Kameras erscheint,
stellen Sie sicher, dass der USB-Anschluss, an den Sie
Illuminate angeschlossen haben, USB 2-Daten unterstützt.
The Light Bar
turns o at max
brightness
Dies weist darauf hin, dass Illuminate nicht genügend Strom
erhält. Stellen Sie sicher, dass der Anschluss mindestens 5 W
Leistung liefern kann.
ES DE
1. Aprire il morsetto della barra luminosa
10
per consentirne il montaggio sul
monitor.
2. Posizionare i piedini di supporto
9
dell’Illuminate nella parte anteriore dello
schermo e piegare il morsetto
5
verso il monitor finché la barra luminosa non è
stabile. Illuminate supporta schermi di spessore 8-30 mm.
3. Collega la porta USB-C della barra luminosa
7
alle porte accessorie USB del
monitor (con una potenza in uscita di almeno 5 W) o al laptop.
4. Tocca il pulsante di accensione
2
per accendere o spegnere la luce.
1. ライトバーのクランプ
10
を開き、モニターの上に取り付けられるようにします。
2. Illuminate のサポート フィート
9
を画面の前面に置き、ライト バーが安定するまで
クランプ
5
をモニターに向かって折ります。 Illuminate は厚さ 8 ~ 30mm のス
クリーンをサポートします。
3. ライトバーの USB-C ポート
7
をモニターの USB アクセサリ ポート (少なくとも 5
W の電力出力) またはラップトップに接続します。
4. 電源ボタン
2
をタップして、ライトのオンまたはオフを切り替えます。
1. Per regolare la luminosità, toccare e tenere premuto il pulsante di accensione/
luminosità
2
.
2. Per modificare la temperatura del colore della luce, toccare il pulsante
Temperatura colore
1
.
3. Premere per regolare la temperatura del colore tra livelli fissi 2800k - 4500k
- 6500k.
4. Tenere premuto per aumentare/diminuire la temperatura del colore.
1. 明るさを調整するには、電源/明るさボタン
2
を長押しします。
2. ライトの色温度を変更するには、色温度ボタン
1
をタップします。
3. を押して、色温度を固定レベル 2800k - 4500k - 6500k の間で調整します。
4. 長押しすると、色温度が上昇/下降します。
1. Collegare l’ingresso USB-C del quadrante remoto
14
a una fonte di alimentazione
USB per caricarlo.
2. Tocca e tieni premuto il pulsante di accensione
11
per un secondo per accendere il
quadrante. Il quadrante si spegnerà automaticamente dopo 20 secondi di inattività.
3. Tocca nuovamente il pulsante di accensione
11
per accendere o spegnere la
barra luminosa.
4. Muovi il dito sulla barra di regolazione
3
per regolare la luminosità.
5. Toccare il pulsante Modalità
12
per cambiare il quadrante tra la modalità colore
e la modalità luminosità. La barra di regolazione ora cambierà la luce LED da
fredda a calda.
Nota: la luce più calda provoca meno aaticamento degli occhi negli ambienti bui.
1. リモート ダイヤルの USB-C 入力
14
を USB 電源に接続して充電します。
2. 電源ボタン
11
を 1 秒間押し続けて、ダイヤルをオンにします。 20 秒間何も操作し
ないと、ダイヤルは自動的にオフになります。
3. 電源ボタン
11
をもう一度タップして、ライト バーのオンとオフを切り替えます。
4. 調整バー
3
上で指を動かして、明るさを調整します。
5. モードボタン
12
をタップして、ダイヤルをカラーモードと明るさモードの間で切り替
えます。調整バーは LED ライトをクールからウォームに変更します。
注: 暖かい光は、暗い環境でも目の疲れを軽減します。
1. Una volta connessa al computer tramite USB, la webcam di Illuminate dovrebbe
essere automaticamente disponibile in qualsiasi applicazione che la richieda.
2. Illuminate metterà a fuoco automaticamente tutte le persone entro 30 cm-3 m
dalla webcam.
3. Per motivi di privacy, si consiglia di posizionare la copertura magnetica per la
privacy
8
sulla parte superiore della webcam quando non viene utilizzata.
4. Il LED di stato della fotocamera si accende quando la fotocamera è attualmente
in uso.
Nota: rimuovere la pellicola protettiva sulla webcam poiché ciò potrebbe influire
sulla qualità dell’immagine.
1. USB 経由でコンピュータに接続すると、Illuminate の Web カメラが必要なアプリ
ケーションで自動的に使用できるようになります。
2. Illuminate は、Web カメラから 30cm ~ 3m 以内にいる人に自動的に焦点を
合わせます。
3. プライバシー保護のため、使用しないときはウェブカメラの上に磁気プライバシー カ
バー
8
を置くことをお勧めします。
4. カメラが現在使用されている場合、カメラ ステータス LED が点灯します。
注: 画質に影響を与える可能性があるため、Web カメラ上の保護フィルムを取り
外してください。
Configurazione della barra luminosa
ライトバーのセットアップ
Regolazione della luce
光を調整する
Utilizzo della manopola del telecomando
リモコンダイヤルを使う
Utilizzo della webcam
ウェブカメラの使用
Risoluzione dei problemi
トラブルシューティング
Symptom Soluzione
La webcam non
funziona
Se la webcam di Illuminate “Alogic Illuminate Webcam” non
viene visualizzata nell’elenco delle fotocamere collegate,
assicurati che la porta USB a cui hai collegato Illuminate supporti
i dati USB 2.
The Light Bar
turns o at max
brightness
Ciò indica che Illuminate non riceve energia suciente.
Assicurarsi che la porta possa fornire almeno 5 W di potenza.
症状 解決
ウェブカメラが動
作しない
1. Illuminate の Web カメラ「Alogic Illuminate Webcam」
が接続されたカメラのリストに表示されない場合
は、Illuminate を接続した USB ポートが USB 2 データを
サポートしていることを確認してください。
ライトバーは最大
の明るさでオフに
なります
2. これは、Illuminate が十分な電力を受け取っていないことを
示しています。ポートが少なくとも 5 W の電力を供給できる
ことを確認してください。
IT JP
1
10
2
5
9
8-30
3 USB
7
USB-C
5
4
2
1
2
2
1
3
4
1 USB
14
USB-C
2
11
20
3
11
4
3
5
12
LED
1 USB
2 3 30
3
8
4
LED
1
USB
2
5
AR
FCC Compliance Statement
Declaración de Cumplimiento FCC
EU Declaration of Conformity
FCC-ID: 2ATCA-ALCMIL
This device complies with Part 15 of the FCC Rules. Operation is subject to the following two
conditions:
(1) this device may not cause harmful interference, and
(2) this device must accept any interference received, including interference that may cause
undesired operation.
Changes or modifications not expressly approved by the party responsible for compliance
could void the user’s authority to operate the equipment.
This equipment has been tested and found to comply with the limits for a Class B digital
device, pursuant to Part 15 of the FCC Rules. These limits are designed to provide reasonable
protection against harmful interference in a residential installation. This equipment generates,
uses and can radiate radio frequency energy and, if not installed and used in accordance with
the instructions, may cause harmful interference to radio communications. However, there is
no guarantee that interference will not occur in a particular installation.
If this equipment does cause harmful interference to radio or television reception, which can
be determined by turning the equipment of and on, the user is encouraged to try to correct
the interference by one or more of the following measures:
• Reorient or relocate the receiving antenna.
• Increase the separation between the equipment and receiver.
• Connect the equipment into an outlet on a circuit dierent from that to which the receiver
is connected.
• Consult the dealer or an experienced radio/TV technician for help.
Este dispositivo cumple con la Parte 15 de las reglas de la FCC. El funcionamiento está
sujeto a las dos condiciones siguientes:
(1) Este dispositivo puede no causar interferencias perjudiciales y
(2) Este dispositivo debe aceptar cualquier interferencia recibida, incluidas las interferencias
que puedan causar un funcionamiento no deseado.
NOTA: Cambios o modificaciones no aprobados expresamente por la parte responsable
del cumplimiento pueden invalidar la autoridad del usuario para operar el equipo.
Hereby, ALOGIC Corporation declares that this product is in compliance with Directive
2014/53/EU. The full text of the EU declaration of conformity is available at the following
internet address by clicking on the Compliance Documentation link: www.alogic.co
Responsible Party - U.S. Contact Information
ALOGIC USA LLC
3730 Parish Ave
Fremont CA 94536 USA
Par la présente, ALOGIC Corporation déclare que ce produit est conforme à la directive
2014/30/UE et aux instruments réglementaires britanniques connexes . Le texte complet
de la déclaration de conformité UE est disponible à l’adresse Internet suivante en
cliquant sur le lien Documentation de conformité : www.alogic.co
Le contact pour les questions réglementaires de l’UE est ALOGIC Europe B.V.,
Kraijenhofstraat 137A, 1018RG Amsterdam, Pays-Bas.
Le contact pour les questions réglementaires au Royaume-Uni est ALOGIC UK Pvt Ltd,
Level 3, Belmont, Belmont Road, Uxbridge, United Kingdom, UB8 1HE.
The contact for EU regulatory matters is ALOGIC Europe B.V.,Kraijenhofstraat 137A,
1018RG Amsterdam, Netherlands. The contact for UK regulatory matters is ALOGIC UK
Pvt Ltd, Level 3, Belmont, Belmont Road, Uxbridge, United Kingdom, UB8 1HE.
Déclaration de conformité UE
FCC Radiation Exposure statement
The device has been evaluated to meet general RF exposure requirement. The device can
be used in portable exposure condition without restriction.
Product specificaties
| Merk: | Alogic |
| Categorie: | Webcam |
| Model: | Illuminate ALCMILSLV |
Heb je hulp nodig?
Als je hulp nodig hebt met Alogic Illuminate ALCMILSLV stel dan hieronder een vraag en andere gebruikers zullen je antwoorden
Handleiding Webcam Alogic

1 Mei 2025

18 December 2024
Handleiding Webcam
- Prowise
- Basetech
- Konig
- Kunft
- WyreStorm
- Elro
- IHome
- IC Intracom
- Steren
- Rollei
- Yealink
- J5create
- APM
- Ewent
- Nilox
Nieuwste handleidingen voor Webcam
29 Juli 2025
29 Juli 2025
29 Juli 2025
29 Juli 2025
29 Juli 2025
28 Juli 2025
28 Juli 2025
5 Juli 2025
4 Juli 2025
1 Juli 2025