Alogic DUCMA3 Handleiding
Bekijk gratis de handleiding van Alogic DUCMA3 (4 pagina’s), behorend tot de categorie Overige computer accessoire. Deze gids werd als nuttig beoordeeld door 33 mensen en kreeg gemiddeld 4.5 sterren uit 8 reviews. Heb je een vraag over Alogic DUCMA3 of wil je andere gebruikers van dit product iets vragen? Stel een vraag
Pagina 1/4
Specifications
Model DUCMA3
Input1 x USB-C
Output 2 x DisplayPort, 1 x HDMI, 2 x USB-C 3.1 Gen 2 (10G) BC 1.2 and Apple Charging Support, 2 x USB-A 3.1
Gen1 (5G), 2 x USB-A 2.0, 1 x Audio / Microphone Jack, 1 x RJ45 Ethernet 1Gbps, 1 x SD Card
Resolution Up to 2 x 4K UHD 60Hz or 3 x 4K UHD 30Hz with DP 1.4 HBR3 with DSC enabled host*
*See resolution support tables below for maximum outputs
Warranty2 Years
Package Contents
• 1 x Dock
• 1 x 170W AC Power Adapter
User Instructions
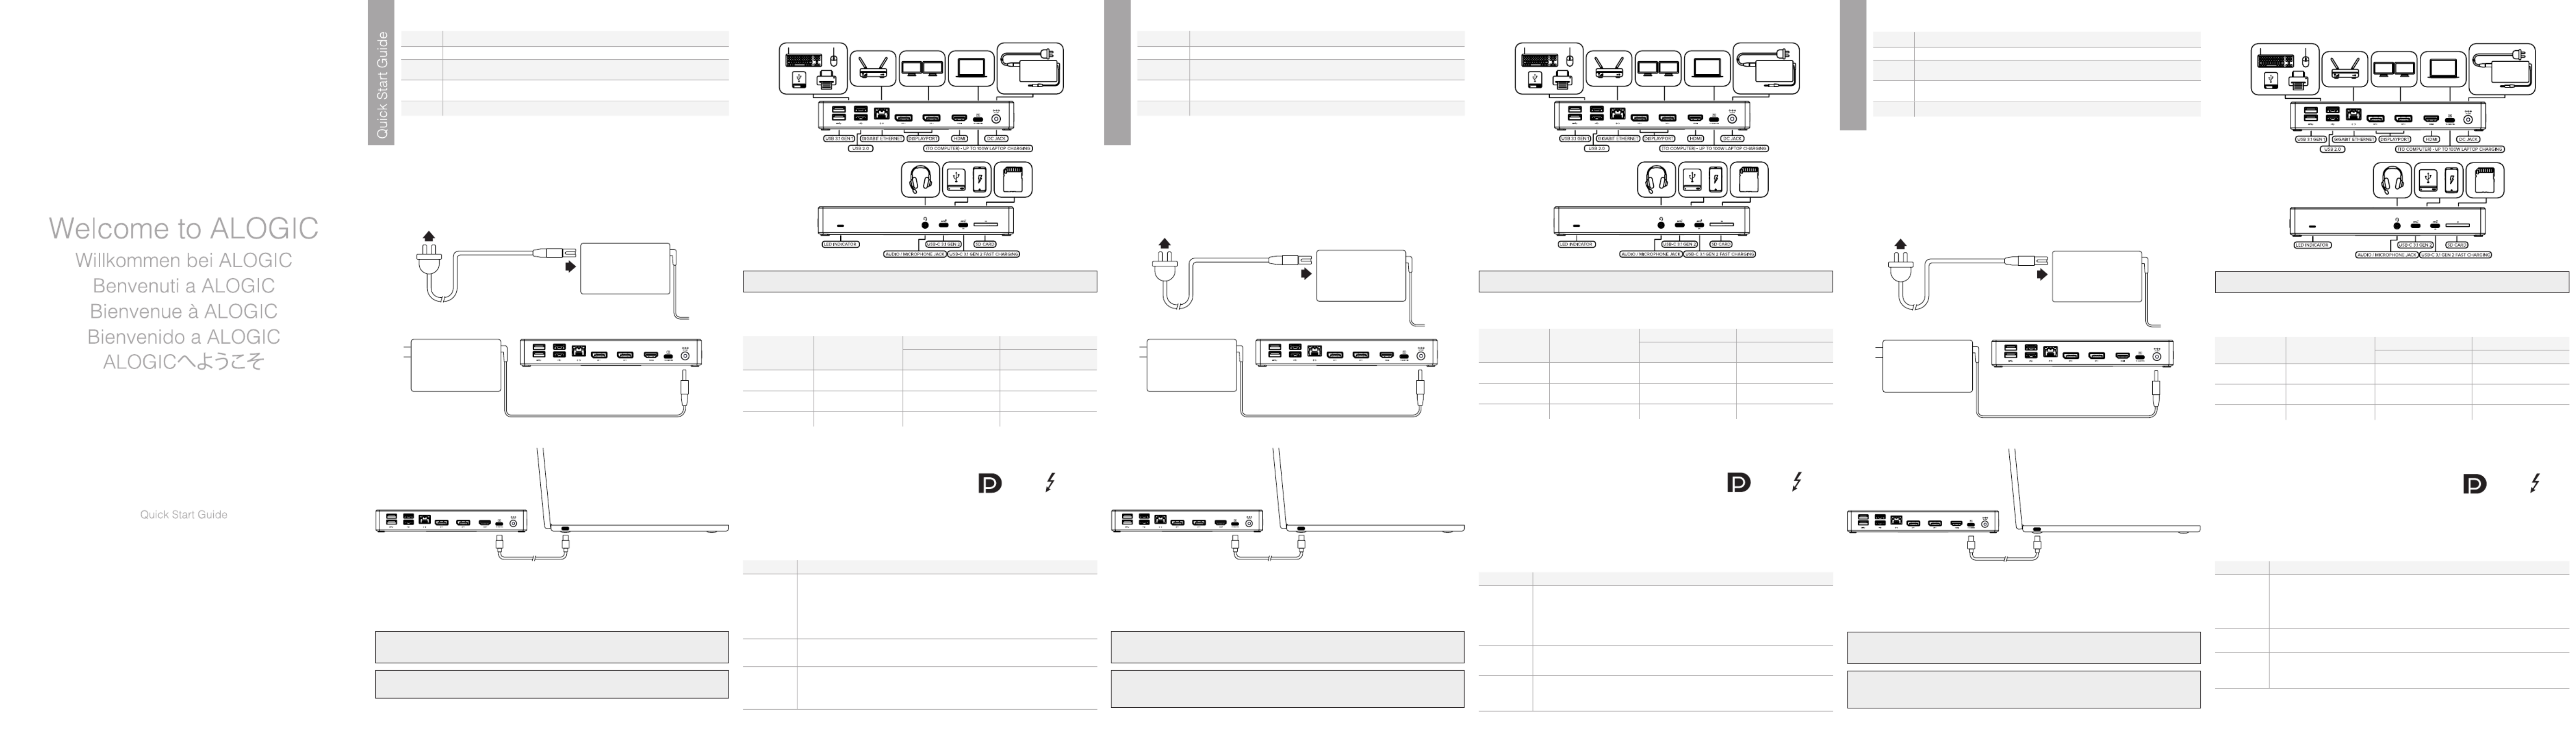
Powering the Dock:
The dock comes included with power cords for US, UK, EU and AU-NZ. Connect the suitable power cord (as per your region)
to the included power adapter. Connect the barrel end of the power adapter to the dock and the plug end of the cable to an
available power socket.
Connecting Devices to the Dock:
Connect external devices such as monitors, memory card, USB memory sticks, ethernet cable and headphone/mic to the dock,
as necessary. The following outlines the available ports and their functions.
Video Output Capabilities:
The following section outlines the maximum video output resolution supported by the dock in dierent display configurations.
The displayport alt mode version supported by the USB-C port on the laptop (HOST) will determine the number of displays,
resolution and refresh rates supported by the dock.
If in doubt about whether a USB-C port supports video output, consult the user manual for your computer or the support
information on the manufacturer’s website.
The device can be used with USB-C ports which do not support video output; however you will not be able to connect the HDMI
ports to external monitors and show video. The other ports (Ethernet, audio, card readers and USB ports) will be functional.
ALOGIC recommend the use of ALOGIC cables to ensure reliable, trouble free operation for your computer and peripherals.
USB-C Port Video Support:
Not all USB-C ports support video output. Many Windows and Chromebook computers have multiple USB-C ports, but only
support video output from one or two of them. If using a Windows or Chromebook machine it is important to ensure that you
plug the device into a port/ports which supports video output for it to be able to show video on external monitors.
Troubleshooting
Connecting the Dock to the Laptop:
The device is Plug and Play compatible and will be detected and configured by your computer automatically. This process
will take a few seconds the first time you plug the device into your laptop, and you may receive a notification that it has been
installed and is ready for use.
Once the device has been recognised and set up by your computer it is ready for use and you can connect other devices as
desired such as monitors, USB devices and a network cable.
Your laptop will also start charging with up to 100W of power when connected to the dock.
Not all USB-C ports on Windows computers support video output. Ensure that you connect the device to a port that are
video capable.
Refer to the USB-C Port Video Support section of this manual for further details.
Not every USB-C port on notebook computers supports charging. If your computer doesn’t start charging when a power
supply is connected to the device and the device is connected to your computer, try a dierent USB-C port on your machine
or consult the computer’s manual to determine which ports accept power from USB PD power sources.
The USB-C ports on the front of the unit supports fast charging of mobile devices. If charging a device, ensure you connect
it to this port.
Host (Laptop USB-C)Single Display
Dual DisplayTriple Display
MST Host (Independent/
Extended)
MST Host (Independent/
Extended
HBR3 DP1.4 with DSC5120x2880@60Hz2*3840x2160@60Hz3*3840x2160@60Hz (with
reduced blanking)
HBR3 DP1.4 without
DSC 3840x2160@60Hz 2*3840x2160@30Hz 1*3840x2160@30Hz+
2*1920x1080P@60Hz
HBR2 DP1.23840x2160@30Hz2*1920x1080P@60Hz3*1920x1080P@30Hz
DisplayPort LogoIntel Thunderbolt
Logo
Symptom Solution
Video doesn’t
show on exter-
nal display
• Check that the HDMI cable is connected securely between the monitor and device and the device is
securely connected to the computer
• Check that the external monitor is turned on and set to the correct input
• Check that your computer is detecting the external display and is set to show video on it
• Check that the USB-C port on the computer that you have connected the device to supports video output
using DisplayPort Alternate Mode
• If the computer doesn’t detect the external monitor or output video after checking the above, restart your
computer and attempt again
Video drops out
intermittently
• Check that the HDMI cable is connected securely between the display and device
• Check that the device is securely connected to the computer
• Check that the HDMI cable being used to connect to the display is of good quality and isn’t damaged
Computer
doesn’t start
charging when
the device is
connected
• Ensure a USB Power Delivery power supply is connected to the USB-C port on the device marked PD
• Ensure that the power supply is connected at the wall and turned on, and the USB-C cable supplying
power is securely connected
• Verify that the USB-C port on the computer supports charging from a USB PD power source
Many USB-C ports that have no labelling support video output, however
USB-C ports which have a DisplayPort logo or Intel Thunderbolt logo
printed next to them almost certainly support video output and you
should look for these icons next to the ports on your computer.
Connect to wall socket
Insert the power cord into the
power adapter
Select the appropriate
power cord
Barrel End
Power Adapter
Dock (To Computer Port) USB-C PortComputer USB-C Port
Connect the included USB-C cable to the USB-C Port
from the back of the dock (To Computer Port) to the
USB-C Port on the computer
Connect to the power socket on the dock
• 1 x US; 1 x UK; 1 x EU; 1 x AU Power Cord
• 1 x User Manual
Schnellstartanleitung
Technische Daten
Modell DUCMA3
Eingang 1 x USB-C
Ausgänge 2 x DisplayPort, 1 x HDMI, 2 x USB-C 3.1 Gen 2 (10G) BC 1.2 and Apple Ladeunterstützung, 2 x USB-A
3.1 Gen1 (5G), 2 x USB-A 2.0, 1 x Audio / Microfon Stecker, 1 x RJ45 Ethernet 1Gbps, 1 x SD Karte
Auflösung Bis zu 2 x 4K UHD 60Hz oder 3 x 4K UHD 30Hz mit DP 1.4 HBR3 mit DSC-fähiger-host*
*Siehe die Tabellen zur Auflösungsunterstützung unten für maximale Ergebnisse
Gewährleistung2 Jahre
Bedienungsanleitung
Das Dock einschalten:
Das Dock wird mit Netzkabeln für USA, Großbritannien, EU und AU-NZ geliefert. Schließen Sie das geeignete Netzkabel
(entsprechend Ihrer Region) an das mitgelieferte Netzteil an. Verbinden Sie das tonnenförmige Ende des Netzadapters mit dem
Dock und das Steckerende des Kabels mit einer verfügbaren Steckdose.
Anschließen von Geräten an das Dock:
Schließen Sie bei Bedarf externe Geräte wie Bildschirme, Speicherkarte, USB-Speichersticks, Ethernet-Kabel und Kopörer/
Mikrofon an das Dock an. Im Folgenden werden die verfügbaren Anschlüsse und ihre Funktionen skizziert.
Videoausgabe-Fähigkeiten:
Die Version des Anzeigeports im Alt-Modus, die vom USB-C-Anschluss des Laptops (HOST) unterstützt wird, bestimmt die
Anzahl der vom Dock unterstützten Anzeigen, die Auflösung und die Aktualisierungsraten.
Wenn Sie im Zweifel sind, ob ein USB-C-Anschluss die Videoausgabe unterstützt, konsultieren Sie das Benutzerhandbuch Ihres
Computers oder die Support-Informationen auf der Website des Herstellers.
Das Gerät kann mit USB-C-Anschlüssen verwendet werden, die keine Videoausgabe unterstützen; es ist jedoch nicht möglich,
die HDMI-Anschlüsse an externe Bildschirme anzuschließen und Videos zu zeigen. Die anderen Anschlüsse (Ethernet-, Audio-,
Kartenleser- und USB-Anschlüsse) werden funktionsfähig sein.
ALOGIC empfiehlt die Verwendung von ALOGIC-Kabeln, um einen zuverlässigen, störungsfreien Betrieb Ihres Computers und
Ihrer Peripheriegeräte zu gewährleisten.
USB-C-Anschluss Video-Unterstützung:
Nicht alle USB-C-Anschlüsse unterstützen die Videoausgabe. Viele Windows- und Chromebook-Computer verfügen über
mehrere USB-C-Anschlüsse, unterstützen aber nur die Videoausgabe von einem oder zwei dieser Anschlüsse. Wenn Sie einen
Windows- oder Chromebook-Computer verwenden, ist es wichtig sicherzustellen, dass Sie das Gerät an einen Port bzw. Ports
anschließen, der bzw. die die Videoausgabe unterstützt, damit es Video auf externen Bidlschirmen anzeigen kann.
Risoluzione dei problemi
Anschließen des Dock an den Laptop:
Das Gerät ist Plug-and-Play-kompatibel und wird von Ihrem Computer automatisch erkannt und konfiguriert. Dieser Vorgang
dauert einige Sekunden, wenn Sie das Gerät zum ersten Mal an Ihren Laptop anschließen, und Sie erhalten möglicherweise
eine Benachrichtigung, dass das Gerät installiert wurde und einsatzbereit ist.
Sobald das Gerät von Ihrem Computer erkannt und eingerichtet wurde, ist es einsatzbereit, und Sie können nach Belieben
andere Geräte wie Monitore, USB-Geräte und ein Netzwerkkabel anschließen.
Wenn Ihr Laptop an das Dock angeschlossen ist, beginnt er auch mit bis zu 100 Watt Leistung zu laden.
Nicht alle USB-C-Anschlüsse von Windows-Computern unterstützen die Videoausgabe. Stellen Sie sicher, dass Sie das
Gerät an einen Anschluss anschließen, der videofähig ist.
Weitere Einzelheiten finden Sie im Abschnitt USB-C-Anschluss Videounterstützung in diesem Benutzerhandbuch.
Nicht jeder USB-C-Anschluss an Notebook-Computern unterstützt das Aufladen. Wenn Ihr Computer nicht mit dem Aufladen
beginnt, wenn ein Netzteil an das Gerät angeschlossen ist und das Gerät an Ihren Computer angeschlossen ist, versuchen
Sie es mit einem anderen USB-C-Anschluss an Ihrem Gerät oder schlagen Sie im Handbuch des Computers nach, um
festzustellen, welche Anschlüsse Strom von USB-PD-Stromquellen annehmen.
Die USB-C-Anschlüsse an der Vorderseite des Geräts unterstützen das schnelle Laden von mobilen Geräten. Wenn Sie ein
Gerät aufladen, stellen Sie sicher, dass Sie es an diesen Anschluss anschließen.
Host (Laptop USB-C)Einzeldisplay
Zweifaches DisplayDreifaches Display
MST Host (Unabhängig/
Erweitert)
MST Host (Unabhängig/
Erweitert
HBR3 DP1.4 mit DSC5120x2880@60Hz2*3840x2160@60Hz3*3840x2160@60Hz (mit reduz-
ierter Ausblendung)
HBR3 DP1.4 ohne DSC3840x2160@60Hz2*3840x2160@30Hz1*3840x2160@30Hz+
2*1920x1080P@60Hz
HBR2 DP1.23840x2160@30Hz2*1920x1080P@60Hz3*1920x1080P@30Hz
DisplayPort Symbol
Viele USB-C-Anschlüsse, die keine Beschriftung haben, unterstützen die
Videoausgabe. USB-C-Anschlüsse, auf denen das DisplayPort-Logo oder das Intel
Thunderbolt-Logo aufgedruckt ist, unterstützen jedoch mit ziemlicher Sicherheit
die Videoausgabe, und Sie sollten nach diesen Symbolen neben den Anschlüsse
auf Ihrem Computer suchen.
An Steckdose anschließen
Stecken Sie das Netzkabel in
das Netzteil
Wählen Sie das geeignete
Netzkabel
Kabel mit
Trommel-ende
Netzteil
Dock (Zum Computeranschluss)
USB-C-Anschluss
Computer USB-C-Anschluss
Schließen Sie das mitgelieferte USB-C-Kabel an den
USB-C-Anschluss auf der Rückseite des Docks (Zum
Computeranschluss) an den USB-C-Anschluss des
Computers an
Schließen Sie das Gerät an die Netzanschlussbuchse
am Dock an
Problem Lösung
Video wird auf der
externen Anzeige
nicht angezeigt
• Überprüfen Sie, ob das HDMI-Kabel sicher zwischen Monitor und Gerät angeschlossen ist und das Gerät sicher mit dem Computer
verbunden ist
• Überprüfen Sie, ob der externe Monitor eingeschaltet und auf den richtigen Eingang eingestellt ist.
• Überprüfen Sie, ob Ihr Computer den externen Bildschirm erkennt und so eingestellt ist, dass er Video darauf anzeigt
• Überprüfen Sie, ob der USB-C-Anschluss des Computers, an den Sie das Gerät angeschlossen haben, die Videoausgabe mit
DisplayPort Alternate Mode unterstützt
• Wenn der Computer den externen Bildschirm nicht erkennt oder kein Video ausgibt, nachdem Sie die oben genannten Punkte
überprüft haben, starten Sie den Computer neu und versuchen Sie es erneut.
Video fällt zeitweise
aus
• Überprüfen Sie, ob das HDMI-Kabel sicher zwischen Bildschirm und Gerät angeschlossen ist
• Überprüfen Sie, ob das Gerät sicher mit dem Computer verbunden ist
• Prüfen Sie, ob das HDMI-Kabel, das zum Anschluss an den Bildschirm verwendet wird, von guter Qualität und nicht beschädigt ist
Computer beginnt
nicht mit dem Laden,
wenn das Gerät
angeschlossen ist
• Stellen Sie sicher, dass eine USB-Stromversorgung an den USB-C-Anschluss des mit PD
• Vergewissern Sie sich, dass die Stromversorgung an der Wand angeschlossen und eingeschaltet ist und dass das USB-C-Kabel zur
Stromversorgung sicher angeschlossen ist.
• Überprüfen Sie, ob der USB-C-Anschluss am Computer das Aufladen von einer USB-PD-Stromquelle unterstützt
Packungsinhalt
• 1 x Dock
• 1 x 170W AC Power Adapte
• 1 x US; 1 x UK; 1 x EU; 1 x AU Netzkabel
• 1 x Benutzerhandbuch
Intel Thunderbolt
Symbol
Guida Rapida
Specifiche
Modello DUCMA3
Ingresso1 x USB-C
Uscita 2 x Porte di visualizzazione, 1x HDMI, 2 x USB-C 3.1 Gen 2 (10G) BC 1.2 e supporto di ricarica Apple, 2 x
USB-A 3.1 Gen1 (5G), 2 x USB-A 2.0, 1 x Audio / Jack per Microfono,1x Ethernet RJ45 1 Gbps, 1 x scheda SD
Risoluzione Fino a 2 x 4K UHD 60Hz o 3 x 4K UHD 30Hz con DP 1.4 HBR3 con host DSC abilitato*
*Vedere le tabelle di supporto della risoluzione sotto riportate per le prestazioni massime
Garanzia2 Anni
La confezione include
• 1 x Connettore
• 1 x 170W AC Adattatore di
alimentazione
Istruzioni per l’utente
Alimentare il connettore:
Il connettore viene fornito con i cavi di alimentazione per gli Stati Uniti, il Regno Unito, l’Unione Europea e l’Australia - Nuova
Zelanda. Collegare il cavo di alimentazione adatto (secondo la propria regione) all’adattatore di alimentazione in dotazione.
Collegare l’estremità rotonda del cavo dell’adattatore di alimentazione al connettore e l’estremità dello spinotto del cavo ad una
presa di corrente disponibile.
Collegare dispositive al connettore:
Se necessario, collegare al connettore dispositivi esterni come monitor, scheda di memoria, chiavette USB, cavo ethernet e
cue/microfono. Di seguito sono indicate le porte disponibili e le loro funzioni.
Capacità di uscita video:
La seguente sezione descrive la massima risoluzione di uscita video supportata dal connettore in diverse configurazioni
di visualizzazione. La versione alt mode della porta di visualizzazione supportata dalla porta USB-C del portatile (HOST)
determinerà il numero di visualizzazioni, la risoluzione e le velocità di aggiornamento supportate dal connettore.
In caso di dubbi sul fatto che una porta USB-C supporti l’uscita video, consultare il manuale dell’ utente del proprio computer o le
informazioni di supporto sul sito web del produttore.
Il dispositivo può essere utilizzato con porte USB-C che non supportano l’uscita video; tuttavia, non sarà possibile collegare le
porte HDMI a monitor esterni e mostrare il video. Le altre porte (Ethernet, audio, lettori di schede e porte USB) saranno operative.
ALOGIC raccomanda l’uso di cavi ALOGIC per garantire un funzionamento adabile e senza problemi per il computer e le
periferiche.
Supporto video porta USB-C:
Non tutte le porte USB-C supportano l’uscita video. Molti computer Windows e Chromebook hanno più porte USB-C, ma
supportano solo l’uscita video da una o due di esse. Se si utilizza un computer Windows o Chromebook è importante assicurarsi
di collegare il dispositivo a una porta/porte che supporti l’uscita video per poter mostrare il video su monitor esterni.
Risoluzione dei problemi
Collegare il connettore al portatile:
Il dispositivo è compatibile con il Plug and Play e sarà rilevato e configurato automaticamente dal vostro computer. Questo
processo richiederà alcuni secondi la prima volta che si collega il dispositivo al computer portatile, e si potrebbe ricevere una
notifica che è stato installato ed è pronto per l’uso.
Una volta che il dispositivo è stato riconosciuto e impostato dal computer è pronto per l’uso ed è possibile collegare altri
dispositivi a piacere come monitor, dispositivi USB e un cavo di rete.
Il vostro portatile inizierà anche a caricarsi fino ad un massimo di 100W di potenza quando è collegato al connettore.
Non tutte le porte USB-C dei computer Windows supportano l’uscita video. Assicurarsi di collegare il dispositivo ad una
porta che supporta video.
Per ulteriori dettagli consultare la sezione Supporto video della porta USB-C di questo manuale.
Non tutte le porte USB-C dei computer notebook supportano la ricarica. Se il computer non inizia a caricarsi quando un
alimentatore è collegato al dispositivo e il dispositivo è collegato al computer, provare una diversa porta USB-C sulla vostra
unità o consultare il manuale del computer per determinare quali porte accettano l’alimentazione da fonti di alimentazione
USB PD.
Le porte USB-C sulla parte anteriore dell’unità supportano la ricarica rapida dei dispositivi mobili. Se si carica un
dispositivo, assicurarsi di collegarlo a questa porta.
Host (USB-C per
Portatile) Visualizzazione singolaDoppia visualizzazioneVisualizzazione tripla
MST Host (Indidendente/ Esteso)MST Host (Indipendente/ Esteso)
HBR3 DP1.4 with DSC5120x2880@60Hz2*3840x2160@60Hz3*3840x2160@60Hz (con
soppressione ridotta)
HBR3 DP1.4 without
DSC 3840x2160@60Hz 2*3840x2160@30Hz1*3840x2160@30Hz+
2*1920x1080P@60Hz
HBR2 DP1.23840x2160@30Hz2*1920x1080P@60Hz3*1920x1080P@30Hz
DisplayPort LogoIntel Thunderbolt
Logo
Sintomo Soluzione
Il video non appare
sul visualizzatore
esterno
• Controllare che il cavo HDMI sia collegato saldamente tra il monitor e il dispositivo e che il dispositivo sia collegato saldamente al
computer
• Controllare che il monitor esterno sia acceso e impostato sull’ingresso corretto
• Controllare che il computer rilevi il visualizzatore esterno e che sia impostato per la visualizzazione di un video su di esso
• Controllare che la porta USB-C del computer a cui avete collegato il dispositivo supporti l’uscita video utilizzando la modalità
Alternate Mode della porta di visualizzazione
• Se il computer non rileva il monitor esterno o il video in uscita dopo aver controllato quanto sopra, riavviare il computer e tentare di
nuovo
Il video si interrompe
a intermittenza
• Controllare che il cavo HDMI sia collegato saldamente tra il visualizzatore e il dispositivo
• Controllare che il dispositivo sia collegato saldamente al computer
• Controllare che il cavo HDMI utilizzato per il collegamento al visualizzatore sia di buona qualità e che non sia danneggiato
Il computer non
inizia a caricare
quando il dispositivo
è collegato
• Assicurarsi che un alimentatore USB Power Delivery sia collegato alla porta USB-C sul dispositivo contrassegnato come PD
• Assicurarsi che l’alimentazione sia collegata alla parete e che sia accesa, che il cavo USB-C che fornisce l’alimentazione sia
saldamente collegato
• Verificare che la porta USB-C del computer supporti la ricarica da una fonte di alimentazione USB PD
Molte porte USB-C che non hanno un’etichetta supportano l’uscita video,
tuttavia le porte USB-C che hanno un logo Porta di Visualizzazione o il logo Intel
Thunderbolt stampato accanto ad esse quasi certamente supportano l’uscita
video e dovreste cercare queste icone accanto alle porte del vostro computer.
Collegare alla presa nella parete
Inserire il cavo di alimentazione
nell’adattatore di corrente
Selezionare il cavo di
alimentazione corretto
Fine del
barilotto
Adattatore di Corrente
Porta USB-C del connettore (alla
porta computer)
Porta USB-C del computer
Collegare il cavo USB-C in dotazione alla porta USB-C
dal retro del connettore (alla porta del computer) alla
porta USB-C del computer.
Collegare alla presa di corrente sul dock
• 1 x US; 1 x UK; 1 x EU; 1 x AU Cavo di Alimentazione
• 1 x Manuale per l’utente
Product specificaties
| Merk: | Alogic |
| Categorie: | Overige computer accessoire |
| Model: | DUCMA3 |
| Kleur van het product: | Zwart |
| Gewicht: | 360 g |
| Breedte: | 880 mm |
| Diepte: | 2100 mm |
| Hoogte: | 290 mm |
| Gebruikershandleiding: | Ja |
| LED-indicatoren: | Ja |
| Connectiviteitstechnologie: | Bedraad |
| Ethernet LAN: | Ja |
| Type stroombron: | DC |
| Meegeleverde kabels: | AC |
| Geïntegreerde geheugenkaartlezer: | Ja |
| Compatibele geheugenkaarten: | SD, SDHC, SDXC |
| Inclusief AC-adapter: | Ja |
| Aantal USB 2.0-poorten: | 2 |
| Aantal HDMI-poorten: | 1 |
| Microfoon, line-in ingang: | Ja |
| Aantal Ethernet LAN (RJ-45)-poorten: | 1 |
| Bevestigingsmogelijkheid voor kabelslot: | Ja |
| Certificering: | FCC, CE |
| Netvoeding: | 170 W |
| Aansluiting voor netstroomadapter: | Ja |
| HD type: | 4K Ultra HD |
| Materiaal: | ABS |
| Resolutie (maximum digitaal): | 5120 x 2880 Pixels |
| Duurzaamheidscertificaten: | RoHS |
| Aantal DisplayPorts: | 2 |
| Aantal per verpakking: | 1 stuk(s) |
| Ethernet LAN, data-overdrachtsnelheden: | 1000 Mbit/s |
| Ondersteunt Windows: | Windows 10, Windows 7, Windows 8, Windows 8.1 |
| Aantal: | 1 |
| Aantal poorten USB 3.2 Gen 1 (3.1 Gen 1) Type A: | 2 |
| Combo koptelefoon/microfoon port: | Ja |
| Aantal poortenUSB 3.2 Gen 1 (3.1 Gen 1) Type C: | 2 |
| Hostinterface: | USB 3.2 Gen 1 (3.1 Gen 1) Type-C |
| DisplayPort versie: | 1.4 |
| USB Power Delivery: | Ja |
| USB Power Delivery tot max.: | 100 W |
| Aantal displays ondersteund: | 3 |
| Code geharmoniseerd systeem (HS): | 84733020 |
Heb je hulp nodig?
Als je hulp nodig hebt met Alogic DUCMA3 stel dan hieronder een vraag en andere gebruikers zullen je antwoorden
Handleiding Overige computer accessoire Alogic

7 April 2026
16 Augustus 2025
4 Augustus 2025
2 April 2025
10 Februari 2025
10 Februari 2025
23 December 2024
23 December 2024
23 December 2024
23 December 2024
Handleiding Overige computer accessoire
Nieuwste handleidingen voor Overige computer accessoire
18 Mei 2026
10 Mei 2026
27 April 2026
27 April 2026
22 April 2026
10 April 2026
27 Maart 2026
25 Maart 2026
25 Maart 2026
12 Maart 2026