Akuvox X915S Handleiding
Akuvox
Intercomsysteem
X915S
Bekijk gratis de handleiding van Akuvox X915S (4 pagina’s), behorend tot de categorie Intercomsysteem. Deze gids werd als nuttig beoordeeld door 70 mensen en kreeg gemiddeld 4.8 sterren uit 35.5 reviews. Heb je een vraag over Akuvox X915S of wil je andere gebruikers van dit product iets vragen? Stel een vraag
Pagina 1/4

Flush-mounng Accessories (Please find in In-Wall Installaon Kit box):
Wall-mounng Accessories (Please find in On-Wall Installaon Kit box):
Mainframe Accessories :
Before you being using the device, please check the version you obtained and ensure that the following items are included in the
shipped box:
X915X
Back Cover x 1
Rubber Plug(Small)x 2 Rubber Plug(Medium)x 2X915 x 1
Flush-mounting box x 1 ST4 x 35 screw x 4 Plastic Wall Anchor x 4
Wall-mounting box x 1
Unpacking
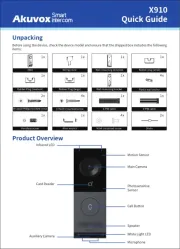
Product Overview
Face-liveness detection camera
X915X
M3x4 Screw x 6
Silicon Rubber Sealing Ring x 1
M4 x 30 Screw x 2 ST4 x 20 screw x 4
Torx Screw x 2
Torx Wrench x 1 Card Reader Touch Plate x 1
Rubber Plug(Large)x2
Plate Removal Key x 1 Rope x 1
2 x 6 PIN Terminal Blockx 1 2 x 5 PIN Terminal Blockx 1 2 PIN Terminal Block x 1 Pry barx 1
Plastic Wall Anchor x 4
Main camera
MIC
Infrared LED
White light LED
MIC
Infrared LED
White light LED
Touch screen
IR sensor
Card reader
Loudspeaker
Diode x 3

1. Wall-Mounng
Step 1 Wall-mounng Box or Flush-mounng Box Installaon:
Installaon Environment
Indoor and outdoor installation are supported.
If installing the device outdoors, please do not place device under direct sunlight.
If installing the device indoors, please keep device at least 2 meters away from light, and at least 3 meters away from window and door .
Backlight Direct sun
through window
Close to lightDirect sunlight Indirect sunlight
through window
X915X
Installaon
Fix the wall-mounng box on to the embedded
box (86) with two M4x30 Screws, mark the
posions of the four holes of the wall mounng
box at the hole center.
Place the wall mounng box closely against the
wall while lining up its four holes with their
corresponding drilled holes and then fix the wall
mounng box on the wall by ghtening the four
ST4 x 20 screws and two M4x30 screws to the
plasc wall anchors.
Take off the box and drill the four marked
holes using 5 mm drill bit hand drill before
inserng the plasc wall anchors into the
drilled holes.
According to the posion of the wire on the wall, put the
wall-mounng box closely on to the wall and mark the
four posioning holes, while making sure that relave
posions between wall-mounng box and wiring hole are
correct.
Note: It is suggested that you move the boom edge the square hole 10 mm
away from the wring hole on the wall as highlighted in green in the drawing.
Drill the marked holes using 5 mm drill bit
hand drill before inserng plasc wall
anchors in to the drilled holes.
Place the wall-mounng box closely against the wall
while lining up its four holes with their
corresponding drilled holes and then fix the
wall-mounng box on the wall by ghtening four ST x
20 screws and two M4x30 screws to the plasc wall
anchors.
1.2 Without embedded junction box in the wall
1.1 With 86x86 mm embedded junction box in the wall

X915X
2. Flush-Mounng
Cut out a square hole
with the dimension
(height*width*depth
= 337*122*57 mm).
Insert the flush-mounting box in to
the hole and mark the the
positions of the four holes of the
flush-mounting box on the wall,
then take off the box and drill the
holes on the marked positions
using 5 mm drill bit hand drill
before inserting the plastic
anchors in to the drilled holes.
Break off the round knock-out
wiring holes and lead the wires
through the corresponding hole in
to the flush-mounting box, then
press the flush-mounting box in to
the square hole. The upper and
lower folded edges of the
flush-mounting box must fit snugly
against the wall. Then fix the box
using the four plastic wall anchors
and the four ST4x20 screws.
STEP 2 Back cover Installaon:
Connect the wires to the terminal
blocks as needed (for details, refer to
"Device Wiring"), then insert the
terminal blocks into the corresponding
interface of the main board as
indicated in the drawing according to
the number of PIN.
Note: The pry bar attached can be used to unplug
the terminal blocks if needed.
Choose a suitable size rubber plug
(small, large and medium) to hold
down the wires, while tearing off the
adhesive sticker on the selected
rubber plug and stick it on to the
X915 back cover and then tear off the
adhesive sticker on the other rubber
plug of the same size and stick it on
to the back cover in the position as
indicated in the drawing.
STEP 3 Device Mounng:
Take off the rope and hang the device on to the
two square hangers on the wall-mounting/
flush-mounting box.Stick the plate removal key
in to the small hole on the upper left corner of
the card reader touch plate to pull out the plate.
Installation is completed.Press the card reader
touch plate in to the
card reader opening.
Drive the two Torx screws in to
their corresponding holes.
Press the X915 back cover
silicone rubber sealing ring in
to the corresponding groove
as indicated by the arrow and
then tighten the back cover
using the six M3x4 screws to
its corresponding holes.
Hang the one end of the rope on
to the square hanger on the
wall-mounting/flush-mounting
box then hang the other end of
the rope on to the square hook
on the device for the
convenience of the later wire
installation etc.
Make sure that the flush-mounting
box are well tightened and its upper
and lower folded edges are fit snugly
against the wall, fill in the gap
between the wall and the
flush-mounting box using cement or
non-corrosive structural adhesive
and wait until the cement is
hardened before proceeding to the
next step.
or
铝后盖
出线压盖
沉头螺丝
压线盖密封硅胶垫
Product specificaties
| Merk: | Akuvox |
| Categorie: | Intercomsysteem |
| Model: | X915S |
| Kleur van het product: | Zwart |
| Breedte: | 130 mm |
| Diepte: | 41.6 mm |
| Hoogte: | 350 mm |
| Materiaal behuizing: | Roestvrijstaal |
| Kleur: | Ja |
| Internationale veiligheidscode (IP): | IP65 |
| Beeldschermdiagonaal: | 8 " |
| Resolutie: | 1920 x 1080 Pixels |
| Touchscreen: | Ja |
| Ondersteunde videoformaten: | H.264 |
| Stemcodecs: | G.711a, G.722, G.729 |
| Inclusief besturingssysteem: | Android |
| Connectiviteitstechnologie: | Bedraad |
| Ondersteunde video-modi: | 1080p |
| Minimale belichting: | 0.1 Lux |
| Kijkhoek, horizontaal: | 115 ° |
| Kijkhoek, verticaal: | 63 ° |
| Nachtvisie: | Ja |
| LED-type: | IR |
| Maximale beeldsnelheid: | 30 fps |
| Luidspreker: | Ja |
| Aantal Ethernet LAN (RJ-45)-poorten: | 1 |
| Ingebouwde luidsprekers: | Ja |
| Aantal luidsprekers: | 1 |
| Omvang optische sensor: | 1/2.8 " |
| Megapixels: | 2 MP |
| Type beeldsensor: | CMOS |
| Maximale videoresolutie: | 1920 x 1080 Pixels |
| Ingebouwde microfoon: | Ja |
| Witbalans: | Auto |
| Operating systeem versie: | Android 9 |
| Display technologie: | IPS |
| Ethernet LAN, data-overdrachtsnelheden: | 10, 100 Mbit/s |
| Netwerkstandaard: | IEEE 802.3at |
| Temperatuur bij opslag: | 30 - 70 °C |
| Ondersteunde netwerkprotocollen: | IPv4, HTTP, HTTPS, FTP, SNMP, DNS, NTP, RTSP, RTP, TCP, UDP, ICMP, DHCP, ARP |
| Ophangsysteem voor aan de muur: | Ja |
| Power over Ethernet (PoE): | Ja |
| IK code: | IK10 |
| Binnenunit inbegrepen: | Ja |
| Buitenunit inbegrepen: | Ja |
| Vermogen luidsprekers: | 2 W |
| RFID lezer: | Ja |
| Bedrijfstemperatuur (T-T): | 30 - 60 °C |
| Relatieve vochtigheid in bedrijf (V-V): | 10 - 90 procent |
| Echo annulatie: | Ja |
| Vandaalbestendig: | Ja |
| Stroomtype van binnenunit: | DC |
| Video-codecs: | H.264 |
Heb je hulp nodig?
Als je hulp nodig hebt met Akuvox X915S stel dan hieronder een vraag en andere gebruikers zullen je antwoorden
Handleiding Intercomsysteem Akuvox
12 Juni 2025

17 November 2024

12 Juni 2023

8 Juni 2023

30 Mei 2023

16 Mei 2023

14 Mei 2023
Handleiding Intercomsysteem
- Eartec
- HQ
- Wuloo
- Gewiss
- Panasonic
- Fibaro
- Pentatech
- EtiamPro
- Silvercrest
- Elcom
- Vimar
- Seco-Larm
- Ritto
- GEV
- Alcatel
Nieuwste handleidingen voor Intercomsysteem
30 Juli 2025
29 Juli 2025
29 Juli 2025
29 Juli 2025
29 Juli 2025
29 Juli 2025
29 Juli 2025
29 Juli 2025
29 Juli 2025
29 Juli 2025