7inova 7W310 Handleiding
7inova Wifi-repeater 7W310
Bekijk gratis de handleiding van 7inova 7W310 (2 pagina’s), behorend tot de categorie Wifi-repeater. Deze gids werd als nuttig beoordeeld door 25 mensen en kreeg gemiddeld 4.4 sterren uit 3 reviews. Heb je een vraag over 7inova 7W310 of wil je andere gebruikers van dit product iets vragen? Stel een vraag
Pagina 1/2
Before you start to use this device, please check if there’s anything
missing in the package, and contact your dealer of purchase to
claim for missing items:
Package Contents:
1x 7W310 WiFi Repeater
1x 1m Ethernet cable with RJ45 connector
1x Quick Installation Guide
Wireless-N WiFi Repeater 300M
Quick Installation Guide
Model:7W310
WPS
RESET
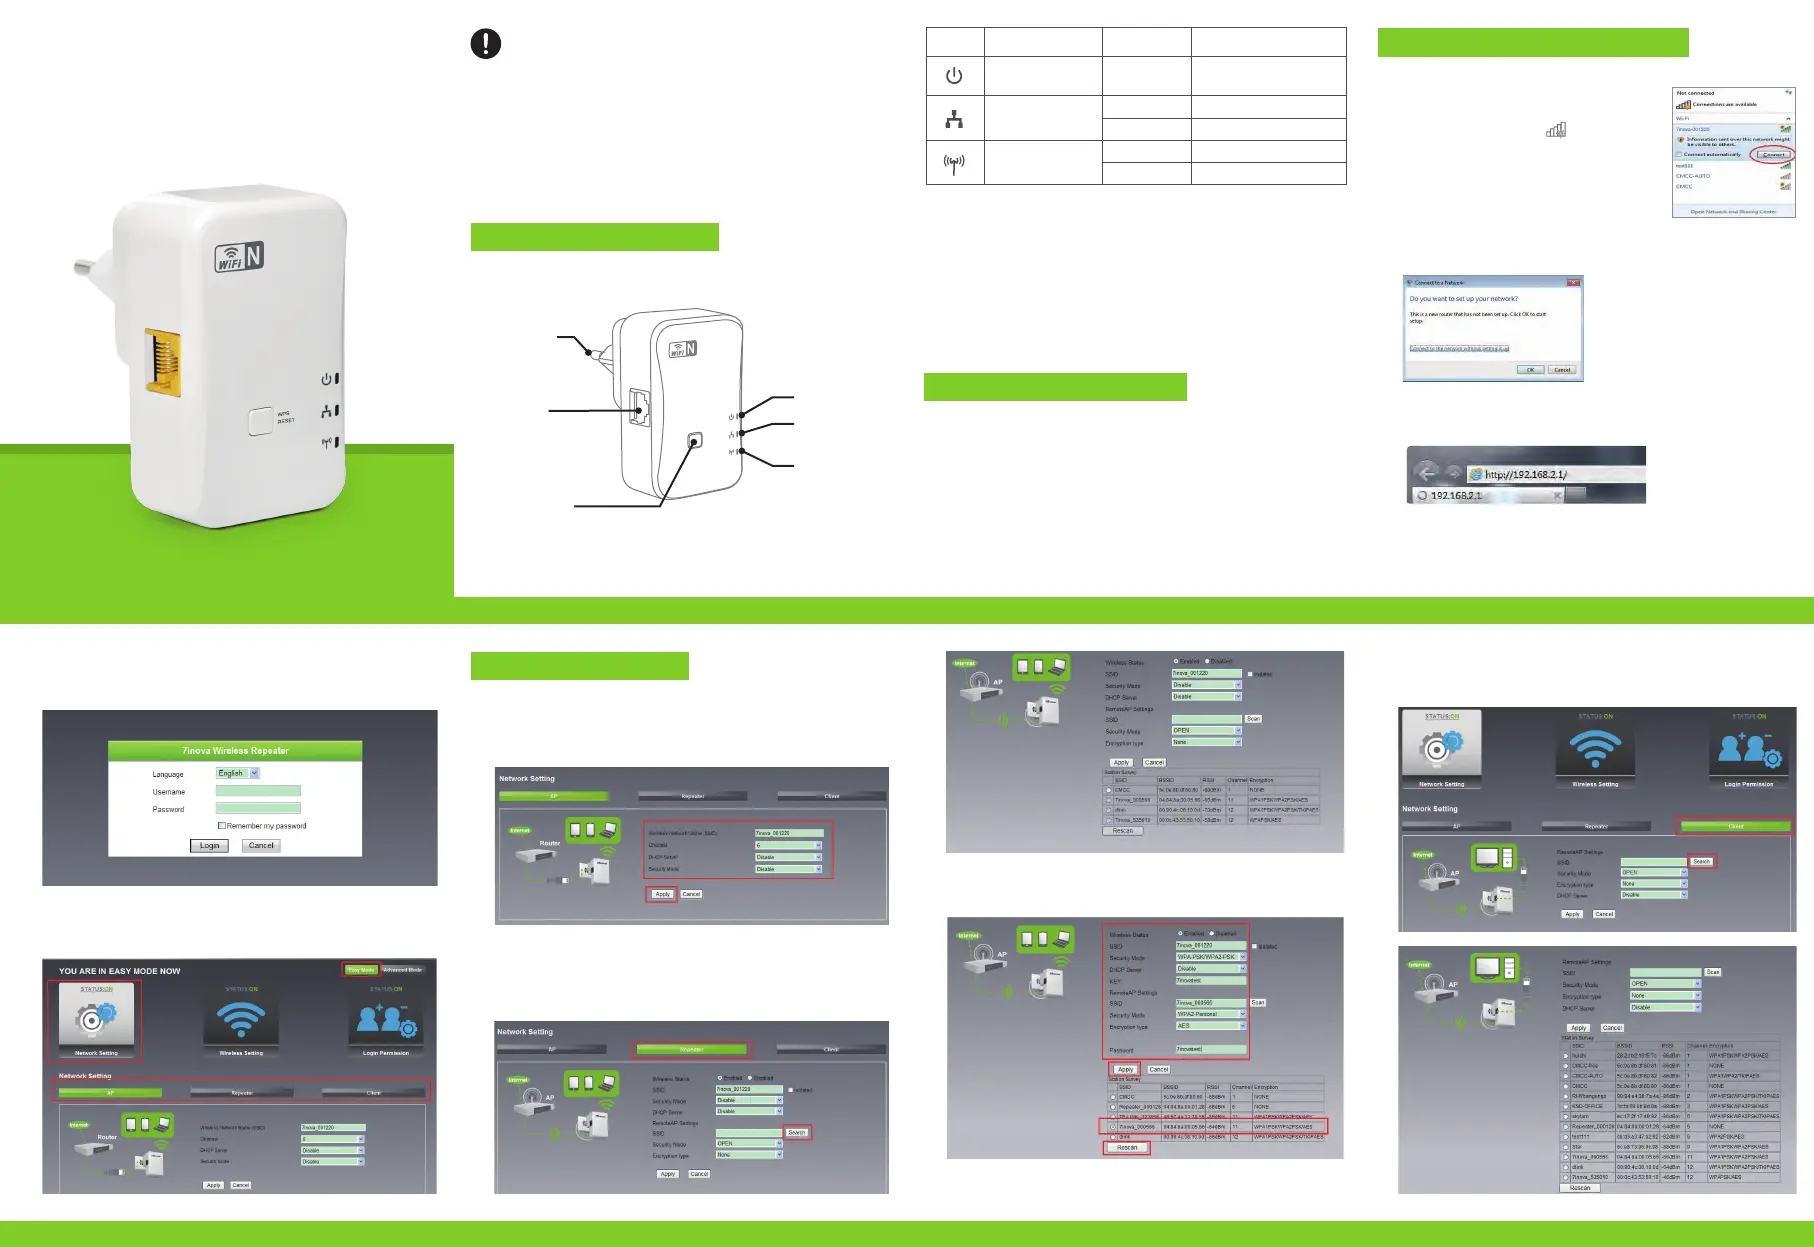
LED indicators’ Status Description:
Reset & WPS
Ethernet
WLAN LED
Ethernet LED
Power LED
Plug
Cautions:
1. Disconnect the device in thunderstorms in case of lightning damage.
2. Keep far from heat source and ensure ventilation.
3. Keep waterproof in the storage, transportation and operating environment.
IndicatorName
Power Status IndicatorGreen OnGet Powered
StatusDescription
Ethernet Status Indicator
Green fast blink
Green On
Data Transmission via Ethernet
Ethernet Connected
Wireless Status Indicator
Green slow blinkWireless Function Launched
Green fast blinkData Transmission via wireless
Reset: If need to reset the Repeater, press and hold RESET button for 3-5
seconds, release until all other LED are off except Power LED.
Note: Please check whether the WiFi-Repeater accord with factory default
settings once you can’t download http://192.168.2.1. If you are still not sure
what reasons, you can reset the WiFi-Repeater, just need to press the reset
button for 3-5 seconds, then try again.
Appearance Introduction
1 Computer Configuration
3 Configuration Mode
2 Connect To Wireless Network
1.1 Click “Start→Control Panel→Network and Internet→Network and Sharing
Center→Change adapter settings→Wi-Fi(right click)→Properties”
3.1.1 Follow process 2.3 to 2.5.
3.1.2 Select “AP” and enter the information what you want to set up wireless
information and password, then click “Apply”, wait for 3~5 seconds it complete.
3.1 Configure AP Mode
3.2.1 Follow process 2.3 to 2.5.
3.2.2 Select “Repeater” then click on “Search”.
3.2.3 Select wireless which you want to connect and enter the password (if wireless don’t
have password is “None”), then enter the wireless information what you want to set.
3.2.4 Then click “Apply” and wait for 3~5 seconds it is complete.
3.2 Configure Repeater Mode
3.3.1 Follow process 2.3 to 2.5
3.3.2 Select “Client” then click on “Search”
3.3 Configure Client Mode
2.6After logging in click “Easy Mode” and then click “Network Setting”, you
will see 3 modes: AP Mode, Repeater Mode and Client Mode
2.1 Pulg the Wi-Fi Repeater to a wall socket.
2.2 Click on the network icon( ) on the right
bottom of your desktop. You will find the signal
from the Wi-Fi Repeater. Click on “Connect”
and wait for a few seconds.
2.3 When shows: “Connect to a Network”, please click “Connect to the
network without setting it up”
2.5 The login screen below will appear. Enter the “Username” and “Password”
then click “Login” to login. The default Username is “admin” and Password
is “admin”.
2.4 Open web browser and type http://192.168.2.1 in the browser’s address
box. This number is the default IP address for this devices.
1.2 Double click “Internet Protocol Version 4(TCP/IPv4)”
1.3 To set up the computer IP 192.168.2.x (x arbitrary integer between 2~252),
subnet mask of 255.255.255.0, Click “OK”. Back to the last interface and
click “OK”
01Wireless-N Repeater02Wireless-N Repeater03Wireless-N Repeater
05Wireless-N Repeater04Wireless-N Repeater06Wireless-N Repeater07Wireless-N Repeater
Product specificaties
| Merk: | 7inova |
| Categorie: | Wifi-repeater |
| Model: | 7W310 |
Heb je hulp nodig?
Als je hulp nodig hebt met 7inova 7W310 stel dan hieronder een vraag en andere gebruikers zullen je antwoorden
Handleiding Wifi-repeater 7inova

16 Juni 2023
16 Juni 2023
16 Juni 2023
16 Juni 2023
Handleiding Wifi-repeater
Nieuwste handleidingen voor Wifi-repeater
29 April 2026
14 Maart 2026
13 Maart 2026
12 Maart 2026
12 Maart 2026
12 Maart 2026
12 Februari 2026
9 Februari 2026
9 Februari 2026
9 Februari 2026