Zoom ZDTV Wireless Keyboard Handleiding

Zoom Toetsenbord ZDTV Wireless Keyboard

Lees hieronder de đź“– handleiding in het Nederlandse voor Zoom ZDTV Wireless Keyboard (7 pagina's) in de categorie Toetsenbord. Deze handleiding was nuttig voor 43 personen en werd door 2 gebruikers gemiddeld met 4.5 sterren beoordeeld

Pagina 1/7
Z D T V W I R E L E S S K E Y B O A R D
Z D T V W I R E L E S S K E Y B O A R D Z D T V W I R E L E S S K E Y B O A R D
Q U I C K S T A R T
Q U I C K S T A R T
Q U I C K S T A R T
Q U I C K S T A R T Q U I C K S T A R T
This Quick Start describes how to use your a, or XP computer. It also describes wireless keyboard with any Windows 7, Vist
how to enjoy special features of the keyboard when you use an HDMI cable to connect a Windows 7 or Vista computer’s HDMI
port to an HDTV.
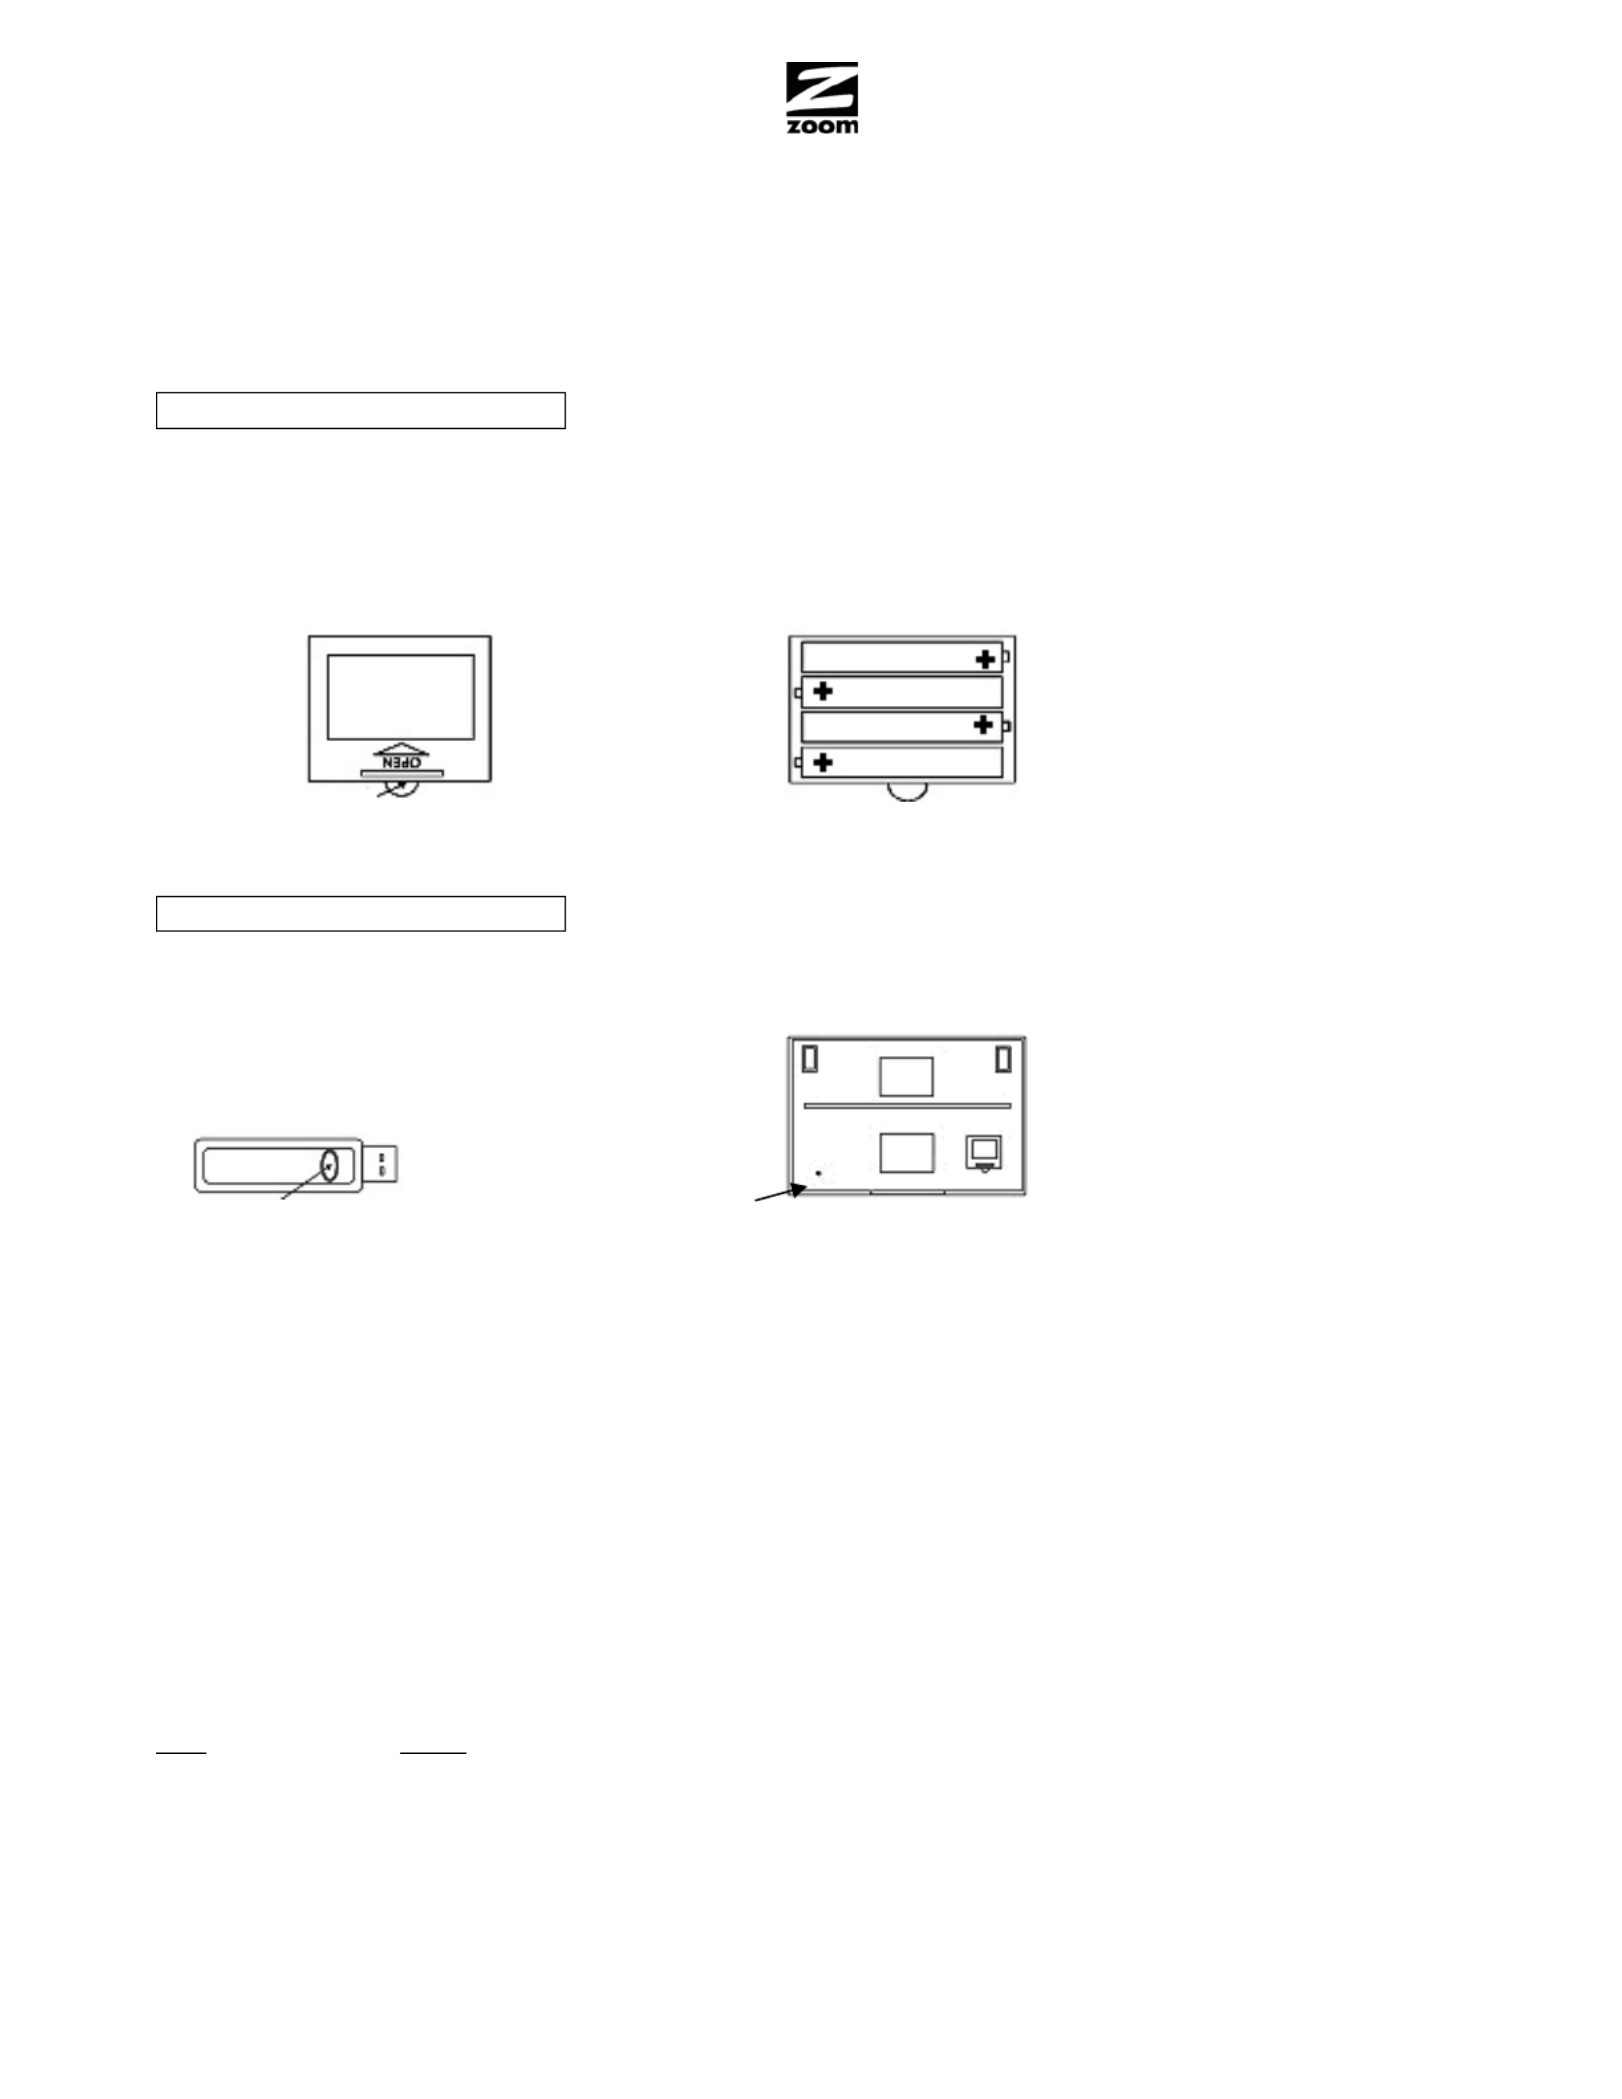
Step 1: Installing the keyboard batteries
For Windows 7, Vista, and XP
Warning: Improper installation of the batteries may cause the keyboard to overheat.
You will need four AAA batteries. (These do not come with the keyboard.) On the bottom of the keyboard, find the little door
marked OPEN. Put your finger into the se push the center armi-circle near the edge of the door, and then ea on the edge of the
door toward the arrow and pull up. The door will open. Install four AAA batteries, making sure to properly orient the Plus side of
each battery as shown in the keyboard’s battery container and the illustration below. Make sure the batteries are seated
securely. Now close the door by first inserting its two feet and then pressing down on the edge near the semi-circle.
Push then lift
Step 2: Mating the keyboard to a computer
For Windows 7, Vista, and XP
If your computer isn’t already running, power it up now.
To pair the keyboard with your computer, first find the button on the USB dongle and the Reset button on the bottom of the
keyboard.
USB RESET KEYBOARD RESET
Plug the USB dongle into a computer’s USB port. The wireless keyboard will automatically identify itself to your computer’s
Windows operating system. This will take about half a minute, during which you may see a message such as, “Installing
device driver software. Click here for status.” When the software is installed, you will get a message such as, “Your device
is ready to use. Device driver software installed successfully.” After that, press the button on the USB dongle briefly, and
within 10 seconds press the keyboard’s Reset button for at least 2 seconds. This will pair the computer with your keyboard. To
start using your keyboard, simply press one of the keyboard’s keys.
After you’ve done this once, your computer will always recognize your keyboard. If you unplug the USB dongle and you later
plug it back in, it will automatically pair up with the keyboard. Twenty-five or more seconds after you plug in the USB dongle,
you can press any key on the keyboard to re-activate it. If for some reason the keyboard doesn’t work (for instance the batteries
were replaced) simply repeat the pairing described above.
Waking up the keyboard
The keyboard conserves its batteries by automatically going into a low-power mode when you haven’t used it for about 5
minutes. To wake it back up, simply press one of the keyboard’s keys.
Special Touchpad features:
Goal Action
Move cursor Slide your finger
Left click Tap one finger on the touchpad or use the left-click button
Middle click Tap two fingers on the touchpad
Right click Tap 3 fingers on the touchpad or use the right-click button
Double left click Double tap one finger on the touchpad
Drag Double tap the touchpad and then slide your finger
Vertical scroll Slide 2 fingers vertically
Step 3: Connecting an HDTV to your computer
For Windows 7
If you have a Windows 7 computer with an HDMI port, we highly recommend that you try using the computer with an HDTV and
the wireless keyboard. This is particularly convenient with a notebook or small desktop computer. We want you to be able to
enjoy all your computer has to offer, including the Internet and Windows Media Center, from your favorite chair. Special
functions on the keyboard, including Magnify features, work with our software to make using it with an HDTV easy and fun.
1
1
1
11 Most HDTV sets have an HDMI port. If your HDTV does have an HDMI port, plug an HDMI cable into a free HDMI port on
the HDTV.
2
2
2
22 Plug the other end of the cable into an HDMI port on your computer. If all your HDTV’s HDMI ports are used, ZDTV may
have to share an HDMI input with a DVD player or other device. (If your Windows 7 computer does not have an HDMI port,
you can try connecting to an HDTV using a VGA or DVI video connection. You may get acceptable performance, depending
on the capabilities of your computer and HDTV, but some ZDTV features may not work correctly.)
3
3
3
33 Your HDTV remote or a button on your HDTV lets you select the TV’s normal input, your computer, or some other input as
the current input for your HDTV screen. Sele similar to selecting a DVD player. cting your computer for the screen input is
Now press Source, Input, or a similarly-named button on your remote or HDTV to select your computer as the HDTV input.
Check to make sure that you see your computer’s Windows desktop on your HDTV.
4
4
4
44 You will see the message New Display Detected. Select Show my desktop on the external display only. Select Apply
and then select OK.
For Windows Vista:
Note: Windows Vista users with Desktop PCs should connect only the HDTV; no other monitor or display should be
connected at the same time.
1
1
1
11 Your PC may offer a DVI connector. If it does, use a DVI to HDMI cable to connect your PC to your HDTV. Otherwise, in
most cases, your PC will have a VGA port. Connect this port to a VGA input port on your HDTV.
When using an HDMI to HDMI cable, you will see the message New Display Detected. Select Show my desktop on the
external display only. Select Apply and then select OK.
Note: You will separately need to make an audio connection.
2
2
2
22 From your TV’s menu system, select the video input that you just connected to. If you have connected via VGA, often this
will be labeled “PC.”
3
3
3
33 Power up your computer if it isn’t already on. If you can’t see a display on your HDTV, or the picture doesn’t look ideal, go
to Step 5: Optimizing Screen Settings when you connect your PC to your HDTV. Then come back to Step 4:
Installing the ZDTV software. Otherwise, continue with Step 4: Installing the ZDTV software.
For Windows XP:
Note: Windows XP users with Desktop PCs should connect only the HDTV; no other monitor or display should be connected
at the same time.
1
1
1
11 In the vast majority of cases, your PC will have a VGA port. Connect this port to a VGA input port on your HDTV.
Note: You will separately need to make an audio connection.
2
2
2
22 From your TV’s menu system, select the video input that you just connected to. If you have connected via VGA, often this
will be labeled “PC.”
3
3
3
33 Power up your computer if it isn’t already on. If you can’t see a display on your HDTV, or the picture doesn’t look ideal, go to
Step 5: Optimizing Screen Settings when you connect your PC to your HDTV. Then come back to Step 4: Installing
the ZDTV software. Otherwise, continue with Step 4: Installing the ZDTV software.
Step 4: Installing the ZDTV software if you have a CD ROM drive in your computer
For Windows 7, Vista, and XP
Make sure your computer is on and connected to the Internet, and that you are logged on to an account with administrative
privileges. The CD that came with your keyboard should run automatically when inserted into your computer’s CD/DVD ROM
drive. If it does not, go to the AccessoriesStart menuÆ All ProgramsÆ Æ Run and type
E:Setup.exe where E: is the letter
of your CD-ROM drive.
Follow the on-screen instructions to complete the software installation.
If the keyboard times out during any phase of the installation process, press the
Fn key to re-activate the keyboard.
Note: If you get a message stating “This program might not have installed correctly" you should click on “This program installed
correctly”.
If you are prompted to enter a 4-character Activation Code during software installation, please enter the appropriate code for
your country/region from the table below. If a dialog box appears to upgrade ZDTV, select
Upgrade Now and click
Continue.
Activation Codes
Country / Region Code to enter
US ZDTV
UK 72UK
Spain ZDSP
Latin America ZDLN
Installing ZDTV software if you don't have a CD ROM drive in your computer
You will need to download the ZDTV software from the Zoom website. Make sure your computer is connected to the Internet.
Open a browser and type http://zdtv.zoomtel.com/download in your browser's address bar.
Follow the on-screen instructions to download and install the software on your computer.
If the keyboard times out during any phase of the installation process, press the
Fn key to re-activate the keyboard.
Step 5: Optimizing Screen Settings when you connect your PC to your HDTV
For Windows 7
Double-click the ZDTV icon on your Windows desktop to launch the ZDTV software that was installed. The first time you do
this, the Screen Setup Wizard that was installed on your desktop when you ran the ZDTV CD will run. Answer the Wizard’s
simple questions to set up your computer for your HDTV. If you are using a notebook, keep the lid open while you do this. The
ZDTV wizard will turn off your notebook’s screen and adjust video settings for the best possible picture on your HDTV.
You may be asked to change your HDTV’s video setting for the HDTV input that connects to your computer. Depending on the
model of your TV, you may find HDTV screen adjustment settings under one of these video menu titles: Aspect, Format,
Picture Format, Screen, Picture Size, Size, Viewing Modes, View Mode. If you select one of the above, you will see another
list of menu options which will typically include one or more of the following 1:1, 16/9, Aspect, Dot-by-Dot, Full Pixel, Just
Scan, Native, Pixel-by-Pixel, and Screen Fit. Try any of these options that you see on your TV’s menu until you find the
optimal setting.
If you still have problems with the display - for example, only part of the items located at the edge of the screen are visible, such
as the Start button in Windows (or the circles in squares in the test screen) - try turning off an "overscan" setting. This may be
called overscan, cropping, or something similar. An overscan or cropping setting is likely to appear in a menu close to the
one that controls the screen settings we described above.
If you are using a notebook and you disconnect the HDMI cable from your HDTV, your notebook’s screen will turn on whenever
the notebook is On. Whenever you reconnect your HDTV to your notebook, your notebook will automatically adjust its video
display to turn off the local display and generate the optimal display for your HDTV. You should not have to run the ZDTV
Wizard again unless you use a different HDTV.
If you connect a notebook to your HDTV, ZDTV software ensures that the notebook will not go to standby or shut down
automatically even if the notebook’s cover is closed. This makes it easy to tuck the notebook into a convenient place. If you use
a desktop computer, ZDTV will leave alone any power mode settings you may have set.
If you connect your notebook to a different HDTV, the Screen Setup Wizard may run again. If you need to adjust the screen,
click Help. Go to Adjust Screen from the ZDTV menu.
Please continue with Step 7: Using your notebook computer with an HDTV.
For Windows Vista users with Notebook or Desktop PCs
This process may require you to make adjustments to the display settings on your PC and to the Screen or Picture settings on
your HDTV. When you are done you should have the highest resolution picture possible and it should fit neatly within your
display.
Note: Windows Vista users with Desktop PCs should connect only the HDTV; no other monitor or display should be connected
at the same time.
Click Start Æ (Settings) ÆControl Panel ÆAppearance and Personalization Æ Personalization Æ Display Settings. (in
Category View)
FOR DESKTOPS ONLY: Continue with Step 6: Adjusting Your Screen Settings.


Product specificaties

Merk: Zoom
Categorie: Toetsenbord
Model: ZDTV Wireless Keyboard
Kleur van het product: Zwart
Gebruiksaanwijzing: Ja
Automatisch uitschakelen: Ja
Connectiviteitstechnologie: Draadloos
Frequentieband: 2.4 GHz
Type stroombron: Batterij/Accu
Ondersteund aantal accu's/batterijen: 2
Aantal toetsen, toetsenbord: 78
Certificering: CE, FCC part 15
Aansluitbereik: 9.1 m
Aansluiting: RF Draadloos
Stroomverbruik: 8 mA
Inclusief muis: Nee
Compatibiliteit: Playstation 3, Xbox 360, PC
USB: Ja
Meegeleverde ontvanger: Ja
Ingebouwde touchpad: Ja
Wireless ontvanger interface: USB Type-A
Dimensies toetsenbord (BxDxH): 279 x 112 x 18 mm
Gewicht toetsenbord: 281 g
Batterijen inbegrepen: Ja
Batterijtechnologie: Alkaline
Type batterij: AAA

Heb je hulp nodig?

Als je hulp nodig hebt met Zoom ZDTV Wireless Keyboard stel dan hieronder een vraag en andere gebruikers zullen je antwoorden


Handleiding Toetsenbord Zoom

Handleiding Toetsenbord

Nieuwste handleidingen voor Toetsenbord