Zircon MultiScanner i700 OneStep Handleiding
Zircon Meetapparatuur MultiScanner i700 OneStep
Bekijk gratis de handleiding van Zircon MultiScanner i700 OneStep (2 pagina’s), behorend tot de categorie Meetapparatuur. Deze gids werd als nuttig beoordeeld door 63 mensen en kreeg gemiddeld 4.4 sterren uit 4 reviews. Heb je een vraag over Zircon MultiScanner i700 OneStep of wil je andere gebruikers van dit product iets vragen? Stel een vraag
Pagina 1/2
MultiScanner
®
i700 OneStep
™
Multifunction Wall Scanner
Congratulations on purchasing the most technically advanced wall scanner
ever created! Zircon introduced the StudSensor
™
in 1980 and has put over
25 years of research into developing OneStep
™
,the advanced technology
at the core of MultiScanner
®
i700.OneStep technology senses,processes,
and adapts to wall surfaces to provide high-definition visibility into walls,
floors,and ceilings.MultiScanner
i700 is the fastest,most accurate,and
easiest-to-use wall scanner on the market today.
REGISTER YOURPRODUCT AND WIN!
At Zircon,we value customer feedback,which allows us to better serve you
with product support and updates,and make enhancements to our products
and Web site.Register your product today and be automatically entered in
our monthly drawings to win free Zircon products.To quickly and easily
|register your Zircon product,please visit www.zircon.com
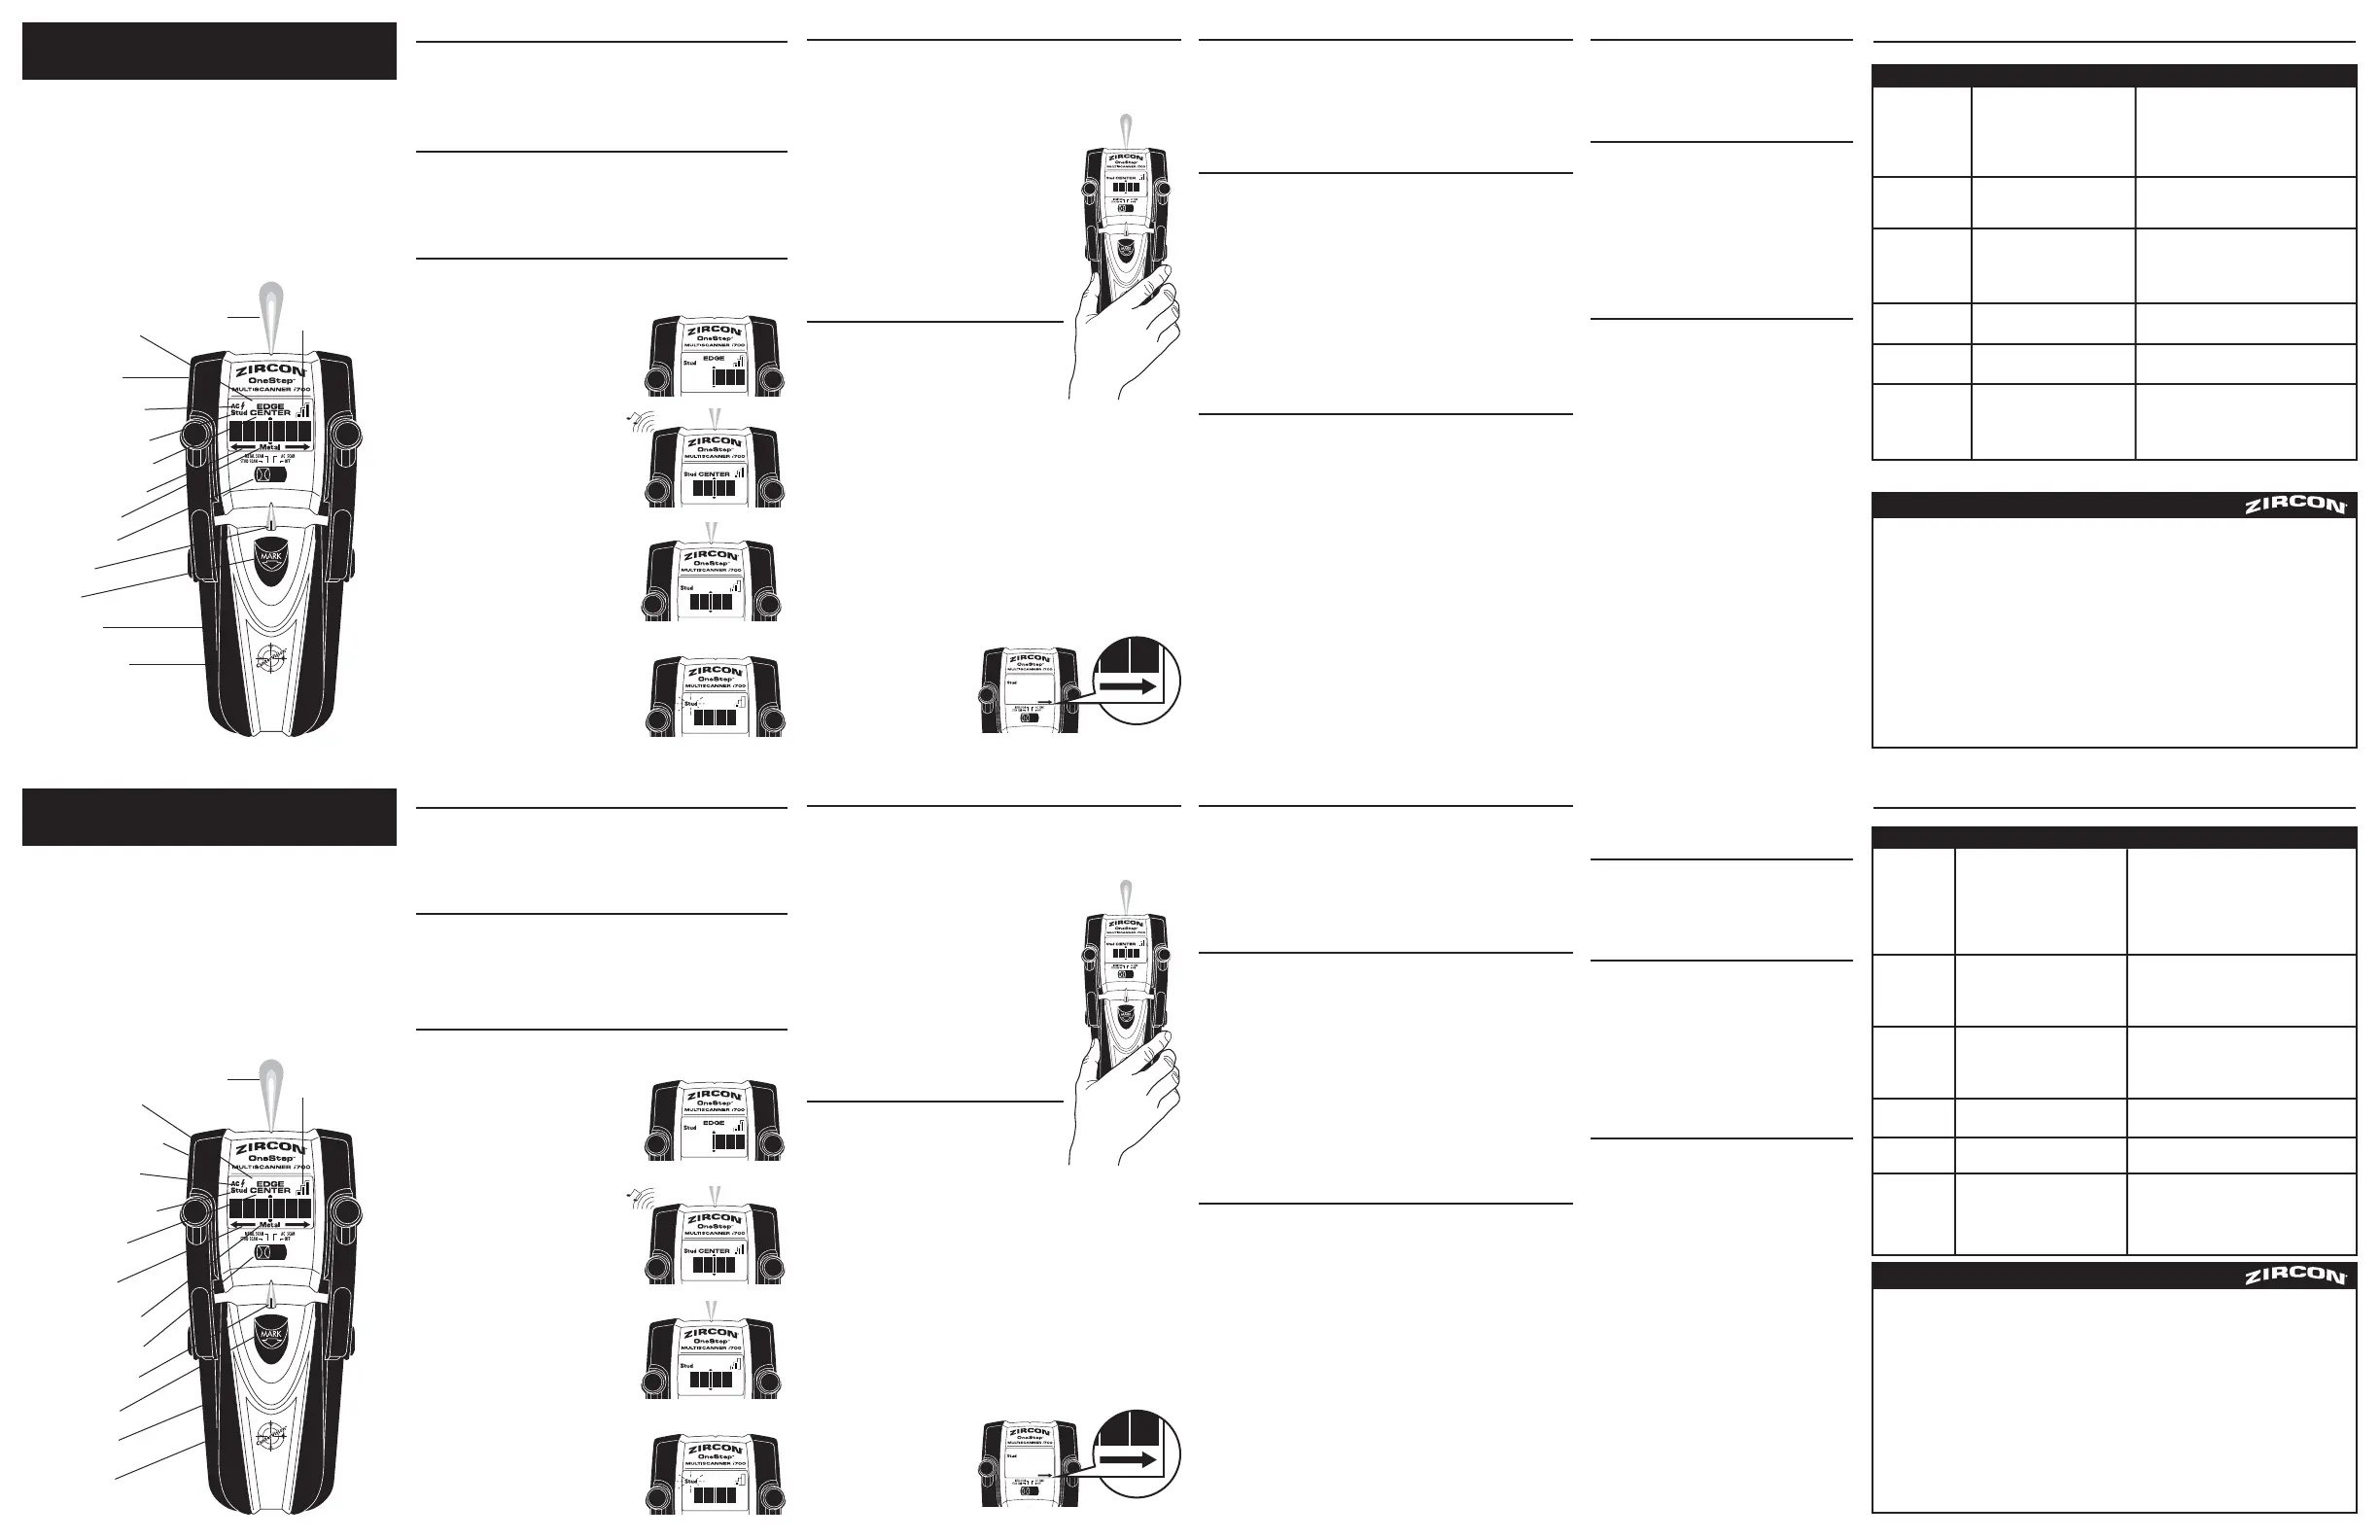
Dual SpotLite
®
Pointing System
Backlit LCD
Mode Selector Switch
Battery (back of unit)
Stud Scan Mode Indication
Stud Edge or Center Indication
AC Mode & WireWarning
®
Indication
Metal Mode Indication
Auto Recalibration Indication
Signal Strength
Indicator
Erasable Marker
Mark Button
Running Board
Metal Sensor
(back of unit)
1. INSTALLING THE BATTERY
Press battery door release in with your finger or a coin and lift up
to remove door.
Place 9-volt battery into the compartment and press into place.
Replace battery door and snap shut.Battery will last approximately
2 years under normal conditions.
2. SELECTING THE MODE
Move selector switch to the desired mode:STUD SCAN for finding wood
or metal studs;METAL SCAN for locating metal;or AC SCAN for locating
hot AC wiring.
Move selector switch to the Off position when not in use to prevent the
tool from accidentally powering on and wearing down the battery.
3. FINDING A STUD
Always start with the scanner placed against the wall,then press
the handle down.Wait for beep to confirm calibration has completed
before moving tool.
Slowly slide tool across surface.EDGE
display will illuminate,indicating
location of the stud edge.
Continue sliding tool.When the center of
stud is located with three bars on the
Signal Strength Indicator,the buzzer will
sound,and the four middle bars,CENTER
display,and SpotLite will illuminate.
In cases of deeper studs (or thicker
walls) two bars will show on the
Signal Strength Indicator and only
the SpotLite and four middle bars will
illuminate.If you still can’t locate a
stud,try the next step.
Quickly (within one second) release
and re-press the handle down.The
scanner will enter the High Sensitivity
Modeand the StudScan Mode Indication
will flash continuously.The center of a
very deep stud will be indicated by the
four middle bars illuminating.
4. TIPS FOR PROPER OPERATION
For optimum scanning results it is important to properly hold MultiScanner
i700 and move slowly when scanning.The following tips will ensure
accurate scanning results:
•Grasp the handle with your thumb on one side
and your fingers on the other side.Make sure
your fingertips are resting on or above the
running board and not touching the surface
being scanned or the scanning head of the tool.
•Hold the tool straight up and down,parallel to
the studs,and do not rotate the tool.
•Keep tool flat against the wall and do not rock
or tilt the tool when slowly sliding across the
surface being scanned.
•Make sure your other hand or any other part
of your body is not touching the surface
being scanned.This could interfere with the
tool’s performance.
5. CALIBRATING THE TOOL
MultiScanner i700 is the world’s first StudSensor
that can be calibrated anywhere on the wall.
•Place MultiScanner
i700 against the wall and
press the handle until it lays flat against the wall.
Pressing the tool to lay flat against the wall will
automatically power on the tool via the internal
on/off switch.
•Once powered on,tool will automatically
perform all calibrations.The LCD will display
all icons until calibration is complete.Upon
completion of calibration,the SpotLites and
buzzer will momentarily activate and the
tool will begin continuous measurements.
Continue to press the tool flat against the wall
and begin scanning.
Note: It is important to wait for calibration to complete
(1–2 seconds) before moving the scanner.
•One of the most important factors in ensuring scanning accuracy is
calibrating the tool away from a stud,so the tool will sense increased
density over the stud.During scanning,the tool will automatically
recalibrate itself when needed.This recalibration is usually transparent
and no indication is made.
If the tool is initially calibrated
near a stud and then moved
away (it will detect the density
of the wall decreasing),and an
arrow icon will be illuminated,
indicating the direction of the
missed stud.
6. SCANNING IN METAL MODE
Press the tool flat against the wall and slowly slide the scanner across the
surface.MARK the spot where the display bars peak and the steady tone
sounds.The SpotLites will also shine a beam of light.Continue in same
direction until display bars reduce.
Reverse direction and MARK the spot where the display bars peak from
the reversed direction.The midpoint of the two marks is the location of the
center of the metal object.
7. SCANNING IN AC MODE
Press the tool flat against the wall and slowly slide the scanner across the
surface.MARK the spot where the display bars peak.Continue in the same
direction until display bars reduce.
Reverse direction and MARK the spot where the display bars peak from
the reversed direction.The midpoint of the two marks is the location of
the center of the electrical object.
Note: AC SCAN mode will only detect hot AC wiring.
AC WireWarning
®
Zircon’s AC WireWarning
®
feature works continuously in all modes.When AC
voltage is detected,the AC Alert warning icon will appear in the display.
CAUTION: Wires deeper than 2 inches (51 mm) from the surface, in conduit,
or behind plywood shear wall may not be detected. Use extreme caution
under these circumstances or whenever hot AC wiring is present. Always turn
off power when working near electrical wires.
8. WORKING WITH DIFFERENT MATERIALS
Wallpaper:The MultiScanner i700 functions normally on walls covered with
wallpaper or fabric,unless the materials are metallic foil,contain metallic
fibers,or are still wet after application.
Lath & plaster:Due to irregularities in plaster thickness,it is difficult for
the MultiScanner
i700 to locate studs in STUD SCAN mode.Change to
METALSCAN mode to locate nail heads holding laths to stud.If plaster
has metal mesh reinforcement,MultiScanner
i700 will be unable to detect
through that material.
Textured walls or acoustic ceilings:When scanning a ceiling or wall with
an uneven surface,place thin cardboard on the surface to be scanned and
scan over the cardboard.Calibrate with cardboard in place.
Wood flooring,subflooring,or gypsum drywall over plywood
sheathing:Use STUDSCAN mode and move the tool slowly.The signal
strength indicator may only display 1 or 2 bars when the tool locates a
stud through thick surfaces.
MultiScanner
i700 cannot scan for wood studs and joists through carpeting
and pad.In problematic situations,try using METAL SCAN to locate nails or
drywall screws that line up vertically where a stud is positioned.
Note: Sensing depth and accuracy can vary due to moisture content
of materials, wall texture, and paint.
Detects other objects
besides studs in STUD
SCAN mode.Finds
more targets than
there should be.
Area of voltage appears
much larger than actual
wire (AC only).
Difficulty detecting metal.
Image of metal object
appears wider than
actual size.
Constant readings of
studs near windows
and doors.
You suspect electrical
wires,but do not
detect any.
•Electrical wiring and metal/plastic
pipes may be near or touching back
surface of wall.
•Static charge may develop on drywall,
spreading voltage detection as much as
12 in.(305 mm) laterally from each
side of an actual electrical wire.
•Tool calibrated over metal object.
•Metal targets too deep.
•Metal has greater density than wood.
•Double and triple studs are usually
found around doors and windows.
Solid headers are above them.
•Wires may be shielded in metal conduit
or behind metallic wall covering.
•Wires deeper than 2 in.(51 mm) from
surface might not be detected.
•Wires may not be hot.
•Scan the area in METAL and AC SCAN modes to
determine if metal or hot AC is present.
•Check for other studs equally spaced to either side (12,
16,or 24 in.[305,406,or 610 mm]) apart or the same
stud at several places directly above or below the first.
Use CAUTION when nailing, sawing, or drilling in walls,
floors, and ceilings where these items may exist.
•To narrow detection,turn unit off and on again at the
edge of where wire was first detected and scan again.
•Place your free hand flat against wall near tool during
the entire scan to drain static.
•The scanner may have been calibrated over a
metal object,reducing sensitivity.Try calibrating
in another location.
•Scan in both horizontal and vertical directions.Metal
sensitivity is increased when metal object is parallel
to sensor,located under Zircon logo.
•To reduce sensitivity,recalibrate MultiScanner
i700
over either of first two marks.
•Detect outer edges so you know where to begin.
•Try METAL SCAN to see if you can find metal,wire,
or metal conduit.
•Always turn off the power when working near
electrical wires.
•Try turning on switches to outlet.
•Try plugging a lamp into outlet and turning on switch.
12. HELPFUL HINTS
(See also number 4,Tips for Proper Operation)
SituationProbable CauseSolution
LIMITED 2 YEAR WARRANTY
Zircon Corporation,(“Zircon”) warrants this product to be free from
defects in materials and workmanship for two years from the date of
purchase.Any in-warranty defective product returned to Zircon*,freight
prepaid with proof of purchase date and $5.00 to cover postage and
handling,will be repaired or replaced at Zircon’s option.This warranty
is limited to the electronic circuitry and original case of the product
and specifically excludes damage caused by abuse,unreasonable use
or neglect.This warranty is in lieu of all other warranties,express or
implied,and no other representations or claims of any nature shall bind
or obligate Zircon.Any implied warranties applicable to this product
are limited to the one year period following its purchase.IN NO
EVENT WILL ZIRCON BE LIABLE FOR ANY SPECIAL,INCIDENTAL OR
CONSEQUENTIAL DAMAGES RESULTING FROM POSSESSION,USE
OR MALFUNCTION OF THIS PRODUCT.In accordance with government
regulations,you are advised that:(i) some states do not allow limitations
on how long an implied warranty lasts and/or the exclusion or limitation
of incidental or consequential damages,so the above limitations and/or
exclusions
may not apply to you,and further (ii) this warranty gives you specific
legal rights and you may also have other rights which vary from state
to state.
Return product freight prepaid with proof of purchase date (dated sales
receipt) and $5.00 to cover postage and handling,to:
UPS SCS C/O ZIRCON RETURNS
Lohstrabe 30a
85445 Schwaig
Munich,Germany
Be sure to include your name and return address.Out of warranty
service and repair,where proof of purchase is not provided,shall be
returned with repairs charged C.O.D.Allow 4 to 6 weeks for delivery.
Customer Service,1-800-245-9265 or 1-408-963-4550
Monday–Friday,8:00 a.m.to 5:00 p.m.PST
E-mail:[email protected]
U.S.Patent 5917314,6259241,Canada Patent 2341385,Japan Patent
3581851,E.U.patent EP0657032 and Patents Pending
©2006 Zircon Corporation • P/N 62131 Rev A 12/06
Visit www.zircon.com/support for the most current instructions.
StudSensor,WireWarning,Centervision,MultiScanner,OneStep,SpotLite,and Zircon are registered trademarks or trademarks of Zircon Corporation.
9. MARKING THE LOCATION
Once an object is located,you can MARK the location
by gently pulling down the MARK button with the tip
of your finger.Pulling back the MARK button will
cause a pencil point to extend from the front of the
handle,placing a short erasable line on the wall.
10. CHANGING THE MARKER TIP
Pull and hold the MARK button to fully extend the
marker tip.Grasp the marker and pull it off the marker
post.To install a new marker tip,pull and hold the
MARK button to fully extend the marker post.Push
the new marker onto the marker post.
Note: MultiScanner
i
700’s comes with three spare
marker tips. These tips are stored in a compartment
located behind the battery. Additional marker tips can
be ordered from customer service at 1-800-245-9265.
11.REMOVING OR REPLACING
THE SCANNING HEAD
MultiScanner i700’s scanner head may be removed
from the handle to facilitate cleaning or repair.Or the
scanning head may also become separated from the
handle if accidentally dropped or twisted.Follow the
directions below to replace the scanning head:
To remove head:Place the back of the head in the
palm of one hand,and grasp the body of the unit in
the other hand.Slowly and gently lift and turn the
body,removing one arm from the socket at a time.
To replace the head:Align the end of the arms over
the sockets and gently snap them back into their
sockets,one arm at a time.
FCC Part 15 Class B Registration Warning
This equipment has been tested and found to comply
with the limits for a Class B digital device,pursuant
to Part 15 of FCC Rules.
MultiScanner
®
i700 OneStep
™
Multifunktions-Wand-Scanner
Wir beglückwünschen Sie zum Kauf des technisch am weitesten fortgeschrittenen
Wand-Scanners,der je entwickelt wurde.Zircon erfand den StudSensor
™
im Jahre 1980 und
hat über 25 Jahre an Forschungsarbeit in die Entwicklung von OneStep
™
,der fortgeschrittenen
Technologie mit dem MultiScanner
™
i
700 als Kernprodukt,investiert.Die OneStep Technologie
spürt Gegenstände in Wänden auf,verarbeitet die Informationen weiter und passt sich
verschiedensten Oberflächen an.Damit wird größtmögliche Einsicht in das Innenleben von
Wänden,Böden und Decken gegeben.MultiScanner
i
700 ist der schnellste Wand-Scanner
auf dem Markt,der gleichzeitig die größte Präzision und einfachste Bedienung bietet.
REGISTRIEREN SIE IHR PRODUKT UND GEWINNEN SIE!
Wir von Zircon schätzen Ihre Rückmeldungen und Anregungen sehr,da wir Sie dann besser
für Ihr Produkt unterstützen und Ihnen Updates bieten sowie Produktentwicklungen weiter
vorantreiben und Informationen auf unserer Webseite ergänzen können.Registrieren Sie Ihr
Produkt noch heute und nehmen damit an unseren monatlichen Gewinnziehungen für
Zircon-Produkte teil .Registrieren Sie sich schnell und ohne Aufwand unter www.zircon.com
DualSpotLite
™
Anzeigesystem
LCD Hintergrundlicht
Modus Selektionsschalter
Batterie (auf der
Rückseite des Geräts)
Holzträger Modus Indikation
Anzeige der Kante
oder des Mittelpunkts
Indication Stromkabel
und Elektrizitätswarnung
Metall Modus Indikation
Automatische
Rekalibrierung Indikation
Anzeige der
Signalstärke
Löschbarer Markier-Stift
Markierungsknopf
Geräte-Lauffläche
Metall Sensor (Geräterückseite)
1. ANSCHLIESSEN DER BATTERIE
Drücken Sie die Freigabetaste des Batteriefaches mit dem Finger oder einer Münze herunter
und entfernen Sie die Abdeckung.
Legen Sie eine 9 V Batterie in das Batteriefach ein und vergewissern Sie sich,dass sie korrekt
eingesteckt ist.Bringen Sie die Abdeckung wieder an und lassen sie diese einrasten.Unter
normalen Einsatzbedingungen hat die Batterie eine Lebensdauer von ca.2 Jahren.
2. WAHL DER BETRIEBSART
Schieben Sie den Betriebswahlschalter auf den gewünschten Modus:STUD SCAN für das
Auffinden von Holzträgern und Metallpfosten,METAL SCAN für das Lokalisieren von Metall
oder AC SCAN zum Aufspüren von spannungsführenden AC-(Wechselspannungs-)Drähten.
Stellen Sie den Betriebswahlschalter auf “OFF”(=AUS),wenn Sie das Gerät nicht benutzen,
so dass es nicht versehentlich eingeschaltet ist und die Batterie dadurch nicht unnötig
erschöpft wird.
3. Einen Holzträger finden
Beginnen Sie immer indem Sie das ganze Gerat gegen die Wand drücken.Warten Sie bis ein
akustisches Signal die Kalibrierung angibt,bevor Sie das Werkzeug bewegen.
Bewegen Sie das Werkzeug langsam über die
Oberflache.Das Wort “EDGE”wird angezeigt,wenn
das Gerät eine Kante des Holzträgers erreicht.
Bewegen Sie das Gerät langsam weiter.Wenn die
Mitte des Holzträgers erreicht ist sind drei Balken
auf dem Signal Indikator des Displays sichtbar,ein
akustisches Signal ist hörbar und ein Leuchtsignal
( SpotLite) zeigt die Mitte des Holzträgers an.
Falls dickere Wände oder tiefer liegende Holzträger
vorhanden sind,werden zwei Balken auf dem Signa
l Indikator im Display sichtbar und nur das Leuchtsignal
und vier mittlere Balken in der Anzeige.Falls Sie keine
Holzträger finden,versuchen Sie,was folgt.
Heben Sie binnen einer Sekunde das Gerät kurz von
der Wand und drücken Sie es schnell wieder gegen die
Wand.Das Gerät wechselt dann in einen besonders
empfindsamen Arbeitsmodus.Der StudScan Indikator
blinkt kontinuierlich.Die Mitte eines tief liegenden
Holzträgers wird dann durch vier mittlere Indikatoren
auf dem Display angezeigt.
4. HINWEISE ZUM ORDNUNGSGEMÄSSEN BETRIEB
Um optimale Scan-Ergebnisse zu erzielen,ist es wichtig,den MultiScanner
i
700 ordnungsgemäß
in der Hand zu halten und ihn langsam über die abzutastende Oberfläche beim Scannen gleiten
zu lassen.Die folgenden Tipps stellen sicher,dass Sie präzise Scan-Werte erhalten:
•Fassen Sie den Handgriff des Gerätes mit dem Daumen auf der
einen und den Fingern auf der anderen Seite an.Vergewissern
Sie sich,dass Ihre Fingerspitzen auf oder über der Lauffläche
liegen und nicht die abzutastende Oberfläche oder den
Abtastkopf des Gerätes berühren.
•Halten Sie das Gerät gerade in Aufwärts- oder Abwärtsrichtung
und parallel zu den Pfosten und schwenken Sie das Gerät
nicht herum.
•Setzen Sie das Gerät flach gegen die Wand an,bewegen Sie es
nicht schnell hin und her und heben es auch nicht von der Wand
ab,sondern lassen das Gerät langsam über die abzutastende
Oberfläche gleiten.
•Stellen Sie sicher,dass Ihre andere Hand und auch kein anderer
Körperteil mit der abzutastenden Oberfläche in Berührung
kommt.Dies könnte die Leistung des Geräts beeinträchtigen
5. KALIBRIEREN DES GERÄTES
MultiScanner
i
700 ist der welterste StudSensor,der überall an der
Wand kalibriert werden kann.Er überwacht ständig,d.h.10 mal
pro Sekunde,die Umgebung der Fläche unterhalb der
Wandoberfläche und kalibriert sich bei Bedarf selbst neu,um den
Mittelpunkt von Pfosten in OneStep erfolgreich aufzuspüren!
•Setzen Sie den MultiScanner
i
700 gegen die Wand und drücken
Sie den Handgriff,bis das Gerät flach auf der Wand aufliegt.
Durch das Drücken des Geräts,um es flach gegen die Wand
zu platzieren,schaltet sich das Gerät automatisch über den
internen Ein-/Ausschalter ein.
•Sobald das Gerät eingeschaltet ist,nimmt es selbsttätig alle
Kalibrierungen vor.Das LCD zeigt alle Symbole an,bis die
Kalibrierung vollständig abgeschlossen ist.Nach vollständiger
Kalibrierung werden sofort die SpotLites-Anzeigen und der
Summer aktiviert.Das Gerät beginnt sofort mit ständigen
Messungen.Halten Sie das Gerät weiterhin flach gegen die
Wand und beginnen Sie mit dem Scannen.
•Einer der wichtigsten Faktoren zum Sicherstellen von akkuraten
Abtastergebnissen ist das Kalibrieren des Gerätes in ausreichender Entfernung zu einem Pfosten,
damit das Gerät die höhere Dichte über einen Pfosten erkennen kann.Während des Scan-
Vorgangs kalibriert sich das Gerät bei Bedarf automatisch selbst.Diese Neukalibrierung ist nor-
malerweise transparent,und es erfolgt
keine Anzeige.Falls das Gerät ursprünglich
in der Nähe eines Pfostens kalibriert und
dann weg bewegt wurde (es stellt fest,
dass die Dichte der Wand abnimmt),zeigt
ein beleuchtetes Pfeil-Symbol die Richtung
des nicht aufgefundenen Pfostens an.
6. SCANNEN IM METAL MODE
Drücken Sie das Gerät flach gegen die Wand und bewegen Sie den Scanner langsam über die
Oberfläche.MARKIEREN Sie die Stelle,wo die Anzeigebalken am stärksten werden und ein
akustischer Dauerton zu hören ist.Die SpotLites senden auch einen Lichtstrahl aus.Fahren Sie
in der selben Richtung fort,bis die Anzeigebalken schwächer werden.
Kehren Sie daraufhin in der Richtung um und MARKIEREN den Punkt,an dem nun von der
umgekehrten Richtung kommend die höchsten Signalstärkebalken angezeigt werden.Der
Mittelpunkt dieser zwei Markierungen stellt den Mittelpunkt des lokalisierten
Metallgegenstandes dar.
7. SCANNEN IM AC MODE
Drücken Sie das Gerät flach gegen die Wand und bewegen Sie den Scanner langsam über die
Oberfläche.MARKIEREN Sie die Stelle,wo die Anzeigebalken am stärksten werden Fahren Sie in
der selben Richtung fort,bis die Anzeigebalken schwächer werden.Kehren Sie daraufhin in der
Richtung um und MARKIEREN den Punkt,an dem nun von der umgekehrten Richtung kommend
die höchsten Signalstärkebalken angezeigt werden.Der Mittelpunkt dieser zwei Markierungen
stellt den Mittelpunkt des lokalisierten elektrischen Gegenstandes dar.
Achtung: Der AC SCAN Modus lokalisiert nur spannungsführende
(Wechselspannungs=AC-) Leitungen.
AC WireWarning
™
/ Warnung vor Wechselspannung
Zircon's AC WireWarning
™
funktioniert kontinuierlich in allen Betriebsarten.Wenn
Wechselspannung geortet wird,wird ein AC-Warnungssymbol auf dem Display angezeigt.
ACHTUNG: Drähte, die tiefer als 51 mm (2 Inches), in Kabelkanälen oder hinter Sperrholzwänden
liegen, können unentdeckt bleiben. Lassen Sie unter solchen Umständen oder wenn Sie wissen,
dass Wechselspannung-führende Drähte vorhanden sind, höchste Vorsicht walten. Schalten Sie
stets den Strom aus, wenn Sie in Nähe von elektrischen Drähten arbeiten.
8. ARBEITEN MIT UNTERSCHIEDLICHEN MATERIALIEN
Tapeten:Der MultiScanner
i
700 funktioniert ganz normal auf Wänden mit Tapeten oder Stoff,
ausser es wurden Materialien wie Metallfolien bzw.Materialien,die Metallfasern enthalten,
verwendet,oder die Tapeten / Stoffe sind nach dem Anbringen noch nass.
Latten und Verputz:Aufgrund unregelmäßiger Dicke des Verputzes ist es schwierig,mit dem
MultiScanner
i
700 Pfosten im STUD SCAN Modus zu lokalisieren.Wechseln Sie zum METAL
SCAN Modus,um Nagelköpfe,die Latten mit Pfosten zusammenhalten,zu orten.
Wenn der Verputz mit Metallgeflecht verstärkt ist,kann der MultiScanner
i
700 nichts durch
dieses Material hin orten.
Strukturwände oder Akustikdecken:Beim Abtasten einer Decke oder einer Wand mit
unebener Oberfläche platzieren Sie ein Stück dünner Pappe an die Decke oder Wand und
scannen über die Pappe,um eine möglichst glatte Oberfläche zu erhalten.Auch bei der
Kalibrierung sollte Pappe oder festes Papier verwendet werden.
Holzböden,Unterböden oder Gips-Trockensteinmauern über Schichtholz-
Ummantelungen:Wenden Sie die STUDSCAN Betriebsart an und bewegen Sie das Gerät
langsam.Die Signalstärkenanzeige zeigt eventuell nur 1 oder 2 Balken an,wenn das Gerät
einen Pfosten durch dicke Oberflächen hindurch lokalisiert.
Der MultiScanner
i
700 kann keine Holzpfosten und Profilträger durch Teppichboden und
Polster orten.Bei schwierigen Umständen versuchen Sie es am besten mit METAL SCAN,
um Nägel oder Trockenstein-Schrauben,die vertikal aufgestellt sind,wo ein Pfosten
positioniert ist,zu lokalisieren.
Ortet andere Objekte
statt Pfosten im STUD
SCAN Modus.Findet
mehr Ziele als vorhanden
sein sollten.
Der Spannungsbereich
erscheint viel größer
als der tatsächliche
Draht (nur bei
Wechselspannung)
Schwierigkeiten beim
Orten von Metall
Das Bild des Metallobjekts
erscheint breiter als seine
tatsächliche Größe
Konstante Meldungen
von Pfosten nahe
Fenstern und Türen
Sie vermuten elektrische
Drähte,aber orten keine.
•Elektrische Drähte und Metall-/Plastikrohre können
sich in der Nähe befinden oder die Rückseite der
Wandoberfläche berühren.
•Auf Trockenstein kann statische Aufladung
entstehen.Dadurch kann sich der Bereich,
in dem Spannung geortet wird,auf eine
Breite von 305 mm auf beiden Seiten vom
tatsächlichen Draht weg ausdehnen.
•Gerät wurde über einem
Metall-Gegenstand kalibriert.
•Die Metall-Zielobjekte liegen zu tief.
•Metall hat eine größere Dichte als Holz.
•Doppelte und dreifache Pfosten werden normalerweise
um Türen oder Fenster herum vorgefunden.Darüber
befinden sich starke Querbalken.
• Drähte können in Metall-Kabelkanälen oder hinter
Wandabdeckungen mit Metall abgeschirmt sein.
• Drähte,die tiefer als 51 mm von der Oberfläche
her entfernt sind,können evtl.nicht geortet werden.
•Es können Drähte,die keine Spannung führen,sein.
•Scannen Sie den Bereich in den METAL und AC SCAN Betriebsarten ab,
um herauszufinden,ob Metall oder Wechselspannung-führende Drähte
vorhanden sind.
•Überprüfen Sie,ob andere Pfosten,die gleich zu jeder Seite hin entfernt
sind (305,406 oder 610 mm bzw.12,16 oder Inches),vorhanden sind
oder der selbe Pfosten an mehreren Stellen direkt über oder unter dem
ersten ist.
VORSICHT beim Einschlagen von Nägeln, beim Sägen oder Bohren in
Wänden, Böden und Decken, wo solche Objekte vorhanden sein könnten.
•Um den Ortungsbereich einzuschränken,schalten Sie den Scanner
an der Kante,wo Sie den Draht zuerst geortet hatten,aus und wieder
an und scannen Sie nochmals.
•Halten Sie Ihre freie Hand flach gegen die Wand neben dem
Gerät während des kompletten Scan-Vorgangs,um die statische
Elektrizität abzubauen.
•Der Scanner wurde eventuell über einem Metallobjekt kalibriert,
wobei die Ortungsempfindlichkeit herabgesetzt wurde.Führen Sie
die Kalibrierung an einer anderen Stelle durch.
•Scannen Sie sowohl in horizontaler als auch vertikaler Richtung.
Die Empfindlichkeit auf Metall steigt,wenn sich das Metallobjekt
parallel zum Sensor,der unterhalb des Zircon Logos sitzt,befindet.
• Um die Empfindlichkeit herabzusetzen,kalibrieren Sie den
MultiScanner i700 über einer der ersten beiden Markierungen.
•Orten Sie die äußeren Kanten,damit Sie herausfinden,wo Sie
beginnen müssen.
•Versuchen Sie es mit dem METAL SCAN Modus,um herauszufinden,ob Sie
Metall,Draht oder einen Metall-Kabelkanal orten können.
•Schalten Sie stets den Strom ab,wenn Sie in der Nähe von elektrischen
Drähten arbeiten.
•Versuchen Sie,die Schalter zur Steckdose einzuschalten.
•Versuchen Sie,eine Lampe an der Steckdose anzuschließen und schalten
Sie ein.
12. HIFLREICHE HINWEISE
(Bitte beachten Sie auch Paragraph 3,Hinweise zum ordnungsgemäßen Betrieb)
SituationWahrscheinlicheUrsacheLösung
BEGRENZTE GEWÄHRLEISTUNG FÜR 2 JAHRE
Zircon Corporation (“Zircon”) garantiert für die Dauer Zwei
Jahre ab Kaufdatum,daß dieses Produkt frei ist von Material-
und Herstellungsfehlern.Wird ein beliebiges Produkt im
Rahmen der Garantiezeit an Zircon*,Fracht bezahlt,unter
Beilage des Kaufnachweises und $5,00 für Versandkosten
zurückgeschickt,wird das Produkt nach Ermessen von Zircon
entweder repariert oder ersetzt.Diese Gewährleistung ist auf
die elektronischen Schaltkreise und das Originalgehäuse des
Produkts beschränkt.Schäden durch Mißbrauch,
unangemessene Verwendung oder Vernachlässigung sind
speziell ausgenommen.Diese Gewährleistung gilt anstelle
aller anderen Garantien,gleich,ob ausdrücklich oder
stillschweigend,und Zircon darf nicht durch anderweitige
Gewährleistungen oder Ansprüche beliebiger Art gebunden
oder verpflichtet werden.Jegliche stillschweigenden
Gewährleistungsansprüche,die für dieses Produkt gelten,sind
auf den Zeitraum von einem Jahr ab Kaufdatum beschränkt.
IN KEINEM FALL IST ZIRCON HAFTBAR FÜR KONKRETE,
ZUFÄLLIGE ODER FOLGESCHÄDEN,DIE AUS BESITZ,VERWEN-
DUNG ODER FEHLFUNKTION DIESES PRODUKTS ENTSTEHEN.
Bezüglich behördlicher Regelungen gilt folgendes:
(i) In einigen Ländern ist eine Einschränkung der
Geltungsdauer einer stillschweigenden Gewährleistung
und/oder der Ausschluß bzw.die Einschränkung zufälliger
Schäden oder Folgeschäden nicht zulässig,so daß die vorge-
nannten Einschränkungen und/ oder Ausschlüsse für Sie nicht
gelten;des weiteren (ii) verleiht diese Gewährleistung Ihnen
spezielle rechtliche Ansprüche,und Sie haben darüber hinaus
ggf.weitere Rechte,die von Land zu Land unterschiedlich sein
können.
Schicken Sie das Produkt,Fracht bezahlt,unter Beilage des
Kaufnachweises (Kaufbeleg mit Datum) und $5,00 für
Versandkosten an:
UPS SCS C/O ZIRCON RETURNS
Lohstrabe 30a
85445 Schwaig
Munich,Germany
Patente USA 5917314,6259241,Patente Kanada 2341385,
Patente Japan 3581851,Patente E.U.EP0657032,Patente fuer USA
und International eingereicht
©2006 Zircon Corporation • P/N 62131 Rev A 12/06
Suchen Sie www.zircon.com/support auf,fuer die neuesten Anweisungen.
Achtung: Die Messtiefe und die Genauigkeit können je nach
Feuchtigkeitsgehalt der Materialien, der Wandstruktur und der
Farbe variieren.
9. MARKIEREN EINER STELLE
Ist ein Gegenstand lokalisiert,können Sie die Stelle MARKIEREN,
indem Sie den MARK Taster mit der Fingerspitze sanft nach unten
ziehen.Drückt man den MARK Taster zurück,kommt die Spitze
eines Markierstifts auf der Vorderseite des Handgriffes heraus und
zeichnet eine kurze löschbare Linie auf die Wand.
10. WECHSELN DER MARKIERSPITZE
Ziehen und halten Sie den MARK Taster fest,sodass die
Markierspitze vollständig heraus kommt.Fassen Sie den Markierstift
und ziehen Sie ihn aus der Halterung.Um eine neue Markierspitze
einzusetzen,ziehen und halten Sie den MARK Taster fest,sodass
die Halterung komplett heraus kommt.Drücken Sie die neue
Markierspitze in die Halterung ein.
Achtung:Der MultiScanner
i
700 wir d mit 3 Reserve-
Markierspitzen geliefert.Diese Spitzen befinden sich in
einem Fach hinter der Batterie.
11.ENTFERNEN ODER ERSETZEN
DES ABTASTKOPFES:
Der Abtastkopf des MultiScanner
i
700 kann zum einfacheren
Säubern oder Reparieren vom Handgriff abgenommen werden.
Auch kann sich der Abtastkopf vom Handgriff loslösen,wenn das
Gerät versehentlich fallen gelassen oder verdreht wurde.Zum
Auswechseln des Abtastkopfes gehen Sie bitte wie folgt vor:
Zum Entfernen des Abtastkopfes:Legen Sie die Rückseite des
Kopfes in eine Handfläche und fassen Sie den Gerätegriff mit der
anderen Hand an.Heben Sie den Griff langsam und vorsichtig an
und drehen Sie ihn ebenfalls langsam und vorsichtig um,sodass
Sie eine Seite nach der anderen vom Sockel lösen können.
Zum Wiedereinsetzen des Abtastkopfes:Passen Sie die
Seitenenden in die Sockel vorsichtig ein und lassen sie sie in die
Sockel nacheinander einrasten.
Warnhinweise zur FCC Part 15 Class B Registrierung
Dieses Gerät wurde getestet und entspricht den Grenzwerten für
ein ClassB Digital Device gemäß Part 15 der FCC Rules.
Product specificaties
| Merk: | Zircon |
| Categorie: | Meetapparatuur |
| Model: | MultiScanner i700 OneStep |
Heb je hulp nodig?
Als je hulp nodig hebt met Zircon MultiScanner i700 OneStep stel dan hieronder een vraag en andere gebruikers zullen je antwoorden
Handleiding Meetapparatuur Zircon

5 Mei 2026
5 Mei 2026
14 Juli 2023
14 Juli 2023
13 Juli 2023
13 Juli 2023
13 Juli 2023
13 Juli 2023
13 Juli 2023
13 Juli 2023
Handleiding Meetapparatuur
Nieuwste handleidingen voor Meetapparatuur
5 Mei 2026
4 Mei 2026
2 Mei 2026
30 April 2026
30 April 2026
30 April 2026
29 April 2026
29 April 2026
28 April 2026
28 April 2026