Whirlpool W10113901A Handleiding
Bekijk gratis de handleiding van Whirlpool W10113901A (4 pagina’s), behorend tot de categorie Fornuis. Deze gids werd als nuttig beoordeeld door 78 mensen en kreeg gemiddeld 4.6 sterren uit 39.5 reviews. Heb je een vraag over Whirlpool W10113901A of wil je andere gebruikers van dit product iets vragen? Stel een vraag
Pagina 1/4

FILLER STRIP INSTALLATION INSTRUCTIONS
for Slide-In Ranges
Tools and Parts
Gather the required tools and parts before starting installation.
Read and follow the instructions provided with any tools listed
here.
Tools Needed
■#2 Phillips or #2 square tip screwdriver
■Measuring tape
■Electric drill
■¹⁄₈" (3 mm) drill bit
■Pliers
■Marker or pencil
Parts Supplied
■Filler strip
■2 Mounting brackets
■4 #8–18 x ¹⁄₂" screws
NOTE: This filler strip is used only when the opening depth for the
slide-in range is deeper than the recommended opening depth.
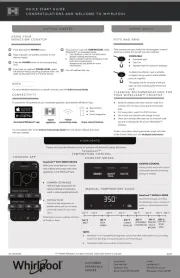
Install Filler Strip
1. The filler strip can be used to fill gaps of 2⁵⁄₈" (67 mm),
2¹⁄₄" (57 mm), or 1¹⁄₂" (38 mm).
It is recommended to mount the filler strip flush to the
countertop but it is not necessary.
2. Determine the approximate gap between the back of the
countertop cutout and slide-in range by measuring the
distance from the back of the countertop cutout to the front of
the countertop and subtracting 22³⁄₄" (57.8 cm) from the total.
3. Rotate the filler strip to determine the filler strip depth that
best fills the gap.
4. Align the filler strip edge to the back of the countertop cutout
and the countertop cutout sides. To keep the filler strip
straight, check that the back edge of the filler strip is flush to
the back wall of the countertop cutout.
A. 2⁵⁄₈" (67 mm)
B. 2¹⁄₄" (57 mm)
C. 1¹⁄₂" (38 mm)
A
B
C
A. Filler strip
B. Countertop
C. Countertop cutout
B
A
B
C
W10114233

2
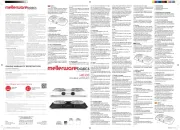
5. Place the mounting brackets on each corner of the bottom
side of the selected filler strip depth. Use a pair of pliers to fold
the lower end tab of the bracket at the notch so that the tab
acts as a support for the bottom edge of the filler strip.
For 2¹⁄₄" (57 mm) and 2⁵⁄₈" (67 mm) depths, the bracket end
tab should be folded at a 90° angle.
For 1¹⁄₂" (38 mm) depth, the bracket end tab should be folded
at a 45° angle.
NOTE: If the bracket is not flush to the side of the cabinet, use
a piece of wood to fill the gap. A longer screw may be needed.
If the depth determined is 1¹⁄₂" (38 mm), the brackets should
be attached on the 2⁵⁄₈" (67 mm) side. If the depth determined
is 2¹⁄₄" (57 mm), the brackets should be attached on the
2⁵⁄₈" (67 mm) side. If the depth determined is 2⁵⁄₈" (67 mm),
the bracket should be attached on the 2¹⁄₄" (57 mm) side.
6. Mark the holes on the sides of the cabinet where the brackets
will be mounted.
7. Drill the holes as marked. Mount the brackets onto the sides
of the cabinets with the four #8–18 x ¹⁄₂" screws provided.
8. Remove the adhesive strip cover to expose the adhesive side
of the brackets. Attach the filler strip to the adhesive on the
mounting brackets with selected filler strip depth facing up.
9. Proceed with normal range installation. See Slide-in Range
Installation Instructions.
A. Filler strip
B. Cabinet side
C. Mounting bracket tab
D. Mounting bracket
E. Folded tab for support
B
C
D
E
A

3
INSTRUCTIONS D’INSTALLATION -
PLANCHETTE DE REMPLISSAGE
pour cuisinière encastrée
Outillage et pièces
Rassembler les outils et pièces nécessaires avant de commencer
l’installation. Lire et suivre les instructions fournies avec les outils
indiqués ici.
Outillage nécessaire
■Tournevis Phillips n° 2 ou tournevis à embout carré n° 2
■Mètre ruban
■Perceuse électrique
■Foret de ¹⁄₈" (3 mm)
■Pince
■Marqueur ou crayon
Pièces fournies
■Planchette de remplissage
■2 brides de montage
■4 vis n° 8–18 x ¹⁄₂"
REMARQUE : Cette planchette de remplissage n'est utilisée que
lorsque la profondeur de l'espace d'encastrement de la cuisinière
est supérieure à la dimension recommandée.
Installation de la planchette de remplissage
1. On peut utiliser la planchette de remplissage pour obturer un
espace de 2⁵⁄₈" (67 mm), 2¹⁄₄" (57 mm), ou 1¹⁄₂" (38 mm).
On recommande d'installer la planchette de remplissage en
affleurement avec le plan de travail; cependant ceci n'est pas
indispensable.
2. Déterminer la distance approximative entre l'arrière de
l'ouverture découpée dans le plan de travail et la cuisinière
encastrable : mesurer la distance entre l'arrière de l'ouverture
découpée dans le plan de travail et l'avant du plan de travail,
et déduire 22³⁄₄" (57,8 cm) de cette dimension.
3. Faire pivoter la planchette de remplissage pour déterminer
quel côté du triangle s'adapte le mieux à l'espace à obturer.
4. Aligner les rives de la planchette de remplissage avec l'arrière
de l'ouverture découpée dans le plan de travail et avec les
côtés de l'ouverture découpée dans le plan de travail. Veiller à
ce que la rive arrière de la planchette de remplissage soit en
affleurement avec la rive arrière de l'ouverture découpée dans
le plan de travail.
A. 2⁵⁄₈" (67 mm)
B. 2¹⁄₄" (57 mm)
C. 1¹⁄₂" (38 mm)
A
B
C
A. Planchette de remplissage
B. Plan de travail
C. Ouverture découpée dans le plan de travail
B
A
B
C
Product specificaties
| Merk: | Whirlpool |
| Categorie: | Fornuis |
| Model: | W10113901A |
Heb je hulp nodig?
Als je hulp nodig hebt met Whirlpool W10113901A stel dan hieronder een vraag en andere gebruikers zullen je antwoorden
Handleiding Fornuis Whirlpool
15 Juli 2025

14 Juli 2025

14 Juli 2025

14 Juli 2025

4 Juli 2025

3 Juni 2025

13 Mei 2025

13 Mei 2025

13 Mei 2025

6 Mei 2025
Handleiding Fornuis
- Simfer
- Zojirushi
- AEG
- Thetford
- Ariete
- Esmaltec
- Duronic
- Ignis
- Edesa
- Luxor
- Backyard Pro
- Westinghouse
- Fritel
- Scholtes
- Infiniton
Nieuwste handleidingen voor Fornuis
6 Augustus 2025

6 Augustus 2025

6 Augustus 2025
6 Augustus 2025

6 Augustus 2025

5 Augustus 2025

5 Augustus 2025

5 Augustus 2025

5 Augustus 2025

5 Augustus 2025