Wahl LifeProof 07061-100 Handleiding
Wahl Scheerapparat LifeProof 07061-100
Bekijk gratis de handleiding van Wahl LifeProof 07061-100 (2 pagina’s), behorend tot de categorie Scheerapparat. Deze gids werd als nuttig beoordeeld door 28 mensen en kreeg gemiddeld 5.0 sterren uit 4 reviews. Heb je een vraag over Wahl LifeProof 07061-100 of wil je andere gebruikers van dit product iets vragen? Stel een vraag
Pagina 1/2
432567
14
910
8131112
QUICK TIPS & HANDY
REMINDERS
1. If you are a first-time electric shaver user, or changing from
another brand, there will be a 2 to 3 week (or less) adjustment
period while your face and beard adapts to the new foil.
2. When you open your package, charge your shaver for 1 hour
before the first shave or until charging is complete.
3. Replace the foil head and cutter bars every 12 months or if foils
are damaged. Replacement foils can be ordered at https://home.
wahl.com.
4. Be sure to clean the shaver, cutter bars and foil after every three
or four shaves.
5. Use the pop-up long-hair trimmer to snip stray hairs.
6. Keep using and both your face and beard will adapt to the shaver.
TRAVEL LOCK
The Wahl 7061 Series Shaver comes with an electronic travel lock
to avoid accidental activation while transporting.
Hold power button down for 3 seconds to engage travel lock.
Hold power button down for 3 seconds to disengage travel lock.
When travel lock is active, pressing the power button will cause the
LED(s) to flash for 1 second.
NOTE: The shaver will not charge while the travel lock is engaged.
vertical or floor mount position.
15. Always attach plug to appliance first, then to outlet.
SAVE THESE
INSTRUCTIONS
For Household Use Only
LITHIUM-ION BATTERY
REPLACEMENT, SHAVER
DISPOSAL AND RECYCLING:
• For battery replacement send the entire, intact shaver unit to:
Wahl Annex 3001 North Locust, P.O. Box 578, Sterling, IL 61081
• Do not attempt to remove the battery. Lithium-Ion batteries can
explode, catch fire, and/or cause burns if disassembled, damaged,
or exposed to water or high temperatures.
• If you choose not to replace the battery, the entire, intact shaver
unit must be disposed. Do not attempt to remove the battery for
disposal. Lithium-Ion batteries may be subject to local disposal
regulations. Many locations prohibit disposal in standard waste
receptacles. Check your local laws and regulations.
• For recycling contact a government recycling agency, waste
disposal service, retailer, or visit online recycling sources, such as
www.batteryrecycling.com or www.rbrc.org.
IMPORTANT SAFEGUARDS
When using your electrical appliance, basic precautions
should always be followed, including the following:
READ ALL INSTRUCTIONS AND SAFEGUARDS
BEFORE USING THIS APPLIANCE.
DANGER
To reduce the risk of death or injury by electric
shock:
1. Do not reach for an appliance that is plugged in and
has fallen into water. Unplug immediately from the
outlet. Note: Some electrical parts inside the shaver
are electrically live, even with the switch “off.”
2. Always unplug this appliance before cleaning.
3. Unplug the charger before using appliance. Appliance will
not operate when plugged in.
4. Except when charging, always unplug this appliance from
the electrical outlet immediately after using.
5. Do not place or store appliance where it can fall or be
pulled into a tub or sink. Do not place in or drop into water
or other liquid.
WARNING
To reduce the risk of burns, electrical shock or injury
to persons:
1. This appliance can be used by children aged from 14
years and above and persons with reduced physical,
sensory or mental capabilities or lack of experience
and knowledge if they have been given supervision or
instruction, by a person responsible for their safety,
concerning the use of the appliance in a safe way and
understand the hazards involved. Children shall not play
with the appliance. Cleaning and user maintenance shall
TIPS FOR FIRST-TIME USERS
If you are using an electric shaver for the first time, your skin will
probably need to condition itself to this new shaving technique.
Start on the easiest part of the face first, usually the smooth portion
of the face below the ear. Shave with a light touch and use your
Wahl Shaver exclusively for three to four weeks, or longer if you
have sensitive skin or if your whiskers grow at different angles in
certain areas. Initially your shaves may not be as close as you
would like, and your skin may become a bit irritated. But if you
stick with it, you will eventually get great shaves.
If you go several days without shaving and your beard gets a bit
long, use the pop-up trimmer to go over your beard, catching all
the longer hairs and setting up the remaining stubble for the foil to
shave smooth and clean.
If you have been using another type of electric shaver before, there
may also be a period of conditioning prior to receiving maximum
results.
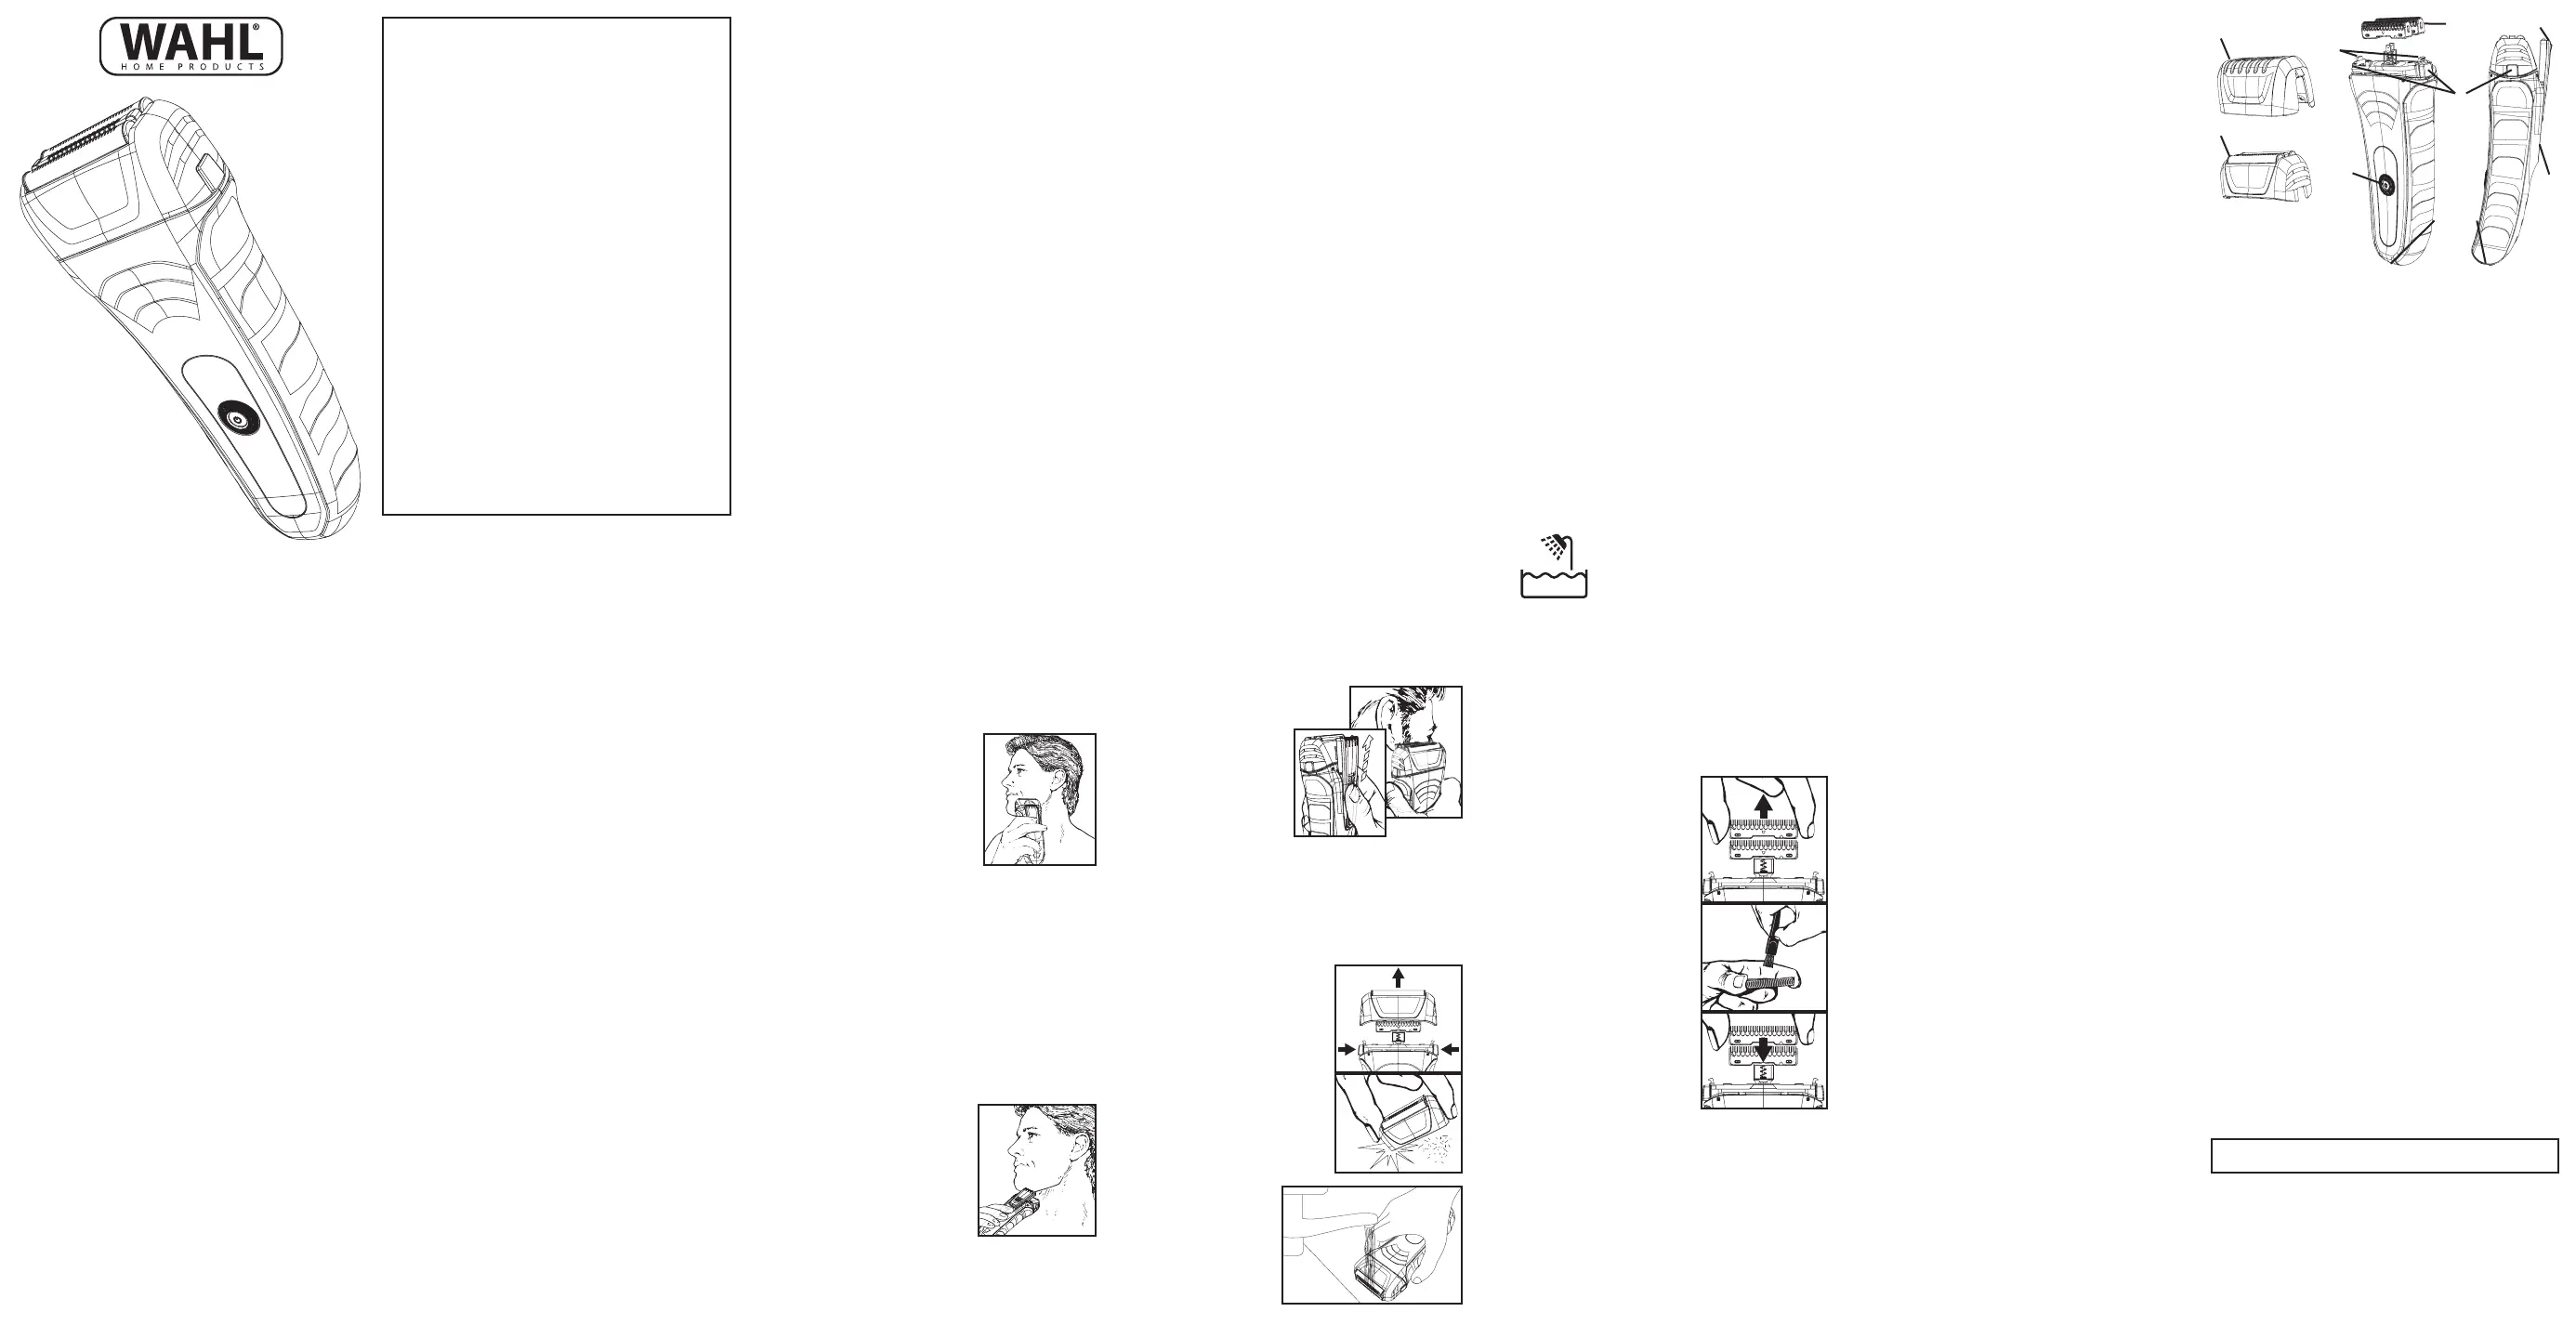
FEATURES
1. Socket
2. On/Off Switch
3. Cutter Bar Assembly
4. Flex Foil Head
5. Long-Hair Pop-Up Trimmer
6. Long-Hair Trimmer Switch
7. Shaver Head Release Button
8. Foil Guard
9. Charger Contacts
10. Spring Clips
Note: Remove LED label before first use.
CHARGING OPERATION
The shaver cannot be overcharged, so you may charge it as often
as desired. However, periodic recharging of the shaver, rather than
continuous recharging, will prolong battery life.
MODELS WITH 1 LED
Charge when shaver seems to lose power or run slower. The
charging LED will light up while charging. LED will turn off when
charging is complete.
MODELS WITH 2 LEDS
The red LED will flash for one second when turning off the shaver
when it is time to charge (below 10%).
The blue LED will light up while charging. LED will turn off when
charging is complete.
MODELS WITH 5 LEDS
The LED meter will show the amount of charge left on the shaver.
The fewer lights that are lit, the lower the charge on the battery is.
The red LED will flash for one second when turning off the shaver
when it is time to charge (below 10%).
While charging, the LED meter will show the progression of
charging. All LEDs will turn off when charging is complete.
LONG-HAIR TRIMMER
OPERATION
Your shaver features a special
long-hair trimmer located on
the back of the shaver which
telescopes up from the foil head
for precise and easy trimming of
sideburns, beards or mustaches,
and for removing long hairs from
the neck. And, as mentioned earlier, it can be used to “knock down”
heavy beard growth prior to shaving with the foil.
To use, remove Foil Guard and simply push the Long-Hair Trimmer
Switch in an upward motion until trimmer slides (clicks) into
position. Push On/Off Switch. Then begin trimming/styling.
CLEANING AND
MAINTENANCE
SHAVER HEAD CARE
For maximum performance, we
recommend you clean your shaver
after every few shaves. Any servicing,
other than replacement of foil head and
cutter bars, should be performed by an
authorized Wahl Shaver Service Center or
Wahl Clipper Corporation (see Warranty
for mailing address information).
To clean, turn shaver “OFF” and remove
the foil head by pushing the
shaver head release buttons
on the sides of the shaver and
lifting the foil head upward.
Lightly tap the open side of the
foil head on a hard surface to
remove the majority of loose
stubble particles. Be careful not to tap foil.
For easy cleaning, you may rinse your shaver with water. While the
foils can be rinsed, we recommed removing the foil head, and rinsing
the cutter bars. This will allow any hairs still on the cutter bars to be
washed away. Leaving the foil head on while rinsing makes in more
difficult for hairs to be washed clean.
TO REMOVE CUTTER BAR
Turn shaver off. Remove the foil head
and, holding the shaver in one hand,
gently pull up on cutter bar. Be sure your
thumb and first finger are positioned at
each end of the cutter bar.
WARNING: Handle cutting components
with care to avoid personal injury.
NOTE: If you do not hold the cutter bar as
shown, brushing the blades could result in
damage to the assembly.
When the foil head and cutter bars are
removed from the shaver, an alternate
cleaning method is to rinse them under
running water. Simply let them air dry.
After cleaning, replace the cutter bars by
pressing down gently. Carefully replace
the foil head, snapping it into place.
From time to time, depending on the density of your beard, you will
need to replace the cutters and foils. If you notice that it is taking
you longer to shave, or if your face starts to feel some irritation, or
if the foil seems to become warm to the touch, it is probably time to
replace the cutters and foils. Replace the cutters and foils only with
WAHL parts (Yellow: 7045-100, Silver: 7045-400, Black Chrome:
7045-700).
CLEANING & OILING BLADES TRIMMER
BLADES
Clean with the included brush. For best results, put one or two
drops of Wahl Clipper Oil on
the blades only when necessary, or approximately once a month.
Motor bearings are permanently lubricated—do not attempt to oil.
When oiling your trimmer, turn the trimmer “ON - I,” hold the unit
with the blades facing DOWN and squeeze one or two drops of oil
onto the blades. Wipe off excess oil with soft cloth.
NOTICE—DO NOT OVER OIL!
Excessive oiling or application of liquids will cause damage if
allowed to seep back into motor.
FOIL & BLADE CARE
Trimmer blades have precision-hardened, ground and lapped
cutting teeth. Foils, cutter bar, and blades should be handled
carefully and never bumped or used to cut dirty or abrasive
material.
STORAGE
Before storing your trimmer, use the cleaning brush to whisk any
loose hairs from the unit, foils, cutter bar, and blades. Store unit in
such a manner so that blades are protected from damage.
When the shaver is not in use, the shaver foil/blade guard
attachment should be in place to protect the blades.
This appliance should be stored in a manner where it is not
subjected to Crushing, Heating above 100°C (212°F), or
Incineration.
CORD CARE
The cord should not be used to pull the shaver. Freedom of
movement needs to be maintained. Care should be used to keep
the cord untwisted and undamaged.
When stored, the cord should be coiled and replaced neatly in its
original package or storage pouch.
grooming.wahl.com
Operating Instructions for
7061 Series Shavers
Instrucciones de Funcionamiento para
Rasuradoras Serie 7061
WET/DRY USE
NOTE: Do not submerge shaver in more than 3 feet of water or for
more than 30 minutes to prevent water ingress into the electronics.
Warranty is void if shaver is submerged beyond these limitations.
The Wahl shaver is designed to be water resistant and shower
proof (IPX7). This lets you use your Wahl shaver in the shower or
at the sink without worry and makes it easy to clean under running
water.
NOTE: The shaver is for wet/dry use. The shaver will not run while
the cord is attached for safety.
SERVICE AND REPAIR
If you have problems with your shaver, send it prepaid
with a note explaining the problem to:
Wahl Clipper Corporation
Attn: Repair Department
3001 Locust Street
Sterling, IL 61081
Telephone (800) 767-9245
For products purchased outside the United States, contact your distributor.
If for any reason within 60 days of purchase of your Wahl
®
shaver you are not satisfied with your shaver and would like
a refund, just return your shaver, together with the sales
receipt, to the retailer from whom you purchased it. Wahl will
reimburse all retailers who accept shavers within 60 days of
purchase. If you have any questions regarding this money-
back guarantee, please call 1-800-767-9245 in the United
States.
60 Day Money Back Guarantee!
© 2016 Wahl Clipper Corporation
Part No. 91590
Printed in U.S.A.
For more information or Product Registration, visit grooming.wahl.com
5-YEAR LIMITED WARRANTY
Valid in U.S.A. Only
If your Wahl product fails to operate satisfactorily within five
(5) years from the date of original purchase or receipt as a gift,
Wahl will, at our option, repair or replace it and return it to you
FREE OF CHARGE. Do not return this product to store where
purchased. Products needing repair under this warranty should
be returned with postage prepaid to:
Wahl Clipper Corp.
Attn: Repair Department
3001 Locust Street
Sterling, Illinois 61081
Include a note describing the defect and the date of original
purchase or receipt as a gift (if in warranty). Products out of
warranty will be repaired at our standard repair charges.
This warranty is void and no repair or replacement will be made
under this warranty or otherwise if: (1) The product is modified
in any manner or repaired by anyone other than Wahl Clipper
Corporation or Wahl authorized service center. (2) The product
has been used commercially or subjected to unreasonable use.
This warranty gives you specific legal rights and you may
also have other rights which may vary from state to state. No
other written express warranty is given. Any implied warranty,
including any warranty of merchantability which may arise from
purchase or use, is limited to the year period provided in this
express warranty. Some states may not allow such limitation,
so it may not apply to you. No responsibility is assumed for
incidental or consequential damages of any type, or for the use
of unauthorized attachments. Some states may not allow the
exclusion or limitation of incidental or consequential damages, so
the limitation or exclusion may not apply to you. Outside U.S.A.,
check with store for Wahl authorized distributor’s warranty.
This symbol, located on the shaver,
represents that the shaver is suitable
for use in the bath and shower.
not be made by children without supervision.
2. Use this appliance only for its intended use as described
in this manual. Do not use attachments not recommended
by the manufacturer.
3. Never operate this appliance if it has a damaged cord or
plug, if it is not working properly, or if it has been dropped
or damaged. Return the appliance to Wahl Clipper
Corporation for examination and repair.
4. Keep the cord away from heated surfaces.
5. Never operate the appliance with the air openings blocked
or while on a soft combustible surface, such as a bed or
couch, where air openings may be blocked. Keep the air
openings (if any) free from lint, hair or the like.
6. Do not use outdoors or operate where aerosol (spray)
products are being used or where oxygen is being
administered.
7. Never drop or insert any object into any opening.
8. Do not use this appliance with a damaged or broken foils,
as injury may occur. Before use, make certain blades are
undamaged.
9. During use, do not place or leave the appliance where
it is expected to be subject to damage by an animal, or
exposed to weather.
10. To disconnect, turn all controls to “OFF,” then remove
plug or charger from outlet.
11. Turn all controls to “OFF” before placing on or removing
foil head, cutter bar, or foil guard.
12. Do not crush, disassemble, heat above 100°C (212°F),
or incinerate the appliance, due to risk of fire, explosion,
or burns.
13. Use only the charger supplied by the manufacturer to
recharge.
14. This charger is intended to be correctly orientated in a
SHAVING PROCEDURES FOR
FAST, CLOSE SHAVES
We suggest that you thoroughly cleanse and
completely dry your skin prior to shaving.
For maximum speed and efficiency, hold the
shaver so that both screens are in contact
with the skin. When shaving the upper lip
or neck, hold shaver so that the uppermost
screen is in contact with skin.
Shave both with and against the grain of the
beard, and stretch the skin taut in the path of the shaver. Guide the
dual foil heads gently back and forth, primarily against the grain of
the beard. Do not press screen heads hard against face. Heavy
scrubbing action with the shaver could damage the foil and will not
result in a closer shave.
Always replace the foil guard to protect the delicate dual foil heads
when shaver is off.
SHAVING HEAVY BEARD
GROWTH
Begin shaving in a less dense area of the beard. Move the shaver
in a circular motion on a small area of the face (this picks up the
hairs that grow in all directions). When you see that this small area
is shaved clean, gradually move into a new
area while still using the circular motion.
Continue this motion, one small section at a
time, until entire face is shaved.
If your beard has more than 3 days of
growth, use the pop-up Long-Hair Trimmer
to cut the beard down to about a one-day
growth before using the shaver foil.
1 & 9
7
3
6
10
4
2
8
5
Product specificaties
| Merk: | Wahl |
| Categorie: | Scheerapparat |
| Model: | LifeProof 07061-100 |
Heb je hulp nodig?
Als je hulp nodig hebt met Wahl LifeProof 07061-100 stel dan hieronder een vraag en andere gebruikers zullen je antwoorden
Handleiding Scheerapparat Wahl

20 Juni 2023
18 Juni 2023
18 Juni 2023
17 Juni 2023
16 Juni 2023
16 Juni 2023
Handleiding Scheerapparat
Nieuwste handleidingen voor Scheerapparat
16 Juli 2026
14 Juli 2026
13 Juli 2026
13 Juli 2026
13 Juli 2026
19 Juni 2026
17 Juni 2026
3 Mei 2026
28 April 2026
21 April 2026