VS Sassoon Digital Sensor VSP500A Handleiding
VS Sassoon Niet gecategoriseerd Digital Sensor VSP500A
Bekijk gratis de handleiding van VS Sassoon Digital Sensor VSP500A (2 pagina’s), behorend tot de categorie Niet gecategoriseerd. Deze gids werd als nuttig beoordeeld door 136 mensen en kreeg gemiddeld 4.9 sterren uit 7 reviews. Heb je een vraag over VS Sassoon Digital Sensor VSP500A of wil je andere gebruikers van dit product iets vragen? Stel een vraag
Pagina 1/2
Ø 40mm
546
Ø 50mm
10389827
1
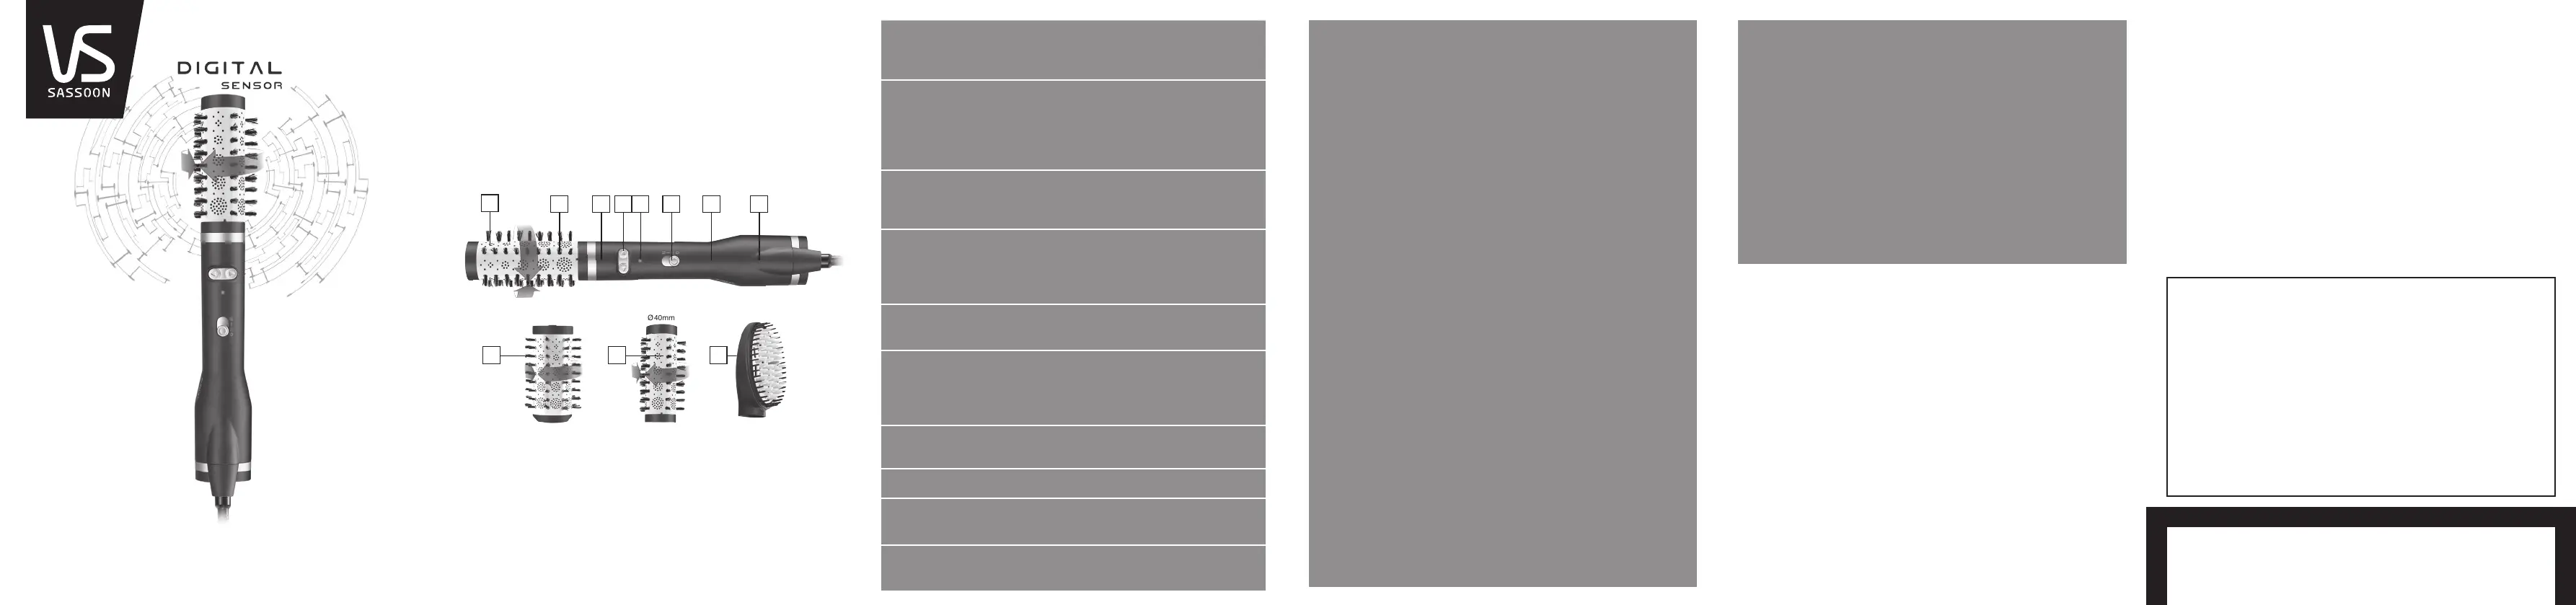
ABOUT YOUR STYLER
CONGRATULATIONS!
The VS Sassoon Intelligent Digital Sensor Hot Air Styler combines the benefits
of a hairdryer with a rotating brush in the one appliance to give you total styling
control in one hand. The Digital Sensor provides constant temperature control to
eliminate damaging hot spots, excellent hair protection for the ultimate blow dry
finish. With 3 unique styling brushes this styler is perfect for styling all hair types.
Go to vssassoon.com.au for hair inspiration and handy videos on how to
get the most out of your new Digital Sensor Hot Air Styler.
1. Motorised Rotating brush
2. 2 Directional Rotation Switches
3. Indicator light
4. 40mm ceramic rotating brush
5. 50mm ceramic rotating brush
6. 3D Styling Control Brush
7. Even flow technology
8. Digital Sensor
9. Ionic Frizz Control
10. Heat / speed control
11. 40mm and 50mm protective brush covers (not shown)
12. Storage pouch (not shown)
VSP500A
MOTORISED ROTATING
BRUSH
Dries, styles and adds volume and
shine to get a professional salon
blow dry result at home.
DIGITAL SENSOR
A digital sensor provides constant
tenperature control for well
protected hair. Eliminate damaging
hot spots on your hair and offering
excellent hair protection.
EVEN FLOW
TECHNOLOGY
Blow holes are ideally positioned
which guarantees even and powerful
airflow that is precisely balanced.
IONIC FRIZZ CONTROL
Ionic conditioning actively
eliminates static and tames frizz.
Active ions surround the hair to give
a shine boost as you dry.
3 SWITCH
COMBINATIONS
2 heat / speed settings plus cool
to set your style.
2 DIRECTIONAL
ROTATION
Rotate left or right to add volume
or softly rounded ends, or rotate
in the opposite direction for a
different look.
REDUCED NOISE
Improved sound comfort while
styling.
40MM CERAMIC BRUSH
Ideal for styling shorter hair.
50MM CERAMIC
STYLING BRUSH
For styling medium to longer style
hair.
3D STYLING CONTROL
BRUSH
Ideal for smoothing while drying.
LOVE
YOU
R
STYLE
™
vssassoon.com.au
TO STYLE
1. Remove the protective brush cover by sliding upwards and plug the styler into
a power outlet - selecting either the low or high heat settings – Depress the
t or u brush rotation buttons to ensure you understand the rotation direction
before styling your hair .
2. Wash and condition your hair as usual. Comb hair before using to detangle.
3. Using a hair dryer, dry your hair first until it is 80% dry. For added
volume, turn your head upside down as you dry.
4. Once hair is 80% dry, you should start to create your style using the Digital Sensor
Hot Air Styler.
BLOW DRYING
1. Ensure you section your hair using clips before styling .
Take a hair section to start styling with approx. 2.5cm - 5cm wide and no more
than 1cm thick (if you have thick hair make the section around 50mm thick).
2. Place either the 50mm or 40mm ceramic brush onto the body of the appliance
and lock into place.
3. Slide the on/off temperature switch to either the low or high heat setting.
4. Place the styler under the section of hair, close to the roots and brush through the
section to remove tangles (without brush rotating).
5. For added volume at the root of the hair , hold the brush in place at the root (hair
section is draped over top of brush) for a few seconds.
6. Move the brush through the hair section (hair is draped over top of brush), towards
the ends and as you reach the end of the hair section, start to rotate the brush
away from your head by pressing and holding the appropriate rotation direction
switch.
7. As you do this it is important to resist the rotation of the brush by pulling the
brush downwards. The brush should be rotating through the section of your hair
(without the hair becoming wound round the brush head if you are holding the
styler with the correct tension against the hair) to create a brushing effect as it
dries and styles the hair.
8. For even more volume, allow the brush to rotate, winding the entire section of hair
around the barrel, the brush will move upwards towards your scalp then release
the the rotation switch and leave in the hair for a few seconds.
9. To release the section of hair, press and hold the opposite rotation button to
unwind the hair section.
Styling tips
• For fine hair types or to gain extra volume use a volumising mousse in your hair
while damp before styling.
• To define layers and give shape to styles , follow step 10 and repeat through the
section.
• To add volume to the roots and body through the top section of the hair, follow
steps 8 to 10 but using an upward motion.
• For long lasting results, follow steps 8 to 10 but then slide the on/off switch to the
cool setting for a few seconds, this will set the hair.
FIRST USE
• Remove all packaging and point of sale labels before use.
• Remove plastic cover from plug before use
(used to protect it from damage during transportation)
IMPORTANT! It may take several attempts to perfect this technique. If the
brush spins too quickly and hair wraps around the brush head , simply release the
rotation button and remove from the hair. Use the low heat setting (low brush
speed) and practise rotating the brush on the lower ends of your hair until you
feel comfortable with the styling action. If hair continues to wrap around the
barrel you need to increase the downward tension.
It is important to section your hair before styling and style section by section to
get the best results.
WARNING! The ceramic brush barrel will get hot during use . Take care to avoid
the hot surface of the styler coming in direct contact with the skin, in particular
the eyes, ears, face and neck.
AFTER USE: Always replace the protective cover shield over the brush head to
protect the bristles
10. Repeat for each hair section.
11. After use switch off and unplug the appliance.
12. Allow the styler to cool before storing.
13. Place the protective brush shield over the head
SMOOTHING AND DRYING
Place the 3D styling brush on the body of the appliance.
Take a section of the hair and position the brush under the section at the hair roots.
Ensure the bristles go right into the hair. Gently slide the brush along the section
from the roots to the tiups ending the action with a slight rotation of the wrist to give
bounce to the style.
NOTE: If you notice the indicator light is flashing, this is completely normal. The
styler is automatically adjusting the temperature to guarantee a gentler and kinder
heat for the hair.
IONIC FRIZZ TECHNOLOGY
Many aspects of modern living, including air conditioning, contact with manmade
fibers and air pollution add to the build-up of static electricity in your hair.
Even simply brushing and towel-drying your hair can increase these levels. This
static charge causes the scales, or cuticles of the hair, to push hair strands apart,
resulting in a rough hair surface. Consequently, your hair may have a dull appearance.
High levels of static charge cause your hair to become ‘flyaway’ & difficult to style.
The advanced internal ionic generator conditions hair by emitting negative ions to
reduce static, leaving your hair silky & shiny with reduced frizz.
HEAT SETTINGS
Your styler features two heat and a cool setting.
Off = “0” setting on switch
Low heat = “I” setting on switch .
High heat = “II” setting on switch
Cool setting = * setting on switch (note : brush does not rotate on this setting)
• Use the high heat setting for initial drying, and the low heat setting as the hair
begins to dry and for styling.
• Use the cool setting to set the style for longer lasting results after drying and
styling.
VSP500A
TheIntelligent Hot Air Styler
For the ultimate blow dry finish.
Product specificaties
| Merk: | VS Sassoon |
| Categorie: | Niet gecategoriseerd |
| Model: | Digital Sensor VSP500A |
Heb je hulp nodig?
Als je hulp nodig hebt met VS Sassoon Digital Sensor VSP500A stel dan hieronder een vraag en andere gebruikers zullen je antwoorden
Handleiding Niet gecategoriseerd VS Sassoon

7 Februari 2024
7 Februari 2024
7 Februari 2024
7 Februari 2024
7 Februari 2024
7 Februari 2024
7 Februari 2024
7 Februari 2024
6 Februari 2024
6 Februari 2024
Handleiding Niet gecategoriseerd
Nieuwste handleidingen voor Niet gecategoriseerd
4 Juli 2026
4 Juli 2026
4 Juli 2026
4 Juli 2026
3 Juli 2026
3 Juli 2026
3 Juli 2026
3 Juli 2026
3 Juli 2026
3 Juli 2026