Vemer Tuo Wi-Fi Lite Handleiding

Vemer Thermostaat Tuo Wi-Fi Lite

Lees hieronder de 📖 handleiding in het Nederlandse voor Vemer Tuo Wi-Fi Lite (3 pagina's) in de categorie Thermostaat. Deze handleiding was nuttig voor 25 personen en werd door 2 gebruikers gemiddeld met 4.5 sterren beoordeeld

Pagina 1/3
3
4
16INITIAL CONFIGURATIONUser Manual
WALL-MOUNTING WI-FI CHRONOTHERMOSTAT
Read all instructions carefully
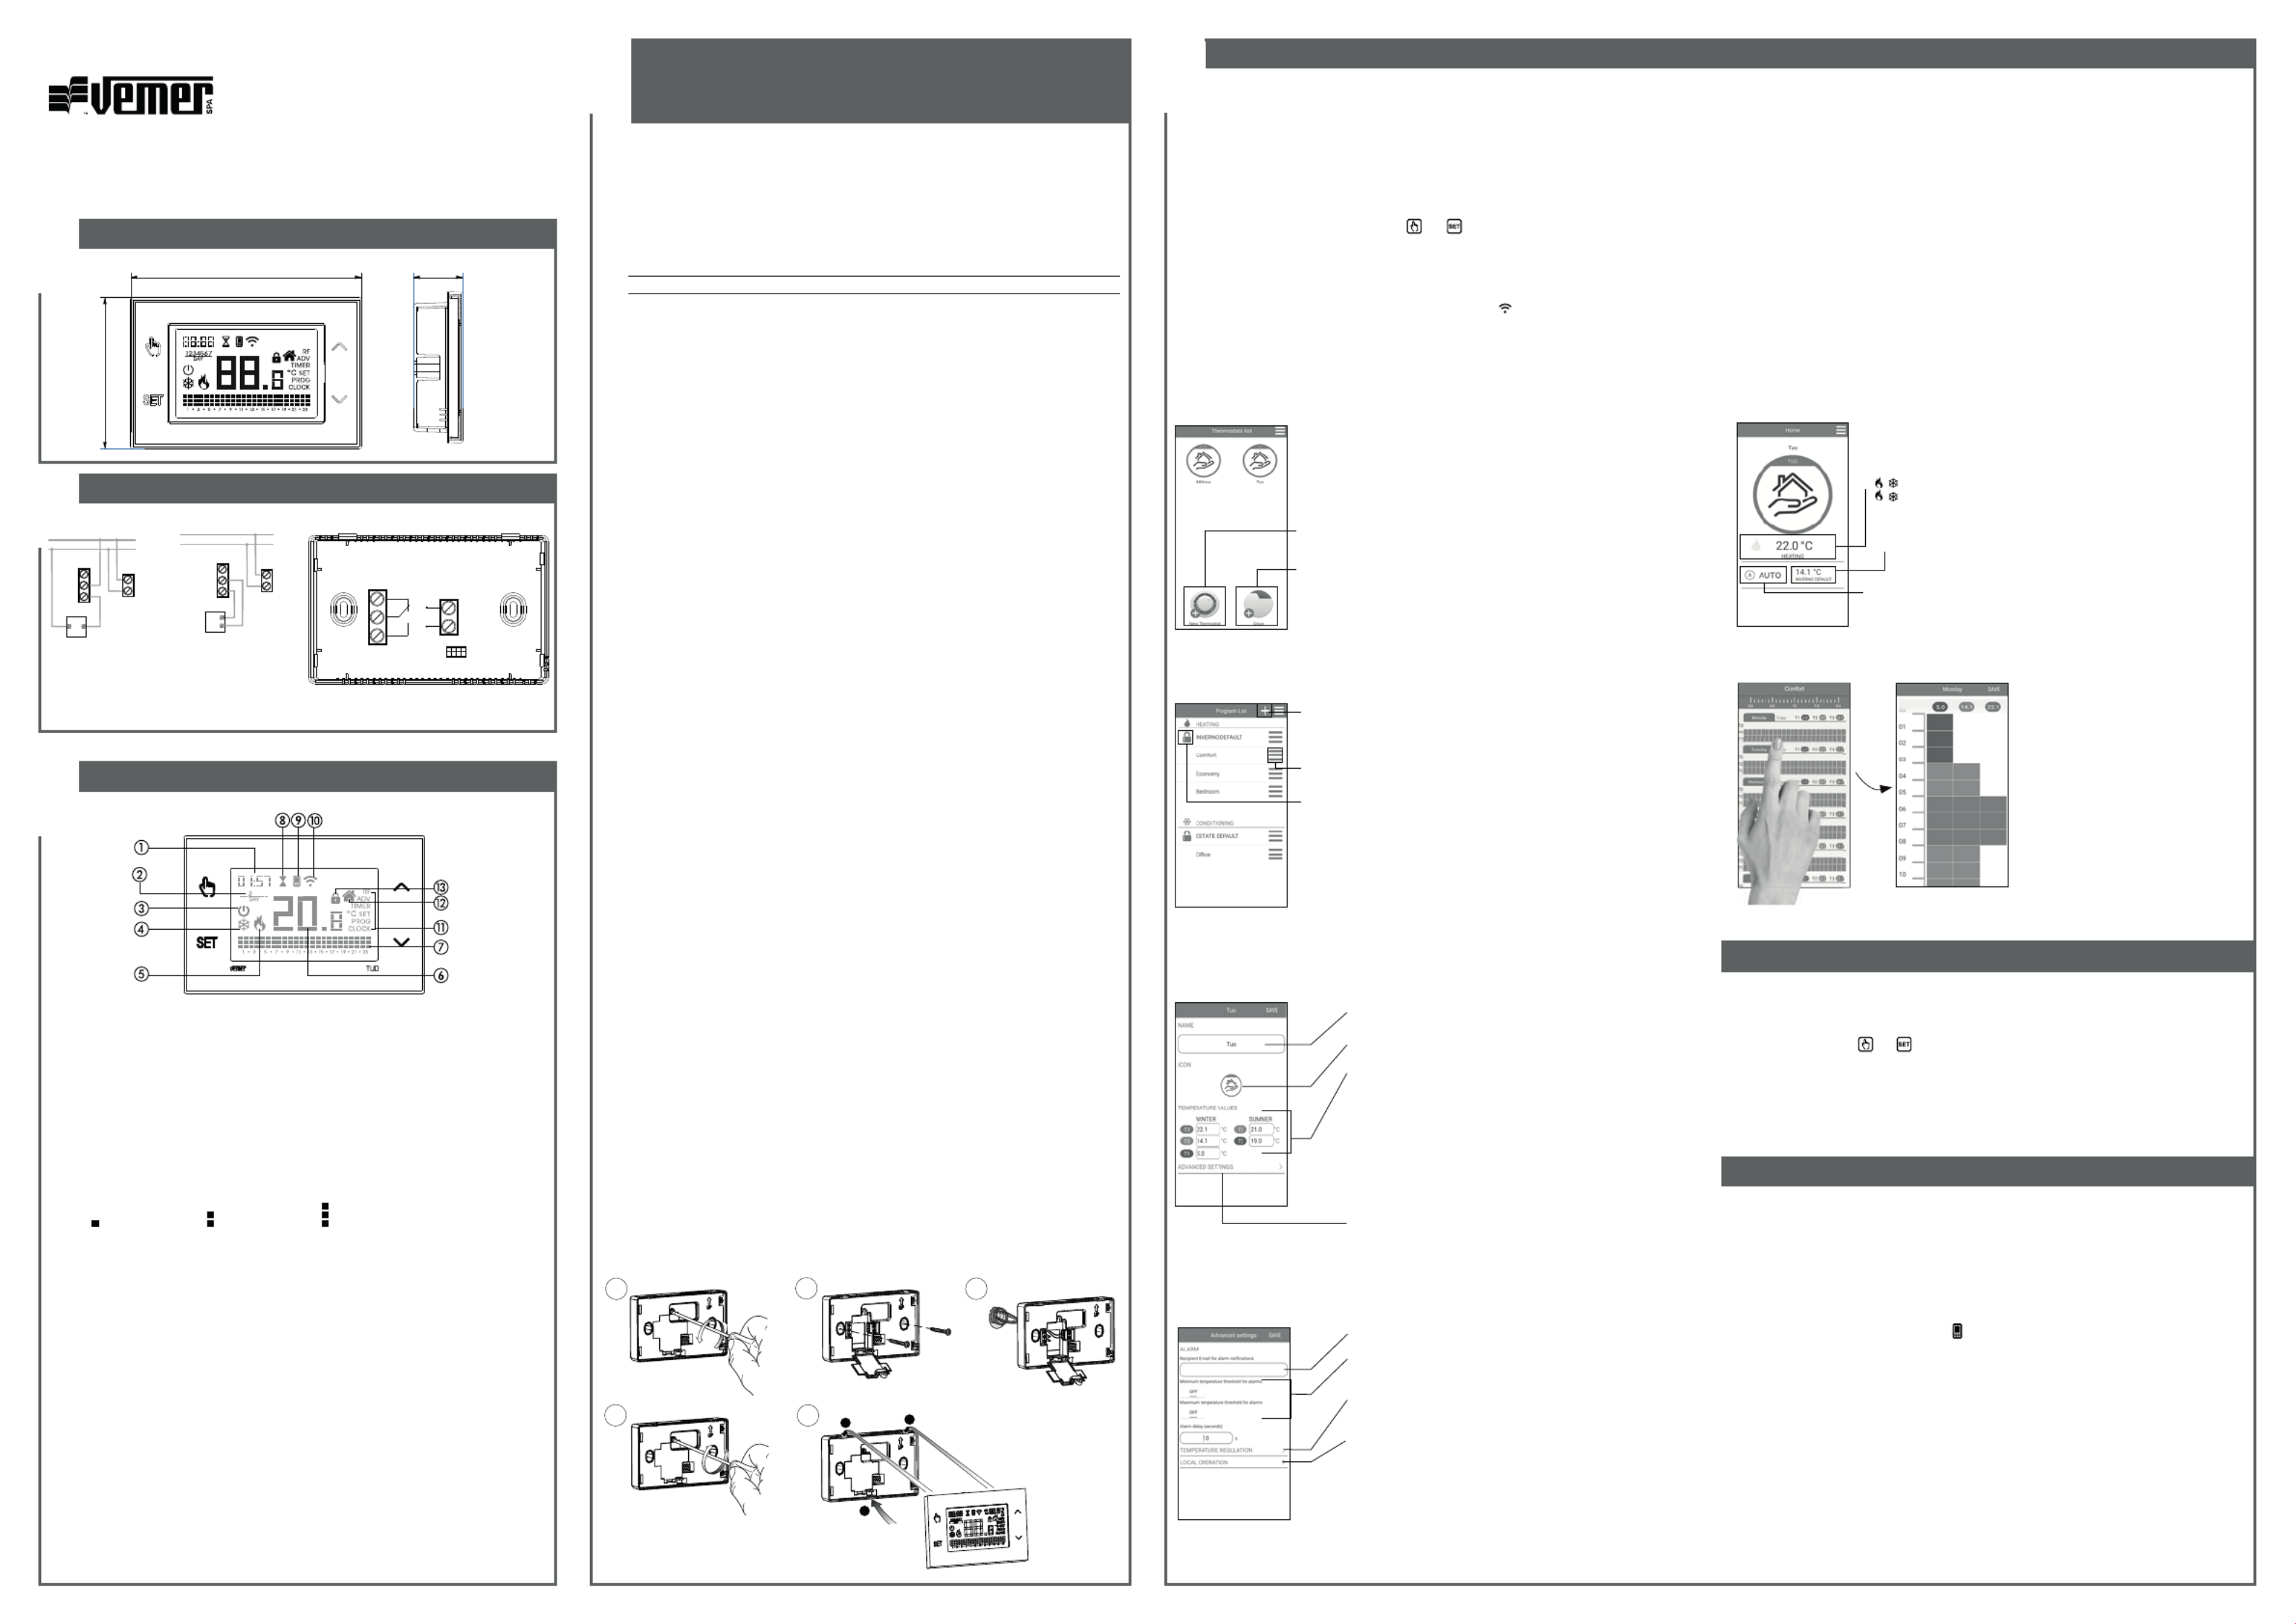
DIMENSIONS
CONNECTION DIAGRAM
DEVICE DESCRIPTION
2
Clock
Day of the week
Off operation
Active load (conditioning mode)
Active load (heating mode)
Measured temperature
Running daily program divided into 24 histograms,
one for each hour of the day. Each hour is associated with one of the 3 temperatures:
Temperature Temperature Temperature T1 T2 T3
Active timed operation
Synchronization with settings on the Vemer Cloud in progress
Connection to the active Wi-Fi network
Configuration menu:
RF (not used)
advanced parameters of the deviceADV
TIMER timings
SET automatic operating temperatures T1, T2, T3
automatic operating programsPROG
CLOCK date and time
Local active operation. In this state the device is disconnected from the Cloud Vemer
and any change in operation must be made using the keys on the chronothermostat.
Local operation can be disabled by the app
Active keypad lock
1 2 3
41
1
2
click
5
130
85
28
L
N
NC
NO
C
L
N
NO
C
NC
U
Connection diagram
for the supply of
circulation pumps,
solenoid valves,
etc. at 230V ~
L
N
NO
C
NC
U
Connection diagram
for the control of the
boiler, heat pumps, etc.
“Programs List page
From the screen “Programs list” its possible:
Vemer S.p.A.
I - 32032 Feltre (BL) • Via Camp Lonc, 16
e-mail: info@vemer.it - web site: www.vemer.it
MKIS01027-010-092020-EN Mod. TUO Wi-Fi Lite
Wi-Fi wall-mounting chronothermostat powered by mains (230 V~), suitable for the control
of heating and air-conditioning systems. The integrated Wi-Fi module allows the remote control
of the device via your smartphone or tablet. It’s necessary to connect the device to the home
router and then install the appropriate app on your smartphone or tablet available free for iOS
and Android devices.
Code Model Description
VE785700 Tuo Wi-Fi Lite Weekly chronothermostat white colour
SAFETY WARNINGS
During installation and operation of the device, it is necessary to comply with the following
instructions:
1) The device must be installed by a skilled person, in strict compliance with the connection
diagrams.
2) Do not power on or connect the device if any part of it is damaged.
3) After installation, inaccessibility to the connection terminals without appropriate tools must be
guaranteed
4) The device must be installed and activated in compliance with current electric systems
standards.
5) Before accessing the connection terminals, verify that the leads are not live.
6) In the electrical system of the building where the device must be installed, a protection device
from the overcurrents must be present.
7) The device performs actions of 1B type and is suitable for environments with pollution degree
2 and overvoltage category III (EN 60730-1).
TECHNICAL CHARACTERISTICS
Power supply: 230V AC ± 10% 50/60 Hz
Output: bistable relay with changeover contact 5A / 250V AC
Weekly programming with 3 settable temperatures: T1, T2, T3
Daily resolution: 1h
Switch-on delay set between 15, 30 or 45 minutes (independent for each hour)
Measured temperature scale: 0°C ÷ + 5C
Measured and displayed temperature resolution: 0.1°C
Temperature regulation range: 2.0°C ÷ + 50°C
Measurement update: every 20 seconds
Measurement accuracy: ± 0.5 ° C
Temperature regulation:
– on/off with adjustable differential between 0.C and 1°C
– proportional with settable band and regulation period
Operating mode: heating (winter) or conditioning (summer)
Display with blue backlighting
Automatic winter time/summer time
Keypad lock with password for installation in public places
Wall installation (or covering the box 503)
Terminal block for cables with section of 1.5 mm
2
Operating frequency band: 2.4 GHz IEEE 802.11 b/g/n
Maximum power of transmitted radiofrequency: 18.3 dBm
Operating temperature: 0°C ÷ +50°C
Operating humidity: 20% ÷ 90% non condensing
Storage temperature: -20°C ÷ +65°C
Degree of protection: IP: XXD
INSTALLATION AND INITIAL CONFIGURATION
The device can be installed on the wall or to cover the 3-module flush-mounting box (type 503).
We recommend positioning at a height of 1.5 meters from the floor, in an area that respects as
much as possible the average temperature conditions of the entire environment. Make sure that the
distance between the router and the device is such as to guarantee stable communication.
Avoid installation near doors or windows, in niches, behind doors and curtains or in positions with
excess or total lack of ventilation, to avoid that the reading of the temperature measured by the probe
is in some way offset.
1) Install and connect the device according to the connection diagrams shown in this manual
2) Install and start the “Clima Wi-Fi Vemer” app on your smartphone (or tablet). Create a Vemer account with which to associate the device Tuo Wi-Fi (If you already have a Vemer account, go to step 3).
a. Choose “Register” and fill in the “e-mail” and “password” fields and confirm by choosing “Register”.
For security reasons it is recommended to choose a password different from the one used to access your e-mail box
b. Check your e-mail box: confirm the activation of the account by clicking on the link contained in the e-mail sent by the system
3) Enter the e-mail address and password of your Vemer account
4) Add Tuo Wi-Fi to your Vemer account
• On the app... Choose “New Thermostat” and follow the guided procedure.
• On Tuo Wi-Fi.... . Hold down the keys and simultaneously until the display shows &RQIQ (7
• On the app... Choose the wi-fi network highlighted in green with the name “ ...” On the next screen select the home wi-fi network to connect Tuo Wi-Fi.iwm
Enter a name that identifies Tuo Wi-Fi, the pin (4 digits shown on the display of Tuo Wi-Fi) and choose an icon that helps identify the device among those proposed. Confirm with “Save”.
The configuration procedure is finished. At this point:
• the app displays the list of devices associated with your account among which also the newly associated device must appear.
• Tuo Wi-Fi displays the main screen. Check that the icon is fixed and that the time shown at the top left is correct.
APP DESCRIPTION
Page “Devices list
From this screen its possible to choose which device to control. The type of chronothermostat can be
recognized by the name shown on the icon.
allows you to record a new device
allows you to group several devices.
For example its possible to group all “Tuo Wi-Fi” in a building of 3 floors
according to the logic: “Floor 1”, “Floor 2” and “Floor 3”.
Main Page
This screen shows the status ofTuo Wi-Fi”:
Measured temperature (22.0°C)
Operating mode (HEATING)
System status:
( ) red = on
( ) grey = off
Set temperature and running program name.
Touch this area to change the running program.
Operating mode
Touch this area to change the operating mode
(heating/cooling) and mode (automatic/manual/off).
to create a new program
to select, to modify, to delete or to rename an existing program
Note: the padlock to the left of the name INVERNO DEFAULT
indicates that the program can not be modified or canceled.
Modify a program
To modify an existing program, select the
profile program of the day to be modified.
On the screen that opens, assign at any time
of day one of the temperature among T1,
T2 and T3 (marked by blue, green and red
colours). Created a program for a day, its
possible to copy it to any other day of the
week (“Copy” function).
Note: the image refers to the version of the
app for smartphone.
On the tablet the whole weekly programming
is visible on a single screen.
HOW TO DO IN CASE OF REPLACEMENT OF THE ROUTER
In case of replacement of the router of the home network, it is necessary
to connect the device to the new wi-fi network. Proceed as follows:
1. On Tuo Wi-Fi:
a. Hold down the keys and simultaneously until the display shows “&21)1(7
2. On the app:
b. Choose “Add Thermostat Tuo £ £Next
c. Choose the Wi-Fi network highlighted in green with the name .”iwm..
d. In the next screen select the new Wi-Fi network and enter the password
e. Exit the app the name and PIN serial numberwithout entering
HOW TO REMOVE THE DEVICE FROM YOUR ACCOUNT
Sometimes it may be necessary to delete a device from a personal account to move it to another
account, for example because the device is installed in a rented home and tenants change. Proceed
as follows:
1. On the app of the previous tenant:
a. Access the “Devices list” page
b. Hold the device to be deleted for a long time until the request to confirm deletion appears
c. After confirming the deletion, the icon starts to flash
2. On the app of the new tenant:
- If you already have a personal Vemer account:
d. Choose “Add Thermostat Tuo “Already configured”£ £
e. Enter the name, the pin (to know how to view the PIN),
see ADV menu WI-FI connection configuration)£
and an icon to help identify the device. Choose “Save”
- If you do not have a personal Vemer account yet:
d. Follow the “Device configuration” procedure described in this manual.
Tuo Wi-Fi Lite setting
From this screen its possible to modify:
The advanced settings:
• temperature alarm configuration
• e-mail of the recipient of the alarm
• regulation type
The name of “Tuo Wi-Fi”
The icon that identifies it
• The temperature values T1, T2 and T3
Advanced settings
From this screen you can:
• enter the email of the user who will receive the alarm signals
• set the temperature thresholds and the time (delay) necessary to
trigger the alarm
• choose the screen to choose the regulation type of temperature
(on/off or proportional)
• access the screen for blocking local operation.
When local operation is locked, any setting made with
Tuo Wi-Fi keypad will be ignored.
This function is useful if you want to have control
of the device only using the app and prevent changes
in settings from the keypad of Tuo Wi-Fi.
OTHER FUNCTIONS OF THE DEVICE
Display of minimum/maximum daily temperature
The device stores the values of the temperature and of the minimum and maximum humidity
measured during the day.
Initial screen
Maximum values
display
Maximum values
resetting
Initial screen
3"
Minimum values
display
Minimum values
resetting
3"
Keypad unlock
When the key lock is active, the device adjusts the temperature using the set programming. In this
condition, after pressing a key, the display shows the writing %/&
To unlock the keypad:
1. While displaying the writing press the key any of the 4 keys for a long time%/&
until the display show “ ”.
2. Enter the correct password using the keys and and confirm with the key .
The keypad remains unlocked for about 45 seconds from the last press of a key, after which
the keypad reactivates the lock. To remove the key lock, see “Password for key lock”.
REFERENCE STANDARDS
EU Conformity Declaration
Vemer declares that the device complies with the Communitary Directive 2014/53/EU (RED)
with reference to the following standards:
EN 60730-2-7, EN 60730-2-9, ETSI EN 300 328, ETSI EN 301 489-1, ETSI EN 301 489-17
The full text of the EU Conformity Declaration is available
at www.vemer.it address.
7PROGRAMMING
CLOCK MENU - DATE AND TIME SETTING
When connected to the Wi-Fi network, the device acquires the date and time settings from the
server and no settings are required. However, if you need to manually set the date and time
values, proceed as follows:
Initial screen Configuration menu
Set the year Set the daySet the month
Set the time
SET
3s
Set the seconds* Set the minutes
To exit the date and time setting:
• press the key once to return to the configuration menu
• press the key twice to exit the menu and return to the initial screen
• to change the settings of the summer/winter time change, press and hold for a long time
the key (see “Configuration of the summer/winter time change”)
Configuration of the summer / winter time change
You can configure the device to independently manage the summer time update.
The factory setting includes:
• the passage winter time summer time (+1h) the last Sunday of March at 2:00 o’clock£
• the passage summer time winter time (-1h) the last Sunday of October at 3:00 o’ clock£
To change the configuration of the summer/winter time change:
• when changing any of the clock parameters (seconds, minutes, hour, year, month or day),
keep the key pressed for a long time until the display shows AUTO
PROG MENU - PROGRAMS SETTING
Access the PROG menu to change the programming of the automatic operation.
The factory setting includes:
• the P1 program from Monday to Friday
• the P2 program on Saturday and Sunday
If this program is not suitable for your needs, you can:
• assign a different program for one or more days of the week
• modify one or more existing programs by personalizing the profile, that is, assigning different
temperature levels for one or more hours of the day.
How to choose a different program for the day Y
x1 time
Initial screen Configuration menu PROG Menu
Choose the day Y
Choose
the Px program
SET /
SET
3s
If the function is enabled (AUTO ON), it is necessary to set:
1 the day of the week (1= Monday...,7= Sunday)
2 the week of the month (1st= first, 2nd= second,...LSt= last)
3 the month of the year
4 time
using the keys and to set the value and the key to confirm and move on to the next
parameter.
To exit the summer/winter time change configuration:
• press the key once to return to the configuration menu
• press the key twice to exit the menu
Note: the winter time change summer time is identified by the symbol .£
the summer time change winter time is identified by the symbol £.
For example, in Italy the summer time starts the last (LST) Sunday (7) of March (03)
at 2:00 o’ clock and the last (LST) Sunday (7) of October (10) at 3:00 o’ clock.
Initial screen Configuration menu SET menu
Change T1 Change T2 Change T3
SET
3s x2 times
Initial screen Configuration menu TIMER menu
SET
3s
Set the timing. Increments of:
- 15 minutes (’) for timings up to 24 hours
- 1 hour (h) for timings from 1 to 5 days (d)
- 12 hours for timings from 5 to 99 days
x3 times
SET MENU - TEMPERATURES T1,T2,T3 SETTING
Access the SET menu to change the values of the 3 temperatures used in automatic
operation. The factory setting includes:
T1 = 5°C, T2 = 15°C, T3 = 18°C (heating/winter operation )
T1 = off, T2 = 23°C, T3 = 25°C (conditioning/summer operation )
How to change the temperature values T1/ T2/ T3
To exit the temperature change:
• press the key once to return to the configuration menu
• press the key twice to exit the menu and return to the initial screen
Note: temperature values between / (minimum value) and (maximum value) are allowed.N,
These factory values are: / N, = 2°C, = 50°C but can be modified through the ADV menu.
Note: the condition T1 ≤ T2 ≤ T3 must be respected.
TIMER MENU - TIMING SETTING
Set a timing to prolong the current operation for the duration of the timing itself.
There are 3 timings available:
• Timed manual: set a timing during manual operation to maintain this operation
until timing has elapsed.
At the end of the timing, the device activates the automatic operation.
Timed automatic: set a timing during the automatic operation to maintain
this operation until the timing has elapsed.
At the end of the timing, the device activates the off operation
• Off timed: set a timing during off operation to maintain this operation until
timing has elapsed. At the end of the timing, the device activates automatic or
manual operation, depending on which operation was active before switching of f.
How to set a timing
To exit the timing change:
• press the key once to return to the configuration menu
• press the key t wice to exit the menu and return to the initial screen
When a timing is in progress, the symbol is lit.
Note: to cancel a timing in progress or to exit without activating the timer, set 00.
Note: the timing ends in the case of changes to the operating mode.
ADV MENU - ADVANCED PARAMETERS SETTING
Initial screen Configuration menu ADV menu
SET
3s x4 times
In the ADV menu, the parameters related to the advanced configuration of the device
are proposed in sequence. Press:
• the keys and to change the value of the selected parameter
• the key to go to the next parameter
• the key to exit and confirm the changes
Note: the device exits the menu after about 40 seconds without any key being pressed.
Operating mode
Setting up:
se if the device is connected to a heating system5,6&
(winter operation)
if the device is connected to an air conditioning system&21'
(summer operation)
Factory value: 5,6& (heating).
Parameters for the regulation type
(this menu varies depending on the chosen regulation type)
If the chosen regulation type is on/off, set the dif ferential GLI.
Allowed values: 0.1°C ÷ 1°C Factory value: 0.3 °C
If the chosen regulation type is proportional,
set the band and the period . EQG SHU
Allowed values: 0.5°C ÷C (band), 10, 20 or 30 minutes (period).
Factory value: 0.5 °C (band), 10 minutes (period).
Adjustment of the measured temperature
In particular installation conditions, it can happen that the temperature
measured by the device deviates from the average temperature present
in the room. In this case, introduce an adjustment temperature with
the ADJ menu.
Allowed values: -C ÷C Factory value: 0 °C.
Note: the temperature value shown on the display during normal operation is
inclusive of any adjustment introduced.
Antifreeze temperature
(this menu is active only if operating mode = heating)
The antifreeze temperature avoids the risk of freezing of the system
when on the chronothermostat is set the of f operation .
Allowed values:  , 1°C ÷ 50°C Factory value: 6 °C.
Note: the “” setting excludes the antifreeze function; in this case,
when the device is off, no minimum temperature is guaranteed
Type of regulation
(this menu is active only if operating mode = heating)
Setting up:
O to choose on/off regulation.
P to choose proportional regulation.
Factory value: (on/off).O
Note: the on/off regulation is suitable for most home situations.
Therefore it is advisable to modify this parameter only in case of real need.
Wi-Fi connection configuration
This sub-menu consists of 3 different screens and described below.
To switch from one screen to another, use the keys and .
• the device PIN. It is a 4-digit number necessary to associate the device
with your Vemer account.
This screen also shows:
- the status of the Wi-Fi connection:
on fixed: device connected to the home network
ashing: search for Wi-Fi network in progress
- the association between the device and Vemer account:
on fixed: associated with a Vemer account
ashing: not associated with any Vemer account
Note: during the first 20 seconds or so of this screen viewing
the icon is always flashing.
• the MAC address of the device. It is a sequence of characters that identifies
uniquely a device inside of a network of devices (reading must be done from
left to right. In the example: C28d7b)
• the intensity of the signal between the device and the router (FLD).
For values:
- higher than -60dB: excellent signal quality
- between -60dB and -90dB: good signal quality
- lower than -90dB: poor signal quality that could compromise communication
between device and router. In this case, bring the device closer to the router.
Minimum/Maximum settable temperature
Under particular installation conditions, for example in public buildings, hotels,
etc., it may be useful to limit the range of values that the temperatures T1/T2/T3
and Tm can assume, in order to prevent incorrect settings by the user.
is the lower limit/
Allowed values: 2°C ÷ Factory value:CNL
is the upper limitNL
Allowed values: ÷ 50°C Factory value: 50°C/
Password for key lock
Under particular installation conditions, for example in public buildings, hotels,
etc., it may be necessary to lock the keypad to prevent changes to the settings
by unauthorized persons.
To activate the keypad lock, set a password between 001 and 999.
To deactivate the lock, press the key until you set “--”.
When the keypad lock is active, the symbol appears on the display and,
after pressing a key, the word BL0C appears.
To find out how to unlock the keypad, see “Keypad unlock”
Hour meter of system operation
It displays the operating hours of the system (relay contacts on C-NA).
The device has two counters (5-digit) independent for heating operation
and for the conditioning operation, but is displayed only the counter
of the selected operation mode.
To reset the counter, press the key for a long time during the display.
The maximum count is 65535h (about 7 years), when this digit is reached,
the counter resumes the count from 0h.
Perform a reset to cancel the settings made and bring the device back to the conditions in which it
appears as soon as it has been removed from the packaging.
To reset:
1. from the initial screen, press the key to enter the configuration menu.
The CLOCK indication flashes.
2. press the keys and simultaneously until ” appears on the display.5(6
3. when the display shows all the segments, press the key until ” appears'()
SET
3s
SET
3s
3"
+
Initial screen
Configuration
menu
To reset if the key lock is active and you do not know the unlock password,
you must remove and restore power and, when the display shows all the segments,
press the key until ”appears.'()
Operation mode heating
(winter)
Regulation type on/o
Dierential (on/o) 0.3 °C
Band (proportional) 0.5 °C
Period (proportional) 10 minutes
Antifreeze temperature OFF 6 °C
Add. ADJ temperature 0 °C
Min. settable temperature 2 °C
Max. settable temperature 50 °C
Hour meter operation / 0 h
Automatic summer time change active
(according to EU rules)
Backlighting active
Key lock password deactivated
Display backlighting
The blue backlighting of the display during normal operation is on but can be turned off if the
installation requires it (for example in bedrooms).
In this condition, the thermostat continues to work normally and the backlighting turns on when
you enter the setpoint modification, advanced programming, pin insertion.
3"
3"
2
4
1
3
If the program meets the needs:
• press the key once to confirm and choose another day to which to assign a different program
• press the key twice to return to the configuration menu
• press the key three times to exit the menu and return to the initial screen
If no program meets the needs:
• choose the one that is closest to you and press the key to customize the profile:
- starting from midnight 00:00, press the keys and to assign to each hour of the day
one of the 3 possible temperatures (T1, T2, T3) and the key to confirm and go to the next
hour.
- to enter a switching delay for the selected hour, press the key for a long time.
For more information about switching delay, see “How the switching delay works”.
When the profile program is suitable for your needs:
• press the key to exit the customization.
How the switching delay works
Set a switching delay for a specific hour to maintain, for the duration
of the delay, the temperature value assigned to the previous hour.
For example, if the program includes:
T2 from 12 to 13 and T3 from 13 to 14 pm with 30 minutes delay
the chronothermostat adjusts the temperature based on the value of
T2 from 12 to 13.30 and T3 from 13.30 to 14.00
It is possible to set delays of 15, 30, 45 minutes, independent for every hour of the day.
DEVICE RESET


Product specificaties

Merk: Vemer
Categorie: Thermostaat
Model: Tuo Wi-Fi Lite

Heb je hulp nodig?

Als je hulp nodig hebt met Vemer Tuo Wi-Fi Lite stel dan hieronder een vraag en andere gebruikers zullen je antwoorden


Handleiding Thermostaat Vemer

Handleiding Thermostaat

Nieuwste handleidingen voor Thermostaat