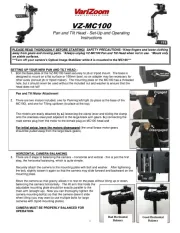
VariZoom VZ-MC100 Handleiding
VariZoom
Niet gecategoriseerd
VZ-MC100
Bekijk gratis de handleiding van VariZoom VZ-MC100 (5 pagina’s), behorend tot de categorie Niet gecategoriseerd. Deze gids werd als nuttig beoordeeld door 20 mensen en kreeg gemiddeld 5.0 sterren uit 10.5 reviews. Heb je een vraag over VariZoom VZ-MC100 of wil je andere gebruikers van dit product iets vragen? Stel een vraag
Pagina 1/5

1
VZ-MC100
Pan and Tilt Head - -Up and Operating Set
Instructions
PLEASE READ THOROUGHLY BEFORE STARTING! SAFETY PRECAUTIONS: *Keep ngers and loose clothing
away from gears and moving parts. *Always unplug VZ-MC100 Pan and Tilt Head when not in use. *Mount only
on stable surfaces.
***Turn off your camera’s Optical Image Stabilizer while it is mounted to the MC100***
SETTING UP YOUR NEW PAN AND TILT HEAD –
1. Bolt the base plate of the VZ-MC100 head securely to jib or tripod mount. The base is
designed to mount on a at surface or 100mm bowl, so an adapter may be necessary for
other sizes (consult jib or tripod maker). The mounting plate on the MC100 has a threaded
hole, but it should never be used without the included nut and washer to ensure that the
head does not fall!
Pan and Tilt Motor Attachment
2. There are two motors included, one for Panning left/right (to place at the base of the
MC100), and one for Tilting up/down (to place at the top).
The motors are easily attached by loosening the clamp lever and sliding the clamp a.)
onto the stainless steel post adjacent to the large black arm gears. connecting the b.)
male stereo plug from the motor to the female plug on MC100 head and
For initial setup, leave the motors disengaged (the small brass motor gears
should be from the large black gears). pulled away
HORIZONTAL CAMERA BALANCING
3. There are 2 steps to balancing the camera horizontal and vertical - this is just the first –
step, the horizontal balancing, which is quite simple.
Securely attach the camera to the mounting plate with bolt and washer. After tightening
the bolt, slightly loosen it again so that the camera may slide forward and backward on the
mounting plate.
Move the camera so that gravity allows it to rest on the plate without tilting up or down,
balancing the camera horizontally. The tilt arm that holds the
adjustable mounting plate should be exactly parallel to the
main arm (straight up). Now you can thoroughly tighten the
camera mounting bolt(s) so that the camera doesn’t slide
when tilting (you may want to use multiple bolts for large
cameras with tripod mounting plates).
CAMERA MUST BE PROPERLY BALANCED FOR
OPERATION.
Bad Horizontal
Balance
Good Horizontal
Balance

2
VERTICAL CAMERA BALANCING
4. The second step of balancing the camera is the vertical balancing, which is a
little more involved and less intuitive.
As you may have noticed, the adjusts up and down along camera platform
the two support rods (pictured at right). The two levers on either side of the
platform must be loosened to mak DO NOT LOOSEN AT e the adjustment –
THIS TIME. These levers can be repositioned without loosening or tightening
by simply pressing on the button and lifting the lever, then rotating it. When
you want to loosen or tighten the lever, simply rotate it normally (“lefty
loosey, righty tighty”).
With the camera horizontally balanced, rotate the platform so the camera is
exactly vertical. Be sure to keep the gears disengaged.
If the camera stays vertical, it is pretty close to vertically balanced.
If the camera platform swings down, the camera is too low and you
need to slide it upward (1). Loosen levers and adjust.
If the camera platform swings up, you need to slide it downward (2).
Loosen levers and adjust.
It is easier to adjust the camera platform with the camera pointing up (the rods horizontal, as pictured above),
as you won’t have to support the weight of the camera while you adjust the platform position.
If the camera stays vertical, go ahead and tighten the levers.
NOW TILT THE CAMERA AT VARIOUS ANGLES ALL THE WAY AROUND IT SHOULD HOLD ANY POSITION –
IF PROPERLY BALANCED. YOU MAY NEED TO TWEAK THE HORIZONTAL AND VERTICAL POSITIONS TO
GET IT EXACTLY RIGHT.
A BALANCED CAMERA WILL HOLD ANY POSITION THROUGH 360 DEGREES WITHOUT THE MOTORS
ENGAGED. THE CAMERA MUST BE THOROUGHLY BALANCED FOR PROPER OPERATION.
5. Engage the brass motor gears to the large black gears on the arm
and tighten. Be sure the levers are pointing away from the rotating
arm.
-NOTE: Once tightened, you can adjust the position of the lever by
simply pulling out on it and then rotating the lever until it faces
away. This will NOT loosen the fastener. Failure to aim lever
away will impede the movement of the MC100.
1
2

3
Connecting the Cables
1. Connect the locking 4-pin control cable to the 4-pin motor cord at the
base of the MC100.
2. Connect the other end of the 4-pin control cable to the
MC100 Control Unit at the locking 4-pin connector.
The additional 3-pin port located beneath the motor cable port
will provide 24VDC output.
3. Connect the 4-pin XLR power cable from the AC adapter to the
4-pin XLR power connector located on the MC100 Control Unit.
OPERATION OF MC100 CONTROL UNIT
1. ner The joystick controls the head in an intuitive man . You can change the
direction of the pan response by flipping the switch “L” to “R”, while the
middle position of the switch “OFF” will put the motor into neutral. This
OFF position is very helpful in situations where you want to prevent motion
or to pan without tilting (or vice-versa). You can also change the direction
of the tilt response by flipping the switch “Up” to “Dn”, while the middle
position of the switch “OFF” will put the motor into neutral.
Also note the silver dials for changing the maximum pan and tilt speeds.
You may want to keep these turned up at least 1/3 of the way for best
operation.
Overslung/Underslung Operation
When switching between overslung and underslung, the left-right (pan)
response of the joystick will be ipped. The toggle switch on the control box
allows you to reverse the left-right response of the joystick.
Product specificaties
| Merk: | VariZoom |
| Categorie: | Niet gecategoriseerd |
| Model: | VZ-MC100 |
Heb je hulp nodig?
Als je hulp nodig hebt met VariZoom VZ-MC100 stel dan hieronder een vraag en andere gebruikers zullen je antwoorden
Handleiding Niet gecategoriseerd VariZoom

24 Mei 2025
24 Mei 2025

24 Mei 2025
24 Mei 2025
24 Mei 2025
Handleiding Niet gecategoriseerd
- Bellini
- Tece
- Dupla
- Silverline
- BBQ Premium
- Artrom
- BEA
- Concept2
- Snoes
- Dateq
- Wasco
- Heinner
- Lexar
- IMC Toys
- Noyafa
Nieuwste handleidingen voor Niet gecategoriseerd
7 September 2025
5 September 2025

5 September 2025

5 September 2025
5 September 2025

5 September 2025
4 September 2025
4 September 2025
4 September 2025

4 September 2025