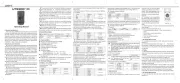
Uni-T UT387D Handleiding
Uni-T
Meetapparatuur
UT387D
Bekijk gratis de handleiding van Uni-T UT387D (2 pagina’s), behorend tot de categorie Meetapparatuur. Deze gids werd als nuttig beoordeeld door 59 mensen en kreeg gemiddeld 4.7 sterren uit 30 reviews. Heb je een vraag over Uni-T UT387D of wil je andere gebruikers van dit product iets vragen? Stel een vraag
Pagina 1/2

P/N:110401109648X
1. Introduction
UT387D is mainly used to detect the metals (rebar/copper pipe) and cables behind the walls, ceilings, and floors, and
it also can detect metals, cables and wood battens under the plasterboard.
2. Safety Instruction
To use the product properly, please read the following instructions carefully before use:
Only qualified maintenance personnel can repair the instrument. Please contact your local distributor if any damage
is found.
To avoid electromagnetic radiation interference, do not use the instrument near other devices and medical instruments
like pacemaker and hearing aids.
Do not use the instrument in explosive and inflammable environment.
Do not use the sensor on the airplane.
Dispose the instrument and accessories properly according to local waste management policy.
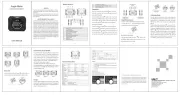
1) Foreign body detection button (Generally for wooden batten)
2) On/off button of detection function
3) Metal and AC detection button
4) Micro-USB charging interface
Warning!
Please charge the instrument by safe charger with output voltage of 5V,
current of 500mA and micro-USB interface. Our company will not be responsible ≥
for any accident caused by using wrong charger.
4. Specifications
Ferrous metals------------------------------ 100mm
Nonferrous metals (Copper) ------------ 80mm
Copper wire ( 4 mm²)------------------- 40mm
Foreign body (wooden batten)---------- 20mm/38mm
≥
Metal mode 0 85%RH~
Foreign body mode 0 60%RH~
Measuring Parameters
Maximum depth
Operating humidity range
General Parameters
Auto power off
Display
Battery type and life
Product size
Operating temperature
Storage temperature
About 5 minutes
1.8-inch color display
300mAh built-in Li-ion, about 3000 times for fully charging by single test
135 60 25mm* *
-10 C 40 C° ~ °
-20 C 60 C° ~ °
The detection results will be af fected by the material, shape and size of the detected objects, as well as the material
and condition of the detected surface. For uncharged wire, the detecting depth of AC will be reduced.
5. Cautions
Keep the product dry against moisture, and do not expose the instrument directly to strong sunlight.
If the instrument was exposed to great difference in temperature, please wait a while for the temperature recovery
before use.
Using or operating a transmitter such as a microwave oven near the sensor may affect the results.
Basically, the detection results may be influenced by environment factors, which refer to strong magnetic or
electromagnetic field generating by other machines. In addition, moisture, metal building materials, aluminum
cladding of insulating materials, and wallpaper, carpet or tile with conductivity will also affect. Hence we must check
the related information (such as architectural drawings) before the drilling, sawing of wallboard, ceiling and floor.
6. For the Best Measurement
Avoid wearing any jewelry (such as rings or watches) when using sensor. Metals may cause inaccuracy.
Move the tool evenly on the surface without lifting or changing the applied pressure.
Maintain the contact between the tool and the surface during detection.
Make sure the holding hand do not touch the scanned surface.
Do not touch the sensor or scanned surface with another hand or any other part of body.
Always test slowly for maximum accuracy and sensitivity.
7. Detection function
7.1Metal Calibration
Make sure there is no moisture on the surface of casing before starting the detection function. Dry the instrument with
a cloth if it is necessary.
Short press the button 2 to turn on the detection function, and press the button 3 to enter the interface of metal detection:
As shown in figure 2, the interface of metal detection function is prepared for detection, and
the speaker indicates the current detection mode (if the speaker is turned off, there will be no
sound). At this time, if one of the icons of steel bar, copper pipe and stainless steel pipe is
displayed on the screen without metal interference, the calibration is required. Place the
instrument in an environment free of metal and strong magnetic field interference (such as:
lift the instrument into the air by hand, etc.), and then press and hold the metal detection
button 3 until the screen shows the interface as Figure 2.
7.2 Detection of Metal Objects
The maximum metal detection depth is 100mm
Short press button 2 to turn on the detection function, and press button 3 to enter the metal detection interface:
Place the instrument on the detecting surface and move it to the left or right by a consistent direction.
When the instrument gradually detects the metal object, the metal icon will be displayed on the screen and gradually
become larger as it is getting close. At the same time, the speaker prompts "metal". When it is closest to the metal
object, a central icon will appear on the screen.
Metal icons: the steel bar icon represents magnetic metal, and the measured object is generally steel bar; the copper
pipe icon means non-magnetic metal, the measured objects are generally copper pipe or alloy. When the instrument
is judged to be magnetic metal or non-magnetic metal, the distance from the instrument to the metal object will be
displayed (as shown in Figure 4 and Figure 5); otherwise, it will not be displayed (as shown in Figure 6).
When metal substances and AC electrical signals are detected at the same time (as Figure 3). The instrument will
emit a rapid "drip drip..." sound.
When the AC current symbol appears, it indicates that there is an AC current signal nearby.
Note: the detection depth will be displayed synchronously on the screen during metal detection. The accuracy of the
depth is related to the shape and material of the measured metal, the distribution of the measured objects, and
surrounding media properties. When the measured object is standard steel bar/copper pipe with diameter of 18mm,
the accuracy of depth can reach maximum. Otherwise, the depth can only be used as a rough reference value.
3.Appearance
Figure 3 Figure 4 Figure 5 Figure 6
Figure 2
On AC mode 0 30%RH~

Do not put any label or nameplate on the detection area (front and rear) of instrument. Especially do not put any
metal nameplate.
Store and carry the instrument with the attached protective bag.
9. Disposal of Waste
Damaged instruments, accessories and packaging materials must be recovered and reused in an environmentally
friendly manner.
8. Maintenance and Cleaning
In order to ensure the good performance of sensor, please follow the instructions below to maintain:
Please do not expose the instrument to extreme cold or hot environment, and do not put external pressure or vibration
on it for a long time.
The product is required to be stored indoors. When it is not in use, please place it in box.
Avoid using the product in the dusty and damp environment. Wipe the dirt of the product by a soft damp cloth to
clean the product. Do not use corrosion, volatile substances, detergent or solvents.
Please replace the battery when the battery status is displayed as low on screen.
Please do not disassemble the instrument without permission to avoid laser damage.
Do not change any optical component of the lens.
Cause
Low battery
Poor button reaction
Solutions
charging
Try to press the power button slightly or send
it for maintenance
Phenomenon
Power-boot failure
1) Press the wood button to enter the foreign body detection mode (as shown in Figure 7), and speaker will indicate
the current detection mode (mute if the sound is turned off).
2) When detecting foreign bodies, the instrument must be vertically attached to the wall and then press the button to
detect. Keep the instrument stay for 1-3s and the instrument calibration will be completed (as shown in Figure 7 and
Figure 8) before conducting the detection operation. Place the sensor on the surface of object and move it evenly
and slowly in the same direction to the left or right, without lifting or applying additional pressure.
1.Signal area and center icon. The center icon appears when the signal reaches
maximum.
2.The current maximum depth of detection is 20mm, Long press the button 1 to
switch to maximum depth 38mm.
3.When the center icon is displayed, the properties of the currently measured
object are displayed here, as follows:
indicates that the measured object is a wooden beam
indicates that the subject is an iron nail
indicates that the measured object is light steel keel
indicates that the measured object is cable
indicates can’t be distinguished between cable and nail
4.This icon is displayed only when the measured object is detected as cable and
simultaneously detects an AC electrical signal.
Figure 10
Warning
In some cases, live wires in walls may not be able to accurately indicated because of internal equipment malfunctions
or improper operation, so do not identify the presence of dangerous live wires totally dependent on the instrument, other
evidences, such as construction drawings or visual identification of wiring or pipe entrance, should also be adopted.
Never take any dangerous operation if there is any live wires in the wall. Be sure to turn of f power, gas, and water
before turning holes or studding the wall.
Concrete, brick, and ceramic surfaces have shielding effects on electric field signals of firing line, which means AC
signal detection will be affected.
AC signals can be easier to be detected when the consumer is connected to the required conductor and turned on.
Signals from live wires will spread from both sides of the actual wire, so sometimes the area of live wire alarms looks
much larger than the actual wire.
AC signals come mainly from live wires, and may also come from static or induced electricity of the environment.
Placing your hand on the wall may help eliminate static and inductive electricity.
The signal strength of a live wire depends on the location of the cable. Therefore, please take further measurements
nearby or use other information to check for live wires.
Non-live wires may be detected as metal objects, and thin wires may not be detected.
7.3 Foreign Body Detection(generally for the wooden batten):
Maximum detection depth: Accurate mode: 20mm; Deep mode: 38mm. Long press the button 1 to switch between
Accurate and Deep modes.
The foreign body detection mode is for objects in gypsum drywall, plywood, solid wood, and coated wood walls.
This mode can’t detect objects in concrete, mortar, lumps, bricks, carpets, foils, metal surfaces, tiles, glass or any
other non-uniform density materials.
Sensitivity depth and accuracy will vary by moisture, material content, wall texture and paint.
The foreign body detection mode actually detects more than just wood batten. It can also detect metals and other
dense materials.
3) When the instrument detects foreign matter, the screen displays signal the strength synchronously (as shown in
Figure 9).
4) Continue to move the instrument in the same direction. When the instrument is in the middle of wooden batten, Icons
1 and 3 in Figure 9 will be displayed.
5) At this time, keep moving in the same direction. When the instrument leaves the center of the measured object, the
screen will display the interface as Figure 9. Continue to move the instrument away from wooden block, the signal
gradually decreases until there is no signal. The display screen displays as shown in Figure 9, and the detection
operation is completed.
Note: repeat the detection, the location will be more accurate.
Please note:
Sometimes due to various environmental factors, the instrument may not be automatically calibrated, and there may
be wrong alarm signal, please calibrate manually . Short press the button of foreign body detection mode, and the
screen displays the interface as Figure 9.
If the instrument has just been calibrated on the wooden batten, move the tool out of the wooden batten scope and
only detect it when the wooden batten is tested again.
If you receive erratic results, it may because of moisture in the wall cavity or drywall, or the recent application of
partially dried paint or wallpaper. While moisture may not always be visible, it can interfere with the sensors. Please
let the walls dry for a few days.
For some environmental factors or uneven surfaces, it is dif ficult to detect wood studs with foreign body detection
mode. It may be easier to detect by the metal detection mode, which can locate the nails that hold the material to the
wood nails.
Depending on how close the wire or pipe is to the wall, the instrument can detect them it as same as foreign body
detection. Always be careful when nailing, cutting or drilling walls, floors and ceilings that may contain these items.
Figure 7 Figure 8 Figure 9
Product specificaties
| Merk: | Uni-T |
| Categorie: | Meetapparatuur |
| Model: | UT387D |
Heb je hulp nodig?
Als je hulp nodig hebt met Uni-T UT387D stel dan hieronder een vraag en andere gebruikers zullen je antwoorden
Handleiding Meetapparatuur Uni-T

9 Juni 2025
1 Mei 2025

12 April 2025
5 April 2025

3 April 2025

3 April 2025

3 April 2025

3 April 2025

3 April 2025

3 April 2025
Handleiding Meetapparatuur
- Laica
- Multimetrix
- Owon
- Topex
- Noyafa
- Proficare
- Oscium
- CEM
- Megger
- Fantini Cosmi
- Voltcraft
- Goclever
- TDE Instruments
- Ideal
- Aeroqual
Nieuwste handleidingen voor Meetapparatuur
29 Juli 2025
29 Juli 2025
29 Juli 2025
29 Juli 2025
29 Juli 2025

29 Juli 2025
28 Juli 2025
28 Juli 2025
28 Juli 2025

28 Juli 2025