Tristar RK-6160 Handleiding
Tristar pénztárgép RK-6160
Bekijk gratis de handleiding van Tristar RK-6160 (10 pagina’s), behorend tot de categorie pénztárgép. Deze gids werd als nuttig beoordeeld door 4 mensen en kreeg gemiddeld 4.3 sterren uit 5 reviews. Heb je een vraag over Tristar RK-6160 of wil je andere gebruikers van dit product iets vragen? Stel een vraag
Pagina 1/10
ProblemExplanation
Steam leaks from lid.Make sure the lid is closed properly. Turn it to the
locked position. Seal ring is missing or dirty, clean
it or install it.
Lid can not be opened.Float valve is still up, wait or use quick release.
Bad smell or smoke.If you are using the appliance for the rst time,
let it run with water for 10 minutes. If the problem
continues, stop using it and contact support.
If there is any damage or unusual operation please contact the manufacturer or its
service agent to check and repair the appliance.
CLEANING AND MAINTENANCE
1. Clean the appliance after every use.
2. Always unplug the appliance and let it cool down before cleaning.
3. Do not use strong or harsh cleaning products. They can damage the appliance.
4. Do not use sharp or metal tools to clean the appliance.
5. Never immerse the electrical appliance in water or any other liquid. The appliance is
not dishwasher proof.
6. The inner pot, rice scoop, measuring cup, and cooking stand are dishwasher safe.
7. The lid is not dishwasher safe. Wash it by hand with warm soapy water.
8. Wash the Seal Ring, Exhaust Valve, Exhaust Valve Protector, Float Valve and Float
Valve silicon cap with hot soapy water. Rinse and dry carefully. Clean the Exhaust
Valve and Exhaust valve protector only if a build up of residue is noticeable. Make
sure all is dry and connected properly again before using the appliance again.
9. Dry all parts completely before using or storing the appliance.
STORAGE
Store the cooker in a dry place.
Keep it out of reach of children and pets.
DISPOSAL
Do not dispose of electrical appliances as unsorted municipal waste,
use separate collection facilities. Contact your local government for
information regarding the collection systems available. If electrical
appliances are disposed of in landlls or dumps, hazardous substances
can leak into the groundwater and get into the food chain, damaging
your health and well-being. When replacing old appliances with new
ones, the retailer is legally obligated to take back your old appliance for
disposals at least free of charge.
Support
You can nd all available information and spare parts at www.tristar.eu!
d
Gebruikshandleiding
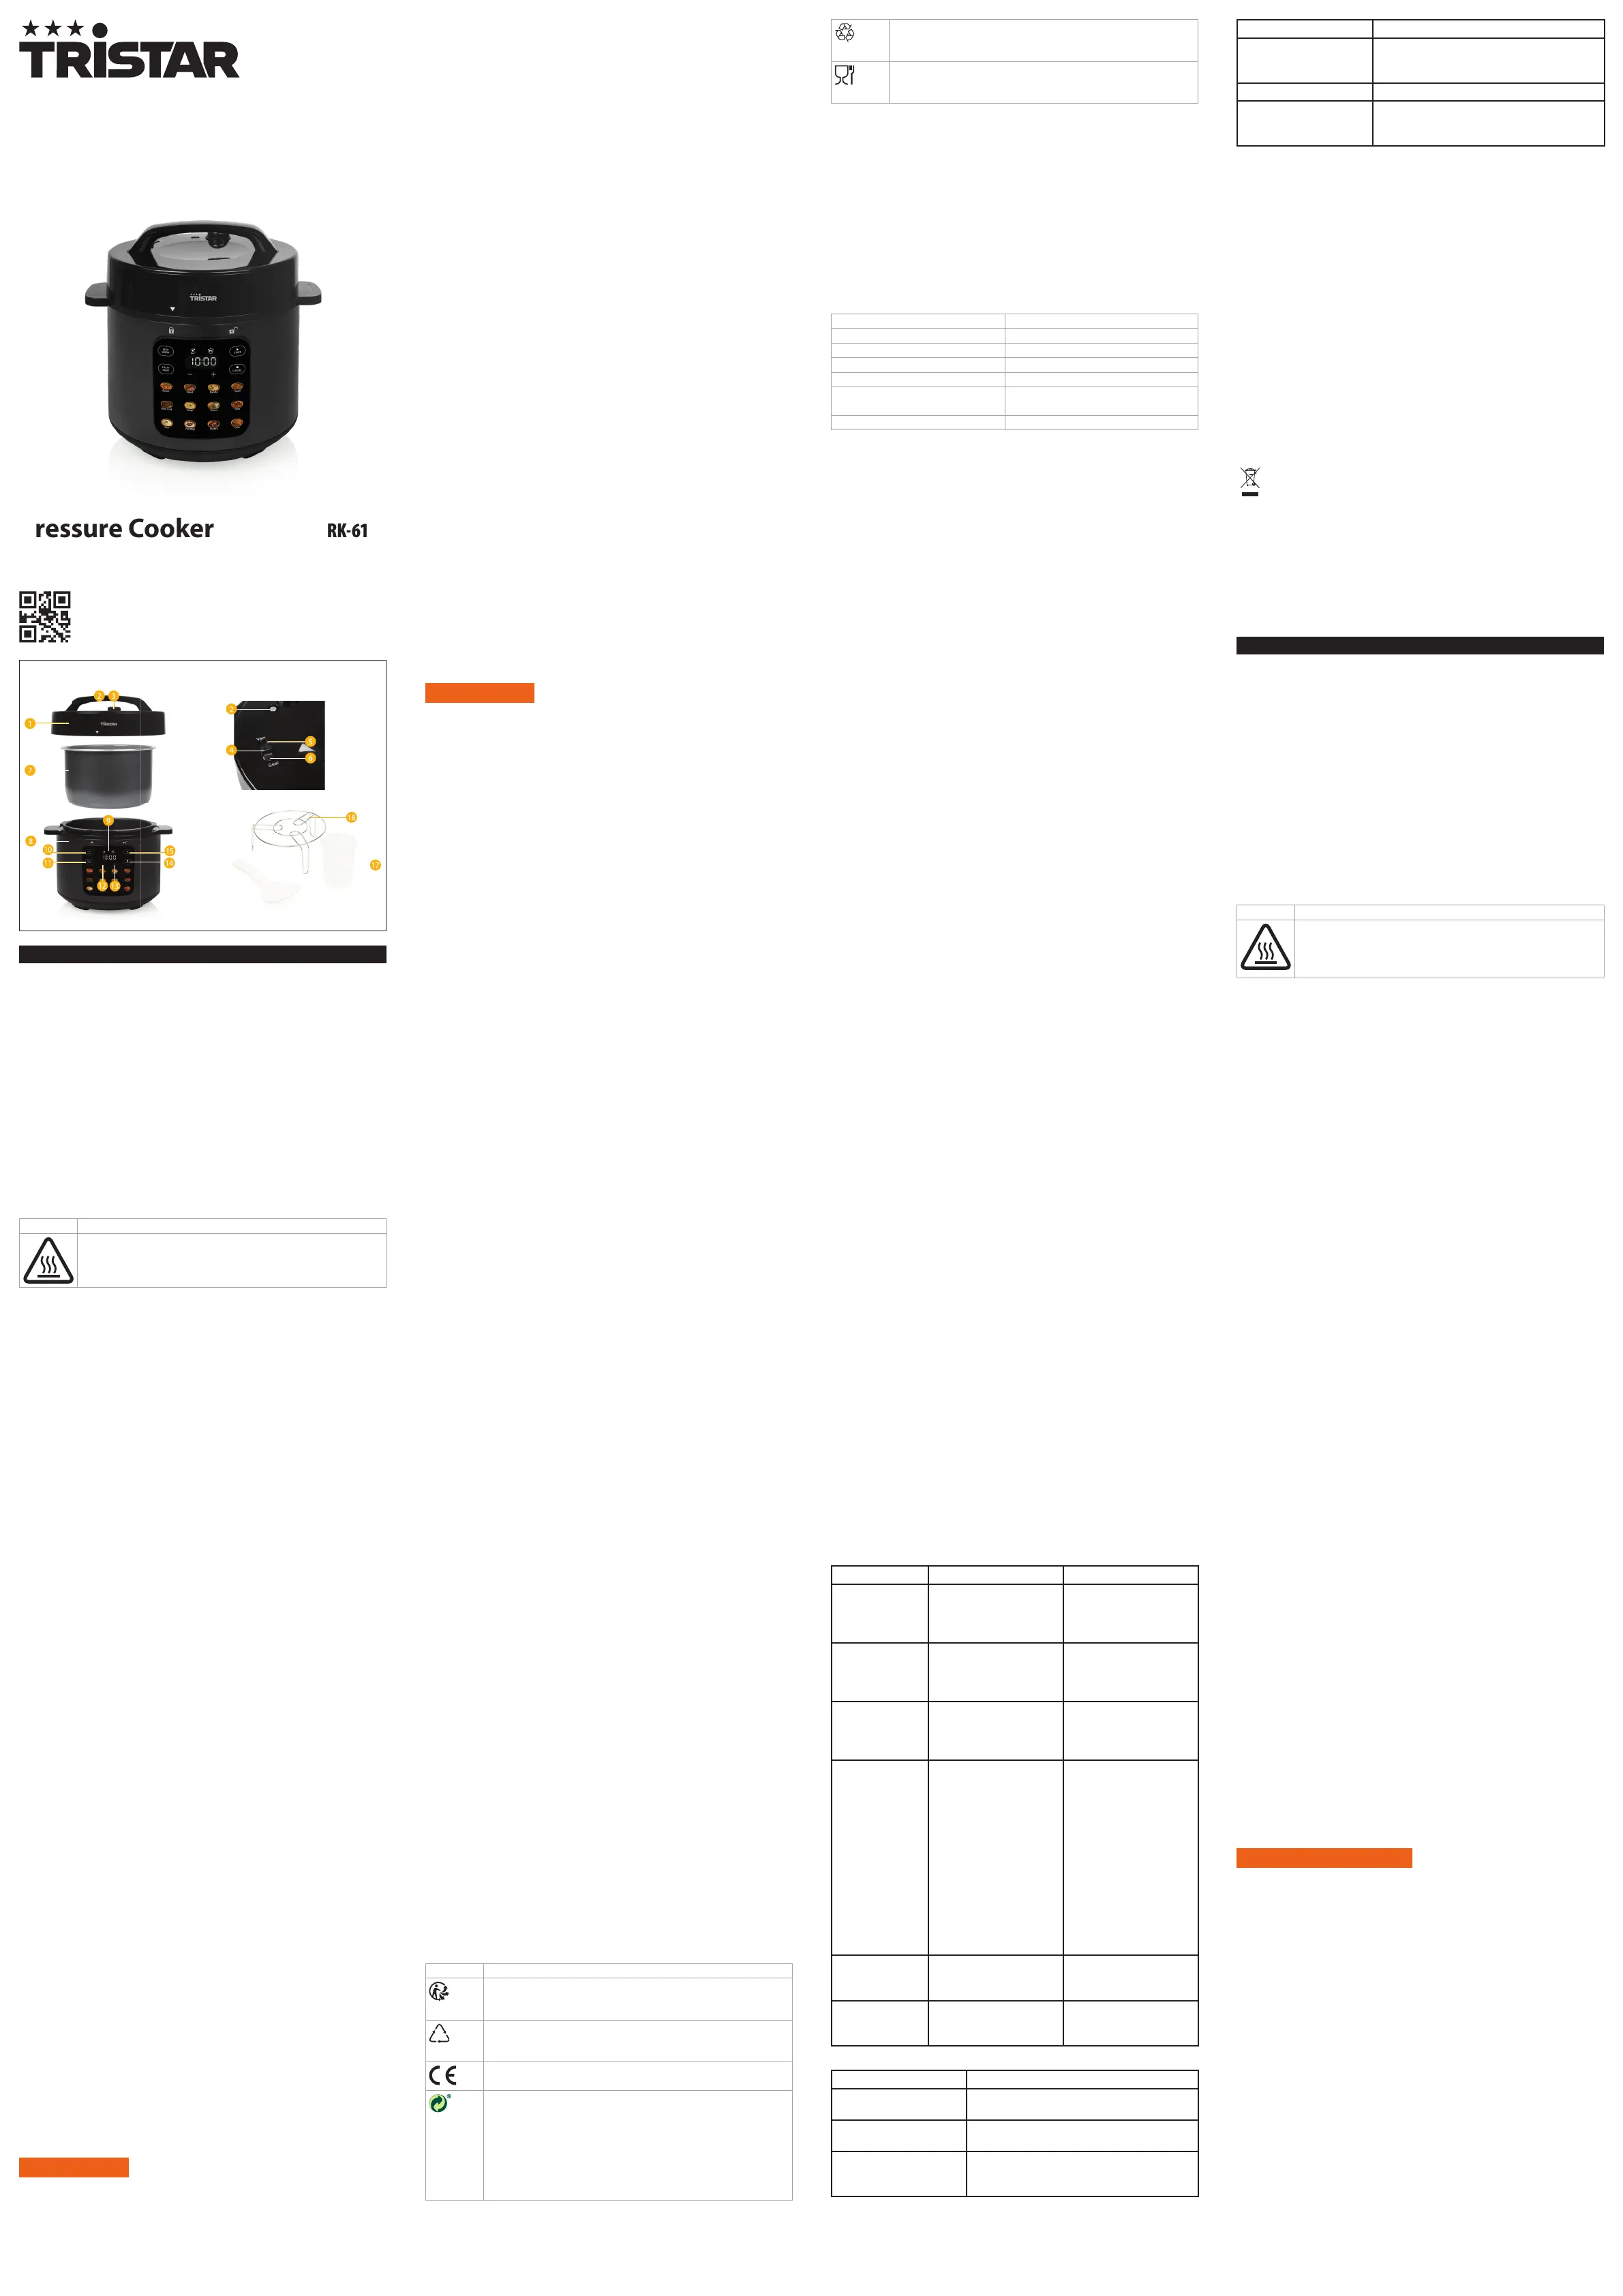
Snelkookpan
Belangrijkste onderdelen (zie afbeelding A)
1
Deksel
2
Vlotterafsluiter
3
Uitlaatklep
4
Drukontlastingsschakelaar
5
Snelle ontkoppeling
6
Natuurlijke vrijlating
7
Binnenpan
8
Hoofdeenheid
9
Bedieningspaneel
q
Warmhoudknop
w
Vertraagde startknop
e
- Knop
r
+ Knop
t
Annuleren
y
Startknop
u
Schepje rijst
i
Maatbeker
o
Kookstand
VEILIGHEID
Veiligheidssymbolen
SymboolBeschrijving
Aanwijzing voor een heet oppervlak.
Contact kan brandwonden veroorzaken.
Niet aanraken.
Veiligheidsvoorzorgsmaatregelen
Belangrijke voorzorgsmaatregelen:
• Lees alle instructies.
• Laat kinderen niet in de buurt van de
snelkookpan komen wanneer deze in gebruik is.
• Plaats de snelkookpan niet in een verwarmde
oven.
• Verplaats de snelkookpan onder druk met de
grootste voorzichtigheid. Raak geen hete
oppervlakken aan. Gebruik de handgrepen en
knoppen. Gebruik indien nodig bescherming.
• Gebruik de snelkookpan niet voor andere
doeleinden dan waarvoor hij bestemd is.
• Dit apparaat kookt onder druk. Zorg ervoor dat
de pan goed gesloten is alvorens warmte toe te
voegen. Zie "gebruiksaanwijzing".
• Open de snelkookpan nooit met geweld. Niet
openen voordat u er zeker van bent dat de
inwendige druk volledig is gedaald. Zie
"gebruiksaanwijzing".
• Gebruik je snelkookpan nooit zonder water toe
te voegen, dit zou de pan ernstig beschadigen.
• Vul de pan niet verder dan 2/3 van de inhoud.
Vul de pan niet voor meer dan de helft wanneer
u voedingsmiddelen kookt die tijdens het koken
uitzetten, zoals rijst of gedehydrateerde
groenten.
• Gebruik de juiste warmtebron(nen) volgens de
gebruiksaanwijzing.
• Prik na het bereiden van vlees met een huid
(bijvoorbeeld ossentong) die kan opzwellen
onder invloed van druk, niet in het vlees terwijl
de huid opgezwollen is; u zou zich kunnen
verbranden.
• Als u deegachtige etenswaren kookt, schud de
pan dan voorzichtig voordat u het deksel opent
om te voorkomen dat er etensresten uit de pan
komen.
• Controleer voor elk gebruik of de kleppen niet
verstopt zitten. Zie "gebruiksaanwijzing".
• Gebruik de snelkookpan nooit onder druk voor
het frituren van voedsel.
• Knoei niet met de veiligheidssystemen buiten de
onderhoudsinstructies in de gebruiksaanwijzing.
• Gebruik alleen het reservemodel van de
fabrikant. Gebruik in het bijzonder een body en
een deksel van dezelfde fabrikant waarvan
aangegeven is dat ze compatibel zijn.
• BEWAAR DEZE INSTRUCTIES.
6
WAARSCHUWING
• Door de veiligheidsinstructies te negeren, kan de
fabrikant niet verantwoordelijk worden gehouden
voor de schade.
• Als de voedingskabel beschadigd is, moet deze
worden vervangen door de fabrikant, diens
servicedienst of gelijkwaardig gekwalificeerd
personeel om gevaren te voorkomen.
• Verplaats het apparaat nooit door aan het snoer
te trekken en zorg ervoor dat het snoer niet
verstrikt raakt.
• Dit apparaat is uitsluitend voor huishoudelijk
gebruik en voor het doel waar het voor bestemd
is.
• Dit apparaat kan worden gebruikt door kinderen
van 8 jaar en ouder als ze onder toezicht staan
of instructies hebben gekregen over het veilig
gebruik van het apparaat en als ze de gevaren
begrijpen. Schoonmaak en gebruikersonderhoud
The universal recycling symbol, logo, or icon is an internationally
recognized symbol used to designate recyclable materials. The
recycling symbol is in the public domain and is not a trademark.
This symbol is used for marking materials intended to come into
contact with food in the European Union as dened in regulation (EC)
No 1935/2004.
APPLIANCE DESCRIPTION
Intended use
This appliance is intended for indoor use only.
This appliance is intended exclusively for domestic, non-commercial use.
This appliance is intended to be used in household and similar applications such as:
- staff kitchen areas in shops, offices and other working environments;
- farm houses;
- by clients in hotels, motels, and other residential type environments;
- bed and breakfast type environments.
Any use of the appliance other than described in this user manual is regarded as
misuse and may cause injury or damage to the appliance and void the warranty.
Technical specications
Appliance namePressure Cooker
Article numberRK-6160
Power supply220-240V ~ 50/60Hz
Power consumption in use1000 W
Power consumption in O-mode0,43 W
Power consumption in Standby
mode
0,72 W
Time needed to reach Standby mode1 MIN
BEFORE FIRST USE
1. Take the appliance and all accessories out of the box. Remove any stickers, plastic,
or protective film from the appliance.
2. Wash the lid A
1
, inner pot A
7
and accessories with warm soapy water and dry
thoroughly.
3. Place the appliance on a flat, stable surface that can handle heat and moisture.
Leave at least 10 cm of space around it.
4. This appliance is not suitable for installation in a cabinet or for outside use.
5. Plug the power cable into a socket.
6. Run the cooker with 2 cups of water, no lid, and no food for 10 minutes to remove
any smell or smoke from the factory. When you turn on the appliance for the
first time, it may give off a slight odor. This is normal. Make sure the room is well
ventilated. This smell is only temporary and will disappear soon.
7. Always put the inner pot A
7
inside the main unit A
8
before switching on the
appliance.
8. Make sure the inner pot A
7
contains liquid, or be ready to immediately add oil,
butter or margarine to the inner pot A
7
before switching on the device.
9. Always dry the outer surface of the inner pot A
7
before placing it inside the
main unit A
8
. Any moisture remaining on the inner pot A
7
surface may cause a
cracking noise while the unit is heating up.
USE
1. Open the lid A
1
• Turn the lid to the left (counterclockwise) until it unlocks, then lift it up.
2. Check the lid parts
• Make sure the float valve A
2
, exhaust valve A
3
, and seal ring (it goes inside the
lid) are clean and in the right place.
• The float valve A
2
must move up and down easily.
3. Add food and liquid to the inner pot A
7
• Do not go over the PC MAX 2/3 line inside the pot.
• For foods that expand, like rice or beans, use only enough liquid to fill the container
halfway.
4. Put the inner pot A
7
into the main unit A
8
• Dry the outside of the pot before placing it inside. Turn it a little to make sure it
touches the heating plate well.
5. Close the lid A
1
• Match the marks on the lid A
1
and main unit A
8
, then turn the lid to the right
(clockwise) until it locks.
6. Set the pressure release switch A
4
to vent or seal:
• For most cooking: set it to seal (Natural release A
6
).
• For slow cook only put the pressure release switch A
4
on vent (quick release
A
5
).
• For slow cook or keep warm: you can use it with or without the lid.
• The "saute" function must be used without the lid.
7. Plug In and start cooking
• Plug in the cooker.
• Press START A
y
.
• The START A
y
button lights up, and the appliance beeps one time.
• Choose a cooking program (like rice, soup, poultry). The selected program flashes
and the default cooking time is shown.
• Hold the + A
r
/- A
e
button to increase or decrease with 10 minutes. Press to
change by 1 min.
• Press START A
y
again or wait 10 seconds to begin. The safety cooking indicator
will light up during cooking.
• The time required for pressure built up depends on the type and quantity of food
and liquids. The cooking time countdown starts once the pressure level reaches
suitable levels.
8. After cooking
• The cooker will go to keep warm A
q
mode automatically.
• You can press CANCEL A
t
to stop it.
9. Open the lid A
1
safely
• Let the appliance cool down. Do not open the lid A
1
immediately or with force.
• Wait until the float valve A
2
(It is next to the exhaust valve) goes down.
• Always wear oven mitts and keep your face and hands away from steam.
• Use quick release A
5
or natural release A
6
to let out pressure.
10. Quick release A
5
:
• Push the pressure release switch forward to let out steam.
• Wait until the float valve A
2
goes down.
• Do not open the lid while the float valve A
2
is still up.
• Let the appliance cool before opening.
• Use oven mitts—hot steam can burn your hands.
11. Natural release A
6
:
• Let the cooker cool down on its own.
• Wait until the float valve A
2
goes down.
• This can take 15–20 minutes while in keep-warm mode.
• You can put a wet towel on the lid A
1
to cool it faster.
• To open the lid A
1
: Hold the lid handle.Turn the lid counterclockwise to open. Lift
the lid up.
• If the lid is hard to open, push the pressure release switch to vent (quick release
A
5
) to let air in.
Control Panel
BUTTONFUNCTIONSETTING
START A
y
Switch on the appliance or
start cooking process
Lights up during Standby and
working mode. Also lights up
during o mode, touch to go
into standby mode.
CANCEL A
t
Cancel cooking process and
switch o the appliance
Lights o when plug in,
lights up when press "Start",
go into standby mode, and
through cooking process.
KEEP WARM A
q
Keep warmingLights up when appliance
keeps warming. Flashing
when press KEEP WARM
button.
DELAY START A
w
Set the auto cook. For
delayed start of selected
program (range: 10min-24
hours). Press the desired
program and press within
10sec the delay start button.
Adjust time using the +/-
buttons. Press the start
button or wait for 10 seconds
to begin the delay start
function. When set time has
elapsed operation will begin
according to the selected
program.
Flashing when press DELAY
START button, stays on,
after 10 seconds or press
START button to start delay
cook program.
+ BUTTON A
r
Increase cooking time.Press to add more cooking
time. Hold the button to
change the numbers faster.
- BUTTON A
e
Decrease cooking time.Press to lower the cooking
time. Hold the button to
change the numbers faster.
TROUBLESHOOTING
ProblemExplanation
The appliance is not working
properly.
Check if it's plugged in. Check your wall socket or
fuse. Let it cool down if overheated.
No pressure.If the Float Valve is stuck up, clean it. If there is not
enough liquid, add more liquid.
Steam keeps coming out.Exhaust valve is not set right, push it down with
oven mitts. If valve is damaged, please contact
support.
replaced by the manufacturer, its service agent
or similarly qualified persons in order to avoid a
hazard.
• Never move the appliance by pulling the cord
and make sure the cord cannot become
entangled.
• This appliance is only to be used for household
purposes and only for the purpose it is made for.
• This appliance can be used by children aged
from 8 years and above if they have been given
supervision or instruction concerning use of the
appliance in a safe way and if they understand
the hazards involved. Cleaning and user
maintenance shall not be made by children
unless they are older than 8 and supervised.
Keep the appliance and its cord out of reach of
children aged less than 8 years. Appliances can
be used by persons with reduced physical,
sensory or mental capabilities or lack of
experience and knowledge if they have been
given supervision or instruction concerning use
of the appliance in a safe way and understand
the hazards involved.
• To protect yourself against an electric shock, do
not immerse the cord, plug or appliance in the
water or any other liquid.
• Children shall not play with the appliance.
• The appliance inlet must be dried before the
appliance is used again.
• For the first operation, it is advisable to read the
manual carefully beforehand and keep it
properly for future use.
• If abnormal noise, smell, smoke or any other
failure or breakage is found during the operation,
you should turn off the switch and unplug it.
Then contact with your service center for repair.
Do not repair by yourself.
• Never leave the appliance unattended during
operation.
6
WARNING
• Position the lid so that steam is directed away
from the handle.
• The heating element surface is subject to
residual heat after use.
• Warning: Risk of injury in case of misuse.
• Never use the appliance if there are visible signs
of damage or defects. Always replace a
damaged or defective appliance immediately.
• Always check the valves, allowing the escape of
steam, to ensure that they are not blocked.
• Do not cover the valves, lid and/or air vent of the
appliance. Do not place any object over the top
opening.
• During use, when releasing pressure and when
opening the lid, hot steam is released. Do not
stand in the path of the steam, as it can cause
burns or other serious injuries. Make sure the
appliance is properly closed.
• Never use the appliance for deep frying or
pressure frying with oil. It may cause fire or
serious damage.
• This appliance cooks under pressure. Improper
use may result in burns and injury. For detailed
information read the "Use" section in this
manual.
• Do not open the pressure cooker until the
appliance has cooled and all internal pressure
has been released. If the lid is difficult to open,
this indicates that the cooker is still pressurized.
Never force to open the appliance. Any pressure
in the cooker can cause injury. For detailed
information read the "Use" section in this
manual.
• Do not fill the inner pot higher than the "PC
MAX-2/3" line. For food that expand during
cooking, such as rice and dried vegetables, do
not fill the inner pot over 1/2.
• Warning: Spilled food can cause serious burns.
• Do not use the lid handle to move the product,
but use the appliance handles.
• To prevent risk of explosion and injury, never
replace the seal ring yourself. Always let the
manufacturer, its service agent or a similarly
qualified person replace it.
Electric shock hazard due to short-circuiting:
• Always avoid spillage on the power cable.
• Never open the appliance. The appliance may
only be opened for maintenance by an
authorised technician.
• Never replace the power cable yourself. Always
let the manufacturer, its service agent or a
similarly qualified person replace the power
cable.
• Always unplug the power cable when the
appliance is not in use or unattended, and
before cleaning.
• Always check if the voltage stated on the type
plate of your appliance matches your mains
voltage before use.
• For detailed information on how to clean
surfaces that come into contact with food, refer
to the "Cleaning and maintenance" section in
this manual.
FOREWORD
About this document
This user manual contains all the information for correct, safe, and efficient use of the
appliance.
Ensure you have fully read and understood the instructions in this user manual before
you use the appliance.
Always store this user manual in a safe place near the appliance for future reference.
This manual is originally written in English. All other languages are translated
documents.
General symbols
SymbolDescription
Applicable in France:
The product or packaging can be recycled and components must be
disposed of separately. Follow the local regulations.
Applicable in Italy:
The product or packaging can be recycled and components must be
disposed of separately. Follow the local regulations.
This product complies with conformity requirements of the applicable
European regulations or directives.
The Green Dot is the registered trademark of Der Grüne Punkt –
Duales System Deutschland GmbH and is protected as a trademark
worldwide. The logo may only be used by customers of DSD GmbH
holding a valid trademark usage contract or by engaged waste
management companies within the Federal Republic of Germany. This
also applies to reproduction of the logo by third parties in a dictionary,
an encyclopaedia or an electronic database containing a reference
manual.
a
User manual
Pressure Cooker
Main parts (see image A)
1
Lid
2
Float Valve
3
Exhaust valve
4
Pressure release switch
5
Quick release
6
Natural release
7
Inner pot
8
Main unit
9
Control panel
q
Keep warm button
w
Delay start button
e
- Button
r
+ Button
t
Cancel button
y
Start button
u
Rice scoop
i
Measuring cup
o
Cooking stand
SAFETY
Safety symbols
SymbolDescription
Indication for a hot surface. Contact may
cause burns. Do not touch.
Safety precautions
Important precautions:
• Read all the instructions.
• Do not let children near the pressure cooker
when in use.
• Do not put the pressure cooker into a heated
oven.
• Move the pressure cooker under pressure with
the greatest care. Do not touch hot surfaces.
Use the handles and knobs. If necessary, use
protection.
• Do not use the pressure cooker for a purpose
other than the one for which it is intended.
• This appliance cooks under pressure. Scalds
may result from inappropriate use of the
pressure cooker. make sure that the cooker is
properly closed before applying heat. See
"instructions for use".
• Never force open the pressure cooker. Do not
open before making sure that its internal
pressure has completely dropped. See
"instructions for use".
• Never use your pressure cooker without adding
water, this would seriously damage it.
• Do not fill the cooker beyond 2/3 of its capacity.
When cooking foodstuffs which expand during
cooking, such as rice or dehydrated vegetables,
do not fill the cooker to more than half of its
capacity.
• Use the appropriate heat source(s) according to
the instructions for use.
• After cooking meat with a skin (e.g. ox tongue)
which may swell under the effect of pressure, do
not prick the meat while the skin is swollen; you
might be scalded.
• When cooking doughy food, gently shake the
cooker before opening the lid to avoid food
ejection.
• Before each use, check that the valves are not
obstructed. See "instructions for use".
• Never use the pressure cooker in its pressurized
mode for a deep or shallow frying of food.
• Do not tamper with any of the safety systems
beyond the maintenance instructions specified in
the instructions for use.
• Only use manufacturer's spare model. In
particular, use a body and a lid from the same
manufacturer indicated as being compatible.
• KEEP THESE INSTRUCTIONS.
6
WARNING
• By ignoring the safety instructions the
manufacturer cannot be held responsible for the
damage.
• If the supply cord is damaged, it must be
Pressure CookerRK-6160
A
WWW.TRISTAR.EU
Tristar Europe B.V. | Swaardvenstraat 65
5048 AV Tilburg | The Netherlands
a
User manual
d
Gebruiksaanwijzing
b
Manuel de l'utilisateur
c
Benutzerhandbuch
h
Manual del usuario
i
Manual do utilizador
j
Manuale dell'utente
e
Bruksanvisning
n
Instrukcja obsługi
l
Uživatelská příručka
1
Uživatelská příručka
Product specificaties
| Merk: | Tristar |
| Categorie: | pénztárgép |
| Model: | RK-6160 |
Heb je hulp nodig?
Als je hulp nodig hebt met Tristar RK-6160 stel dan hieronder een vraag en andere gebruikers zullen je antwoorden
Handleiding pénztárgép Tristar

26 Februari 2026
22 December 2025
2 December 2025
17 Mei 2023
9 Mei 2023
20 Maart 2023
26 Februari 2023
Handleiding pénztárgép
Nieuwste handleidingen voor pénztárgép
15 Juli 2026
15 Juli 2026
14 Juli 2026
10 Juli 2026
8 Juli 2026
8 Juli 2026
7 Juli 2026
7 Juli 2026
7 Juli 2026
3 Juli 2026