Tripp Lite PDU1226 Handleiding
Tripp Lite
Stekkerdoos
PDU1226
Bekijk gratis de handleiding van Tripp Lite PDU1226 (12 pagina’s), behorend tot de categorie Stekkerdoos. Deze gids werd als nuttig beoordeeld door 64 mensen en kreeg gemiddeld 5.0 sterren uit 32.5 reviews. Heb je een vraag over Tripp Lite PDU1226 of wil je andere gebruikers van dit product iets vragen? Stel een vraag
Pagina 1/12

1
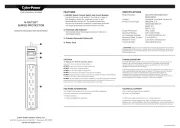
PDU Rackmount
Power Strips
Designed for Mounting in 19 in. Racks
(Series Numbers: AG-IP120V6IPRM, AG-IP120V20RM)
Important Safety Instructions 2
Installation 2
Features 3
Specifications 3
Warranty & Product Registration 4
Español 5
Français 9
Owner’s Manual
WARRANTY REGISTRATION
Register your product today and be
automatically entered to win an ISOBAR
surge protector in our monthly drawing!
tripplite.com/warranty
1111 W. 35th Street, Chicago, IL 60609 USA • tripplite.com/support
Copyright © 2020 Tripp Lite. All rights reserved.
20-03-224-932120.indb 1
20-03-224-932120.indb 1
20-03-224-932120.indb 1
20-03-224-932120.indb 120-03-224-932120.indb 1 5/19/2020 11:37:30 AM
5/19/2020 11:37:30 AM
5/19/2020 11:37:30 AM
5/19/2020 11:37:30 AM5/19/2020 11:37:30 AM

2
Important Safety Instructions
This manual contains information concerning the proper installation and
use of Tripp Lite’s Rackmount Power Strips.
SAVE THESE INSTRUCTIONS.
Do not connect your power strip to an ungrounded outlet. Do not use it with extension
cords or adapters that eliminate its connection to ground. Your power strip is designed
for indoor use only. Install it away from heat emitting devices such as radiators and heat
registers. Do not install where excessive moisture or other conductive contaminants are
present. Never install electrical wiring during a lightning storm.
The power requirement of each device connected to an outlet of your power strip must
not exceed the Outlet Power Rating of your power strip (see Specifications). The total
power requirements of all devices connected to your power strip must not exceed the
Maximum Load Rating of your power strip (see Specifications).
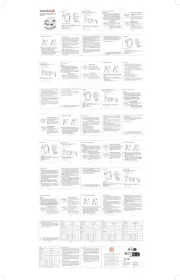
Installation
1U Rackmount Installation
0U Rackmount Installation
1U Rackmount Installation
To Mount Unit in Rack: Put four user-supplied
rackmount screws ( ) through the unit’s mounting A
ears ( ) and into the rack rails as shown. The user B
must determine the fitness of the rackmount screws to
hold the unit in the rack before installation.
0U Rackmount Installation
1. Reorient Mounting Ears: Unscrew the screws (A)
holding the unit’s mounting ears ( ) to the sides of B
the unit. Use the screws from Step 1 ( ) to reattach A
the mounting ears ( ) to the unit as shown. Use B
only the manufacturer-supplied screws or their
equivalent (#6-32, ¼” flat head) to reattach the
mounting ears.
2. Mount Unit on Outside of Rack Rails: Put four
user-supplied screws ( ) or similar mounting C
hardware through the unit’s mounting ears ( ) and B
into the side of the rack as shown. The user must
determine the fitness of the user-supplied mounting
hardware to support the unit before mounting.
Wallmount/Under Counter Installation
Reorient the unit’s mounting ears as per the 0U Rackmount Installation above, then put four user-
supplied screws or similar mounting hardware through the unit’s mounting ears and into the
mounting surface. The user must determine the fitness of the user-supplied mounting hardware to
support the unit before mounting.
20-03-224-932120.indb 2
20-03-224-932120.indb 2
20-03-224-932120.indb 2
20-03-224-932120.indb 220-03-224-932120.indb 2 5/19/2020 11:37:31 AM
5/19/2020 11:37:31 AM
5/19/2020 11:37:31 AM
5/19/2020 11:37:31 AM5/19/2020 11:37:31 AM

3
Features
Specifications
PDU1215 PDU1220 PDU2430
Nominal Voltage/Frequency: 120V/50 or 60 Hz 120V/50 or 60 Hz 120V/50 or 60 Hz
Output Power Rating (amps): 15 amps 20 amps 24 amps
AC Receptacles: 13 x NEMA 5-15R 13 x NEMA 5-15/20R 24 x NEMA 5-15R
(12 rear/1 front) (12 rear/1 front) (12 rear/12 front)
AC Line Cord: 15', w/NEMA 5-15P plug 15', w/NEMA 5-20P plug 15', w/NEMA L5-30P plug
Circuit Breaker(s) (Resettable): 15 amps 20 amps 2 x 15 amps
Dimensions (HxWxD, inches): 1¾ × 17¼ × 3¾ 1¾ × 17¼ × 3¾ 1¾ × 17¼ × 3¾
PDU121506 PDU1226 PDU1220T6
Nominal Voltage/Frequency 120V/50 or 60 Hz 120V/50 or 60 Hz 120V/50 or 60 Hz
Output Power Rating (amps): 15 amps 20 amps 20 amps
AC Receptacles 13 x NEMA 5-15R 13 x NEMA 5-15/20R 13 x NEMA 5-15/20R
(12 rear/1 front) (12 rear/1 front) (12 rear/1 front)
AC Line Cord: 6’, w/NEMA 5-15P plug 6’, w/NEMA 5-20P plug 6’, w/NEMA L5-20P plug
Circuit Breaker(s) (Resettable) 15 amps 20 amps 20 amps
Dimensions (HxWxD, inches): 1¾ × 17¼ × 3¾ 1¾ × 17¼ × 3¾ 1¾ × 17¼ × 3¾
PDU12IEC PDU1220T
Nominal Voltage/Frequency: 100V to 240V/50 or 60Hz 120V/50 or 60 Hz
Output Power Rating (amps): 15 amps for 100V to 120V or 20 amps
16 amps for 208 to 240V
AC Receptacles: 4 x IEC-C13 (front), 13 x NEMA 5-15/20R
8 x IEC-C13/2 x IEC-C19 (rear) (12 rear/1 front)
AC Line Cord: N/A (IEC320-C20 inlet) 15', w NEMA L5-20P plug
Circuit Breaker(s) (Resettable): 2 x 16 amps 20 amps
Dimensions (HxWxD, inches): 1¾ × 17¼ × 3¾ 1¾ × 17¼ × 3¾
Circuit Breaker(s)
If the current draw of the equipment connected to your power strip exceeds your model’s
Maximum Load Rating (see Specifications) for longer than a few seconds, a circuit breaker will trip
to prevent any possible damage. When a circuit breaker trips, its plunger will pop up. Remove
excess equipment and allow the breaker to cool one minute before depressing its plunger to reset
the breaker.
Grounding Lug
Use this screw (located by the power strip’s receptacles) to connect your power strip to ground.
Input Receptacle (IEC Model Only)
The PDU12IEC has no power cord. Instead, it has a IEC320-C20 inlet receptacle. To connect a
PDU12IEC to utility power, use a user-supplied detachable power cord with an IEC plug on one
end and a plug appropriate to your local utility outlets on the other.
20-03-224-932120.indb 3
20-03-224-932120.indb 3
20-03-224-932120.indb 3
20-03-224-932120.indb 320-03-224-932120.indb 3 5/19/2020 11:37:31 AM
5/19/2020 11:37:31 AM
5/19/2020 11:37:31 AM
5/19/2020 11:37:31 AM5/19/2020 11:37:31 AM
Product specificaties
| Merk: | Tripp Lite |
| Categorie: | Stekkerdoos |
| Model: | PDU1226 |
| Kleur van het product: | Zwart |
| Gewicht: | 2360 g |
| Breedte: | 482.6 mm |
| Diepte: | 114.3 mm |
| Hoogte: | 44.4 mm |
| Snoerlengte: | 1.83 m |
| Gewicht verpakking: | 2590 g |
| Breedte verpakking: | 518.2 mm |
| Diepte verpakking: | 236.2 mm |
| Hoogte verpakking: | 55.9 mm |
| Soort: | Eenfasig |
| Gebruikershandleiding: | Ja |
| Materiaal behuizing: | Metaal |
| Land van herkomst: | China |
| Temperatuur bij opslag: | -30 - 50 °C |
| Stroomspanning bescherming: | Overbelasting |
| Hoogte, in bedrijf: | 0 - 3000 m |
| Maximaal vermogen: | 2500 W |
| Montage: | Horizontaal/Verticaal |
| Stekker: | NEMA 5–20P |
| (Buitenste) hoofdverpakking hoogte: | 256.5 mm |
| (Buitenste) hoofdverpakking breedte: | 525.8 mm |
| (Buitenste) hoofdverpakking brutogewicht: | 16100 g |
| (Buitenste) hoofdverpakking lengte: | 342.9 mm |
| Hoeveelheid per (buitenste) hoofdverpakking: | 6 stuk(s) |
| Rackcapaciteit: | 0U/1U |
| AC-ingangsfrequentie: | 50/60 Hz |
| Relatieve vochtigheid in bedrijf (V-V): | 5 - 95 procent |
| GTIN (EAN/UPC)-nummer (buitenste) hoofdverpakking: | 10037332255751 |
| Aantal AC uitgangen: | 13 AC-uitgang(en) |
| Nominale input voltage: | 100 - 127 V |
| Stopcontacttypes: | NEMA 5–15R, NEMA 5–20R |
| Stroom (max.): | 20 A |
| PDU types: | Basis |
| Rekbevestigingspakket: | Ja |
| Netspanning, in bedrijf: | 100 - 127 V |
Heb je hulp nodig?
Als je hulp nodig hebt met Tripp Lite PDU1226 stel dan hieronder een vraag en andere gebruikers zullen je antwoorden
Handleiding Stekkerdoos Tripp Lite

30 Mei 2023

29 Mei 2023

26 Mei 2023

25 Mei 2023

23 Mei 2023

21 Mei 2023

18 Mei 2023

4 Mei 2023

4 Mei 2023

3 Mei 2023
Handleiding Stekkerdoos
- Huslog
- StarTech.com
- Philips
- Eminent
- Icy Box
- Sven
- Kondator
- REV
- Vivanco
- Intellinet
- HQ
- GoGEN
- Panduit
- Anton/Bauer
- Geist
Nieuwste handleidingen voor Stekkerdoos
29 Juli 2025

29 Juli 2025

29 Juli 2025

29 Juli 2025
6 Juli 2025
30 Juni 2025

10 Maart 2025

9 Maart 2025

9 Maart 2025

26 Februari 2025