TP Link VN020-F2v Handleiding
Bekijk gratis de handleiding van TP Link VN020-F2v (2 pagina’s), behorend tot de categorie Router. Deze gids werd als nuttig beoordeeld door 51 mensen en kreeg gemiddeld 4.3 sterren uit 26 reviews. Heb je een vraag over TP Link VN020-F2v of wil je andere gebruikers van dit product iets vragen? Stel een vraag
Pagina 1/2

Quick Installation Guide
VN020-F2v
300Mbps Wireless N VoIP
VDSL/ADSL Modem Router
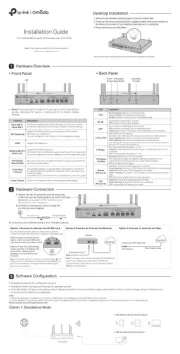
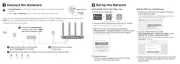
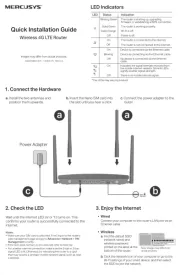
Connect the Hardware
Configure the Modem Router
Enjoy the Internet Now you can enjoy your internet.
2. Connect your router to the internet
using a web browser
.
Enter http://tplinkmodem.net 192.168.1.1 or in the address bar
of a web browser. Use for both username and password, admin
and then click . Login
A
B
Choose in the main menu, and then click to start the Quick Setup Next
conguration.
Follow the step-by-step instructions to set up an internet
connection.
Wired Connection
Wireless Connection
Connect wirelessly by using the SSID (network name) and Wireless
Password printed on the product label at the bottom of the router.
1. Connect your computer to the router via a wired or wireless
connection.
Power Adapter
Phone Cable
Phone (Optional)
2
If you don’t need a phone service, directly connect the modem router to the phone jack
with the provided phone cable, then follow steps 3 and 4 to complete the hardware
connection.
3Push in to turn on
the modem router.
Phone Cable
Phone Jack
1
DSL Splitter
LINE
PHONE MODEM
Note: The DSL LED takes 1 to 2 minutes to stabilize.
4Verify that the Power and DSL
LEDs turn stable before
continuing with the conguration.
Phone
VoIP Service
Ethernet cable
Note: If the login page does not appear, please refer to FAQ->Q1.
http://tplinkmodem.net
admin
admin
Login

Q1. What should I do if I cannot access the web management page?
A1. If the computer is set to a static IP address, change its settings to obtain an IP address
automatically.
A2. Make sure or is correctly entered in the web http://tplinkmodem.net http://192.168.1.1
browser.
A3. Use another web browser and try again.
A4. Reboot your modem router and try again.
A5. Disable then enable the network adapter in use.
Q2. What should I do if the DSL LED does not turn solid on?
A1. Check your cables and make sure they are all plugged in correctly, including the telephone
lines and power adapter.
A2. Restore your modem router to its factory default settings.
A3. Remove the DSL splitter, directly connect the modem router to the phone jack and follow
this guide to reconfigure the modem router.
A4. Contact your ISP (internet service provider) to check the status of your DSL line.
A5. If the problem persists, contact our Technical Support.
Q3. What should I do if I cannot access the internet?
A1. Make sure all telephone and Ethernet cables are correctly and securely connected to the modem
router.
A2. Try to log in to the web management page of the modem router using the default address
http://tplinkmodem.net http://192.168.1.1or . If you cannot, change your computer settings to
obtain an IP address automatically from the modem router. If you can, try the steps below.
A3. Consult your ISP (internet service provider) and make sure that the VPI/VCI (or VLAN ID),
connection type, account username and password are all correct. If they are not, please replace
them with the correct settings and try again.
A4. Restore the modem router to its factory default settings and reconfigure it by following the
instructions in this guide.
A5. Please contact our Technical Support if the problem persists.
Q4. What should I do if I forget my password?
For the web management page:
A. Refer to FAQ > Q5 to reset the modem router, and then use (all lowercase) for both admin
username and password to log in.
For the Wi-Fi network:
A1. The default Wi-Fi Password can be found on the product label at the bottom of the modem
router.
A2. If you have changed your password, log in to the modem router’s Web Management page,
go to Wireless Wireless Security > to obtain or reset your password.
Q5. How do I restore the modem router to its factory default settings?
A1. With the modem router powered on, press and
hold down the RESET Button on the rear panel
of the modem router for about 5 seconds.
A2. Log in to the Web Management page of the
modem router, and go to System Tools >
Factory Defaults Restore, click , then wait until
the reset process is complete.
FAQ (Frequently Asked Questions)
LED Indicators USB Features Safety Information
Keep the device away from water, fire, humidity or hot environments.
Adapter shall be installed near the equipment and shall be easily accessible.
Do not attempt to disassemble, repair, or modify the device.
Do not use damaged charger or USB cable to charge the device.
Do not use any other chargers than those recommended.
Do not use the device where wireless devices are not allowed.
Please read and follow the above safety information when operating the
device. We cannot guarantee that no accidents or damage will occur due to
improper use of device. Please use this product with care and operate at
your own risk.
LED Status Indication
Power
DSL
Internet
Wi-Fi
VoIP1/ VoIP2
WPS
LAN (1-4)
System initialization complete.
Power is o.
DSL line is synchronized and ready to use.
The DSL negotiation is in progress.
There is no connection to the DSL Port or DSL
synchronization fails.
Internet connection is available.
No Internet connection or the modem router is operating
in Bridge mode.
The wireless function is working properly.
The wireless function is disabled.
The corresponding phone is o-hook.
The corresponding phone is on-hook.
Turns On when a WPS synchronization is established and
automatically turns O about ve minutes later.
A wireless device is trying to connect to the network via
WPS. This process may take up to 2 minutes.
The corresponding LAN Port is connected.
The corresponding LAN Port is not connected.
The inserted USB device is identied and ready to use.
A new USB device is being identied.
No USB device is plugged into the USB port.
3G Internet is successfully connected.
The modem router is connecting to the 3G Internet.
3G Internet is not connected or the modem router is
operating in other modes.
On
O
On
Flash
O
On
O
On
O
On
O
On/O
Flash
On
O
On
Flash
O
On
Flash
O
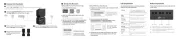
USB
3G
The USB port can be used for media sharing, storage sharing and voice mail.
You can also set up the FTP server to access your les remotely by connecting
to the Internet.
To learn more about the USB features, please visit
http://tp-link.com/app/usb, or simply scan the QR code.
USB sharing port
Remote
Access via
FTP Server
Media
Sharing
Local
Storage
Sharing
RESET Button
Press & Hold for 5 seconds
©2019 TP-Link 7109505260 REV1.0.0
Product specificaties
| Merk: | TP Link |
| Categorie: | Router |
| Model: | VN020-F2v |
Heb je hulp nodig?
Als je hulp nodig hebt met TP Link VN020-F2v stel dan hieronder een vraag en andere gebruikers zullen je antwoorden
Handleiding Router TP Link
4 Juli 2025
4 Juli 2025
2 Juli 2025
13 Mei 2025
13 Mei 2025
2 Mei 2025
26 Maart 2025
20 Februari 2025

13 November 2024

26 September 2024
Handleiding Router
- GL.iNet
- Draytek
- Hamlet
- Dell
- Thrustmaster
- Beafon
- Clas Ohlson
- Kyocera
- Gefen
- Motorola
- Blackmagic Design
- Sweex
- MSI
- ATen
- Acer
Nieuwste handleidingen voor Router
30 Juli 2025

29 Juli 2025
29 Juli 2025

29 Juli 2025
29 Juli 2025
28 Juli 2025
15 Juli 2025
14 Juli 2025
7 Juli 2025
7 Juli 2025