TP Link ER706W-4G Handleiding
Bekijk gratis de handleiding van TP Link ER706W-4G (2 pagina’s), behorend tot de categorie Router. Deze gids werd als nuttig beoordeeld door 36 mensen en kreeg gemiddeld 4.8 sterren uit 18.5 reviews. Heb je een vraag over TP Link ER706W-4G of wil je andere gebruikers van dit product iets vragen? Stel een vraag
Pagina 1/2
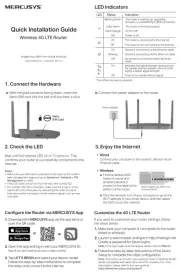
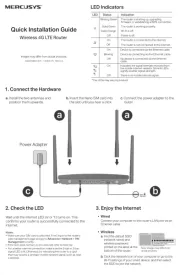
Installation Guide
Omada 4G+ Cat6 AX3000 Gigabit VPN Router
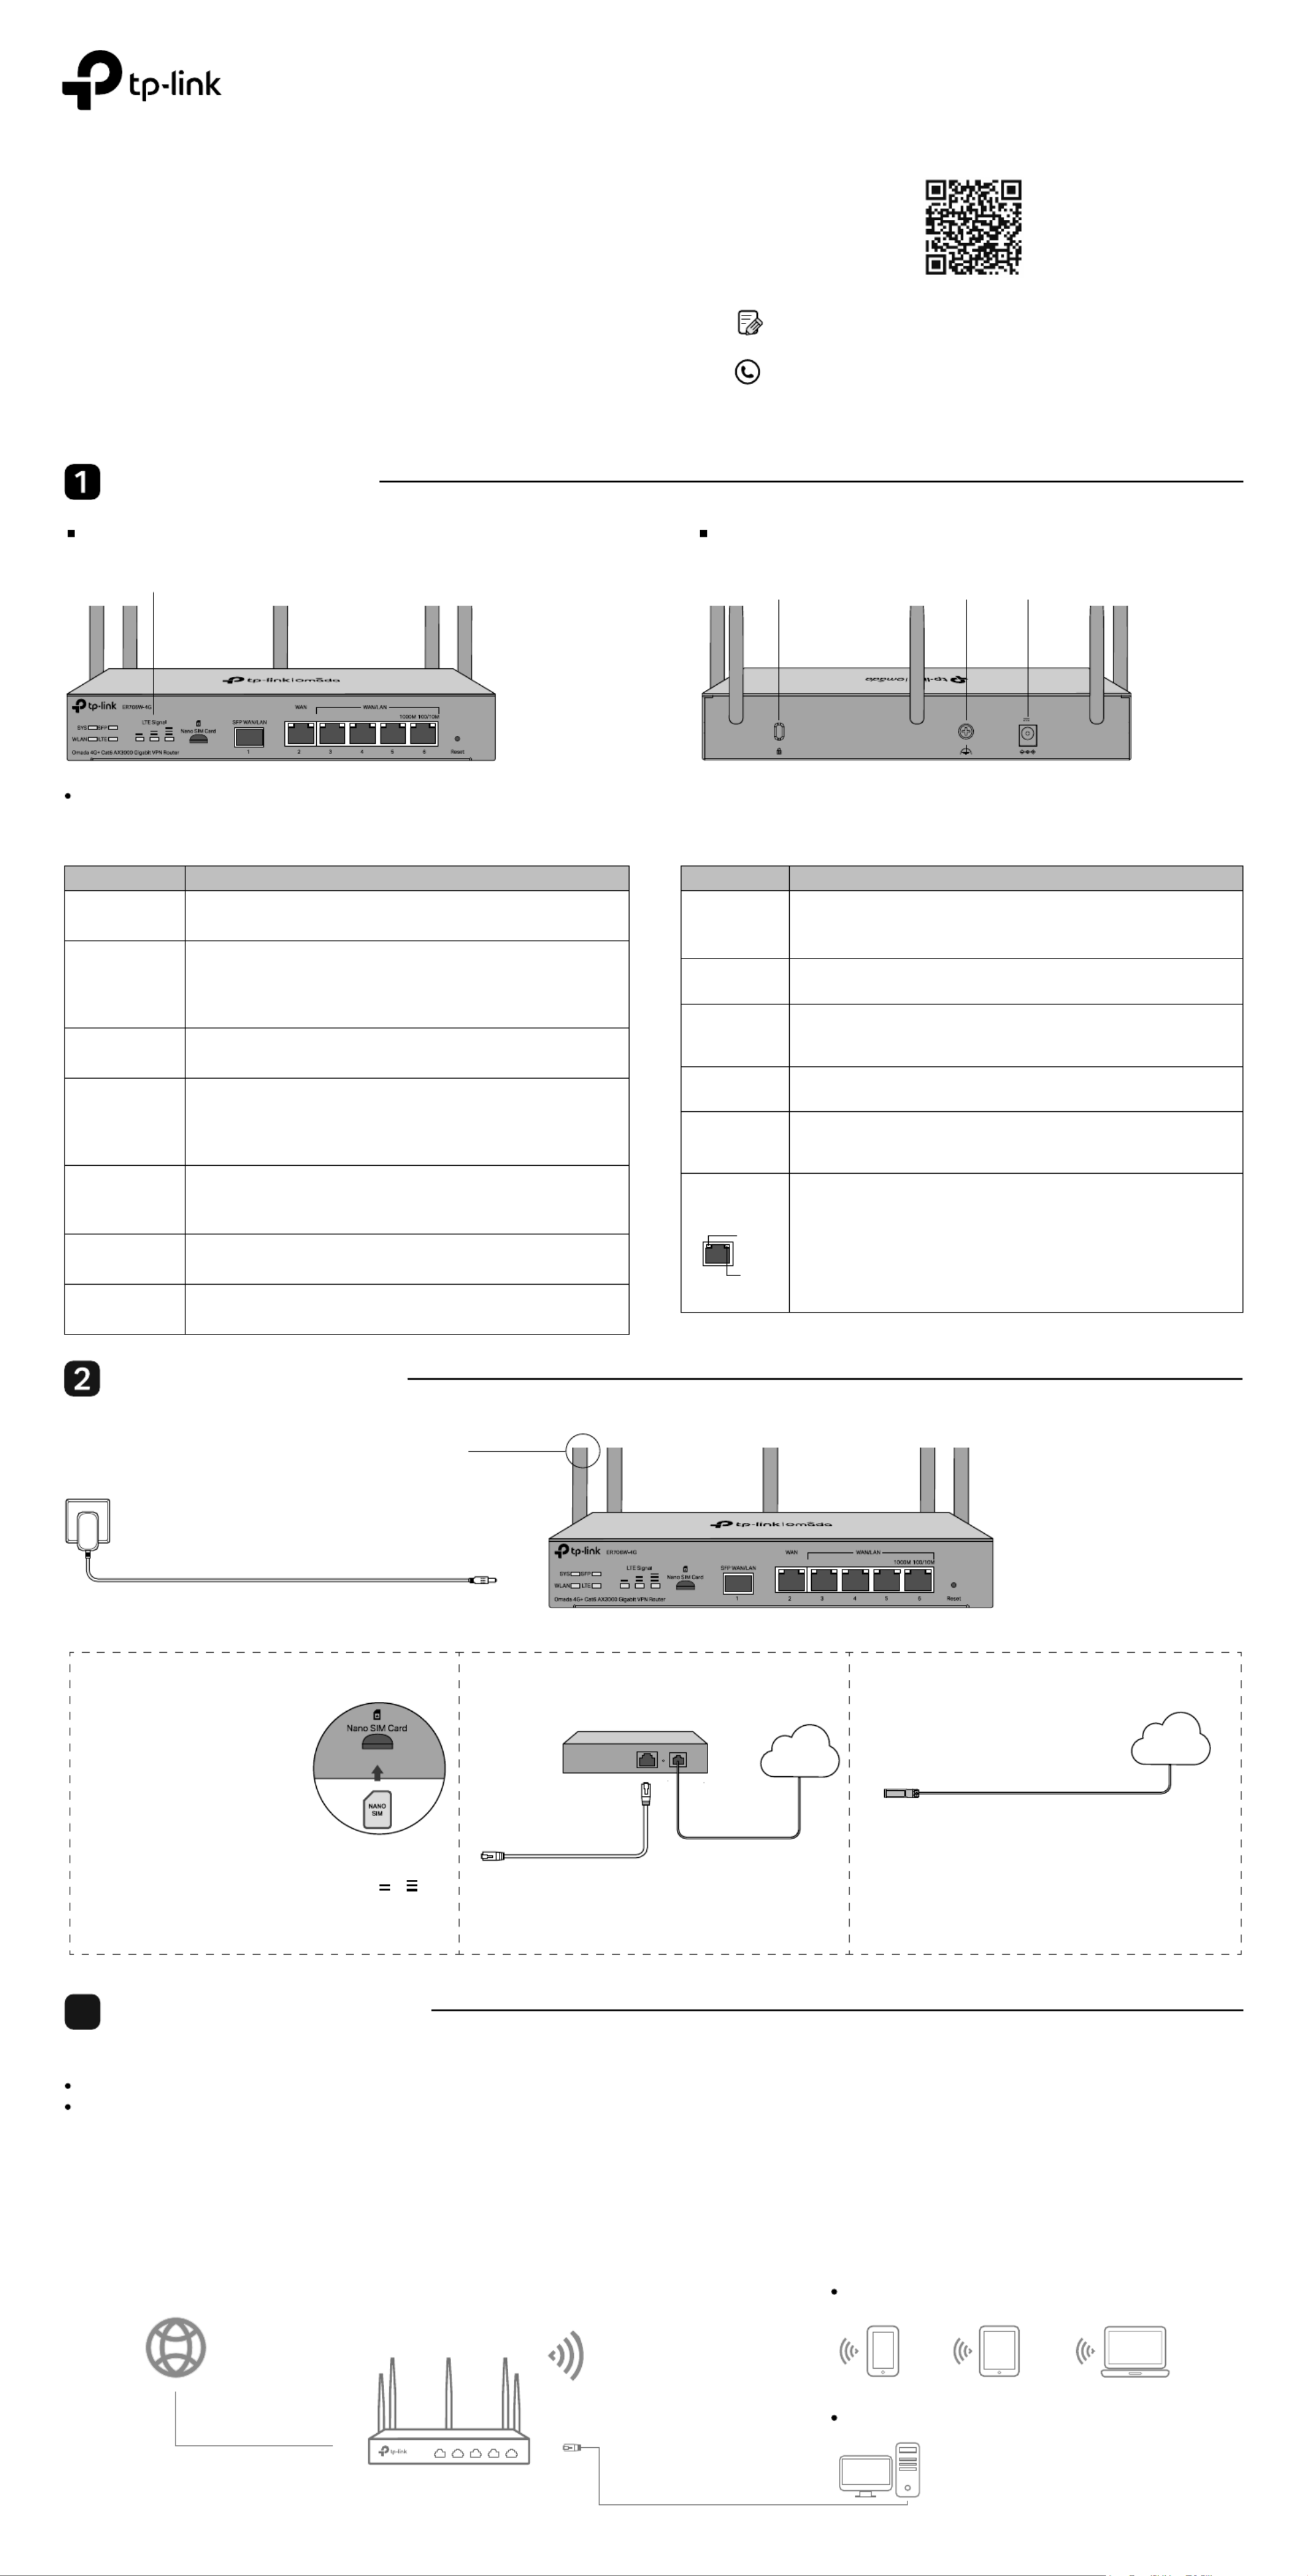
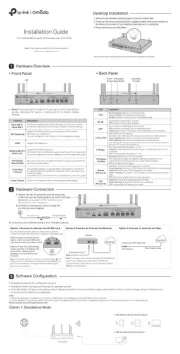
Hardware Overview
Note: The image may dier from the actual product.
For technical support and other information, please visit
https://www.tp-link.com/support, or simply scan the QR code.
To ask questions, find answers, and communicate with TP-Link users or
engineers, please visit https://community.tp-link.com to join TP-Link
Community.
© 2023 TP-Link 7106510447 REV1.0.0
Front Panel Back Panel
Reset: Press and hold the button for 5 seconds, the SYS LED will ash
quickly, indicating the device is being reset to its factory default
settings.
LED Kensington
Security Slot Power Socket
Grounding Terminal
Slow Flashing:
System is running normally.
Quick Flashing:
The router is being reset.
On/O:
System is starting up or running abnormally.
On: Indicates the signal strength the router received from the mobile
internet. More bars indicate a better signal strength.
O: No mobile internet signal.
On: SIM card is connected to the mobile internet.
O: No SIM card is inserted, or it is not connected to the mobile internet.
On: Running at 1000 Mbps, but no activity.
O: No device the corresponding port. is linked to
Flashing: Running at 1000 Mbps, and transmitting or receiving data.
Green On: Running at 1000 Mbps, but no activity.
Green Flashing: Running at 1000 Mbps, and transmitting or receiving data.
Green O: Not running at 1000 Mbps, or no device is connected to the
corresponding port.
Yellow On: Running at 100/10 Mbps, but no activity.
Yellow Flashing: Running at 100/10 Mbps, and transmitting or receiving data.
Yellow O: Not running at 100/10 Mbps, or no device is connected to
the corresponding port.
Yellow
Green
On:
Wireless networking is enabled.
O:
Wireless networking is disabled.
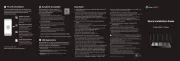
Hardware Connection
Fiber-Optic Cable
SFP Module
Connect to SFP WAN Slot
Internet
Option 3 Connect to Internet via FiberOption 2 Connect to Internet via Ethernet
Modem
Connect to Port 2
Internet
Note: To connect to the internet via another RJ45 WAN port
(ports 3-6), congure your desired port to WAN, then
connect the port to the internet via an RJ45 cable. Refer to
FAQ-Q1 for more details.
Gigabit SFP WAN/LAN port connecting to an SFP module.
By default, it is a WAN port.
You can congure it to a LAN port on the management page.
For Nano SIM card.
Gigabit RJ45 WAN port.
Gigabit RJ45 WAN/LAN ports.
By default, they are LAN ports connecting to local PCs or switches.
You can congure each port to a WAN port on the management page.
Secure the lock (not provided) into the security slot to prevent the
device from being stolen.
The router comes with a lightning protection mechanism.
Connect to the power outlet via the provided power adapter.
Power Socket
Grounding
Terminal
Kensington
Security Slot
WAN/LAN
(Ports 3-6)
WAN
SFP WAN/LAN
Interface
Nano SIM Card
Slot
Description
3. Connect to the internet using one or multiple options.
2. Use the charger provided in the
package to power on the router.
1. Attach the Wi-Fi antennas and 4G
antennas. Antennas can be distinguished
by their markings
With the gold contacts facing
down, insert the nano SIM
card into the slot until you
hear a click.
Note: For better internet connection, make sure or LTE
Signal LED is lit. Otherwise, try relocating the router to a
spot that may receive a stronger mobile network signal,
such as near a window.
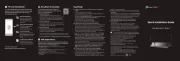
Software Conguration
3
The router supports two conguration options:
Standalone Mode: Congure and manage the router by itself.
Controller Mode: Congure and manage network devices centrally. It is recommended in large-scale networks, which consist of a large number of devices such
as access points, switches, and gateways.
Option 1: Standalone Mode
Note:
1. When the router is managed by a controller, congurations of the router will be overridden by the controller.
2. For the detailed congurations, refer to the User Guide of the router and the controller. The guides can be found on the download center of our ocial website:
https://www.tp-link.com/support/download/.
Router
Wireless Internet Connection
Wired Internet Connection
LTE Signal
(3 LEDs)
Option 1 Connect to Internet via 4G SIM card
Wait until the SYS LED ashes
slowly and the LTE Signal LED
turns solid, indicating the router is
connected to the internet.
Note: Make sure you attach the Wi-Fi antennas and 4G
antennas to the correct connectors.
Link/Act
LTE
SFP
WLAN
SYS
LED Indication
12V 2.0A
Wi-Fi
ANT
Wi-Fi
ANT
Wi-Fi
ANT
Wi-Fi
ANT
Wi-Fi
ANT
Wi-Fi
ANT
4G
ANT
4G
ANT

Safety Information
Keep the device away from water, re, humidity or hot environments.
Do not attempt to disassemble, repair, or modify the device. If you need service, please contact us.
Do not use the device where wireless devices are not allowed.
Do not use damaged charger or USB cable to charge the device.
Do not use any other chargers than those recommended.
Adapter shall be installed near the equipment and shall be easily accessible.
Place the device with its bottom surface downward.
TP-Link hereby declares that the device is in compliance with the essential requirements and other
relevant provisions of the Radio Equipment Regulations 2017.
The original UK declaration of conformity may be found at https://www.tp-link.com/support/ukca/.
TP-Link hereby declares that the device is in compliance with the essential requirements and other
relevant provisions of directives 2014/53/EU, 2009/125/EC, 2011/65/EU and (EU) 2015/863.
The original EU declaration of conformity may be found at https://www.tp-link.com/en/support/ce/.
EU Declaration of Conformity
UK Declaration of Conformity
Frequently Asked Questions (FAQ)
Q1. What should I do if I want to change the mode of the WAN/LAN ports?
Follow the steps:
1. (Recommended) Refer to the Interface Description table of this guide for the default mode of
the WAN/LAN ports.
2. Connect a computer to a LAN port of this router. If your computer is congured with a xed IP
address, change it to .Obtain an IP address automatically
3. Log in to this router’s management page at . Go to http://192.168.0.1 Network > WAN > WAN
Mode, change the mode of the WAN/LAN ports by ticking the checkboxes, and click . Save
Q2. What should I do if I need to connect this router to a modem router?
Check the LAN IP address of the modem router rst. If the LAN IP address of the modem router is
192.168.0.1, which is the same as the default LAN IP address of this router, follow the steps to
change the LAN IP address of this router:
1. Connect a computer to a LAN port of this router. If your computer is congured with a xed IP
address, change it to .Obtain an IP address automatically
2. Log in to this router’s management page at , and go to http://192.168.0.1 Network > LAN >
LAN. Network ListIn the section, change the IP address , and click .192.168.0.1 192.168.1.1 to OK
Via Web Browser
a. Launch a web browser, and enter http://tplinker.net http://192.168.0.1 or in the
address bar.
b. Create a username and a password for subsequent login attempts and for security.
c. Use the username and password set above to log in to the webpage.
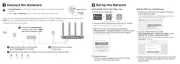
2. Log in to the router.
Turn o the Wi-Fi on your computer and connect to a LAN port of the
router with an RJ45 cable.
Wired
Wireless
a. Find the SSID (network name) printed on the label at the bottom of the router.
b. Click the network icon of your computer or go to Wi-Fi settings of your smart
device, and then select the SSID to join the network.
1. Download the TP-Link Omada App on your mobile device. It can be
downloaded from App Store or Google Play:
Scan for Omada App Download Omada App
or
2. Connect your mobile device to the router by using the default SSIDs
printed on the label at the bottom of the product.
3. Open the Omada App, and wait for the router to appear on the
Standalone Devices > Gateways page. Tap on your desired router to
start the configuration.
Note: When conguring the router, make sure the ports you select as WAN ports
correspond to the real situation.
The Omada App is designed to help you quickly congure the common
settings. If you want to congure advanced settings, use the web page of
your router or use Controller Mode.
(Wireless Connection Only)
1. Connect your device to the router (wired or wireless).
Option 2: Controller Mode
Local Management
2. Launch your Omada App and configure the controller at a local site or remote site.
a. Connect your mobile device to the router by using the default SSID printed on the
label at the bottom of the product.
b. Launch Omada App and go to Local Access +, tap the button on the upper-right
corner to add the controller. Then you can further congure the network.
Remote Management
Note: Before you start, make sure that both your controller and mobile device can
access the internet.
a. Make sure that is enabled on your controller. By default, Cloud Access Cloud
Access is enabled. Make sure that the Cloud LED is flashing slowly.
b. Launch Omada App and log in with your TP-Link ID. Then go to . Cloud Access
Tap the button on the upper-right to add your controller. Then you can further +
configure the network.
Local Management
2. Launch your Omada App and configure the controller at a local site or remote site.
a. Connect your mobile device to the router by using the default SSID printed on the
label at the bottom of the product.
b. Launch Omada App and go to Local Access +, tap the button on the upper-right
corner to add the controller. Then you can further congure the network.
Remote Management
Note: Before you start, make sure that both your controller and mobile device can
access the internet.
a. Make sure that is enabled on your controller and your controller has Cloud Access
been bound with your TP-Link ID.
b. Launch Omada App and log in with your TP-Link ID. Then go to . A list Cloud Access
of controllers that have been bound with your TP-Link ID will appear. Then you can
further configure the network.
Note: Obtain an IP If your computer is congured with a xed IP, change it to
address automatically.
3. After a successful login, you can configure the functions by clicking the
setup menu on the left side of the screen.
Note: Make sure the ports you select as WAN ports correspond to the real situation.
1. Download the TP-Link Omada App on your mobile device. It can be
downloaded from App Store or Google Play:
Scan for Omada App Download Omada App
or
1. Download the TP-Link Omada App on your mobile device. It can be
downloaded from App Store or Google Play:
Scan for Omada App Download Omada App
or
The Omada Hardware Controller (e.g., OC200/OC300, purchased separately) is a
good alternative if you have no spare PC to run the Omada Software Controller.
For more details, refer to the Installation Guide of your Omada Hardware Controller.
The Omada Software Controller is free software for centralized management. To
centrally manage your devices, the Omada Software Controller needs to
continually run on your computer.
Router
EAP
Clients
Omada Hardware Controller EAP EAP
Router
EAP
Clients
Controller
Omada Software Controller
running on the Host PC
EAP EAP
Type 1: Via Omada Hardware Controller Type 2: Via Omada Software Controller
Via Omada App Via Omada App
1. On a PC with Windows OS or Linux OS, download the Omada Software
Controller installation file from
https://www.tp-link.com/support/download/omada-software-controller/.
2. Run the file and follow the wizard to install the Omada Software Controller.
3. Launch the Omada Software Controller and follow the step-by-step
instructions to complete the quick setup.
Note: When conguring the router, make sure the ports you select as WAN ports
correspond to the real situation.
4. After the quick setup, the login page appears. Enter the username and
password you created and click . Then you can further configure the Log in
network.
Note: To download Omada Software Controller successfully, it is recommended to
configure the router’s network to access the internet. Refer to Standalone Mode to
launch the web management page of the router, and go to Network > WAN to
complete the configuration.
Omada Cloud Portal
After installing Omada Software Controller, you can remotely access the
controller through Omada Cloud Portal. Follow the steps below.
a. Enable Cloud Access on the setting page on the controller and bind a TP-Link ID
to your controller. If you have configured this in the setup wizard, skip the step.
b. Launch a web browser and enter https://omada.tplinkcloud.com in the address
bar.
c. Enter your TP-Link ID and password to log in. A list of controllers that have been
bound with your TP-Link ID will appear. Then you can click to further Launch
configure the network.
2. On the Omada Controller’s web page, follow the wizard to complete the
quick setup.
Note: When conguring the router, make sure the ports you select as WAN ports
correspond to the real situation.
3. After the quick setup, the login page appears. Enter the username and
password you have created and click . Then you can further Log in
configure the network.
4. (For Remote Management) You can remotely access and manage your
controller via Omada Cloud Service.
1. As Omada Hardware Controller gets its IP address from the DHCP server
of the router, we don’t know its IP address explicitly. However, we can nd it
out on the router’s DHCP client list.
a. Make sure that is enabled on your controller. By default, Cloud Access Cloud
Access is enabled. Make sure that the Cloud LED is flashing slowly.
b. Launch a web browser and enter https://omada.tplinkcloud.com in the address
bar. Enter your TP-Link ID and password to log in. Click + Add Controller and
choose Hardware Controller to add your controller. Then you can further
configure the network.
a. Use a PC (make sure it is set to ) to nd the IP Obtain an IP address automatically
address of the router. Open the command line on your PC and enter . In ipconfig
the result list, find the Default Gateway, which is also the IP address of the router.
b. Launch a web browser and enter the IP address of the router. Create a username
and password, and log in to the router’s web page. Then go to Network > LAN >
DHCP Client List to find the IP address of your controller according to its MAC
address.
c. Enter the IP address of your controller in the address bar to open its web page.
Via Web Browser Via Web Browser
Note: Omada Controller must have network access to your Omada devices in order to find, adopt, and manage them.
Product specificaties
| Merk: | TP Link |
| Categorie: | Router |
| Model: | ER706W-4G |
| Kleur van het product: | Zwart |
| Breedte: | 226 mm |
| Diepte: | 131 mm |
| Hoogte: | 35 mm |
| LED-indicatoren: | LAN, LTE, Status, System, WAN |
| SIM card type: | NanoSIM |
| 3G standaarden: | HSDPA, HSUPA, WCDMA |
| 4G standaard: | LTE-TDD & LTE-FDD |
| Generatie mobiel internet: | 4G |
| USB-poort: | Nee |
| Ethernet LAN: | Ja |
| Type stroombron: | AC |
| Aantal Ethernet LAN (RJ-45)-poorten: | 5 |
| MIMO: | Ja |
| Intern geheugen: | 512 MB |
| 4G frequentie ondersteund: | 800,850,900,1800,2100,2300,2500,2600 MHz |
| Intern geheugentype: | DDR4 |
| SIM-kaartsleuf: | Ja |
| 3G/4G USB modem compatibiliteit: | Nee |
| Wifi-band: | Dual-band (2.4 GHz / 5 GHz) |
| Wifi-standaard: | Wi-Fi 6 (802.11ax) |
| WLAN gegevensoverdrachtsnelheid (max): | 2402 Mbit/s |
| Interfacetype Ethernet LAN: | Gigabit Ethernet |
| Antennas quantity: | 5 |
| Temperatuur bij opslag: | -40 - 70 °C |
| Luchtvochtigheid bij opslag: | 5 - 90 procent |
| Reset button: | Ja |
| Ethernet WAN: | Ja |
| Flash memory: | 128 MB |
| DHCP server: | Ja |
| Access Control List (ACL): | Ja |
| Network address translation (NAT): | Ja |
| DSL WAN: | Nee |
| URL- filtering: | Ja |
| Bedrijfstemperatuur (T-T): | 0 - 40 °C |
| Relatieve vochtigheid in bedrijf (V-V): | 10 - 90 procent |
| Type product: | Desktop/polerouter |
| MU-MIMO-technologie: | Ja |
| Antenne-ontwerp: | Extern |
| Dynamic DNS (DDNS): | Ja |
| NAT functionality: | • One-to-One NAT\n• Multi-Net NAT\n• Virtual Server\n• Port Triggering†\n• NAT-DMZ\n• FTP/H.323/SIP/IPSec/PPTP ALG\n• UPnP |
| VPN-doorvoer: | Ja |
| Bandbreedteregeling: | Ja |
Heb je hulp nodig?
Als je hulp nodig hebt met TP Link ER706W-4G stel dan hieronder een vraag en andere gebruikers zullen je antwoorden
Handleiding Router TP Link
4 Juli 2025
4 Juli 2025
2 Juli 2025
13 Mei 2025
13 Mei 2025

2 Mei 2025
26 Maart 2025
20 Februari 2025

13 November 2024

26 September 2024
Handleiding Router
- Rosewill
- Grandstream
- Intelix
- OneAccess
- MSI
- Sitecom
- RAVPower
- Huawei
- Kramer
- Lantronix
- AJA
- Alfa
- Asus
- Silentwind
- For.A
Nieuwste handleidingen voor Router
30 Juli 2025

29 Juli 2025
29 Juli 2025

29 Juli 2025
29 Juli 2025
28 Juli 2025
15 Juli 2025
14 Juli 2025
7 Juli 2025
7 Juli 2025