TFA 30.1040 Handleiding
TFA Thermometer 30.1040
Bekijk gratis de handleiding van TFA 30.1040 (2 pagina’s), behorend tot de categorie Thermometer. Deze gids werd als nuttig beoordeeld door 76 mensen en kreeg gemiddeld 4.5 sterren uit 3 reviews. Heb je een vraag over TFA 30.1040 of wil je andere gebruikers van dit product iets vragen? Stel een vraag
Pagina 1/2
Digitales Einstichthermometer
Digitales Einstichthermometer
Vielen Dank, dass Sie sich für dieses Gerät aus dem Hause TFA entschieden haben.
1.Bevor Sie mit dem Gerät arbeiten
•Lesen Sie sich bitte die Bedienungsanleitung genau durch.
•Durch die Beachtung der Bedienungsanleitung vermeiden Sie auch Beschädigungen des Gerätes
und die Gefährdung Ihrer gesetzlichen Mängelrechte durch Fehlgebrauch. Für Schäden, die aus
Nichtbeachtung dieser Bedienungsanleitung verursacht werden, übernehmen wir keine Haftung.
Ebenso haften wir nicht für inkorrekte Messwerte und Folgen, die sich aus solchen ergeben können.
•Beachten Sie besonders die Sicherheitshinweise!
•Bewahren Sie diese Bedienungsanleitung gut auf!
2.Einsatzbereich
•Temperaturmessung von flüssigen, pastösen und halbfesten Objekten für Haushalt, Beruf und Hobby,
auch für Lebensmittel gemäß HACCP und EN13485
3.Zu Ihrer Sicherheit
•Das Produkt ist ausschließlich für den oben beschriebenen Einsatzbereich geeignet. Verwenden Sie das
Produkt nicht anders, als in dieser Anleitung beschrieben wird.
•Das eigenmächtige Reparieren, Umbauen oder Verändern des Gerätes ist nicht gestattet.
•Dieses Gerät ist nicht für medizinische Zwecke oder zur öffentlichen Information geeignet und nur für
den privaten Gebrauch bestimmt.
Vorsicht!
Verletzungsgefahr:
•Bewahren Sie das Gerät und die Batterie außerhalb der Reichweite von Kindern auf.
•Vorsicht beim Umgang mit der Einstichsonde. Immer mit der Schutzkappe aufbewahren!
•Batterien enthalten gesundheitsschädliche Säuren und können bei Verschlucken lebensgefährlich sein.
Wurde eine Batterie verschluckt, kann dies innerhalb von 2 Stunden zu schweren inneren Verätzungen
und zum Tode führen. Wenn Sie vermuten, eine Batterie könnte verschluckt oder anderweitig in den
Körper gelangt sein, nehmen Sie sofort medizinische Hilfe in Anspruch.
•Batterien nicht ins Feuer werfen, kurzschließen, auseinandernehmen oder aufladen. Explosionsgefahr!
•Um ein Auslaufen der Batterien zu vermeiden, sollten schwache Batterien möglichst schnell ausge-
tauscht werden. Beim Hantieren mit ausgelaufenen Batterien chemikalienbeständige Schutzhandschuhe
und Schutzbrille tragen!
Wichtige Hinweise zur Produktsicherheit!
•Setzen Sie das Gerät nicht extremen Temperaturen, Vibrationen und Erschütterungen aus.
•Nur der Fühler ist hitzebeständig bis 250°C.
•Halten Sie niemals den Fühler direkt über Feuer.
•Tauchen Sie das Anzeigeelement nicht in Wasser, sonst kann Feuchtigkeit eindringen und zu Fehlfunk-
tionen führen. Nicht in der Spülmaschine reinigen.
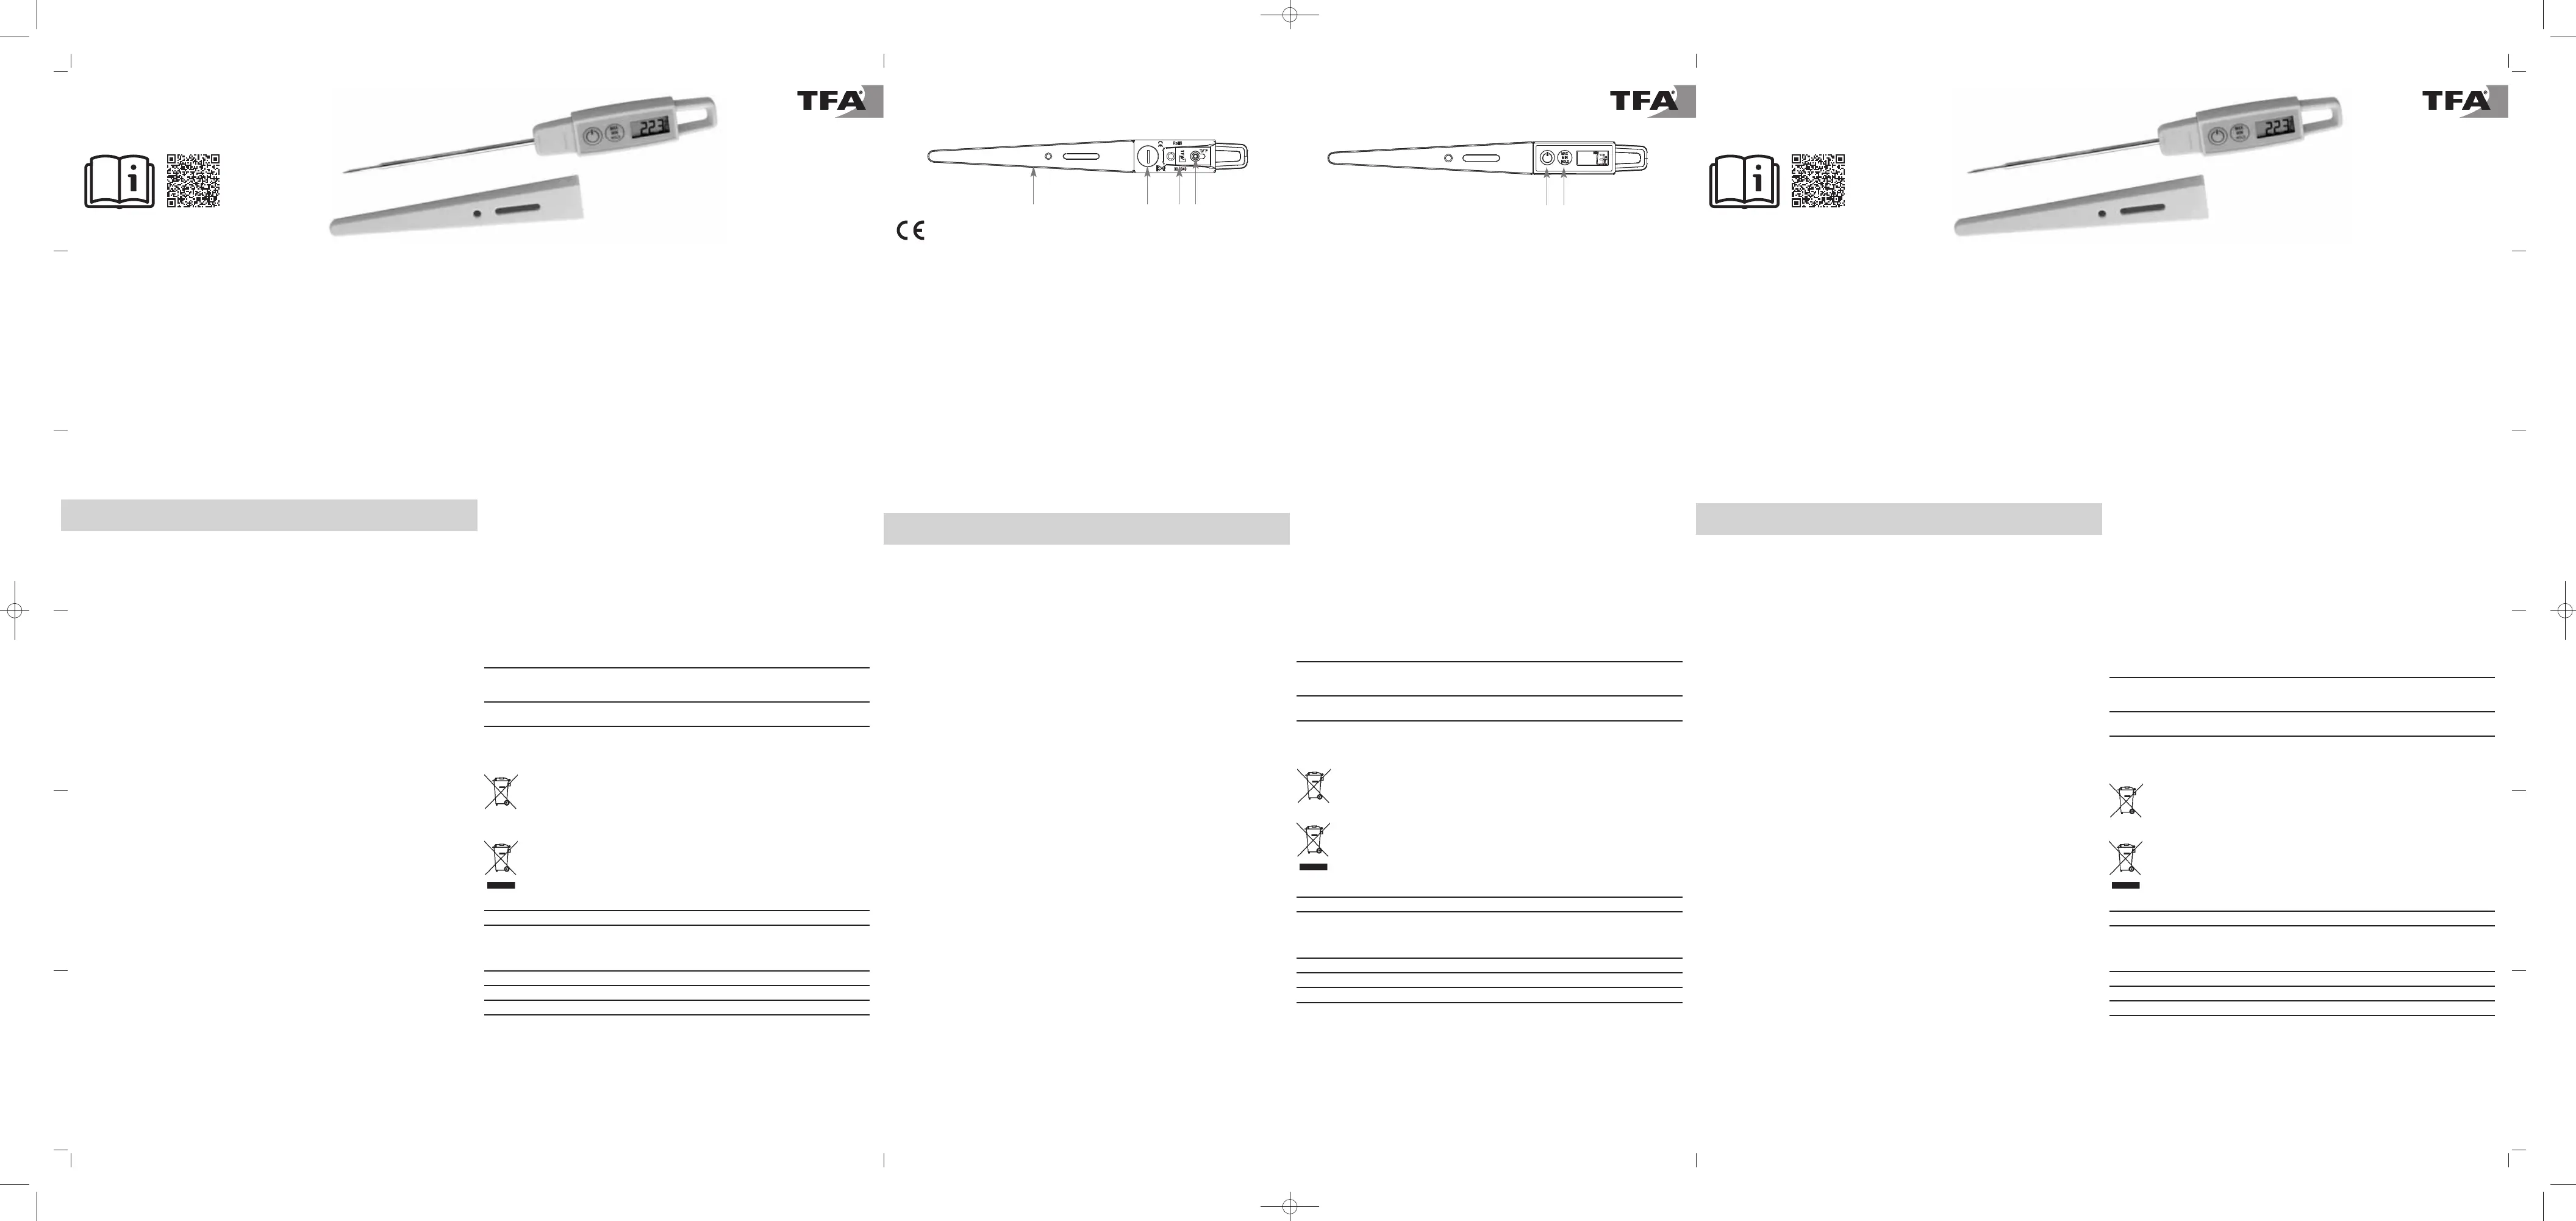
4.Bestandteile
Tasten
1ON/OFF Taste2MAX/MIN/HOLD Taste3°C/°F Taste
Gehäuse
4Batteriefach5Kunststoffhülse6Klipp
5.Inbetriebnahme
•Öffnen Sie das Batteriefach, indem Sie mit Hilfe eines passenden Schraubenziehers den Deckel in Pfeil-
richtung drehen (OPEN) und entfernen Sie den Batterieunterbrechungsstreifen.
•Schließen Sie den Deckel wieder in Pfeilrichtung (CLOSE). Achten Sie dabei auf den Dichtungsring.
•Nehmen Sie die Schutzhülle von der Einstichsonde.
•Drücken Sie kurz die ON/OFF Taste.
•Das Display zeigt die momentan gemessene Temperatur an.
•Der Sensor befindet sich in der Sondenspitze.
•Stecken Sie den Fühler mindestens 2 cm tief in das Messobjekt.
6.HOLD Funktion
•Drücken Sie die MAX/MIN/HOLDTaste im Normalmodus.
•HOLD erscheint auf dem Display.
•Es wird die gemessene Temperatur festgehalten.
•Drücken Sie die MAX/MIN/HOLDTaste dreimal, gelangen Sie in den Normalmodus zurück.
7.MAX/MIN Funktion
•Drücken Sie die MAX/MIN/HOLDTaste zweimal im Normalmodus und es erscheint die maximale Tem-
peratur seit der letzten Rückstellung (MAX).
•Drücken Sie noch einmal die MAX/MIN/HOLDTaste und es erscheint die minimale Temperatur seit der
letzten Rückstellung (MIN).
•Drücken Sie noch einmal die MAX/MIN/HOLDTaste und Sie kehren in den Normalmodus zurück.
•Steigt oder fällt die Temperatur im Max./Min. Modus über oder unter den angezeigten Wert, erfolgt ein
dynamisches Update.
•Zur Löschung der gespeicherten maximalen und minimalen Werte halten Sie die MAX/MIN/HOLDTaste
für 3 Sekunden im entsprechenden Modus gedrückt, während MAX bzw. MIN angezeigt wird.
•„---” erscheint auf dem Display.
•Mit der MAX/MIN/HOLDTaste kehren Sie zurück in den Normalmodus.
8.Abschaltung
•Drücken Sie die ON/OFF Taste für 2 Sekunden.
•OFF blinkt im Display.
•Das Gerät schaltet sich aus.
•Bei Nichtbenutzung schaltet sich das Gerät nach ca. 10 Minuten aus.
•Ziehen Sie die Schutzkappe über die Einstichsonde
9.Umschalten °C/°F
•Drücken Sie mit einem spitzen Gegenstand den grauen Knopf in der Öffnung auf der Rückseite, um zwi-
schen °C (Celsius) und °F (Fahrenheit) als Maßeinheit für die Temperatur zu wählen.
10. Langzeit-Messungen
•Drücken Sie die MAX/MIN/HOLDTaste für 3 Sekunden im Normalmodus.
•X erscheint im Display.
•Die automatische Abschaltfunktion ist deaktiviert.
•Halten Sie die MAX/MIN/HOLDTaste gedrückt, wird die automatische Abschaltfunktion wieder aktiviert.
11. Kalibrierung
•Drücken Sie die ON/OFF Taste.
•Legen Sie das Gerät für 3 Minuten in einen Gefäß mit Eiswasser bis die Temperatur sich nicht mehr ver-
ändert (±2°C).
•Herstellung von Eiswasser: Thermoskanne mit möglichst klein gestoßenen Eiswürfeln komplett füllen.
Danach die Thermoskanne mit kaltem Wasser auffüllen, so dass keine Luft mehr in den Zwischenräu-
men ist. Nach ca. 30 Minuten hat sich eine Temperatur von 0°C (+0,1°C) im Eiswasser der Thermoskan-
ne gebildet. Je nach Qualität der Thermoskanne bleibt die Temperatur bis zu 24 Stunden konstant.
•Beachten Sie dabei, dass der Fühler mindestens zu zwei Drittel seiner Länge eingetaucht ist.
•Halten Sie die °C/°F Taste gedrückt (ca. 3 Sek), um in den Kalibrierungsmodus zu gelangen.
•CAL erscheint auf dem Display.
•Warten Sie, bis die Temperaturanzeige 0°C (+/-0,5°C) anzeigt.
•Halten Sie die °C/°F Taste gedrückt, bis 0°C auf dem Display erscheint.
•Das Gerät ist nun kalibriert.
•Durch Loslassen der °C/°F Taste kehren Sie in den Normalmodus zurück.
12. Pflege und Wartung
•Reinigen Sie das Gerät mit einem weichen, leicht feuchten Tuch. Keine Scheuer- oder Lösungsmittel
verwenden!
•Entfernen Sie die Batterie, wenn Sie das Gerät längere Zeit nicht verwenden.
•Bewahren Sie Ihr Gerät an einem trockenen Platz auf.
13. Batteriewechsel
•Tauschen Sie die Batterie aus, wenn das Batteriesymbol erscheint.
14. Fehlerbeseitigung
ProblemLösung
Keine Anzeige➜ Batterie polrichtig einlegen (+Pol nach oben)
➜ Batterie wechseln
➜ Gerät einschalten (ON)
Unkorrekte Anzeige➜ Sitz des Messfühlers prüfen
➜ Batterie wechseln
15. Entsorgung
Dieses Produkt wurde unter Verwendung hochwertiger Materialien und Bestandteile hergestellt, die re-
cycelt und wiederverwendet werden können.
Batterien und Akkus dürfen keinesfalls in den Hausmüll!
Als Verbraucher sind Sie gesetzlich verpflichtet, gebrauchte Batterien und Akkus zur
umweltgerechten Entsorgung beim Handel oder entsprechenden Sammelstellen gemäß
nationalen oder lokalen Bestimmungen abzugeben.
Die Bezeichnungen für enthaltene Schwermetalle sind:
CD=Cadmium, Hg=Quecksilber, Pb=Blei.
Dieses Gerät ist entsprechend der EU-Richtlinie über die Entsorgung von Elektro- und Elek-
tronik-Altgeräten (WEEE) gekennzeichnet.
Dieses Produkt darf nicht mit dem Hausmüll entsorgt werden. Der Nutzer ist verpflichtet,
das Altgerät zur umweltgerechten Entsorgung bei einer ausgewiesenen Annahmestelle für
die Entsorgung von Elektro- und Elektronikgeräten abzugeben.
16. Technische Daten
Messbereich Temperatur:-40°C ...+250°C (-40°F...+482 °F)
Genauigkeit:±1°C @ -40°C…-10°C (±2°F @ -40°F…+14°F)
±0,5°C @ > -10°C…+100°C (±1°F @ +14°F…+212°F)
±1°C @ > +100°C…+200°C (±2°F @ +212°F…+392°F)
±2°C @ > +200°C…+250°C (±4°F @ +392°F…+482°F)
Betriebstemperatur:-20°C... +50°C (-4°F...+122°F)
Schutzart:IP 67
Spannungsversorgung:1x LR44 Knopfzell-Batterie
Dieses Produkt erfüllt die Richtlinien gemäß der Norm EN 13485.
Eignung: S, T (Lagerung, Transport)
Umgebung: E
Genauigkeitsklasse: 0,5
Messbereich: -40°C…+250°C
Nach EN 13485 ist eine regelmäßige Überprüfung und Kalibrierung des Messgeräts gemäß EN 13486
durchzuführen (Empfehlung: jährlich).
TFA Dostmann GmbH & Co. KG, Zum Ottersberg 12, D-97877 Wertheim, Deutschland
Diese Anleitung oder Auszüge daraus dürfen nur mit Zustimmung von TFA Dostmann veröffentlicht werden. Die technischen Daten entsprechen
dem Stand bei Drucklegung und können ohne vorherige Benachrichtigung geändert werden. Die neuesten technischen Daten und Informationen
zu Ihrem Produkt finden Sie auf unserer Homepage unter Eingabe der Artikel-Nummer in das Suchfeld.
www.tfa-dostmann.de03/21
Kat. Nr. 30.1040
Bedienungsanleitung
Hg
Digital probe thermometer
Digital probe thermometer
Thank you for choosing this instrument from TFA.
1.Before you use this product
•Please make sure you read the instruction manual carefully.
•Following and respecting the instructions in your manual will prevent damage to your instrument
and loss of your statutory rights arising from defects due to incorrect use.
•We shall not be liable for any damage occurring as a result of non-following of these instructions.
Likewise, we take no responsibility for any incorrect readings or for any consequences resulting
from them.
•Please take particular note of the safety advice!
•Please keep this instruction manual safe for future reference.
2.Field of operation
•Temperature measuring of liquids, pastes and semi-solid materials for household, business and hobby,
also for food checks (according to HACCP) and EN 13485.
3.For your safety
•This product is exclusively intended for the field of application described above. It should only be used
as described within these instructions.
•Unauthorised repairs, modifications or changes to the product are prohibited.
•This product is not be used for medical purpose or for public information, it is only intended for home
use.
Caution!
Risk of injury:
•Keep this instrument and the battery out of reach of children.
•Be careful by handling with the probe. If you do not use the instrument, please use always the protec-
tive cap on the probe.
•Batteries contain harmful acids and may be hazardous if swallowed. If a battery is swallowed, this can
lead to serious internal burns and death within two hours. If you suspect a battery could have been
swallowed or otherwise caught in the body, seek medical help immediately.
•Batteries must not be thrown into a fire, short-circuited, taken apart or recharged. Risk of explosion!
•Low batteries should be changed as soon as possible to prevent damage caused by leaking.
•Wear chemical-resistant protective gloves and safety glasses when handling leaking batteries.
Important information on product safety!
•Do not expose the device to extreme temperatures, vibrations or shocks.
•Only the probe is heat resistant until 250 °C.
•Never burn the probe directly over fire.
•Do not immerse the display unit into water. Water can penetrate and cause malfunction. Protect fit rom
moisture. Not suitable for dishwasher.
4.Elements
Buttons
1ON/OFF button2MAX/MIN/HOLD button3°C/°F button
Housing
4Battery compartment 5Protective cap6Clip
5.Getting started
•Open the battery compartment by turning the lid in direction of the arrow by using a suitable screw-
driver (OPEN) and remove the insulation strip.
•Close the battery compartment by turning the lid in direction of the arrow by using a suitable screw-
driver (CLOSE). Pay attention to the sealing ring.
•Remove the protective cap from the probe.
•Press ON/OFF button.
•The actually measured temperature is shown on the display.
•The sensor is located in the point of the probe. To measure the temperature, insert the probe at least
2 cm deep in the object.
6.HOLD function
•Press MAX/MIN/HOLDbutton in normal mode.
•HOLD appears on the display.
•The hold-function for the current temperature is activated.
•Press MAX/MIN/HOLDbutton three times and you will return to normal mode.
7.MAX/MIN function
•Press MAX/MIN/HOLDbutton twice in normal mode and the highest temperature is displayed (MAX)
since the last reset.
•Press MAX/MIN/HOLDbutton again and the lowest temperature is displayed (MIN) since the last reset.
•Press MAX/MIN/HOLDbutton again and you will return to normal mode.
•If the temperature in the Max-Min mode falls or rises below or above the recorded maximum or mini-
mum value a dynamical update will happen.
•To clear the maximum and minimum memory, press and hold the MAX/MIN/HOLDbutton for 3 seconds
in the corresponding mode while MAX or MIN is displayed.
•“---” appears on the display.
•Press the MAX/MIN/HOLDbutton again to return to normal mode.
8.Switch-OFF function
•Hold ON/OFF button for 2 seconds.
•OFF flashes of the display.
•The instrument turns off.
•When the instrument is not used, it will automatically switch off after approx. 10 minutes.
•Put the protective cap over the probe.
9.Unit change °C/°F
•Use a pin for to press the grey °C/°F button at the rear side and the temperature unit can be changed
from °C (grade Celsius) to °F (grade Fahrenheit).
10. Long-term measurement
•Press MAX/MIN/HOLDbutton for 3 seconds in normal mode.
•X appears on the display.
•The automatic off-function is deactivated.
•Press and hold the MAX/MIN/HOLDbutton to activate the function again.
11. Calibration
•Press ON/OFF button.
•Put the instrument for 3 minutes into a bowl with ice water until the temperature does not change any-
more (±2°C).
•Producing of ice water: Fill up a thermos bottle with crushed ice. Than fill cold water into the thermos
bottle up to the top, so that no air will be in the bottle. After approximately 30 minutes the ice water has
reached a temperature of 0°C (+0,1°C). Depending on the quality of the thermos bottle the temperature
stays constant until 24 hours.
•Note that two-thirds of the length of the probe should be immersed into the ice water.
•Press and hold °C/°F button (3 sec.) to get into the calibration mode.
•CAL appears on the display.
•Wait until 0°C (±0,5°C) appears on the temperature display.
•Hold °C/°F button, until 0°C appears on the display.
•The instrument is now calibrated.
•Stop pressing the °C/°F button to return to normal mode.
12. Care and maintenance
•Clean your instrument with a soft damp cloth. Do not use solvents or scouring agents
•Remove the battery if you do not use it for a long period of time.
•Keep the instrument in a dry place.
13. Battery replacement
•Change the battery when the battery symbol appears on the display.
14. Troubleshooting
ProblemsSolutions
No display➜ Ensure battery polarity is correct (+ pole above)
➜ Change the battery
➜ Switch on the instrument (ON)
Incorrect display➜ Check the position of the sensor
➜ Change the battery
15. Waste disposal
This product has been manufactured using high-grade materials and components which can be recycled
and reused.
Never dispose of empty batteries and rechargeable batteries in household waste.
As a consumer, you are legally required to take them to your retail store or to appropriate
collection sites depending on national or local regulations in order to protect the environ-
ment.
The symbols for the heavy metals contained are: Cd=cadmium, Hg=mercury, Pb=lead.
This instrument is labelled in accordance with the EU Waste Electrical and Electronic Equip-
ment Directive (WEEE).
Please do not dispose of this instrument in household waste. The user is obligated to take
end-of-life devices to a designated collection point for the disposal of electrical and elec-
tronic equipment, in order to ensure environmentally-compatible disposal.
16. Specifications
Measuring range temperature:-40°C ...+250°C (-40°F...+482 °F)
Precision:±1°C @ -40°C…-10°C (±2°F @ -40°F…+14°F)
±0,5°C @ > -10°C…+100°C (±1°F @ +14°F…+212°F)
±1°C @ > +100°C…+200°C (±2°F @ +212°F…+392°F)
±2°C @ > +200°C…+250°C (±4°F @ +392°F…+482°F)
Operating temperature:-20°C... +50°C (-4°F...+122°F)
Protection class:IP 67
Power consumption:Button cell battery 1x LR44
This product fulfills the guidelines according to EN 13485.
Suitability: S, T (Storage, Transport)
Location: E
Accuracy class: 0,5
Measuring range:-40°C…+250°C
In accordance with EN 13485, this instrument is subject to regular inspections as per EN 13486 (recom-
mendation: yearly).
TFA Dostmann GmbH & Co. KG, Zum Ottersberg 12, D-97877 Wertheim, Germany
No part of this manual may be reproduced without written consent of TFA Dostmann. The technical data are correct at the time of going to print
and may change without prior notice.
The latest technical data and information about this product can be found in our homepage by simply entering the product number in the search
box.
www.tfa-dostmann.de03/21
Kat. Nr. 30.1040
Bedienungsanleitung
Instruction manual
12
4653
Hg
Thermomètre digital à sonde
Thermomètre digital à sonde
Nous vous remercions d'avoir choisi l'appareil de la Société TFA.
1.Avant d'utiliser votre appareil
•Veuillez lire attentivement le mode d'emploi.
•En respectant ce mode d'emploi, vous éviterez d'endommager votre appareil et de perdre vos droits
légaux en cas de défaut si celui-ci résulte d’une utilisation non-conforme.
•Nous n'assumons aucune responsabilité pour des dommages qui auraient été causés par le non-
respect du présent mode d'emploi. De même, nous n’assumons aucune responsabilité pour des
relevés incorrects et les conséquences qu’ils pourraient engendrer.
•Suivez bien toutes les consignes de sécurité !
•Conservez soigneusement le mode d'emploi !
2.Domaine d'utilisation
•Mesure de la température des liquides, pâtes et matériaux semi-solides pour l'utilisation ménagère,
professionnelle, loisirs, alimentaire (selon HACCP) et également selon EN13485.
3.Pour votre sécurité
•L'appareil est destiné uniquement à l'utilisation décrite ci-dessus. Ne l'utilisez jamais à d'autres fins que
celles décrites dans le présent mode d'emploi.
•Vous ne devez en aucun cas réparer, démonter ou modifier l'appareil par vous même.
•Cet appareil ne convient ni pour une utilisation médicale ni pour l'information publique, il est destiné
uniquement à un usage privé.
Attention !
Danger de blessure :
•Gardez votre appareil et la pile hors de la portée des enfants.
•Faites attention en utilisant la sonde ! Gardez toujours avec la protection en plastique.
•Les piles contiennent des acides nocifs pour la santé et peuvent être mortelles dans le cas d’une inges-
tion. Si une pile a été avalée, elle peut entraîner des brûlures internes graves ainsi que la mort dans l’es-
pace de 2 heures. Si vous craignez qu’une pile ait pu être avalée ou ingérée d’une autre manière, quelle
qu’elle soit, contactez immédiatement un médecin d’urgence.
•Ne jetez jamais de piles dans le feu, ne les court-circuitez pas, ne les démontez pas et ne les rechargez
pas. Risque d'explosion ! Une pile faible doit être remplacée le plus rapidement possible afin d'éviter
toute fuite. Pour manipuler des piles qui ont coulé, utilisez des gants de protection chimique spéciale-
ment adaptés et portez des lunettes de protection !
Conseils importants de sécurité du produit !
•Évitez d’exposer l’appareil à des températures extrêmes, à des vibrations ou à des chocs.
•Seule la sonde est résistante à une chaleur de 250 °C.
•Ne tenez jamais la sonde directement sur le feu.
•N'immergez pas l'appareil indicateur dans l'eau sinon l'humidité pourrait pénétrer et causer une mau-
vaise fonction. Ne peut pas être lavé au lave-vaisselle.
4.Composants
Touches
1Touche ON/OFF 2Touche MAX/MIN/HOLD 3Touche °C/°F
Boîtier
4Logement de batterie5Protection en plastique 6Clip
5.Mise en service
•Ouvrez le compartiment à pile en tournant le couvercle à l'aide d’un tournevis adapté en direction
(OPEN) de la flèche et enlevez le film de protection de la pile.
•Refermez le compartiment à pile en tournant le couvercle à l'aide d’un tournevis adapté en direction
(CLOSE). Ce faisant faites attention à l'anneau de protection en caoutchouc.
•Retirez la protection en plastique de la sonde.
•Appuyez sur la touche ON/OFF.
•L’affichage vous indique la température momentanée.
•Le palpeur se trouve à la pointe de la sonde. Pour mesurer la température, insérez la sonde à au moins
2 cm de profondeur dans l'objet.
6.Fonction HOLD
•En mode normal, appuyez la touche MAX/MIN/HOLD.
•HOLD apparaît sur l'affichage.
•La température mesurée est retenue
•Pour retourner au mode normal, il suffit de presser trois fois la touche MAX/MIN/HOLD.
7.Fonction MAX/MIN
•Pour consulter la température maximale depuis la dernière remise à zéro (MAX), presser deux fois la
touche MAX/MIN/HOLD en mode normal.
•Pour consulter la température minimale depuis la dernière remise à zéro (MIN), presser une nouvelle
fois la touche MAX/MIN/HOLD.
•Pour retourner au mode normal, il suffit de presser encore une fois la touche MAX/MIN/HOLD.
•Si la température monte ou descend en-dessous de la température affichée en mode Max/Min, cela
pourrait entraîner une actualisation dynamique.
•Pour effacer les valeurs MAX/MIN mémorisées il faut presser la touche MAX/MIN/HOLD pendant
3 secondes dans le mode correspondant, tandis qu'est affichée la valeur MAX ou MIN.
•Sur l'écran apparaît «---».
•Pour retourner au mode normal, il suffit de presser encore une fois la touche MAX/MIN/HOLD.
8.Fonction de mise hors circuit
•Appuyez sur la touche ON/OFF pendant 2 sec.
•OFF clignote sur le display.
•L'appareil s'arrête.
•Quand on n’utilise pas l’appareil, il s’arrête de lui-même après environ 10 minutes.
•Mettez la protection en plastique sur la sonde.
9.Commutation °C/°F
•Pour sélectionner l'unité de température et commuter entre °C (Celsius) et °F (Fahrenheit), presser à
l'aide d'un objet pointu le bouton gris dans l'ouverture située à l'arrière du boîtier.
10. Mesures de longue durée
•Presser la touche MAX/MIN/HOLDpendant 3 secondes en mode normal.
•Sur l'écran apparaît X.
•La fonction de mise à l'arrêt automatique sera désactivée.
•Si vous continuez à appuyer la touche MAX/MIN/HOLDla fonction de mise à l'arrêt automatique sera de
nouveau activée.
11. Calibration
•Presser la touche ON/OFF.
•Mettez l'appareil pendant 3 minutes dans un récipient contenant de l'eau glacée, jusqu'à ce que la tem-
pérature reste constante (±2 °C).
•Fabrication d'eau glacée : remplir complètement une bouteille thermos de glace pilée. Remplir ensuite
la bouteille thermos d'eau froide, de sorte qu'il ne reste plus d'air dans les interstices. Après environ 30
minutes de l'eau glacée s'est formée dans la bouteille thermos et possède une température de 0°C
(+0,1 °C). Selon la qualité de la bouteille thermos on peut maintenir cette température constante jusqu'à
24 heures.
•S'assurer que le capteur soit plongé dans l'eau sur au moins deux-tiers de sa longueur.
•Maintenez la touche °C/°F appuyée pendant 3 secondes afin d'accéder au mode de calibration.
•CAL apparaît sur l'affichage.
•Attendre jusqu'à ce que l'affichage de température indique 0°C (±0,5°C).
•Maintenez la touche °C/°F pressée, jusqu'à ce qu'apparaisse 0°C à l'écran.
•Maintenant l'appareil est calibré.
•Pour revenir au mode normal il suffit de relâcher la touche °C/°F.
12. Entretien et maintenance
•
Pour le nettoyage de votre appareil, utilisez un chiffon doux et humide. N’utilisez aucun agent solvant abrasif !
•Enlevez la pile, si vous n’utilisez pas l'appareil pendant une durée prolongée.
•Conservez votre appareil dans un endroit sec.
13. Remplacement de la pile
•Si le symbole de batterie apparaît sur le display, changer la batterie.
14. Dépannage
ProblèmeSolution
Aucun affichage➜ Contrôlez la bonne polarité de la pile (+pôle vers l'extérieur)
➜ Changez la pile
➜ Mettez l’appareil en marche (ON)
Affichage incorrecte➜ Vérifiez l'emplacement de la sonde de mesure
➜ Changez la pile
15. Traitement des déchets
Ce produit a été fabriqué avec des matériaux et des composants de haute qualité qui peuvent être recyclés
et réutilisés.
Les piles et accus usagés ne peuvent en aucun cas être jetés dans les ordures ménagères !
En tant qu'utilisateur, vous avez l'obligation légale de rapporter les piles et accus usagés à
votre revendeur ou de les déposer dans une déchetterie proche de votre domicile conformé-
ment à la réglementation nationale et locale.
Les métaux lourds sont désignés comme suit : Cd = cadmium, Hg = mercure, Pb = plomb.
Cet appareil est conforme aux normes de l'UE relatives au traitement des déchets électriques
et électroniques (WEEE).
L'appareil usagé ne doit pas être jeté dans les ordures ménagères. L’utilisateur s’engage,
pour le respect de l’environnement, à déposer l’appareil usagé dans un centre de traitement
agréé pour les déchets électriques et électroniques.
16. Caractéristiques techniques
Plage de mesure température :-40°C ...+250°C (-40°F...+482°F)
Précision :±1°C @ -40°C…-10°C (±2°F @ -40°F…+14°F)
±0,5°C @ > -10°C…+100°C (±1°F @ +14°F…+212°F)
±1°C @ > +100°C…+200°C (±2°F @ +212°F…+392°F)
±2°C @ > +200°C…+250°C (±4°F @ +392°F…+482°F)
Température d'opération :-20°C... +50°C (-4°F...+122°F)
Class e:IP 67
Alimentation :Pile bouton 1x LR 44
Ce produit accomplit les directives selon la norme EN 13485.
Aptitude :S, T (Stockage, Transport)
Environs : E
Catégorie de précision : 0,5
Plage de mesure :-40°C…+250°C
Selon EN 13485 un contrôle régulier et une calibration de l’instrument de mesure est nécessaire selon EN
13486 (recommandation : par an).
TFA Dostmann GmbH & Co. KG, Zum Ottersberg 12, D-97877 Wertheim, Allemagne
La reproduction, même partielle, du présent mode d'emploi est strictement interdite sans l'accord explicite de TFA Dostmann. Les caractéristi-
ques techniques de ce produit ont été actualisées au moment de l'impression et peuvent être modifiées sans avis préalable. Les dernières don-
nées techniques et les informations concernant votre produit peuvent être consultées en entrant le numéro de l'article sur notre site Internet.
www.tfa-dostmann.de03/21
Kat. Nr. 30.1040
Mode d'emploi
Hg
Instruction manuals
www.tfa-dostmann.de/en/service/downloads/instruction-manuals
Instruction manuals
www.tfa-dostmann.de/en/service/downloads/instruction-manuals
TFA_No. 30.1040_Anl_03_21 27.03.2021 14:46 Uhr Seite 1
Product specificaties
| Merk: | TFA |
| Categorie: | Thermometer |
| Model: | 30.1040 |
Heb je hulp nodig?
Als je hulp nodig hebt met TFA 30.1040 stel dan hieronder een vraag en andere gebruikers zullen je antwoorden
Handleiding Thermometer TFA

29 Oktober 2025
17 April 2025
17 April 2025
17 April 2025
17 April 2025
29 Maart 2025
4 Maart 2025
4 Maart 2025
4 Maart 2025
5 Februari 2025
Handleiding Thermometer
Nieuwste handleidingen voor Thermometer
20 April 2026
12 April 2026
24 Maart 2026
10 Maart 2026
5 Maart 2026
4 Maart 2026
4 Maart 2026
3 Maart 2026
28 Februari 2026
27 Februari 2026