TeachLogic Voicelink Plus Handleiding
TeachLogic
Niet gecategoriseerd
Voicelink Plus
Bekijk gratis de handleiding van TeachLogic Voicelink Plus (2 pagina’s), behorend tot de categorie Niet gecategoriseerd. Deze gids werd als nuttig beoordeeld door 80 mensen en kreeg gemiddeld 4.8 sterren uit 40.5 reviews. Heb je een vraag over TeachLogic Voicelink Plus of wil je andere gebruikers van dit product iets vragen? Stel een vraag
Pagina 1/2
Quick Start Guide
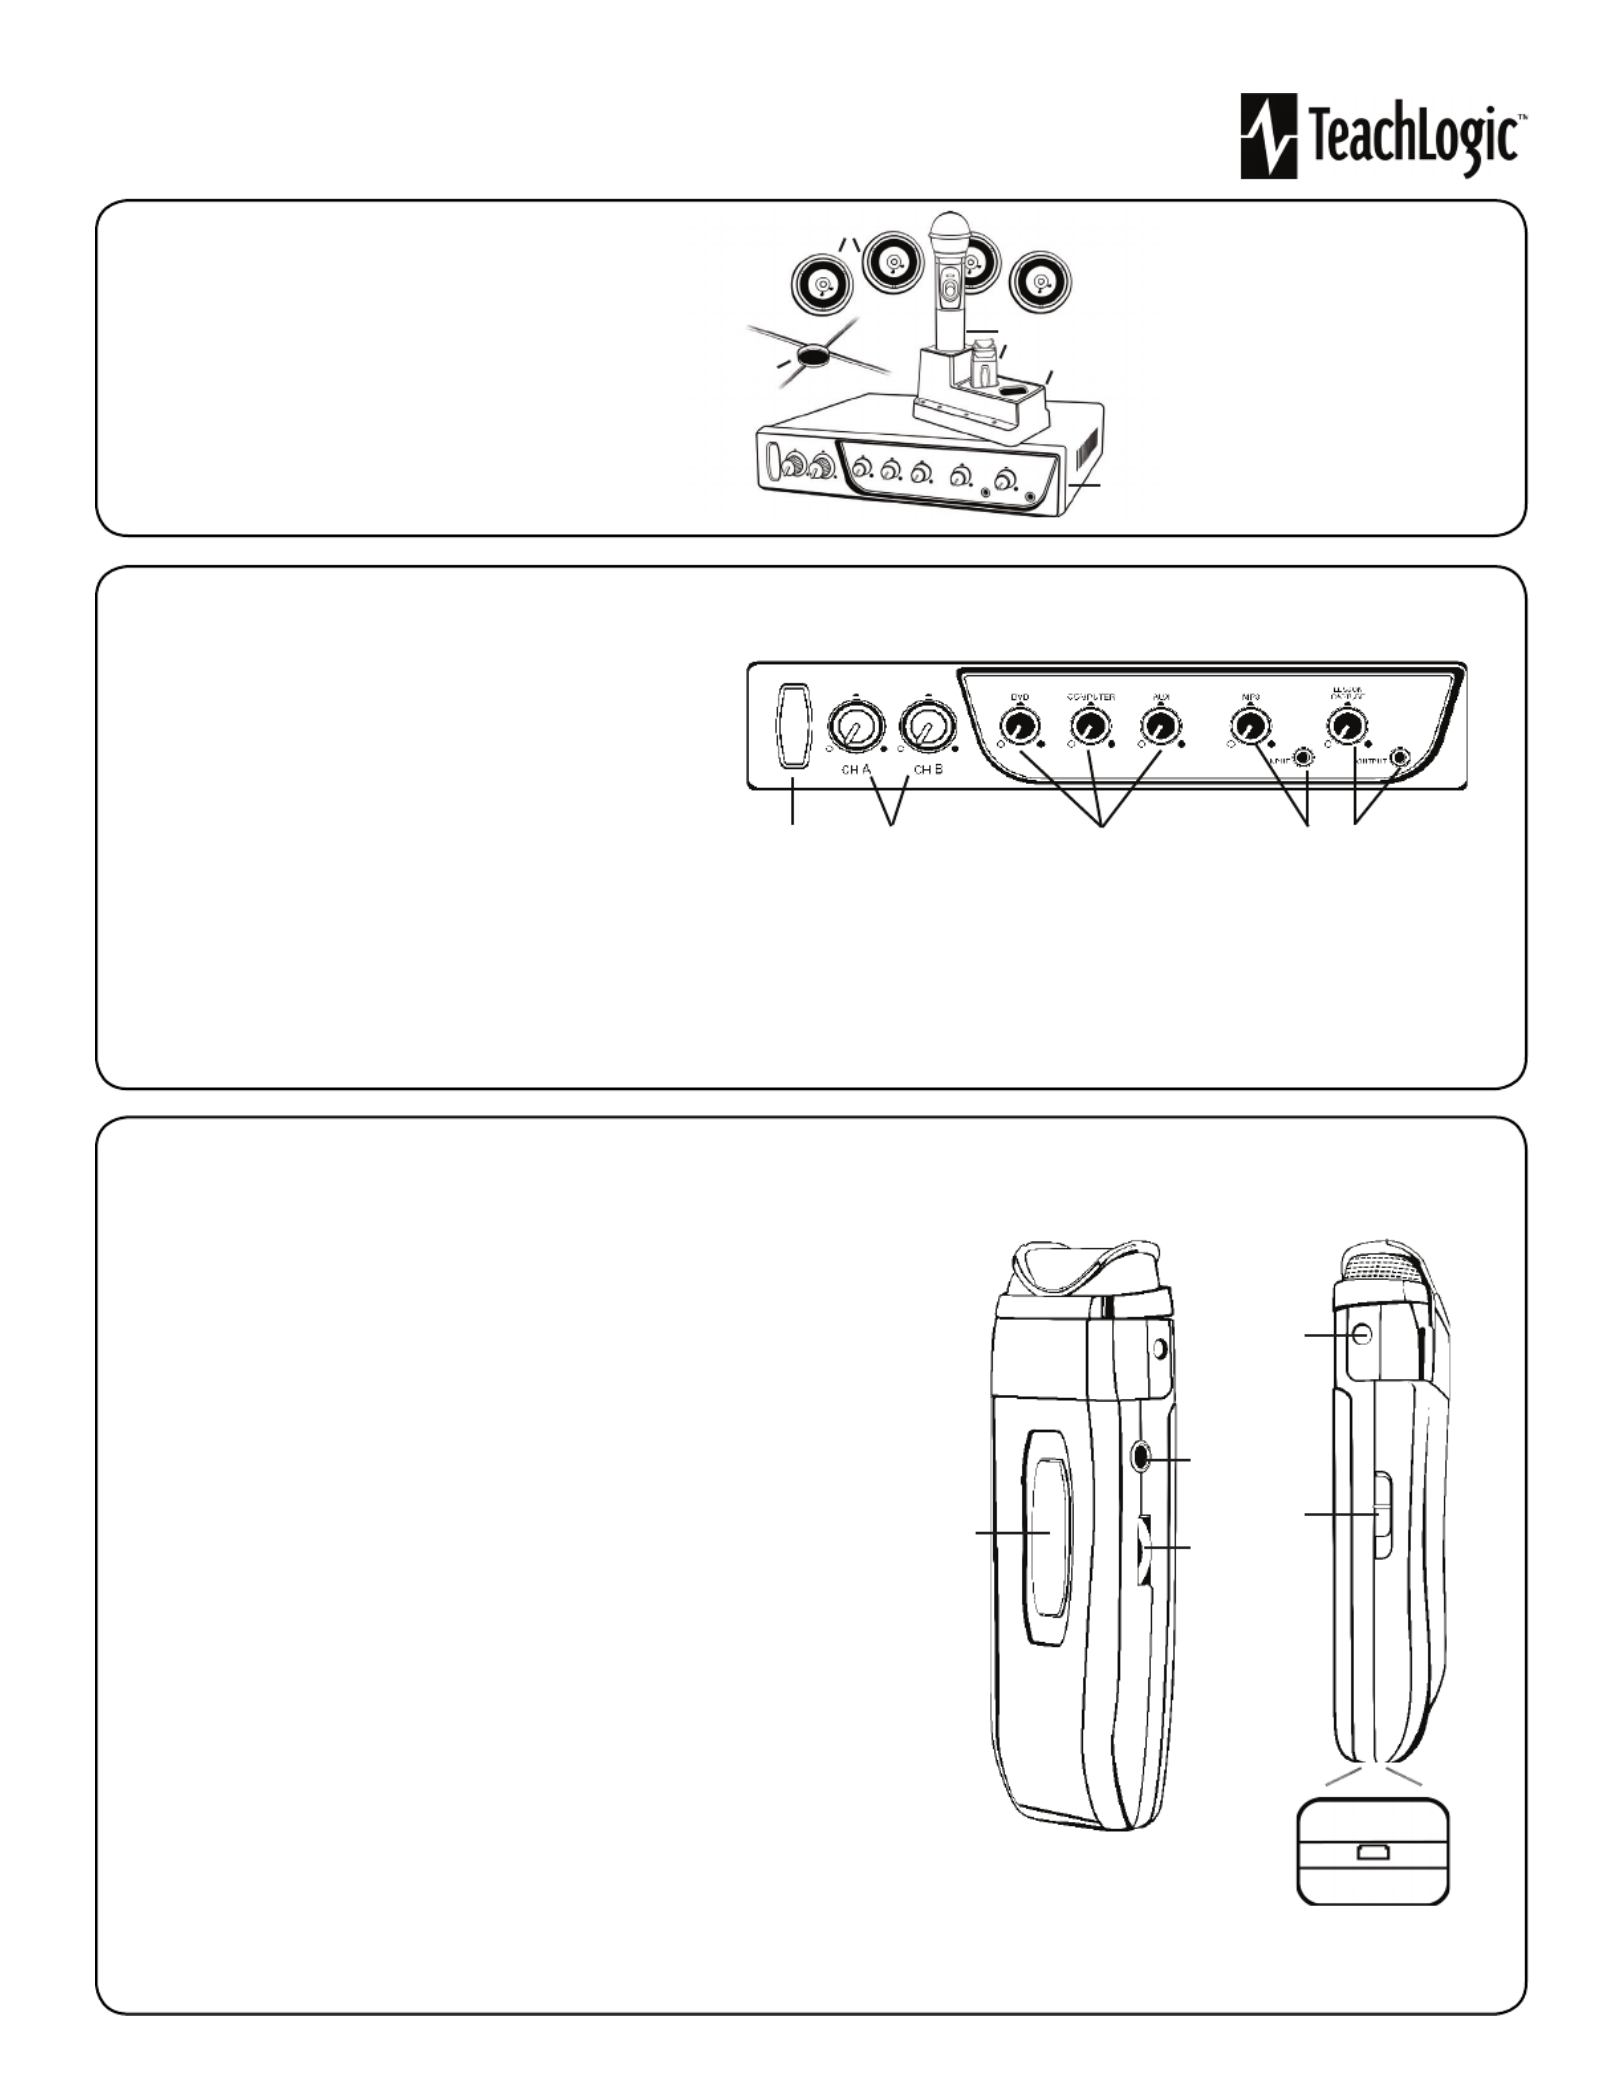
Getting to Kno our Sound System w Y
Make note of the location of the speakers and ceiling sensor in
your classroom. Ensure that you have unpacked and charged
your battery-powered microphones. Keep this guide handy
for future reference.
Please note that some amplifier/receiver controls will differ.
Refer to their markings, user manual, or our teachlogic.com
for more information on their function.
STEP 1. USING THE AMPLIFIER/RECEIVER
1. Speakers
2. Ceiling Sensor
3. Wireless Microphones
4. Microphone battery
charger
5. Receiver/Ampli er
1. Power & Status Indicator
• Red: OFF
• Blue: ON and activated
• Amber: STANDBY
2. Mic Channels/Volume Controls
• Green light: Microphone on and connected to
channel
• No light: Microphone is not on; and/or sensor is not plugged
in; and/or sensor is not receiving mic signal
3. Input Volume Controls
• Controls volume of connected external
devices
1 2 3 4 5
4. Input Jack and Volume Control
• Connects additional external devices to the system (ex. iPhone or mp3 player)
5. Output Volume Control and Output Jack
• Connects devices for recording lessons
(1)
1
2
3
4
5
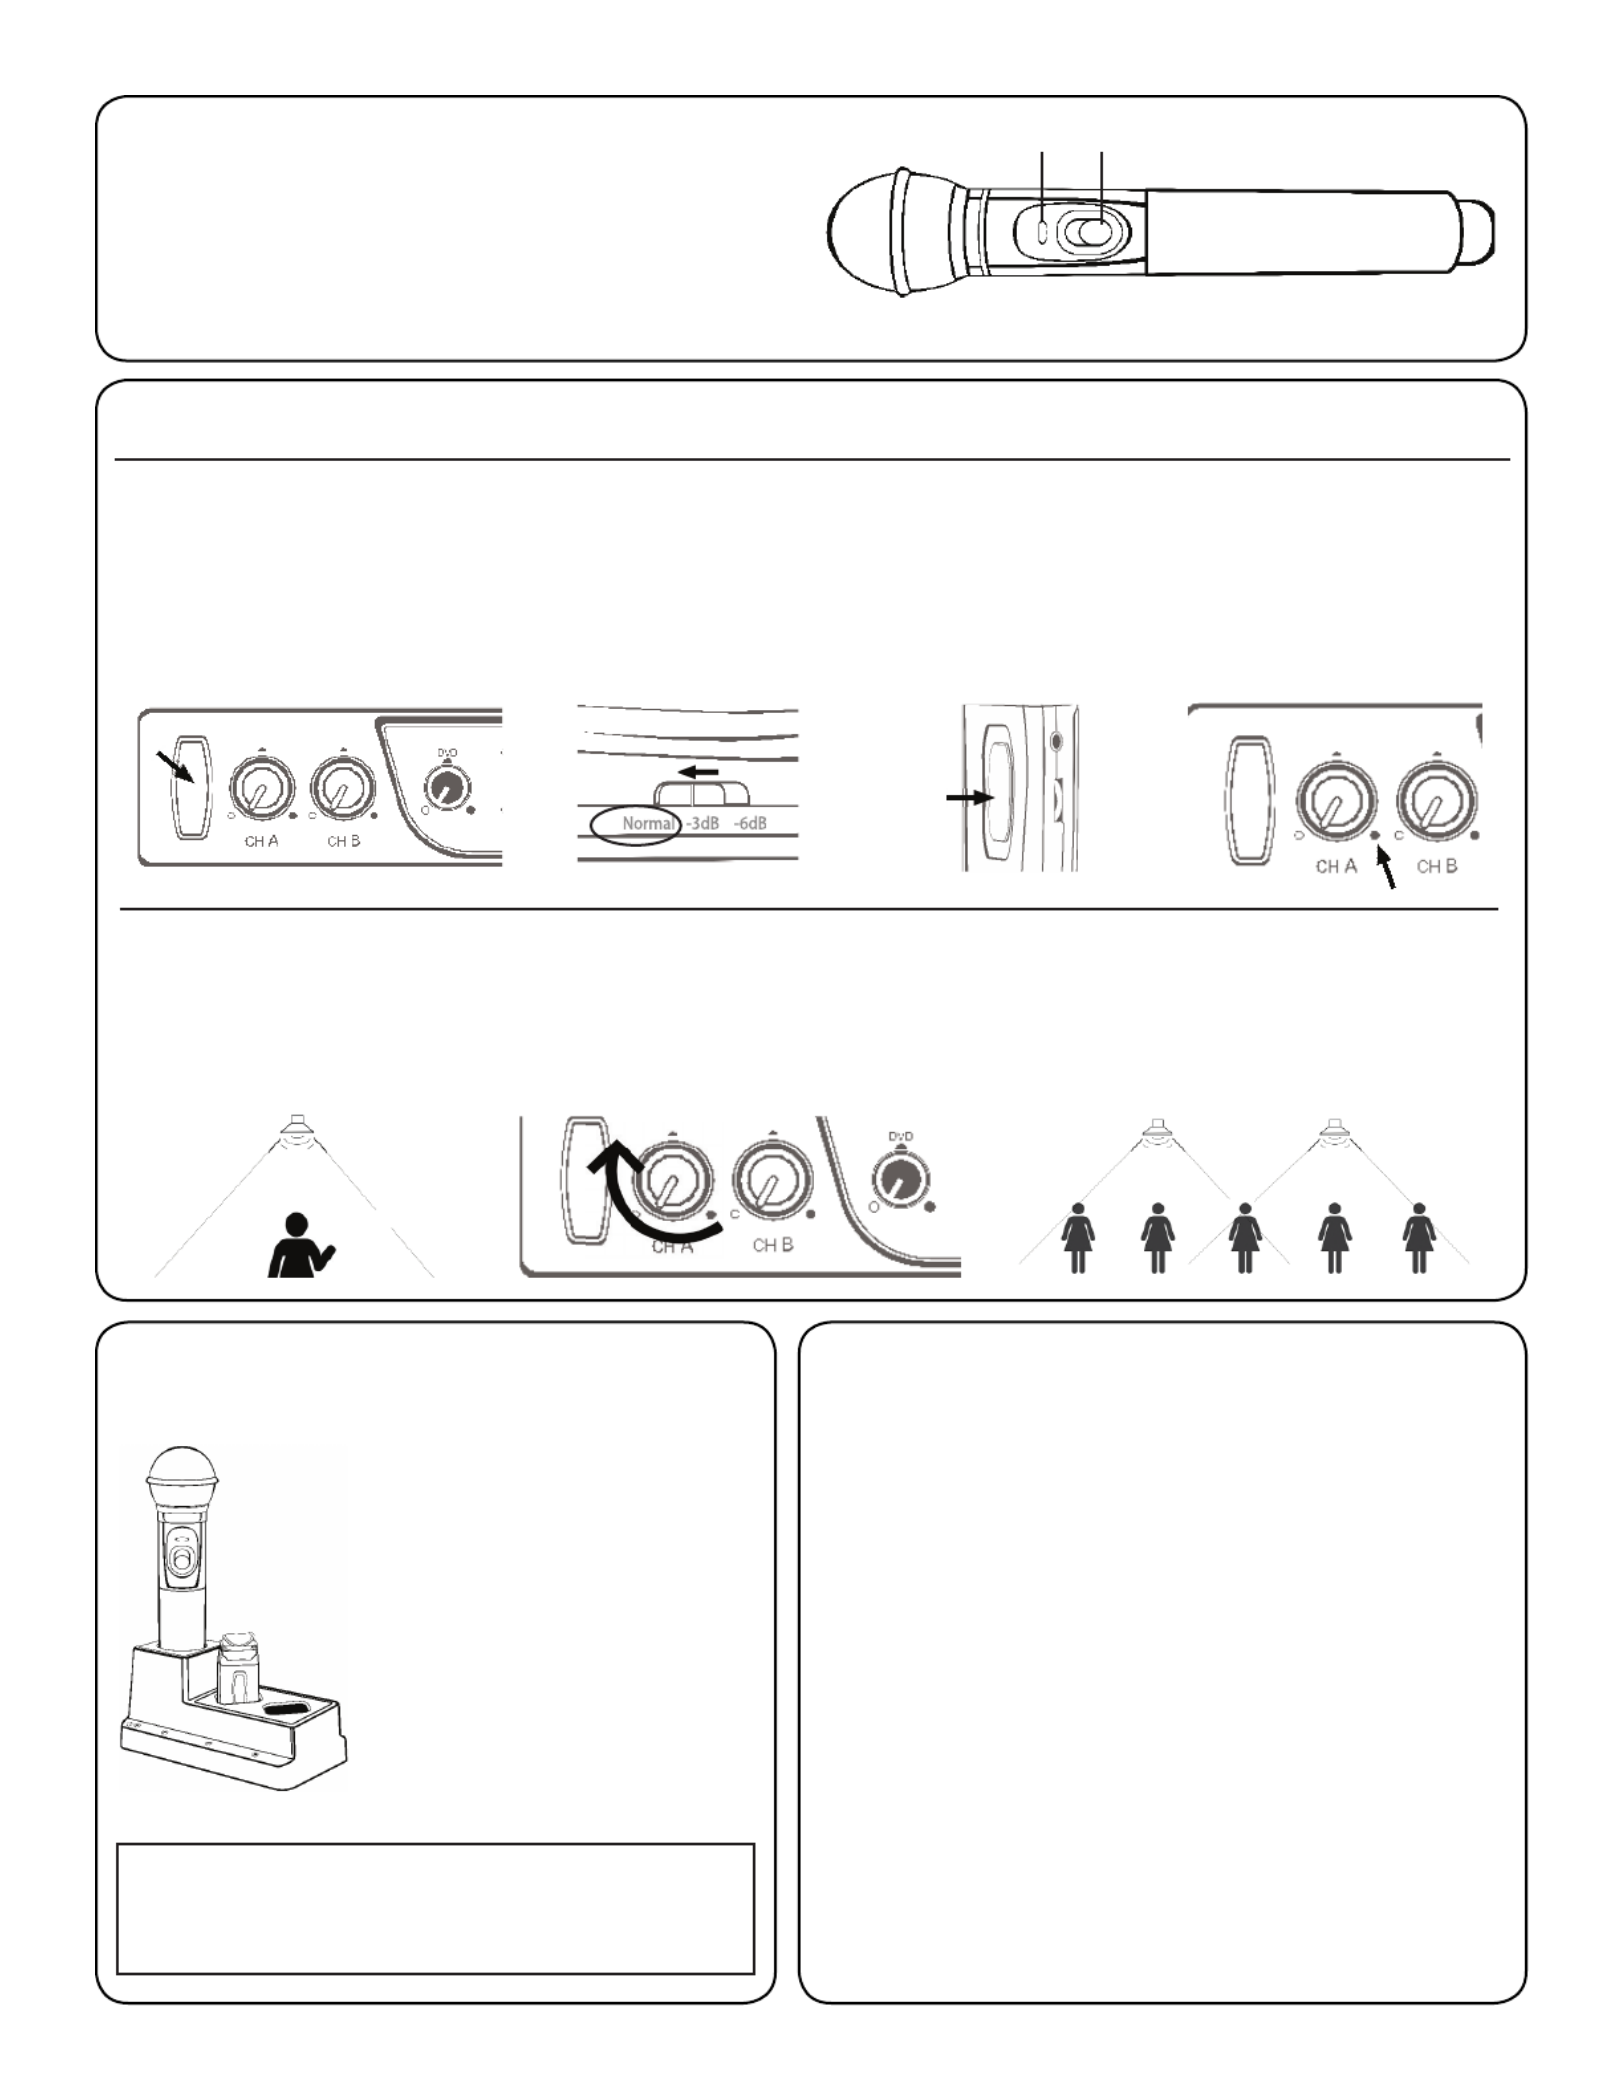
STEP 2. USING THE SAPPHIRETM PENDANT MICROPHONE
1. Power button and status indicator
• Solid Red: OFF
• Solid Blue: ON
• Solid Purple: External devices quieted
2. Mute microphone: Brie y press power button once ( ashing blue).
Unmute microphone: Brie y press power button again (solid blue).
3. Aux Input: Connects devices (like music player) to microphone.
4. Priority Switch: Changes volume of devices plugged into amp inputs
• To increase/decrease volume level: Slide button up or down
• To immediately quiet volume level of external device: Push button once
• To resume volume level of external device: Push button again
5. Activate Security Alert Feature (when available)
• Hold Priority Switch down for 5 seconds. The power light on the amp will ash green,
then return to solid blue.
6. Gain Switch
• There are 3 levels to adjust your microphone volume.
• Set gain at “Normal”. You may reduce the volume by setting it to -3dB or -6bD if your
mic is too loud.
7. Lanyard attachments
• Microphone should rest where your collar bones meet.
8. USB Charge Port (found on the bottom of the mic)
1
2
3
4, 5
8
6
7
STEP 3. USING THE HANDHELD MICROPHONE
(2)
1. ON/OFF switch
2. Battery Level Indicator
• Green: Charged
• Red: Low battery
• Flashing Red: Wrong batteries installed or batteries need replacement
12
STEP 5. CHARGING THE MICROPHONES
Charger Status Indicator
• Blue: ON
• Red: Battery charging
• Green: Charging complete
• Ensure your microphone is fully charged
before its initial use.
• Charging takes approx 6-8 hrs.
• Battery typically lasts 8-10 hrs.
WHEN REPLACING BATTERIES IN THE
HANDHELD MIC, ALWAYS REPLACE
IN PAIRS. ONLY USE RECHARGEABLE
BATTERIES!
Do not force mics into the cradle. Ensure that both the
charger and Sapphire are aligned in the same direction
facing front as shown.
STEP 4. SETTING UP THE MICROPHONES
3. Sapphire Mic: Connect the
lanyard and place around your
neck so the mic sits between your
collar bones. Set the gain switch to
“Normal” position.
4. Turn “ON” the Sapphire
via the front switch;
push and hold for three
seconds.
5. On the amp, check to con rm that
the LED next to CH A volume control
is illuminated green, indicating IR
signal is being received.
1
2
6. Locate yourself directly under a
ceiling speaker.
8. While talking, walk around the room to ensure you
have reception without feedback.
9. Handheld Mic: Repeat this process using CH B to
set the volume.
7. While speaking into the mic, have someone else
slowly increase the volume of CH A. When you begin
to hear a ringing sound (feedback) decrease volume
until it disappears. This is your mic volume setting.
1. Activate the amp by pushing the power
button. The “TL” on the button should be
illuminated blue.
2. Set the CH A and CH B volume controls to
the far counter clockwise position.
STEP 7. TROUBLESHOOTING
1. System is turned on but there is no LED indicator light
• Check if system has been unplugged.
• Verify that electrical outlet is generating power.
2. System has power (LED indicator blue) but no sound
• Make sure microphone is on.
• Ensure the mic signal indicator light is illuminated green.
• Ensure ceiling sensor LED is green. If not, the sensor is not receiving
power.
3. Voice is distorted or sound drops
• Ensure there’s nothing between the mic and ceiling sensor
(mics will not work if placed in pockets, for example).
• Battery charge level may be low. Charge and retest.
4.
Hum
is heard w/computer plugged into Comp/Aux input
• Locate the “COMP ANTI-HUM” switch on the back panel of the amp and
slide to “ON”.
5. Receiver does not “wake up” from standby
• Volume of external device too low when played
• Microphone not on or not working properly
20 0720 22
Product specificaties
| Merk: | TeachLogic |
| Categorie: | Niet gecategoriseerd |
| Model: | Voicelink Plus |
Heb je hulp nodig?
Als je hulp nodig hebt met TeachLogic Voicelink Plus stel dan hieronder een vraag en andere gebruikers zullen je antwoorden
Handleiding Niet gecategoriseerd TeachLogic

20 Februari 2025

20 Februari 2025
20 Februari 2025

7 Mei 2023

18 April 2023

11 April 2023

26 Maart 2023

6 Maart 2023

20 Februari 2023

3 December 2022
Handleiding Niet gecategoriseerd
- Bimar
- Trio Lighting
- Stamony
- Cuisinart
- SilverStone
- Albert Heijn
- Anthem
- AXTRA
- Lantronix
- Emtec
- Gator
- Extralife Instruments
- ZZ-2
- Glasdon
- SkyRC
Nieuwste handleidingen voor Niet gecategoriseerd

14 September 2025

14 September 2025

13 September 2025

13 September 2025

13 September 2025

13 September 2025

13 September 2025

13 September 2025

13 September 2025

13 September 2025