Targus PA095 Handleiding


Lees hieronder de đź“– handleiding in het Nederlandse voor Targus PA095 (2 pagina's) in de categorie Overige computer accessoire. Deze handleiding was nuttig voor 28 personen en werd door 2 gebruikers gemiddeld met 4.5 sterren beoordeeld

Pagina 1/2
Microsoft, Windows and Windows Vista are either registered trademarks or trademarks of Microsoft Corporation in the United States and/or other countries.
All trademarks and registered trademarks are the property of their respective owners. Features and specifications are subject to change without notice.
All rights reserved. © 2007, Targus Group International, Inc. and Targus, Inc. PA095U / 410-0210-001B
Congratulations on your purchase of the Targus Mobile Docking Station with Ethernet USB
2.0. This ultra portable expansion moduie directly connects to a desktop or notebook computer
via a Universal Serial Bus (USB) port.
In addition to this user’s guide, the package contains:
• Targus Mobile Docking Station with Ethernet USB 2.0
• CD-ROM Driver
• AC power adapter
NOTE: THE SUPPLIED AC POWER ADAPTER IS A UNIVERSAL ADAPTER THAT YOU CAN USE IN A 100 TO 240 AC VOLT OUTLET.
• USB 2.0 compliant port (When connected to a USB v1.1 upstream port,
the Mobile Docking Station with Ethernet USB 2.0 will be less than
optimal. For best results, connect it to a USB 2.0 port)
• Windows® 2000/XP/Vista™ operating system
WARNING: YOU MUST INSTALL THE MOBILE DOCKING STATION’S SOFTWARE BEFORE CONNECTING IT TO YOUR COMPUTER. OTHERWISE, THE MOBILE
DOCKING STATION WILL NOT WORK PROPERLY.
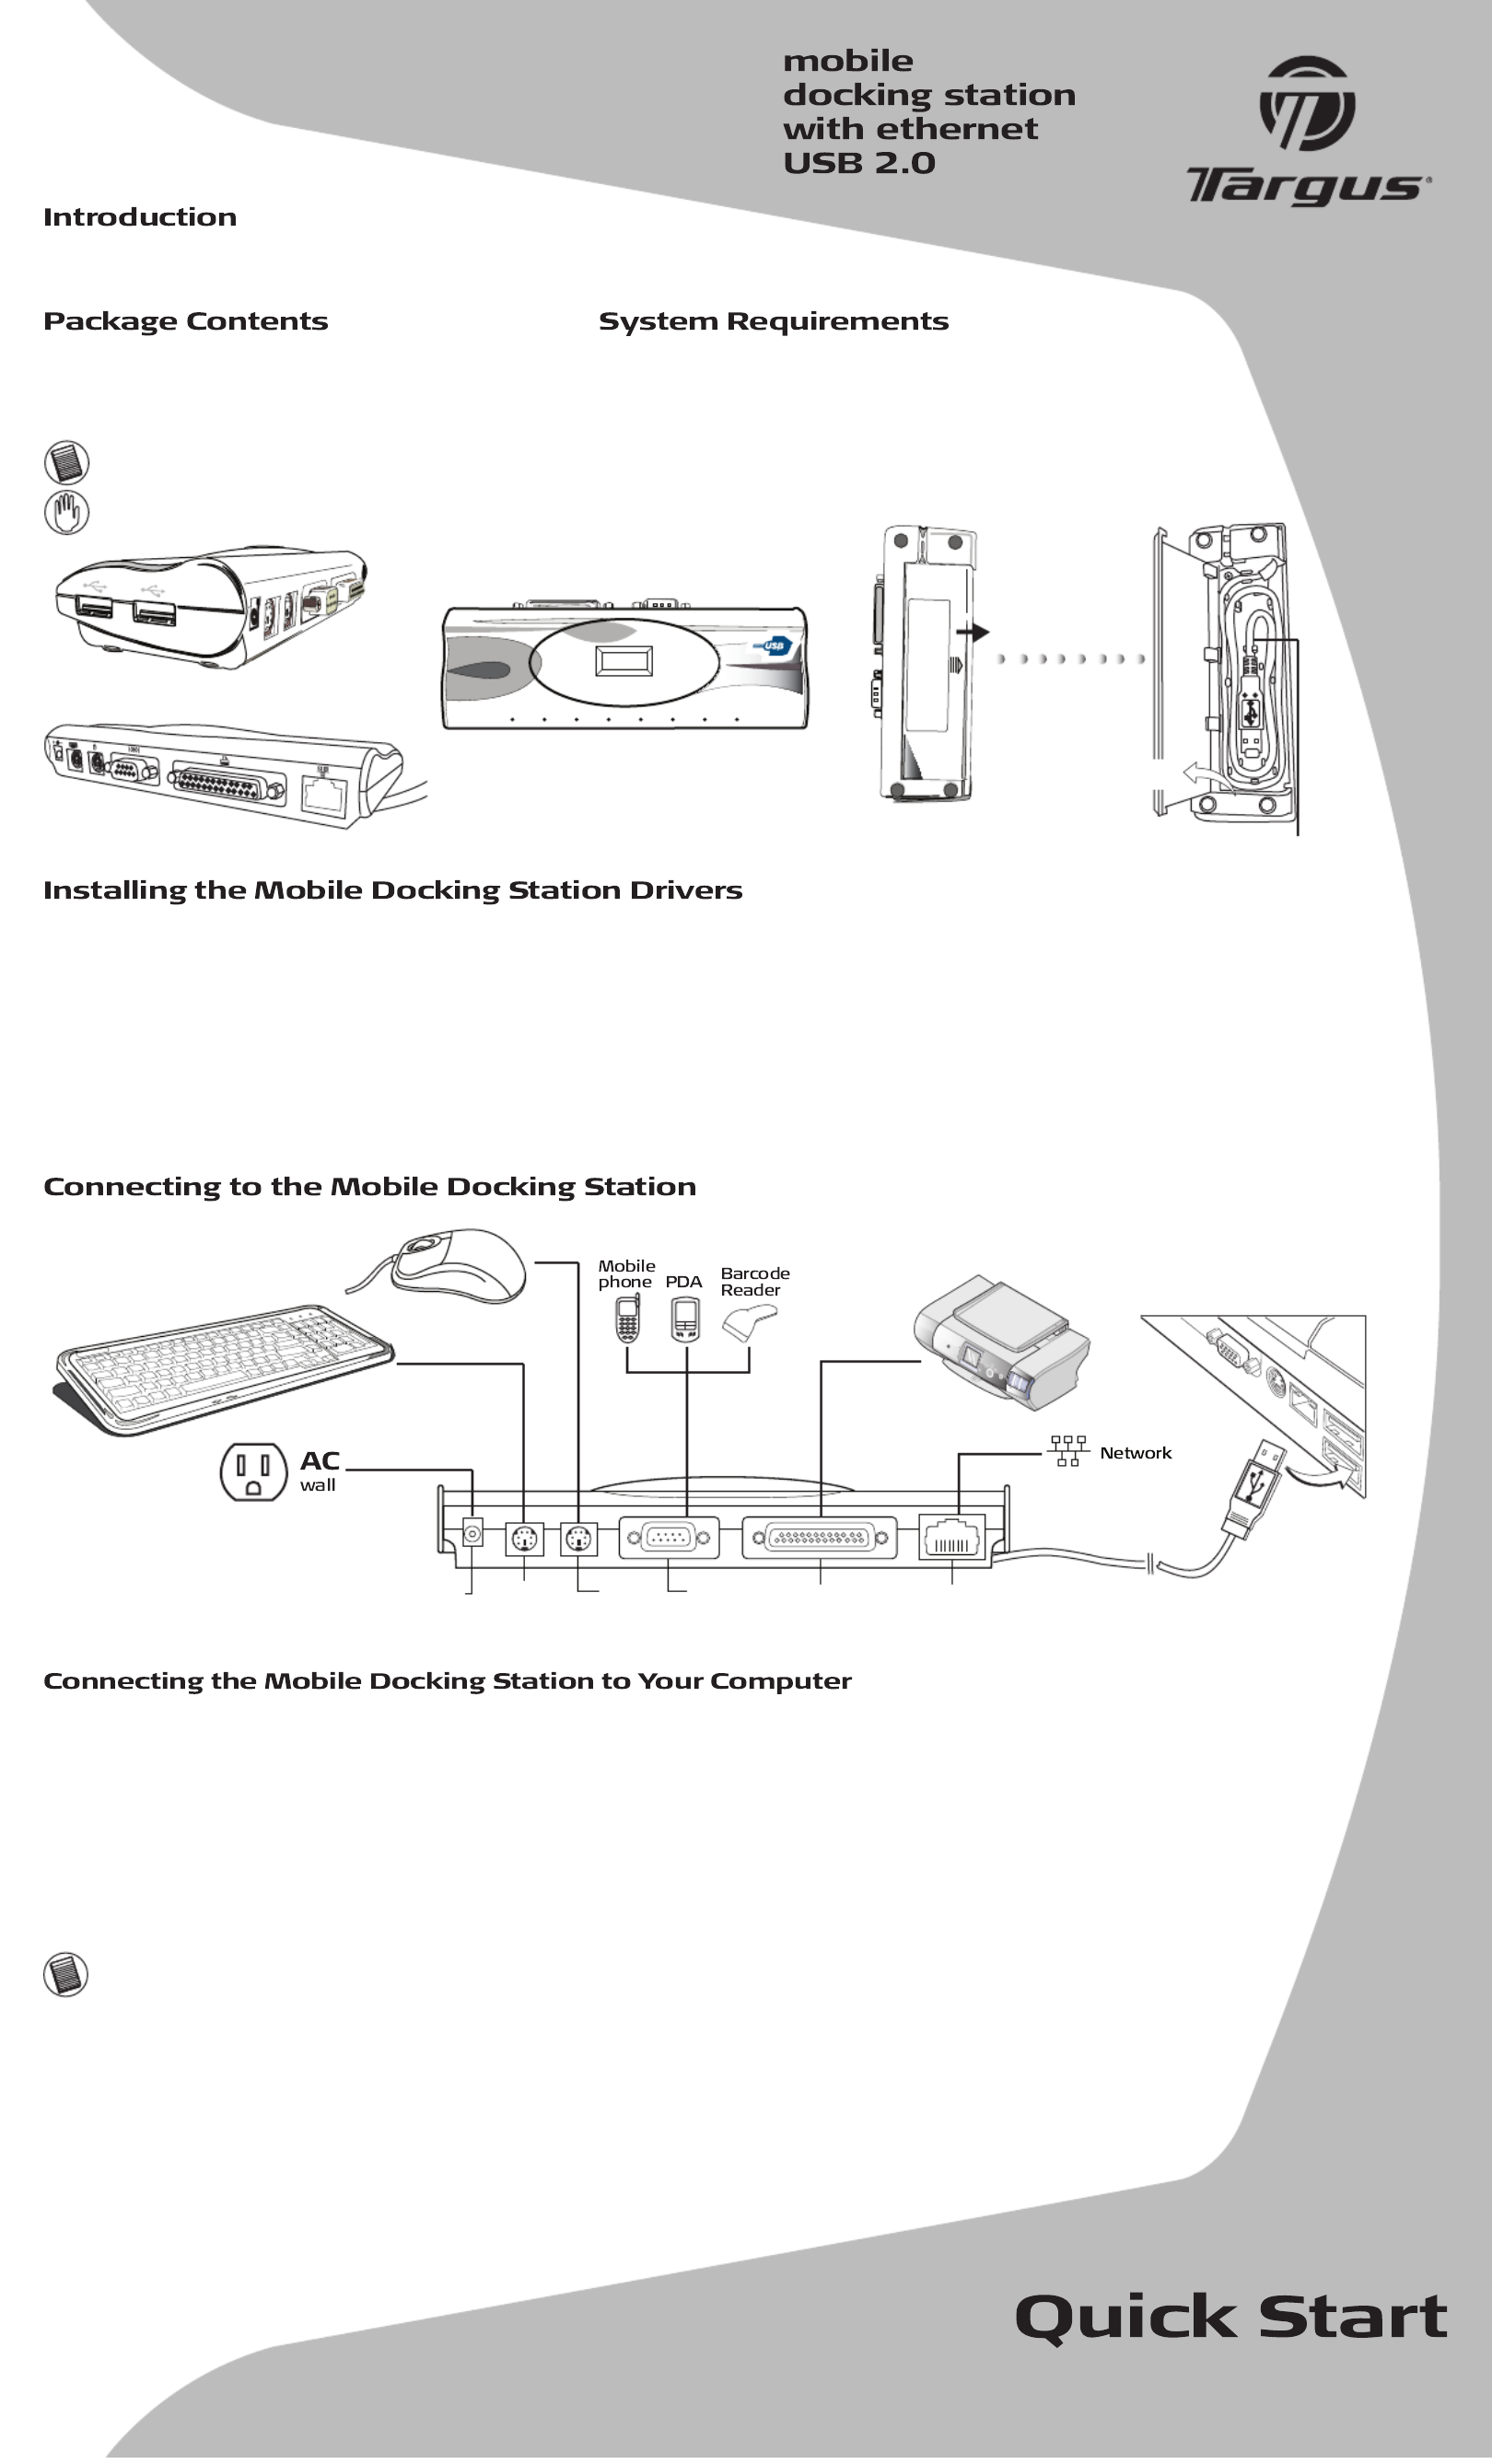
Side View
Back View
Push Out
Bottom View
1. Turn on your computer.
2. Insert the driver software CD into your computer’s CD-ROM drive.
3. If setup does not begin automatically, click , Then enter (where Start, Run D:\Setup.exe D: is the path of your CD-ROM drive) and then click . The OK
Welcome Screen appears.
4. Click .Next
5. If you are running the Windows® XP operating system, the Important Information screen appears. Click Next.
The Setup program begins installing the software driver.
The Setup Complete Screen appears.
6. Click .Finish
7. Restart your computer.
After installing the mobile docking station drivers, you are ready to connect the mobile docking station to your computer. To do this:
1. Open the USB cable compartment, located on the bottom of the mobile docking station, and uncoil the cable.
2. Connect the supplied AC power adapter to the DC jack on the mobile docking station, and the AC power plug to the wall outlet.
3. Plug the USB connector end of the USB cable into the USB port of your computer.
The following will configure automatically:
• Ethernet 10/100 • Serial Interface Controller • USB Device (twice)
• Parallel Interface Controller • PS/2 Adapter (twice)
This configuration process takes a few minutes. The operating system does not prompt when configuration is complete. Watch that all hardware
devices are configured before opening another application or connecting devices to the mobile docking station.
Open
USB connect to computer
Hub Link Tx/Rx 100M Serial PS/2(1) PS/2(2) USB(1) USB(2)
Top Front View
NOTE: SOME HARDWARE DEVICES MAY PROMPT YOU FOR THE LOCATION OF DEVICE DRIVERS.
To install the drivers:
1. Select “Install the software automatically (Recommended)” and click .Next
The Found New Hardware Wizard program begins installing the hardware drivers.
The Completing the Found New Hardware Wizard screen appears.
2. Click and repeat as needed for each device.Finish
3. Restart your computer.
When your computer restarts, the mobile docking station should be completely configured.
DC PS/2
keyboard
PS/2
mouse
RS232 Parallel RJ-45
ethernetSerialjack
2953
For technical questions, please visit:
Internet: www.targus.com/support.asp
Internet: www.targus.com/au Email: infoaust@targus.com Telephone: 1800-641-645
Telephone: 0800-633-222
Targus recommends that you register your Targus accessory shortly after purchasing it. To register your Targus accessory, go to: http://www.targus.com/registration.asp
You will need to provide your full name, email address, phone number, and company information (if applicable).
Targus warrants this product to be free from defects in materials and workmanship for one year. If your Targus accessory is found to be defective within that time, we will promptly repair or
replace it. This warranty does not cover accidental damage, wear and tear, or consequential or incidental loss. Under no conditions isTargus liable for loss of, or damage to a computer; nor loss
of, or damage to, programs, records, or data; nor any consequential or incidental damages, even if Targus has been informed of their possibility. This warranty does not affect your statutory
rights.
This device complies with Part 15 of the FCC Rules. Operation issubject to the following two conditions: (1) This device may notcause harmful interference, and (2) This device must accept any
interference received, including interference that may cause undesired operation.
This equipment has been tested and found to comply with the limits of a Class B digital device, pursuant to Part 15 of the FCC Rules. These limits are designed to provide reasonable protection
against harmful interference in a residential installation. This equipment generates, uses, and can radiate radio frequency energy and if not installed and used in accordance with the instructions,
may cause harmful interference to radio communications. However, there is no guarantee that interference will not occur in a particular installation.If this equipment does cause harmful
interference to radio ortelevision reception, which can be determined by turning the equipment off and on, the user is encouraged to try to correct the interference by one or more of the
following measures:
• Reorient or relocate the receiving antenna;
• Increase the separation between the equipment and receiver;
• Connect the equipment into an outlet on a circuit different from that to which the receiver is connected;
• Consult the dealer or an experienced radio/TV technician for help;
Changes or modifications not authorized by the party responsible for compliance could void the user’s
authority to operate this product.
The LED status indicator lights glow when devices are connected or there are activity on the port.
Hub Link Tx/Rx 100M Serial PS/2(1) PS/2(2) USB(1) USB(2)
Top Front View
The LED Lights will glows green when devices are connected
or there is activity on the port
Before connecting new devices to the mobile docking station, you need to install the docking station driver. Consider the following
guidelines:
• Install the docking station driver automatically, and reboot the computer.
• Connect a new device to the mobile docking station, then plug the USB plug of Docking Station to the computer.
• When connecting a device to the mobile docking station do not force the cable connector into the port on the mobile docking station, to
avoid possible damage. If the cable connector does not attach smoothly, turn the connector over and try attaching it again.
• Your computer will automatically recognize the new device.
To connect a PS/2 device, such as a mouse or keyboard, plug it into a PS/2 port on the mobile docking station and begin using the device.
After the docking station’s driver is installed, just plug the serial device (e.g. serial barcode reader) to the docking station. Then insert the USB plug
of the docking station to your computer. The computer will automatically detect the serial device.
After the installation of docking station’s driver to computer, just plug the parallel device to the docking station. Then insert the USB plug of the docking
station to the computer. Your computer will automatically detect and recognize the device and the software driver. Then follow the steps below:
1. Select Add Printer.
2. Uncheck “Automatically detect & install my Plug and Play printer” in Add Printer Wizard window.
3. Click .Next
4. Select “USB00X” where is the USB port number assigned by your operating system for Virtual Printer Port for USB.X
5. Click .Next
6. Choose the printer model from the list accordingly.
7. Click when the completion screen prompted.Finish
To connect an RJ-45 Ethernet cable, attach the cable connector to the Ethernet port on the mobile docking station. Additional procedures to connect to an
actual network depend on the type of network you are using. Contact your network administrator for detailed instructions.
To connect a USB device, plug it into a USB port on the mobile docking station and follow the additional instructions provided with the device.
When your computer is in suspend mode, the mobile docking station also enters suspend mode to avoid power consumption. When your computer
wakes up, the mobile docking station wakes up automatically.
NOTE: THE ETHERNET PORT IS COMPATIBLE WITH 100Mbps NETWORKS. HOWEVER THE ACTUAL
THROUGHPUT IS 10Mbps MAXIMUM WHEN CONNECTED TO A USB V1.1 PORT DUE TO THE
BANDWIDTH LIMITATION. THE THROUGHPUT MAY DECREASE AS ADDITIONAL DEVICES ARE
ATTACHED TO THE MOBILE DOCKING STATION IS ATTACHED TO A USB 1.1 OR 2.0 PORT. THE
MOBILE DOCKING STATION SUPPORTS HOT SWAPPING OF THE NETWORK CABLE.
You can view devices installed on the mobile docking station from the Device Manager window in System Properties.
1. Go to Start, Control Panel, System and .
2. Select the Hardware tab.
3. Click Device Manager.
4. Search under the category of Universal Serial Bus Controllers.
• Make sure that the device is fully inserted into the correct port on the mobile docking station.
• Plug the device into a diffferent port on the mobile docking station. If it still doesn’t work, test the device by connecting it directly to your computer.
• Verify that you ran the Setup or Install program for the device.
• Make sure that the device appears in Device Manager. For more information refer to “Verifying Devices are Installed.”
• Disconnect all devices from the mobile docking station and reconnect them, one at a time. Check that each device works before plugging in the next one.
If your parallel printer is not working, please refer to the instructions on “Parallel Port - Adding a Printer.”


Product specificaties

Merk: Targus
Categorie: Overige computer accessoire
Model: PA095
Kleur van het product: Zwart
Ethernet LAN: Ja
Aantal USB 2.0-poorten: 2
Aantal Ethernet LAN (RJ-45)-poorten: 1
Certificering: FCC, CE
Interface: USB
Compatibele besturingssystemen: Windows 2000, XP
Afmetingen (B x D x H): 23 x 171.5 x 57 mm
PS/2 poort(en): 2
Parallelle poort(en): 1

Heb je hulp nodig?

Als je hulp nodig hebt met Targus PA095 stel dan hieronder een vraag en andere gebruikers zullen je antwoorden


Handleiding Overige computer accessoire Targus

Handleiding Overige computer accessoire

Nieuwste handleidingen voor Overige computer accessoire