TAMA Rhytm Watch RW200 Handleiding
TAMA Muziekinstrument Rhytm Watch RW200
Bekijk gratis de handleiding van TAMA Rhytm Watch RW200 (8 pagina’s), behorend tot de categorie Muziekinstrument. Deze gids werd als nuttig beoordeeld door 25 mensen en kreeg gemiddeld 4.0 sterren uit 6 reviews. Heb je een vraag over TAMA Rhytm Watch RW200 of wil je andere gebruikers van dit product iets vragen? Stel een vraag
Pagina 1/8
用户手册
中国语
为确保安全操作,请务必在使用前阅读本使用说明书。阅读后请妥善保管,以便在需要时阅读。
安全注意事项==请务必遵守==
为正确使用本设备,下面对需要遵守的事项进行分类说明。
■
忽视指示内容因错误操作产生的危害或损坏程度使用下述标识进行分类说明。
警告
本指示栏表示“可能导致人员死亡或重伤等危险”。
注意
本指示栏表示“可能导致受伤或物品损坏”。
■
使用下述图片标识对要遵守的内容种类进行分类说明。
…本图片标识表示必须采取的“强制”事项。
…本图片标识表示不可做的“禁止”事项。
…
本图片标识表示需要小心的“注意”事项。
警告
切勿分解或改装设备
出现异常时,请停用设备
·冒烟或发出异常的气味和声音时,请立即停用设备。
·请立即从插座上拔下AC适配器。
散热注意事项
·请勿用布、被子等覆盖或包裹AC适配器。
《热量残留可能导致盒子变形或造成火灾。》
请勿用湿手操作。《否则可能导致短路或触电。》
注意
不可使用指定外的AC适配器
·请务必使用指定的AC适配器。
《使用指定外的AC适配器可能导致火灾或触电。》
正确拔插电源插头
·请勿用湿手拔插AC适配器。 《否则可能导致触电。》
·要从插座上拔下AC适配器时,请务必抓住AC适配器本体。
《若拉扯电线部分,可能导致电线损坏、火灾或触电。》
严禁水、湿气、灰尘、高温
·请勿在浴室或室外等有水的地方、湿度高的地方、灰尘多的地方、温度高的地方保管或使用。《否则可能导
致火灾、触电或设备故障。》
请勿保存在振动多的地方《否则可能会造成故障。》
长时间不使用时
·长时间不使用设备时,请从插座上拔下AC适配器,以确保安全。
《否则可能导致火灾。》
适当调节音量
·请勿长时间使用大音量。 《否则可能导致听力衰减。》
不可对设备过度施力,或使其掉落、受到强力撞击
《否则可能导致设备故障或人员受伤。》
不可在修理时使用稀释剂和酒精
《否则可能会造成故障。》
===== 使用电池的商品请遵守以下指示 =====
警告
不可将电池扔入火中。《否则可能导致破裂、发热或起火。》
注意
按+/-方向正确安装电池。《否则可能会造成故障。》
长时间不使用电池时,请将其取出。
《否则设备可能因电池漏液出现故障。》
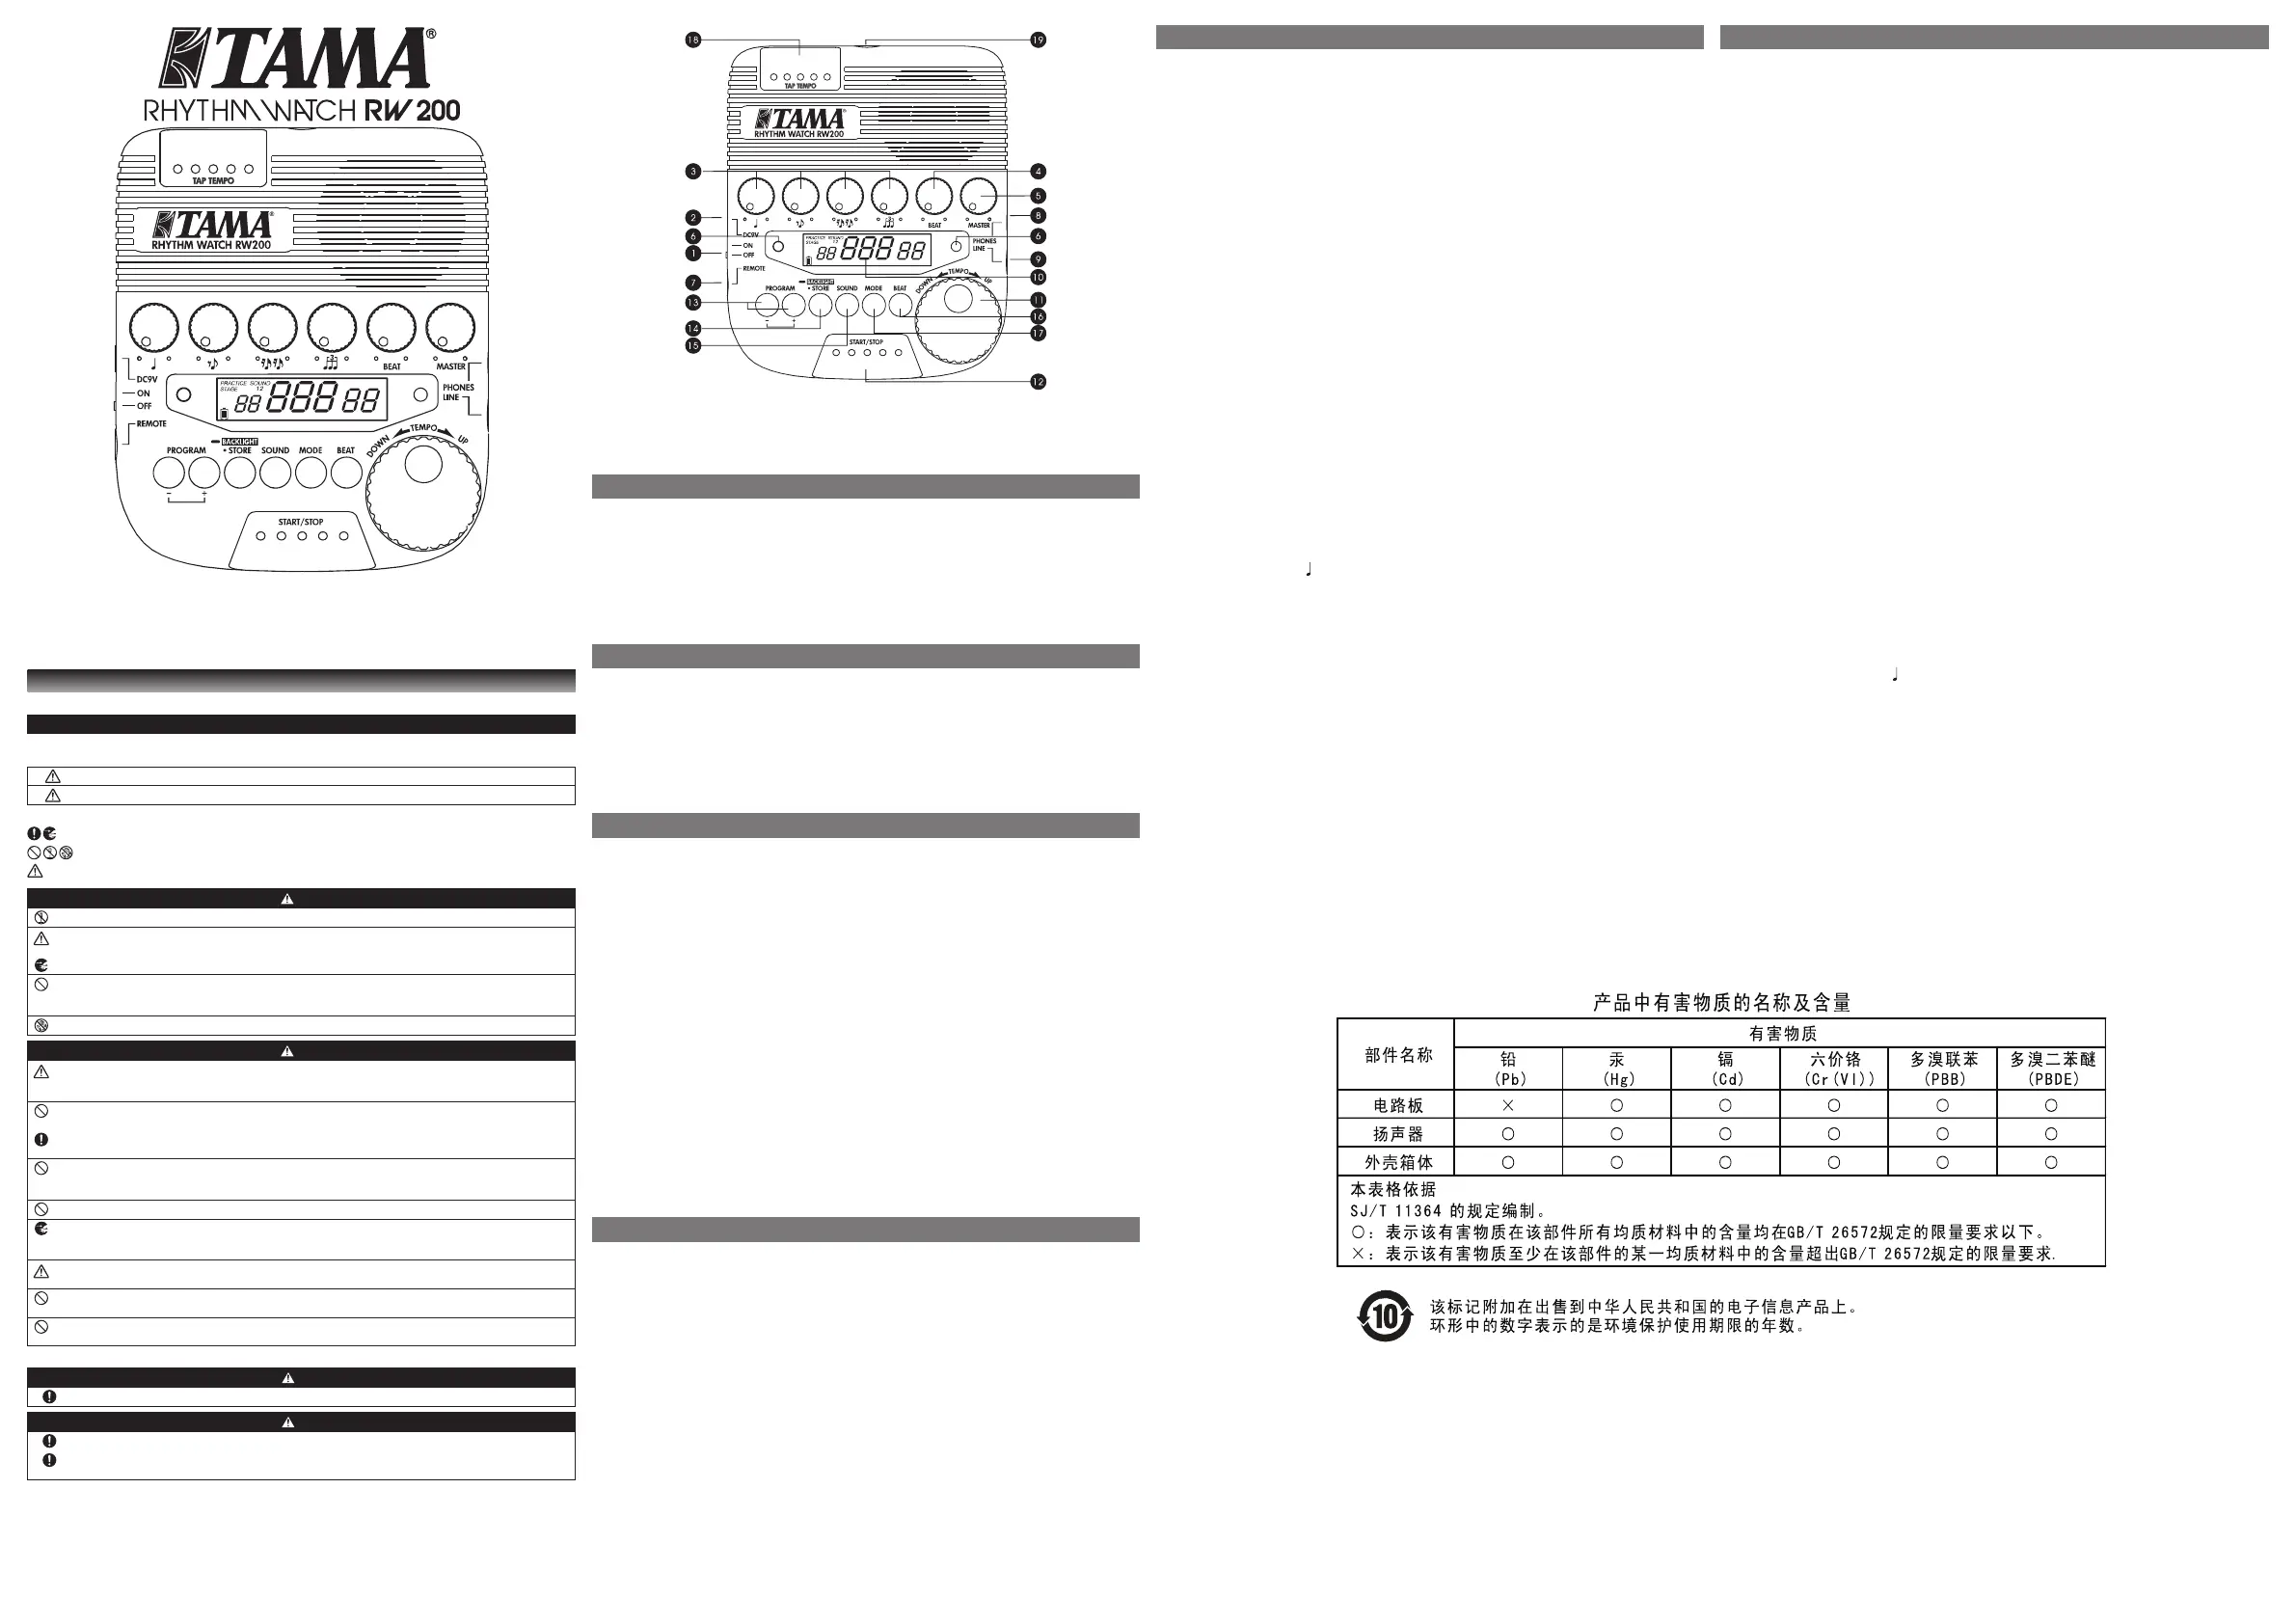
各部件的名称和功能
a
POWER 开关
此开关用于打开或关闭电源。
b
DC IN 插孔
此插孔用于连接 AC 电源适配器。
c
RHYTHM 旋钮
这些旋钮用于控制各种声音之间的音量平衡。
d
BEAT 旋钮
此旋钮用于控制节拍声音的音量。首个节拍会发出鸣响。如果节拍设置为 0,则不会产生节拍
声音。
e
MASTER 旋钮
此旋钮用于控制整体音量。
f
TEMPO LED 指示灯
左侧 LED 指示灯将在首个节拍时闪烁红色。从第二个节拍起,右侧 LED 指示灯将闪烁绿色。
如果节拍设置为 0,则右侧 LED 指示灯也将在首个节拍时闪烁绿色。如果节拍设置为 1,则
只有左侧 LED 指示灯闪烁红色。
g
REMOTE 插孔
此立体声插孔用于连接脚踏开关。尖端被分配用于 START/STOP,环被分配用于程序编号的
递增。我们建议使用 IBANEZ IFS2U 双脚踏开关,左侧开关被分配用于 START/STOP,右
侧开关被分配用于程序编号的递增。
如果您使用的是单脚踏开关,则该开关将被分配用于 START/STOP。
h
PHONES 插孔
此为立体声迷你耳机插孔。当连接耳机时,RW200 的扬声器将不会发出声音。
i
LINE 插孔
此插孔为 1/4” 单声道插孔,输出线路电平信号。可连接放大器或有源监听音箱等设备。连接
后,RW200 的扬声器和 PHONES 输出不会发出声音。
j
LCD 显示屏(液晶显示屏)
显示屏将显示所设置的“PRO-GRAM”、“SOUND”、“MODE”、“BEAT”以及“TEMPO”参数。
还会显示电池的剩余电量。
k
TEMPO 拨盘
该拨盘用于将拍速控制在
=30 ~ 250/分钟。
l
START/STOP 键
该键用于启动和停止节拍器。
m
PROGRAM 键
这些按键用于载入编程设定。您可以以 1 为增量增加/减小程序编号。
n
BACKLIGHT/STORE 键
此键用于将 LCD 显示屏上所显示的参数设置(MODE 设置除外)存入所显示的程序编号。
按住此键约 2 秒钟,可以启用或禁用 LCD 显示屏的背光。
o
SOUND 键
该键用于选择声音,声音可为 SOUND 1 或 SOUND 2。
p
BEAT 键
该键可在 0 到 9 拍的范围内设置节拍。每按一次 BEAT 键就将增加一拍。
q
MODE 键
此键用于在 PRACTICE 模式和 STAGE 模式之间进行选择切换。
r
TAP TEMPO 键
当按下此键至少 5 次后,将开启打拍定速功能并自动测量拍速。
s
安装螺母 (M6)
您可以使用多功能钳将 RW200 连同带有 M6 螺纹的支架一起,安装在鼓架上。
操作
编程功能的操作
RW200 可以储存多达 30 个节拍、声音及拍速的程序编号。
1. 使用 PROGRAM 键或是可选的 REMOTE 脚踏开关,显示所需的程序编号以储存节拍或
拍速。
2. 设置节拍、声音及拍速。
3. 检查 LCD 显示屏上显示的内容,然后按下 STORE/LIGHT SET 键。此时,两个 LED 指
示灯将同时闪烁红色,表示程序已经储存。
节拍器操作 – PRACTICE 模式
此为默认模式,选择此模式后节拍器即按照练习模式工作。
1. 按下MODE键并选择 PRAC-TICE模式。
2. 按下SOUND键,然后选择 SOUND 1或SOUND 2。
SOUND 1与SOUND 2具有不同的声音,因此请根据使用环境来选择合适的模式。
(SOUND 1 的声音具有更强的冲击力,而 SOUND 2 的声音则比较柔和。)
3. 使用 TEMPO 拨盘设置拍速,以及使用 BEAT 键设置节拍。若要载入编程设定,可使用
PROGRAM 键或是 REMOTE 脚踏开关调出所需的程序编号。
4. 将各个控制旋钮调整到合适的位置。
5. 按下 START/STOP 键,启动节拍器。启动后扬声器会传出声音,LED 指示灯开始闪烁。
6. 听到声音传出后,可以调整音符的平衡、节拍音量以及整体音量。
7. 再次按下START/STOP键,停止节拍器。
节拍器操作 – STAGE 模式
按照舞台现场所表演的节目单的准确顺序,预先设定好每首歌曲的拍速、节拍及声音,当您以
预备拍开始歌曲时,此模式将助您一臂之力。
1. 按下 MODE 键并选择 STAGE 模式。
2. 调出第一首歌曲的程序。
3. 按下 START/STOP 键,启动节拍器。启动后扬声器会传出声音,LED 指示灯开始闪烁。
4. 奏响 8 个小节后,节拍器将自动停止,程序编号会增加 1,节拍器将处于待机状态。
5. 次按下 START/STOP 键,均将重复上述的步骤 3 - 4。
打拍定速功能的操作
打拍定速功能够测量任何所需的拍速,并将此拍速应用到节拍器。
1. 使用以下节奏按下 TAP TEMPO 键,输入拍速。在拍打了 5 次时,将显示测量出的拍速。
2. 当您拍打 6 次及以上次数时,设备将显示最后 4 次拍打的平均拍速。
3. 如果您持续约 2.5 秒未按下 TAP TEMPO 键,则将结束拍速测量,拍速值将在 LCD 显示
屏上闪烁。
4. 如果测量出的拍速超出了
=30 ~ 250/分钟的范围,则将显示错误消息。如果拍速低于
30,则将显示消息“Lo”,且拍速会自动设置为 30。如果拍速高于 250,则将显示消息“Hi”,
且拍速会自动设置为 250。
恢复出厂设置
按下 BACKLIGHT/STORE 键的同时打开电源。
感谢您购买 Rhythm Watch RW200。在使用产品前,请仔细阅读本手册以充分利用
其各种特性及功能,并妥善保存本手册以备日后参考。
特性
Rhythm Watch RW200 是一款可广泛应用于各种音乐活动的节拍器,无论是日常练
习还是现场表演都能应对自如。为了实现快速准确的操作,本款节拍器专门增大了常用
的控键与显示屏。
主要功能包括:
•
Stage 模式 - 适用于现场表演
•
编程功能 - 可记录多达 30 首歌曲的节拍、拍速和声音。
•
独立的 Tap 键– 打拍定速
注意事项
* 避免使 RW200 受到撞击,请勿跌落或粗暴对待本设备。
* 在存放 RW200 之前,请关闭电源。
* 请勿在阳光直射、高温或潮湿的环境中使用或存放 RW200,这可能导致 RW200 发
生故障或是永久性损坏。
* 请勿使用稀释剂、苯或其他类似溶剂进行清洁 RW200。
* 可使用一节 9V 电池 (S-006P) 或一个 AC 电源适配器 (DC9V center minus) 作为
本设备的电源。请勿使用任何其他类型的电源。
更换电池
当 LCD 显示屏和 LED 指示灯变暗、声音变小时,意味着电池即将耗尽。当 LCD 显示
屏上的电量指示条消失时,设备的性能表现将迅速下降。请立即更换电池。注意:大量
使用背光将加快电池消耗。
电池更换步骤
1. 按图中箭头所示的方向滑动 RW200 背面的电池盖,取下电池盖。
2. 取出旧电池并放入新电池。
3. 按所示箭头的相反方向滑动电池盖,将电池盖装回原位。
* 在更换电池或连接 AC 电源适配器前,请务必确保已关闭电源开关。
* 更换电池后,请打开电源进行检查以确保 RW200 工作正常。
自动关机功能
RW200 具有自动关机功能,以避免不必要的电量消耗。RW200 在开机后,如果一个
小时之内无任何操作,将自动关机。再次打开电源时,请先将电源开关滑动到关闭位置,
然后打开。自动关机功能将在下列情况下禁用:打开电源的同时按下 START/STOP 键。
LCD 屏幕将首先显示“OFF”。继续按住该键,直至出现正常的显示屏幕。自动关机功
能现在处于禁用状态,直至关闭本设备的电源。关闭电源后,默认的自动关机功能将重
新生效。
内存备份
RW200 内置了闪存设备,可以在无电源的情况下半永久性地保存编程设定。
使用背光
1. 当您操作 POWER 开关、控制旋钮/开关或 TEMPO 拨盘时,将打开背光,其亮起
时间将在最后一次操作后持续约 10 秒钟。
2. 在上述情况下,默认启用背光 。如无需使用背光,可按 BACKLIGHT/STORE 键约
2 秒钟以禁用背光。再次按下 BACKLIGHT/STORE 键约 2 秒钟或是在关闭电源之
后,背光将恢复为默认启用状态。
COPYRIGHT 2016 PRINTED IN CHINA
SEP161059
Product specificaties
| Merk: | TAMA |
| Categorie: | Muziekinstrument |
| Model: | Rhytm Watch RW200 |
Heb je hulp nodig?
Als je hulp nodig hebt met TAMA Rhytm Watch RW200 stel dan hieronder een vraag en andere gebruikers zullen je antwoorden
Handleiding Muziekinstrument TAMA

4 Augustus 2025
4 Augustus 2025
4 Augustus 2025
4 Augustus 2025
Handleiding Muziekinstrument
Nieuwste handleidingen voor Muziekinstrument
23 Juni 2026
15 Juni 2026
5 Mei 2026
6 April 2026
6 April 2026
3 April 2026
1 April 2026
1 April 2026
30 Maart 2026
1 Februari 2026