TAMA Rhythm Watch RW200 Handleiding

TAMA Niet gecategoriseerd Rhythm Watch RW200

Bekijk gratis de handleiding van TAMA Rhythm Watch RW200 (4 pagina’s), behorend tot de categorie Niet gecategoriseerd. Deze gids werd als nuttig beoordeeld door 4 mensen en kreeg gemiddeld 4.4 sterren uit 2.5 reviews. Heb je een vraag over TAMA Rhythm Watch RW200 of wil je andere gebruikers van dit product iets vragen? Stel een vraag

Pagina 1/4
OWNERS MANUAL
扱説
MODE DEMPLOI
BEDIENUNGSANLEITUNG
MAMUALE DI ISTRUZIONI
MANUAL DEL USUARIO
安全上のご注意
してください。
表示について
品を安全にしくお使いいただき、あなたや他の人への危害や財産への
のようになっています。
警告
この表示無視してった取りをする人が
または傷をう可性が想定される内容記載されてい
ます。
注意
この表示無視して、た取りいをすると、人が傷害
った物的損害の発生が想定される内容が記載れてい
ます
絵表示の例
号は禁止(行ってはいけない行為であることを告げるも
のです。図の中やくに具体禁止左図の場合は分解禁止)
かれています。
号は強制必ず実してしいしたり指示する内容がある
ことを告げるものです。図の中やくに具体為(左図の場合
は差みプラグをコンセントからいてくださいかれていま
す。
以下の指示を必ず守って下さい。
警告
この器を分・修改造しない。故障・ショートの原因になり
ます。
水滴のついた手で、作をしない。ショートの恐れがあります。
電池の中に入れない。破裂発熱発火の恐れがあります。
注意
電池は⊕⊖をしく装着する。故障の原因になります。
のような場所での使や保存はしない。故障の原因になります。
度が極端い場所(直光の当たる場所、器のく、
発熱する器の上など
水気(風呂場、洗面台、れた床など湿度のい場所
動の多い場所
電池長時間使しないときは外す。漏液等故障の原因になりま
す。
スイッチや体に無理力を加えたり、としたり、強くぶつけた
りしない。故障・けがの原因になります。
お手入れにはシンナー・アルコールは使しない。
故障の原因になります。
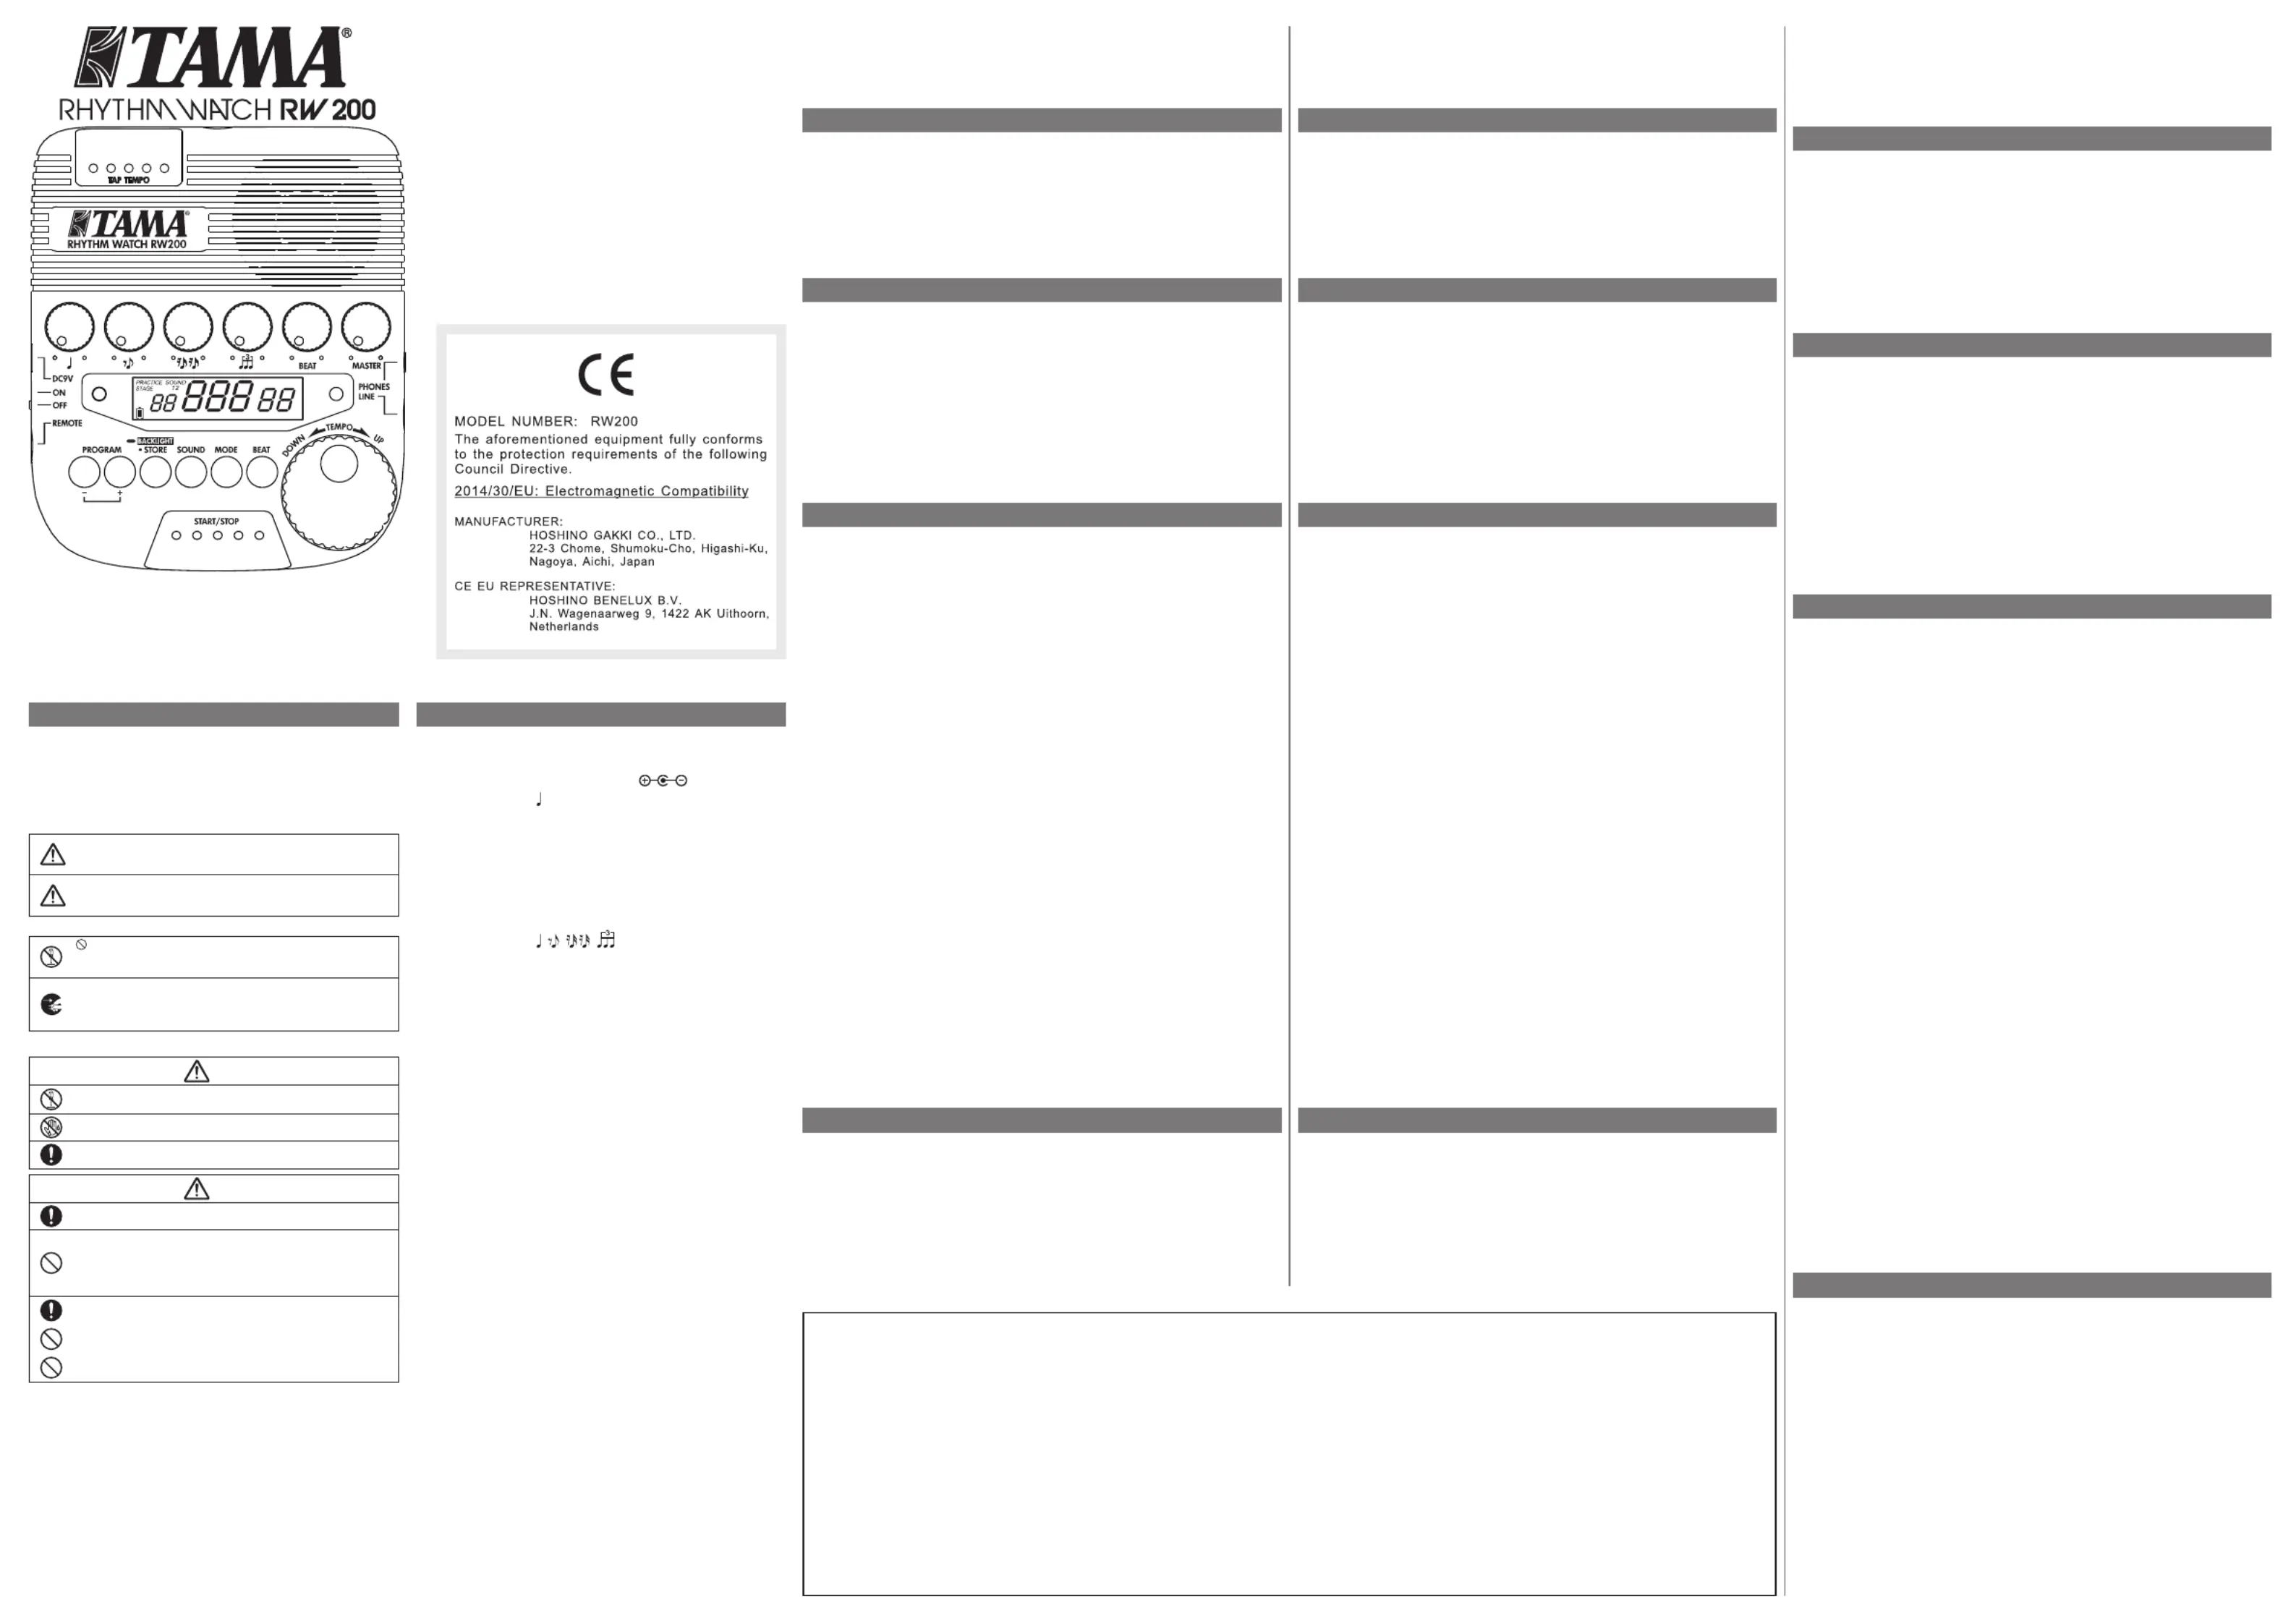
PRODUCT SPECIFICATIONS
Power supply 9V battery (S-006P)
9V 200mA AC adapter
(IBANEZ AC509)
Tempo range = 30 ~ 250/minute
Tempo precision ±0.2%
Beats 0, 1, 2, 3, 4, 5, 6, 7, 8, 9
Displays LCD (PROGRAM, SOUND, MODE, BEAT,
TEMPO, Remaining battery level)
Tempo LED x 2
Speaker × 1
Controls , , , , BEAT volume, MASTER vol-
ume, PROGRAM +/, STORE, BACKLIGHT,
SOUND, MODE, BEAT number, TEMPO dial,
TAP TEMPO, START/STOP
Size 127 x 35 x 150 mm (5 x 1.4 x 6)
Weight 285g (10oz) including battery
Accessories Soft case, Instruction manual, 9V battery
* Specications and external appearance are subject to change without
notice due to improvements.
* び外のため予告ながあす。
* Les spécications ainsi que la comception de l’appareil peuvent être
modiées pour amélioration sans avis préalable.
* Die Technischen Daten und das Design können sich aufgrund des
technischen Forischritts jederzeit ohne Ankündigung ändern.
* Le speciche tecniche e l’aspetto esteriore sono soggetti a variazioni
senza alcun preavviso.
* Las especicaciones y la apariencia externa de este aparato podrán
ser modicadas sin previo aviso, con objeto de mejorar el producto.
*因产品改进,规格或外观可能有所变更,敬请留意。
Thank you for purchasing the Rhythm Watch RW200. Please read this man-
ual carefully before using your product, in order to take full advantage of its
many features and functions, and be sure to store the manual in a safe place
for future reference.
FEATURES
The Rhythm Watch RW200 is a metronome designed for a broad spectrum of
musical activities ranging from practice to live performance. Frequently used
controls and displays are especially large for fast and accurate operation.
Key functions include:
Stage Mode - For live performance
Program Function - Record beats, tempos and sounds for up to 30 songs.
Independent Tap Key - Tap tempo
PRECAUTIONS
* Avoid subjecting the RW200 to impact, such as dropping it or handling it
roughly.
* Turn off the power before storing the RW200.
* Storage or use of RW200 that subjects the unit to direct sunlight, high tem-
perature, or humidity can cause the RW200 to malfunction or fail perma-
nently.
* Do not use thinners, benzene, or other similar solvents to clean the RW200.
* Either a 9 V battery (S-006P) or an AC adaptor (DC9V center minus) can be
used as the power supply. Do not use any other type of power supply. Rec-
ommended AC adapter: IBANEZ AC509
REPLACING THE BATTERY
When the battery begins to run down, the LCD and the LED darkens, and
sound weakens. When the bar of the battery level indicator on LCD disap-
pears, performance will rapidly deteriorate. Replace battery promptly. Note:
Heavy use of the backlight will run batteries down quickly.
Battery Replacement Procedure
1. Slide the battery cover on the back of the RW200 in the direction indicated
by the arrow in the diagram, and take off the battery cover.
2. Take out the old battery and insert the new one.
3. Slide the cover in the opposite direction from that indicated by the arrow,
attaching the cover in its original position.
* Always check to make sure the power switch has been turned off before re-
placing the battery or connecting the AC adaptor.
* After replacing the battery, turn the power on and check to make sure the
RW200 functions properly.
Automatic power-off function
The RW200 has an automatic power-off function to avoid unnecessary battery
power drainage. If the RW200 is powered without being operated for approx-
imately one hour, the power will automatically turn off. In order to turn the
power on next time, you need to slide POWER switch to the off position once
and turn on.
This auto-off feature can be disabled by doing the following: Turn the POW-
ER on while simultaneously pushing START/STOP key. LCD will rst dis-
play “OFF.” Continue to hold buttons until normal display screen appears.
The auto-off feature is now disabled, until the unit’s POWER is shut off.
Once you turn the POWER off, this default auto-off feature becomes effective
again.
Memory backup
The RW200 incorporates a flash-memory device that saves programs
semi-permanently without power supply.
Using the backlight
1. The backlight will be turned on when you operate the POWER switch,
control knobs/switches, or the TEMPO dial, and stay on for approximately
10 seconds from the last operation.
2. The backlight is enabled in the above conditions by default. If the back-
light is unnecessary, it can be disabled by pressing BACKLIGHT/STORE
key for approximately 2 seconds. Press BACKLIGHT/STORE key for 2
seconds again or turn the power off once, and backlight will return to the
default condition
.
この度は Rhythm Watch RW200 をおい上げき、にありがとうござい
ます品の機能を十分に発揮してくために、ご使前に必ず本説明書をお
み下さい。また、本書は大切に保して下さい。
特徴
Rhythm Watch RW200 は、トレーニングからライブまで幅広い使用目的
対応するメトロノームです。頻繁に使るコントロールやディスプレイ
大型にすることにより、素早正確作することが可です機能、ラ
化したステージモード、独立したタップスイッチ、30 分のビー
( ) とテンポを憶するプログラムメモリー富な機能を備えてい
ます。
使用上のご注意
衝撃与えな取ないい。
使ないは、電源い。
光の当た場所、度や湿度のい場所の多い場所での使
ブルの原因のでて下い。
ーニグのは、ーやンジ使いで下い。
電源は、V電池 (S-006P)または、ACダプター(DC9V セターイナ)
を使ますこれ以外は使ない AC ダプタ :
IBANEZ AC509
電池交換
電池消耗てくると液晶ディスプイやンポ LED くなたり
が小さくなったりと性しく低下します。
ディスプレイ上の池残量表をご参照頂電池を交してさい。
にバックライト使用時は、電池消耗くなりますのでめの電池
又は、AC アダプターのご使をおすすめします。
電池交換の手順
1. 体の裏面電池バーを図印の向へス電池バーを取
2. 電池を取
3. バーを取付けす。
電池AC ター接続は、必ず電源になてい確認
て下い。
電池後は電源入れ動作確認て下さい。
オート電源オフ機能
RW200 電源スイッチの切り忘れによる電池消費ため、オート電源
機能搭載しています。電源を入れた態で後の作から約1時間経
と、電源がオフになります。再度電源を入れるには、POWER スイッ
チを一度オフにしてから、オンにしてください。
この機能効にしたいSTART/STOP しながら
POWER スイッチをオンにしてください。ディスプレイ上に “OFF”表示され、
手動 POWER スイッチをオフにしないり、電源がオフされなくなります
度手 POWER イッをオするオー電源オフ機能が再び
になりますので、この機能効にしたい回この作をってください。
メモリーのバックアップ
RW200 はフラッシュメモリーが内させているので、電池電源アダプター
接続されていなくても、半にプログラムが保存されます。
バックライトの使用方
1. 電源 ON TEMPO ルを
10 間点灯す。
2. 記条
が一切場合は、BACKLIGHT/STORE 秒間押
点灯しな。( BACKLIGHT/STORE スイチを
旦電 OFF にす期状 ON
。)
TAMA vous remercie d’avoir porté votre choix sur le tronome Rhythm
Watch RW200. Veuillez lire attentivement ce mode d’emploi avant d’utiliser
l’appareil; ceci vous permettra de tirer le meilleur parti de ses nombreuses
caractéristiques et fonctions. Veillez à conserver ce mode d’emploi, il pourra
vous être très utile pour toute vérication ultérieures.
CARACTÉRISTIQUES
Le Rhythm Watch RW200 est un métronome conçu pour répondre à un large
éventail de besoins pour vos applications musicales, de la répétition à la
scène. Laffichage, ainsi que les commandes indispensables ont été conçus
pour assurer une utilisation rapide et précise.
Principales fonctions :
Mode scène : pour les spectacles en direct.
Fonction de programmation : pour enregistrer les battements, les tempos
et les sons de 30 morceaux.
Touche TAP indépendante : pour taper le tempo.
PRÉCAUTIONS
* Un choc risquerait d’endommager le RW200. Le manier avec soin et ne pas le
laisser tomber.
* Mettre le RW200 hors tension avant de le ranger.
* Le rangement ou l’utilisation du RW200 dans des endroits où il serait expo-
sé à la lumière directe du soleil, à une température élevée ou à de l’humidité
pourraient entraîner une défaillance ou une panne du RW200.
* Ne pas utiliser de solvants tels que du benzène ou du diluant pour nettoyer le
RW200.
* Le RW200 peut être alimenté à l’aide d’une pile de 9 V (S-006P) ou d’un
adaptateur secteur (9 V c.c., polarité négative au centre). N’utiliser aucun
autre type dalimentation. Adaptateur secteur recomman : IBANEZ
AC509.
REMPLACER LA PILE
Lorsque la pile commence à être déchargée, l’afchage à cristaux liquides et
les témoins DEL perdent de leur luminosité et le son perd de sa puissance.
Lorsque la barre de l’indicateur de charge de la pile sur l’afchage à cristaux
liquides disparaît, les performances se dégradent rapidement. Il convient de
remplacer la pile sans tarder. Remarque : une utilisation intensive du rétroé-
clairage épuisera la pile plus rapidement.
Comment remplacer la pile
1. Glisser le couvercle du compartiment à pile au dos du RW200 dans la di-
rection indiquée par la èche (se reporter à l’illustration) ; ôter le couvercle.
2. Retirer la pile déchargée et installer la nouvelle pile.
3. Glisser le couvercle du compartiment à pile jusqu’en bout de course dans
la direction opposée à celle indiquée par la èche.
* Toujours s’assurer que l’appareil est hors tension avant de remplacer la pile
ou de connecter l’adaptateur secteur.
* Après avoir remplacé la pile, mettre le RW200 sous tension et s’assurer qu’il
fonctionne correctement.
Fonction de mise hors tension automatique
Le RW200 est doté d’une fonction de mise hors tension automatique, qui per-
met d’éviter tout déchargement inutile de la pile. Le RW200 s’éteint automa-
tiquement s’il est inutilisé pendant environ une heure. Pour remettre lappareil
sous tension, placer le commutateur POWER sur la position OFF puis sur la
position ON.
La procédure ci-dessous permet de désactiver temporairement la fonction de
mise hors tension automatique : mettre l’appareil sous tension en appuyant
simultanément sur la touche START/STOP. L’afchage à cristaux liquides in-
dique d’abord « OFF ». Maintenir les boutons enfoncés jusqu’à l’afchage de
l’écran normal. La fonction de mise hors tension automatique est désactivée
jusqu’à la prochaine mise hors tension de l’appareil. Une fois l’appareil mis
hors tension, cette fonction de mise hors tension automatique par défaut rede-
vient opérationnelle.
Sauvegarde de la mémoire
Le RW200 est équid’un dispositif à mémoire flash, qui stocke les pro-
grammes de façon semi-permanente, y compris sans alimentation électrique.
Utilisation du rétroéclairage
1. Le rétroéclairage s’allume lorsqu’on actionne le commutateur POWER, l’un
des boutons ou commutateurs de commande ou la commande TEMPO, et
il reste allupendant environ 10 secondes (à compter de la dernière opé-
ration).
2. Par défaut, le rétroéclairage est activé dans les conditions ci-dessus. L’uti-
lisateur peut désactiver le rétroéclairage en maintenant enfoncée la touche
BACKLIGHT/STORE pendant environ 2 secondes. Maintenez la touche
BACKLIGHT/STORE enfoncée pendant 2 secondes, ou mettez l’appareil
hors tension pour réinitialiser les réglages par défaut du rétroéclairage.
FEDERAL COMMUNICATIONS COMMISSIONRADIO FREQUENCY INTERFERENCE STATEMENT
This equipment has been tested and found to comply with the limits for a Class B digital device, pursuant to part 15 of the FCC Rules. These limits are designed to
provide reasonable protection against harmful interference in a residential installation. This equipment generates, uses and can radiate radio frequency energy and, if
not installed and used in accordance with the instructions, may cause harmful interference to radio communications. However, there is no guarantee that interference
will not occur in a particular installation. If this equipment does cause harmful interference to radio or television reception, which can be determined by turning the
equipment off and on, the user is encouraged to try to correct the interference by one or more of the following measures:
• Reorient or relocate the receiving antenna.
• Increase the separation between the equipment and receiver.
• Connect the equipment into an outlet on a circuit different from that to which the receiver is connected.
• Consult the dealer or an experienced radio/TV technician for help.
This device complies with Part 15 of the FCC Rules. Operation is subject to the following two conditions:
(1) This device may not cause harmful interference, and
(2) This device must accept any interference received, including interference that may cause undesired operation.
Unauthorized changes or modication to this system can void the users authority to operate this equipment.
This equipment requires shielded interface cables in order to meet FCC class B Limit.
Vielen Dank für den Kauf der Rhythm Watch RW200. Bitte lesen Sie diese Anleitung sorg-
ltig, bevor Sie die Rhythm Watch benutzen, so dass Sie alle Fähigkeiten und Funktionen
voll ausnutzen können, und bewahren Sie die Anleitung zum späteren Nachschlagen an
einem sicheren Ort auf.
EIGENSCHAFTEN
Die Rhythm Watch RW200 ist ein Metronom, das für eine Vielzahl musikalischer Aktivi-
täten geschaffen wurde-von der Probe bis zum Live-Auftritt. Oft benutzte Bedienungsle-
mente und Anzeigen sind für die schnelle und sichere Bediegung besonders groß ausge-
führt.
Die Tastenfunktionen beinhalten:
Modus Stage - für Liveauftritte
Programmfunktion - Zeichnet Taktschläge, Tempi und Klangbilder für bis zu 30
Songs auf.
Unabhängige Tap Taste - Tap Tempo
VORSICHTSMAßNAHMEN
* Setzen Sie die RW200 keinen Sßen aus, z. B. durch Fallenlassen oder unvorsichtige Be-
handlung.
* Schalten Sie die Stromversorgung aus, bevor Sie die RW200 verstauen.
* Die Aufbewahrung oder der Gebrauch der RW200, welche das Gerät direktem Sonnen-
licht, hohen Temperaturen oder Luftfeuchtigkeit aussetzen, können zu Fehlfunktionen
oder dauerhaftem Ausfall der RW200 führen.
* Verwenden Sie keine Verdünnung, kein Benzin oder ähnliche sungsmittel für die
Reinigung der RW200.
* Als Stromversorgung kann entweder eine 9-V-Batterie (S-006P) oder ein Steckernetzteil
(DC9V negative Polarität) verwendet werden. Benutzen Sie keine andere Spannungs-
quelle. Empfohlenes Steckernetzteil: IBANEZ AC509.
AUSTAUSCHEN DER BATTERIE
Wenn die Batterie fast entladen ist, verdunkeln sich das LC-Display und die LEDs,
und der Klang wird leiser. Wenn der Balken der Batterieladeanzeige am LC-Display
verschwindet, nimmt die Leistung sehr schnell ab. Tauschen Sie die Batterie sofort aus.
Hinweis: Ein häuger Gebrauch der Hintergrundbeleuchtung führt zu einem schnelleren
Verbrauch der Batterien.
Vorgehensweise
1. Schieben Sie die Abdeckung des Batteriefachs der RW200 in Pfeilrichtung (siehe Ab-
bildung), und nehmen Sie die Abdeckung ab.
2. Nehmen Sie die entladene Batterie heraus, und setzen Sie eine neue Batterie ein.
3. Schieben Sie die Abdeckung entgegen der Pfeilrichtung, und befestigen Sie die Abde-
ckung an ihrer ursprünglichen Position.
* Achten Sie vor dem Austausch der Batterie oder dem Anschluss des Steckernetzteils
immer darauf, dass das Gerät ausgeschaltet ist.
* Sobald Sie die neue bzw. aufgeladene Batterie eingesetzt haben, schalten Sie die RW200
ein, und prüfen Sie, ob sie einwandfrei funktioniert.
Automatische Abschaltfunktion
Die RW200 verfügt über eine automatische Abschaltfunktion, um unnötige Batterieen-
tladung zu vermeiden. Wenn Sie die RW200 einschalten ohne sie etwa eine Stunde zu
betreiben, wird die Stromversorgung automatisch abgeschaltet. Um die Stromversorgung
das nächste Mal einzuschalten, müssen Sie den Schalter STROMVERSORGUNG einmal
in Stellung Aus schieben und dann einschalten.
Diese automatische Abschaltung können Sie wie folgt deaktivieren: Schalten Sie die
STROMVERSORGUNG ein, während Sie gleichzeitig die Taste START/STOP drücken.
Das LC-Display zeigt zunächst “OFF” an. Halten Sie die Taste gedrückt, bis der normale
Anzeigebildschirm eingeblendet wird. Die automatische Abschaltfunktion ist nun de-
aktiviert, bis die STROMVERSORGUNG des Geräts abgeschaltet wird. Sobald Sie die
STROMVERSORGUNG abschalten, wird diese standardmäßige automatische Abschalt-
funktion wieder aktiviert.
Datensicherung
Die RW200 ist mit einem Flash-Speicher ausgestattet, welches Programme semi-perma-
nent ohne Stromversorgung speichert.
Verwendung der Rückbeleuchtung
1. Die Hintergrundbeleuchtung wird eingeschaltet, wenn Sie den Schalter POWER, die
Reglerknöpfe/-schalter oder den TEMPO-Regler betätigen, und leuchtet etwa 10 Se-
kunden lang nach der letzten Betätigung.
2. Die Hintergrundbeleuchtung ist unter den oben genannten Bedingungen standardmä-
ßig eingeschaltet. Wenn Sie die Hintergrundbeleuchtung nicht benötigen, können Sie
diese deaktivieren, indem Sie die Taste BACKLIGHT/STORE etwa 2 Sekunden lang
gedrückt halten. Drücken Sie die Taste BACKLIGHT/STORE weitere 2 Sekunden
oder schalten Sie die Stromversorgung einmal aus. Die Hintergrundbeleuchtung wird
zum Grundzustand zurückkehren
Gracias por adquirir el metrónomo Rhythm Watch RW200. Lea el presente manual muy
detenidamente antes de utilizar el producto para poder sacar el mayor provecho de todas las
características y funciones que le ofrece. Guarde el manual en un lugar seguro para poder
consultarlo cada vez que lo necesite.
CARACTERÍSTICAS
El metrónomo Rhythm Watch RW200 ha sido diseñado para una amplia gama de activi-
dades musicales que incluyen tanto prácticas como conciertos. Los controles y pantallas
utilizados con más frecuencia son de tamaño grande, lo cual permite un acceso más preciso
y rápido.
Las funciones principales son:
Modo Stage - para actuaciones en directo
Función Program - Registra compases, tempos y sonidos de hasta 30 canciones.
Tecla Tap independiente - Tap tempo
PRECAUCIONES
* Evite que el RW200 reciba cualquier tipo de impacto, no permita que se caiga y mani-
púlelo con cuidado.
* Apague el RW200 antes de guardarlo.
* Guardar o utilizar el RW200 bajo la luz directa del sol, a altas temperaturas o con ni-
veles de humedad elevados puede provocar errores de funcionamiento en el RW200 o
incluso averiarlo.
* No utilice diluyentes, benceno ni otros disolventes para limpiar el RW200.
* Se puede utilizar con el metrónomo tanto una pila de 9 voltios (S-006P) como un adap-
tador de corriente alterna (DC9V centro negativo). No utilice otro tipo de fuente de
alimentación. Adaptador de CA recomendado: IBANEZ AC509.
SUSTITUCIÓN DE LA PILA
Cuando la pila empiece a agotarse, el LCD y los indicadores LED perderán intensidad
y el sonido se atenuará. Cuando la barra indicadora del nivel de carga de la pila desapa-
rezca en el LCD, las prestaciones irán disminuyendo rápidamente. Sustituya la pila de
inmediato. Nota: el uso intensivo de la luz de fondo agotará la pila más rápidamente.
Procedimiento de sustitución de la pila
1. Deslice la cubierta del alojamiento de la pila situado en la parte trasera del RW200 en la
dirección indicada por la echa en la ilustración y retire la cubierta del alojamiento.
2. Retire la pila usada y coloque una nueva en su lugar.
3. Deslice la cubierta en la dirección contraria a la indicada por la echa y colóquela en su
posición original.
* Asegúrese siempre de que ha apagado el metrónomo antes de proceder a la sustitución de
la pila o a la conexión del adaptador.
* Cuando termine de colocar la pila, encienda el metrónomo y compruebe que el RW200
funciona correctamente.
Función de apagado automático
El RW200 dispone de una función de apagado automático para evitar que las pilas se gasten
innecesariamente. Si el RW200 está encendido y no es utilizado durante una hora aproxi-
madamente, el metnomo se apagará automáticamente. Para encenderlo de nuevo, coloque
el interruptor POWER en la posicn apagado (off) y luego vuelva a ponerlo en encendido
(on).
Esta función de apagado automático puede desactivarse de la siguiente manera: encienda
el aparato mientras pulsa la tecla START/STOP. En el LCD aparecerá primero “OFF”. Siga
apretando los botones hasta que aparezca la pantalla normal. La función de apagado auto-
tico está ahora desactivada, hasta que se apague el metrónomo. Al apagarlo, la función
de apagado automático por defecto vuelve a activarse.
Conservación de la memoria
El RW200 incorpora un dispositivo de memoria ash que guarda programas de forma
semipermanente sin conexión a alimentación eléctrica.
Utilización de la luz de fondo
1. La luz de fondo se activará cuando accione el interruptor POWER, las ruedas/interrup-
tores de control o el cuadrante TEMPO, y permanecerá encendida durante aproximada-
mente 10 segundos tras la última operación.
2. La luz de fondo está activada por defecto en las condiciones anteriores. Si no necesita
la luz de fondo, podrá desactivarla manteniendo pulsada la tecla BACKLIGHT/STORE
durante aproximadamente 2 segundos. Pulse la tecla BACKLIGHT/STORE durante
aproximadamente 2 segundos o vuelva a encender el aparato y se restablecerá el estado
predeterminado de la luz de fondo.
Vi ringraziamo per aver acquistato il Tama Rhythm Watch RW200. Vi raccomandiamo
di leggere attentamente questo manuale prima di usare il prodotto, per essere sicuri di
sfruttare appieno le sue caratteristiche e le sue funzioni. Questo manuale dovrebbe essere
conservato in un luogo sicuro per eventuali future consultazioni.
CARATTERISTICHE
Il Tama Rhythm Watch RW200 è un metronomo studiato per un’ampia gamma di attività
musicali, che vanno dall’esercizio quotidiano alle performance dal vivo. I controlli di
uso più frequente e i display sono ben dimensionati per consentire un impiego veloce ed
accurato.
Le funzioni principali includono:
modalità Stage - per le esibizioni dal vivo;
funzione Program - registra i beat, i tempi e i suoni per un massimo di 30 canzoni;
tasto Independent Tap - per il tap tempo.
PRECAUZIONI
* Evitate che l’RW200 subisca forti urti, cadute o un trattamento troppo brusco.
* Se non dovete utilizzare l’RW200, spegnete l’alimentazione prima di riporlo.
* Evitate di porre l’RW200 in luoghi dove può essere esposto alla luce solare diretta, alle
alte temperature, all’umidità e alla polvere. Questi fattori possono essere causa di catti-
vo funzionamento oppure di rotture.
* Non usate diluenti, benzene o altri solventi di questo tipo per pulire l’RW200.
* Per alimentare lo strumento è possibile usare una batteria da 9 Volt (S-006P) o un adat-
tatore per corrente alternata (9V CC con polarità centro negativo). Non usate altri tipi di
alimentazione. Adattatore per corrente alternata consigliato: IBANEZ AC509
SOSTITUZUONE DELLA BATTERIA
Quando la batteria comincia ad esaurirsi, il display LCD e i LED diventano più scuri,
mentre il suono diventa più debole. Quando sul display LCD scompare la barra dell’indi-
catore del livello della batteria, le prestazioni calano rapidamente. Sostituire prontamente
la batteria. Nota: l’uso frequente della retroilluminazione causa un rapido consumo delle
batterie.
Procedura di sostituzione batteria
1. Fate scorrere all’indietro il coperchio della batteria dell’RW200 nella direzione indicata
dalla freccia sul diagramma, ed estraetelo.
2. Estraete la vecchia batteria ed inseritene una nuova.
3. Fate scorrere il coperchio in direzione opposta a quella indicata dalla freccia, rimetten-
dolo nella sua posizione originale.
* Controllate sempre che lo strumento sia spento, prima di sostituire la batteria o di collega-
re l’adattatore per corrente alternata.
* Dopo aver sostituito la batteria, riaccendete l’RW200 ed accertatevi che funzioni corret-
tamente.
Funzione di spegnimento automatico
L’RW200 è dotato di una funzione di spegnimento automatico per evitare un consumo
non necessario delle batterie. Se l’RW200 resta acceso ma non utilizzato per circa un’ora,
l’alimentazione viene automaticamente interrotta. Per riattivare l’alimentazione occorre
portare l’interruttore POWER nella posizione di spegnimento e poi in quella di accensio-
ne.
È possibile disattivare tale funzione nel modo seguente. Accendete l’alimentazione te-
nendo premuto il tasto START/STOP; sul display LCD apparirà “OFF”. Tenete premuti i
pulsanti nché non appare la normale schermata del display. A questo punto, la funzione
di spegnimento automatico resta disattivata fino allo spegnimento dell’unità. Dopo lo
spegnimento, la funzione si attiva nuovamente.
Memoria di backup
L’RW200 è dotato di un dispositivo di memoria ash che salva i programmi in modo se-
mi-permanente in assenza di alimentazione.
Uso della retroilluminazione
1. La retroilluminazione si accende quando si usano l’interruttore POWER, i controlli/inter-
ruttori o il controllo rotativo TEMPO e rimane accesa per circa 10 secondi dopo l’ultima
operazione eseguita.
2. La retroilluminazione è abilitata come impostazione predenita nelle condizioni di cui
sopra. Se la retroilluminazione non è necessaria, è possibile disabilitarla tenendo pre-
muto il tasto BACKLIGHT/STORE per circa 2 secondi. Per riportare la retroillumina-
zione alla sua condizione predenita, tenete di nuovo premuto il tasto BACKLIGHT/
STORE per 2 secondi oppure disattivate una volta l’alimentazione.
RhythmWatchRW200。在使用产品前,请细阅读本手册以充分利用
其各特性及功能,妥善保存本手册以备日后
特性
RhythmWatchRW200是一款可广泛应用于各种音乐活动的拍器是日常
是现场都能应对如。为了实现快的操作本款拍器专增大了常用
的控与显
包括
Stage•模式-适
独立的•Tap•键打拍
注意事项
*免使RW200到撞击,请跌落暴对待备。
*存放RW200之前电源。
*勿在光直射温或潮湿的环境中使用或存放RW200致RW200
生故或是永久性损坏
*勿使用稀释剂、其他似溶剂清洁RW200。
*使用一节9V电池(S-006P)或一个AC电源(DC9Vcenterminus)
为本勿使用任何其他使AC电源
IBANEZAC509。
更换电池
LCD屏和LED变暗、变小电池即将尽。当LCD
屏上的电条消失,设备的性能表现将迅速请立即更换电池。注意
使用光将加快电池消
电池更换步
1.按图头所的方向滑动RW200背面的电池盖取下电池盖
2.取出旧电池并放入新电池
3.按所头的方向滑动电池盖将电池盖回原位。
*更换电池或AC适配器前,请务必源开关。
*换电池后打开电源进行检查以RW200工作正常。
动关机功能
RW200具有动关机能,免不的电RW200在开机如果一个
小时之内无任何操作动关机。再次打开电源先将电源开关滑动到关置,
然后打开。动关机将在下列情况打开电源的同时按START/STOP键
LCD屏幕将先显“OFF”继续按住该键,现正常的显屏幕。动关机功
现在处于用状态备的电源。电源后默认动关机功
新生效
内存备份
RW200可以在无电源的情况下半永久性地保存程设定。
使用背光
1.当您操POWER开关、控制旋/ 关或TEMPO拨盘时其亮
在最后一次操作后续约10秒钟
2.在上,默启用光。如无使用可按BACKLIGHT/STORE约
2秒钟。再次按BACKLIGHT/STORE键约2秒钟是在关电源之
光将恢复默认启用状态
DESCRIPTION DES FONCTIONS
a
Commutateur de mise sous tension POWER
Ce commutateur sert à allumer ou éteindre l’appareil.
b
Borne dalimentation DC IN
Cette borne sert à connecter un adaptateur secteur.
c
Boutons RHYTHM
Ces boutons permettent de régler la balance entre les diffé-
rents sons.
d
Bouton BEAT
Ce bouton permet de régler le volume du battement. Le
premier battement est caractérisé par un son de sonnette.
Si la valeur du battement est 0, aucun son n'est émis.
e
Commande de volume général MASTER
Cette commande permet de régler le volume général.
f
moins DEL de tempo
Les témoins DEL bicolores de tempo gauche et droit s’il-
luminent alternativement sur le temps, indiquant au mu-
sicien les temps pairs et impairs. Le temps initial (impair)
sera toujours indiqué en rouge par un des deux témoins,
les autres temps de la mesure par les deux moins (en
vert). (Si la valeur sélectionnée pour le temps correspond à
0, le temps initial sera également indiqué en vert.)
g
Borne REMOTE
Cette prise jack stéréo sert à connecter une pédale de com-
mande. La pointe (tip) du connecteur est associée à la
commande de marche et d’arrêt, alors que l’anneau (ring)
est affecté à l’incrémentation des programmes. Nous re-
commandons l’utilisation de la pédale à deux commandes
IBANEZ IFS2U : le commutateur de gauche est associé à la
commande de marche et d’arrêt, alors que le commutateur
de droite est affecté à l’incrémentation des programmes. Si
une pédale à simple commande est connectée à l’appareil,
seule fonctionne la commande de marche et d’art.
h
Prise jack pour casque découte PHONES
Cette borne stéréo permet de connecter un casque d’écoute.
Lorsqu’un un casque y est connecté, aucun son n’est produit
par le haut-parleur intégré du RW200.
i
Borne LINE
Cette prise jack mono 6,35mm correspond à la sortie ligne.
Y connecter un amplicateur ou encore un retour de scène
amplié. Si un équipement est connecà cette borne, le
haut-parleur et la sortie PHONES du RW200 n’émettent
aucun signal.
j
Afchage à cristaux liquide
Cet affichage indique les valeurs sélectionnées pour les
paramètres « PROGRAM », « SOUND », « MODE »,
« BEAT » et « TEMPO ». Il indique également le niveau
de charge de la pile.
k
Commande de tempo
TEMPO
Cette commande permet de sélectionner une valeur de
tempo entre
=30 ~ 250/minute.
l
Touche START/STOP
Cette touche allume et éteint le métronome.
m
Touches PROGRAM
Ces touches permettent de charger des programmes mé-
moris. Chaque pression sur ces touches augmente ou
diminue de 1 le numéro du programme.
n
Touche BACKLIGHT/STORE
Cette touche stocke les paramètres, à lexception de
MODE, indiquées sur l’afchage à cristaux liquides, pour
le numéro de programme afché. Maintenir cette touche
enfoncée pendant environ 2 secondes pour activer ou dé-
sactiver le rétroéclairage de l’afchage à cristaux liquides.
o
Touche SOUND
Cette touche permet de sélectionner le son SOUND 1 ou
SOUND 2.
p
Touche de mesure BEAT
La mesure peut être dénie entre 0 et 10 battements par
mesure. A chaque pression de la touche BEAT, le nombre
de battements à la mesure augmente d’une unité.
q
Touche MODE
Cette touche permet de sélectionner le mode PRACTICE
ou STAGE.
r
Touche TAP TEMPO
La fonction TAP commence la mesure du tempo automa-
tique lorsque l’utilisateur appuie sur cette touche au moins
5 fois.
s
Écrou de xation (M6)
Le RW200 peut être xé à un pied de votre batterie, grâce
à un clamp de xation muni d’un let M6.
FONCTIONNEMENT
Utilisation de la fonction de mémorisation
Le RW200 peut mémoriser jusqu’à 30 numéros de pro-
gramme de battements, de sons et de tempos.
1. À l’aide de la touche PROGRAM ou dune pédale option-
nelle connectée à la prise REMOTE, sélectionner le numéro
de programme sous lequel le battement ou le tempo doit être
mémorisé.
2. Dénir le battement, le son et le tempo.
3. Vérifier les données sur l’affichage et appuyer sur la
touche STORE/LIGHT SET. Les deux témoins DEL
émettent simultanément un clignotement rouge, indi-
quant que le programme est mémorisé.
Utilisation du métronome : mode PRACTICE
Ce mode par défaut fonctionne comme un métronome de
répétition.
1. Appuyer sur la touche MODE et sélectionner le mode
PRACTICE.
2. Appuyer sur la touche SOUND et sélectionner SOUND
1 ou SOUND 2. Les modes SOUND 1 et SOUND 2
diffèrent par le son ; il convient donc de sélectionner le
mode adapà l’utilisation. Le mode SOUND 1 produit
un son avec une attaque plus vive, alors que le mode
SOUND 2 produit un son plus doux.
3. Définir le tempo à l’aide de la commande TEMPO et
la mesure à l’aide de la touche BEAT. Pour rappeler le
numéro de programme souhaité, utiliser la touche PRO-
GRAM. ou un commutateur au pied connecté à la borne
REMOTE.
4. Effecteur un réglage adéquat des différentes com-
mandes.
5. Appuyer sur la touche START/STOP pour activer le
métronome. Le son sera reproduit via le haut-parleur et
les témoins DEL s’illumineront alternativement.
6. Effectuer la balance entre le niveau de volume des
notes, du temps initial et le volume général.
7. Appuyer à nouveau sur la touche START/STOP pour
désactiver le métronome.
Utilisation du métronome : mode STAGE
La programmation, par avance, des tempos, des battements
et des sons de chaque morceau, selon l’ordre des morceaux
joués sur scène, est très utile aux groupes qui démarrent
leurs morceaux avec un décompte.
1. Appuyer sur la touche MODE, puis lectionner le
mode STAGE.
2. Appeler le programme du premier morceau.
3. Appuyer sur la touche START/STOP pour activer le
métronome. Le son sera reproduit via le haut-parleur et
les témoins DELs’illumineront alternativement.
4. Le métronome s’arte automatiquement aps avoir
produit un son pendant 8 barres de mesure. Le numéro
de programme augmente de 1 et le métronome se met
en veille.
5. Chaque pression de la touche START/STOP déclenche
les phases 3 à 4 ci-dessus.
Utilisation de la fonction TAP
La fonction TAP permet d’entrer un tempo manuellement,
et s’applique au tempo du métronome.
1. Dénir le tempo en appuyant sur la touche TAP TEM-
PO selon le rythme suivant. Taper 5 fois pour afcher le
tempo mesuré.
2. Si l’utilisateur tape 6 fois ou plus, l’appareil afche le
tempo moyen des 4 dernières pressions.
3. Si l’utilisateur n’appuie pas sur la touche TAP TEMPO
pendant environ 2,5 secondes, la mesure du tempo
s’arrête et la valeur du tempo clignote sur l’afchage à
cristaux liquides.
4. Si le tempo mesuré dépasse la limite de
= 30 ~ 250/
minute, plusieurs messages d’erreur s’affichent. Si le
tempo est inférieur à 30, l’appareil afchera le message
« Lo » et le tempo se dénit automatiquement sur 30. Si
le tempo est supérieur à 250, l’appareil afche le mes-
sage « Hi » et le tempo se dénit automatiquement sur
250.
initialisation des réglages dusine
Mettre l’appareil sous tension en appuyant sur la touche
BACK-LIGHT/STORE.
NAMES AND FUNCTIONS OF PARTS
a
POWER switch
This is used to turn the power supply on and off.
b
DC IN jack
This is the jack to which the AC adaptor is connected.
c
RHYTHM knobs
These are used to control the volume balance between the various
sounds.
d
BEAT knob
This is used to control the volume of the beat sound. The chime
sound produced for the rst beat. If the beat setting is 0, no beat
sound is produced.
e
MASTER knob
This is used to control the overall volume.
f
TEMPO LEDs
The left LED flashes red in time with the initial beat. The right
LED ashes green in time with the second and after beats. If the
beat setting is 0, the right LED ashes green also in time with the
initial beat. If the beat setting is 1, only the left LED ashes red.
g
REMOTE jack
This is the stereo jack to which the foot switch is connected. Tip
is assigned START/STOP, and ring is assigned program number
increment. We recommend using IBANEZ IFS2U dual footswitch,
left switch is assigned START/STOP and right switch is assigned
program number increment.
If you use a single footswitch, it is assigned START/STOP.
A momentary/unlatch-type of footswitch should be used, and connect
before turning the power supply on.
h
PHONES jack
This is the stereo mini jack for headphones. When connected, no
sound is produced from the RW200’s speaker.
i
LINE jack
This is the 1/4” monaural jack that outputs line level signal. Con-
nect an amplier or a powered monitor speaker etc. When connect-
ed no sound is produced from the RW200’s speaker and PHONES
out.
j
LCD (liquid crystal display)
This displays the values set for the “PROGRAM,SOUND,”
“MODE,” BEAT,” and TEMPOparameters. Also shows re-
maining battery level.
k
TEMPO dial
This is used to control the tempo between
=30 ~ 250/minute.
l
START/STOP key
This key starts and stops the metronome.
m
PROGRAM keys
These are used to load programs. You can increment/decrement
program number by 1.
n
BACKLIGHT/STORE key
This stores the parameter settings except MODE shown on the
LCD in the displayed program number. Press and hold for approx-
imately 2 seconds to switch the LCD backlight between enabled
and disabled.
o
SOUND key
This selects a sound, SOUND 1 or SOUND 2.
p
BEAT key
The beat can be set within a range from 0 to 9 beats. The number
of beats shift by an increment of one each time the BEAT key is
pressed.
q
MODE key
This selects a mode, PRACTICE mode or STAGE mode.
r
TAP TEMPO key
TAP function starts working and measuring tempo automatically
when this key is pressed at least 5 times.
s
Mounting nut (M6)
The RW200 can be attached to a stand of your drum kit along with
a holder attachment having an M6 thread with Multi Clamp.
各部の名称
a
POWER ス
源のオンオフスイッチです。
b
DC IN
AC アダプターを接続するジャックです。
c
ーム
符の音量バランスをコントロールします。
d
BEAT ーム
ビート音(1拍目の音)音量をコントロール
します。(0拍子に定すると、ビ
ません。)
e
MASTER ボーム
全体の音量をコントロールします。
f
LED
左側は常に拍目のみで色に、右側は拍目以
に合せて緑色に点滅します0 拍子にする
と、拍目も右側が緑色に点滅します。1 拍子に
定すると、左側のみが色に点滅します
g
REMOTE ジ
フットスイッチを接続するためのステレオジャッ
す。TIP START/STOP、RING
り、
IBANEZ IFS2U がお薦めです。
シングルスイッチのフットスイッチをご使用の場
合は START/STOP が割り当てられます。
フットスイッチはモーメンタリー ( ンラッチ )
イプをご使用になり、必ず OFF の状態で接続
してください。
h
PHONES ジ
ヘッドフォンを接続するステレオミニジャックで
す。接続時、RW200 のスピーカかは出ませ
ん。)
i
LINE
ラインレベルの信号が出力される、1/4”モノラル
ジャックです。アンプやモニター用パワードスピー
カー等に接続できます。接続時、RW200 のスピー
カと PHONES 出力からは出ません。
j
LCD 液晶デスプレイ
/SOUND/MODE/BEAT/
TEMPO 定値と、池残を表示します。
k
TEMPO ダ
ポの
30 250/ 囲で
トロールします。
l
START/STOP
メトロノームをスタート / ストップさせます。
m
PROGRAM
プログラムを呼び出すスイッチです。プログラムナ
ンバーのアッ / ダウンが可能です。
n
BACKLIGHT/STORE ス
LCD に表示されているパラメータの定状況を
表示のプログラムナンバーに記憶します。MODE
は記憶されません 秒押し続けると、LCD
バックライトの点灯 / 消灯モードを切り替えます。
o
SOUND ス
SOUND1 もしくは SOUND2 のどちらかの
択します。
p
BEAT ス
拍子の範囲で拍子を す。
BEAT と、
ずつ増えます。
q
MODE
PRACTICE/STAGE のどちらかのモードをびま
す。
r
TAP TEMPO ス
5
がオンになり、テンポを計測します。
s
トス (M6)
M6 ボルトのあるホルダーとマルチクランプを組
み合わせて、ドラムセットのスタンドに取り付け
ることができます。
OPERATION
Operating the program function
The RW200 stores up to 30 program numbers of beats, sounds and
tempos.
1. Using the PROGRAM key or the optional REMOTE footswitch, bring
up the program number in which the beat or tempo is to be stored.
2. Set the beat, sound and tempo.
3. Check the contents displayed on the LCD and press the STORE/
LIGHT SET key. At this point, the two LEDs ash red on time,
indicating that the program has been stored.
Metronome Operation - PRACTICE Mode
This is a default mode that works as a metronome for practice.
1. Press the MODE key and select PRACTICE mode.
2. Press the SOUND key and select either SOUND 1 or SOUND
2. The SOUND 1 and SOUND 2 have different voicings, so
select whichever mode is appropriate for the usage conditions.
(SOUND 1 has a sound with a stronger attack, while SOUND 2
produces a softer sound.)
3. Set the tempo using the TEMPO dial, and the beat using the
BEAT key. To load a program, use the PROGRAM key or the
REMOTE footswitch to call out the required number.
4. Adjust the various control knobs to the appropriate positions.
5. Pressing the START/STOP key starts the metronome. Sound is
produced from the speaker, and the LEDs begin ashing.
6. While listening to the sound produced, adjust the balance of the
notes, the beat volume, and the overall volume.
7. Pressing the START/STOP key again to stops the metronome.
Metronome Operation - STAGE Mode
Programming beforehand tempos, beats, and sound of each song
in the exact order of set list you play in live stage, it will be useful
for you when starting songs with count-in.
1. Press the MODE key and select STAGE mode.
2. Call the program of your rst song.
3. Pressing the START/STOP key to start the metronome. Sound is
produced from the speaker, and the LEDs begin ashing.
4. Metronome stops automatically after it sounds for 8 bars, pro-
gram number increments by 1, and metronome will be in stand-
by state.
5. Each time you press the START/STOP key, the above 3 - 4 is
repeated.
Operating the tap function
The tap function lets you measure any desired tapped tempo and
applies to the tempo of metronome.
1. Enter the tempo by pressing the TAP TEMPO key with follow-
ing rhythm. At the moment you tap 5 times, the measured tem-
po is displayed.
2. When you tap 6 times or more, it displays average tempo of the
last 4 taps.
3. If you don’t push the TAP TEMPO key for approximately 2.5
seconds, tempo measurement will nish and tempo value on the
LCD display ashes.
4. If the measured tempo exceeds the range o
= 30 ~ 250/minute,
error messages are displayed. If the tempo is lower than 30,
message “Lo” will be displayed and tempo is set 30 automat-
ically. If the tempo is higher than 250, message “Hi” will be
displayed and tempo is set 250 automatically.
Factory reset
Turn the power on with pressing BACKLIGHT/STORE key.
操作方法
プログラム機能の操作方法
RW200 30
拍子、テンポ、サウンドを記憶させることができ
ます。
1. 憶させたプログラムナバーをPROGRAM
チま REMOTE スイチで呼び
2. ビー拍子
3. スプレイに表示されている内容を確
STORE スイッチを短く押します。この
LED 色に 1 回点プログラムが記憶さ
を示す。
トロノームの操作方法 – PRACTICE モ
練習時に常のメトロノームとしてご使用ける
スタンダードなモードです ON
ちらのモードになります。
1. MODE チでPRACTICE モー
2. SOUND スイチで SOUND1 また SOUND2
択し。SOUND1 SOUND2
ていますで、使用す状況
してださいSOUND1 アタクの
強いSOUND2 トなで発
3. TEMPO ダイヤルポをBEAT
でビ。プグラを呼
び出て使用するきは、PROGRAM チま
たは REMOTE チでンバー
呼びます
4. 各コロールボムを当な位置に調
5. START/STOP スイチを押すームがス
出力 LED 点滅を始め
6. きなら各符のビー音量
全体音量調て下い。
7. 再度、START/STOP チを押す
が止
メトロノームの操作方法 – STAGE モード
ライブ等でテンポ、拍子の異なる楽曲を複数演奏す
便す。ポ・
子をあらかじめ曲どおりにプログラムしておき、
曲の最初のみカウントしてサポートします。
1. MODE STAGE
2. 演奏する曲の拍子をたプ
ムをす。
3. START/STOP スイチを押すーム
ター出力され LED が点滅をす。
4. 節分発た後、自動的グラ
ムナンバつア態でスタンバ
5. START/STOP スイチを押すたび、上記
が繰
タップ機能の操作方法
タップされたテンポを計測し、自動的にメトロノー
ムのテンポに用する機能です。
1. TAP
TEMPO 続けて押5 回押
で、計測ます
2. 6 回以上押す最後回の平均テ表示
3. 2.5 TAP TEMPO チを押さない
上のポ値が点滅の計
終了す。
4.
30 250/ 分の範囲を
た場合はエラーセージが表示さます。29
下の場合“Lo”と表示され後、自的に 30
ます。251 以上の場合Hi”表示さ後、
自動 250 ます
工場出荷時設定に戻すには
BACKLIGHT/STORE ら、
POWER スイッチをオンにしてください。


Product specificaties

Merk: TAMA
Categorie: Niet gecategoriseerd
Model: Rhythm Watch RW200

Heb je hulp nodig?

Als je hulp nodig hebt met TAMA Rhythm Watch RW200 stel dan hieronder een vraag en andere gebruikers zullen je antwoorden