Sygonix BT-MD-914 Handleiding
Bekijk gratis de handleiding van Sygonix BT-MD-914 (4 pagina’s), behorend tot de categorie Kluis. Deze gids werd als nuttig beoordeeld door 10 mensen en kreeg gemiddeld 5.0 sterren uit 2 reviews. Heb je een vraag over Sygonix BT-MD-914 of wil je andere gebruikers van dit product iets vragen? Stel een vraag
Pagina 1/4
Installation
Montieren Sie den Tresor an einer vertikalen Fläche, z. B. an der Wand, an der Tür oder im
Inneren eines Schranks. Überprüfen Sie, ob die mitgelieferten Schrauben für die Art der zu
befestigenden Oberäche geeignet sind. Im Zweifelsfall einen Fachmann konsultieren.
Überprüfen Sie vor dem Bohren immer, ob sich unter der Oberäche verdeckte Drähte oder
Rohre benden, die beschädigt werden könnten.
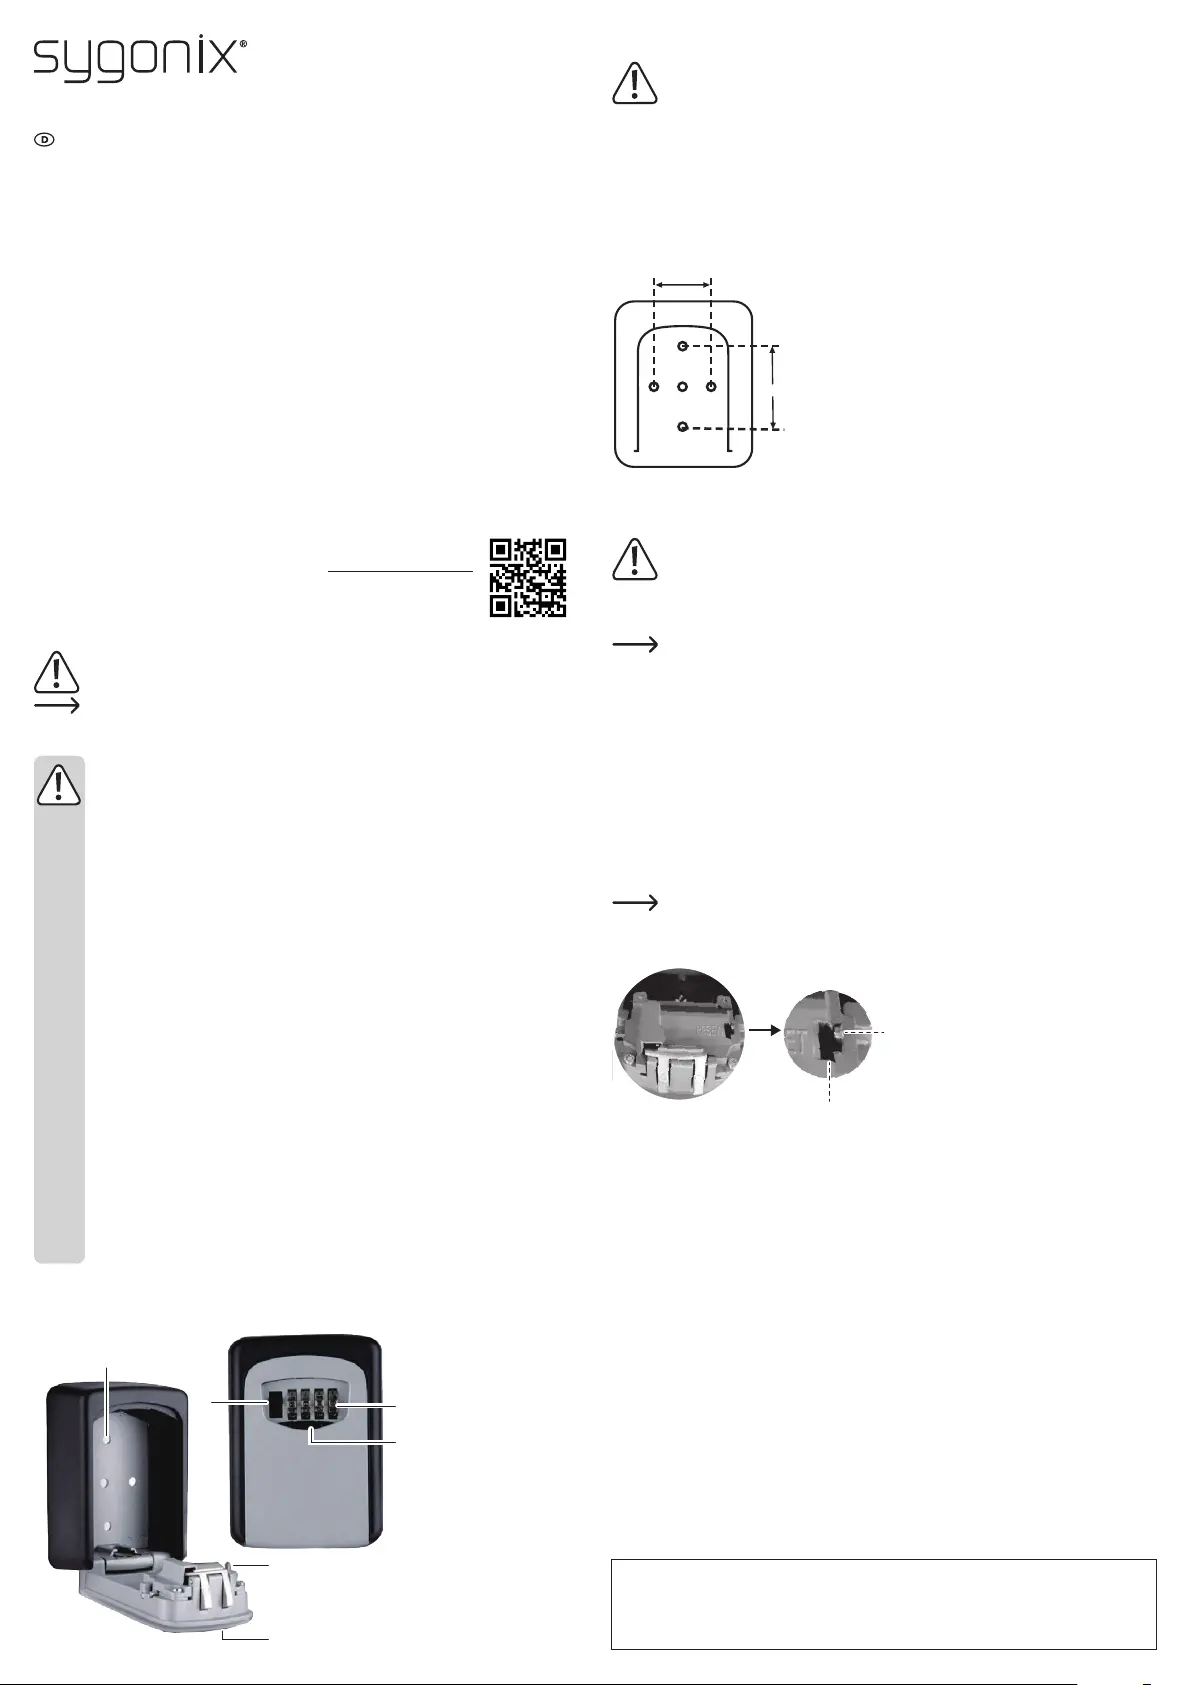
Das mittlere Loch ist für eine Gucklochhalterung (nicht im Lieferumfang enthalten) vorgesehen.
57 mm
40 mm
• Fachabdeckung (6) öffnen.
• Anweisungen zum Öffnen der Tresortür (4) nden Sie im Abschnitt
„Tresor entsperren“.
• Im Inneren benden sich 4 Befestigungspunkte (1). Halten Sie den
Tresor an die Wand und markieren Sie die Stelle für die Löcher mit
einem Bleistift.
• Verwenden Sie eine Wasserwaage, um sicherzustellen, dass die
Löcher eben sind.
• Verwenden Sie einen Bohrer mit einem Durchmesser von 6 mm, um
Löcher für die mitgelieferten Schrauben zu bohren.
• Setzen Sie die Kunststoffdübel ein. Verwenden Sie einen Hammer,
um diese bei Bedarf einzufügen.
• Setzen Sie den Tresor gegen die Löcher an der Wand und befestigen
Sie sie mit den mitgelieferten Schrauben.
• Schließen Sie die Tresortür (4) und verschlüsseln Sie die
Zifferntasten (5).
• Schließen Sie die Fachabdeckung (6).
Betrieb
Um die Sicherheit zu maximieren, sollte die Kombination so bald wie möglich von der
Werkseinstellung „0000“ geändert werden.
Halten Sie die Fachabdeckung (6) für erhöhten Wasserwiderstand geschlossen.
Rotieren Sie die Zifferntasten (5) wöchentlich, damit sie gut funktionieren.
a) Tresor entsperren
Wenn Sie die Kombination zum Entsperren des Tresors eingeben, decken Sie die Ziffertasten (5)
mit Ihrer Hand oder Ihrem Körper ab, um zu verhindern, dass andere die Kombination sehen. Die
Werkseinstellung ist „0000“.
• Schieben Sie die Fachabdeckung (6) auf, um die Zifferntasten (5) freizulegen.
• Drehen Sie die Zifferntasten (5) auf die eingestellte Kombination.
• Drücken Sie auf den Freigabeschalter (2), um die Tresortür (4) zu öffnen.
• Öffnen Sie die Tresortür (4) weit und legen Sie die Schlüssel in den Tresor oder entfernen Sie sie.
b) Tresor verriegeln
• Schließen Sie die Tresortür (4).
• Verschlüsseln Sie die Zifferntasten (5).
• Schieben Sie die Fachabdeckung (6) zu.
c) Stellen Sie eine neue Kombination ein.
Die Werkseinstellung ist „0000“.
A
B
• Öffnen Sie den Tresor. Siehe Abschnitt „Tresor
entsperren“.
-Belassen Sie die Zifferntasten (5) in der
Entsperr-Kombination.
• Schieben Sie den RESET- Knopf von Position
A nach B.
• Stellen Sie die Zifferntasten (5) auf eine neue
4-stellige Kombination ein.
• Schieben Sie den RESET- Knopf zurück in
Position A, um die neue Kombination zu xieren.
• Schließen Sie die Tresortür (4) und die
Fachabdeckung (6).
Pege und Reinigung
• Das Produkt ist wartungsfrei.
• Es wird empfohlen, die Tasten wöchentlich zu rotieren, damit sie gut funktionieren.
• Verwenden Sie keine aggressiven Reinigungsmittel, Alkohol oder andere chemischen Lösungsmittel, da
diese zu Schäden am Gehäuse und zu Fehlfunktionen führen können.
• Verwenden Sie zum Reinigen des Produkts ein trockenes, faserfreies Tuch.
Technische Daten
Zugang .................................................zum 4-Tastenkombinationsschloss
Material .................................................Aluminiumlegierung
Betriebsbedingungen ............................-20 bis +60 °C, 40 – 85 % relative Luftfeuchte
Lagerbedingungen ................................-20 bis +60 °C, 40 – 85 % relative Luftfeuchte
Abmessungen (B x H x T) ....................87,5 x 41 x 120 mm
Gewicht .................................................441 g
Gebrauchsanweisung
Schlüsseltresor „KeySafe C4“
Best.-Nr. 1732742
Bestimmungsgemäße Verwendung
Dieser Tresor bietet einen relativ sicheren Platz zur Aufbewahrung von Schlüsseln. Er verfügt über ein
4-stelliges Zahlenschloss, das durch eine Schiebefachabdeckung vor Witterungseinüssen geschützt
ist. Das kompakte Aluminiumgehäuse ist korrosions- und schlagfest. Es kann mit den mitgelieferten
Montageteilen an einer horizontalen Fläche befestigt werden.
Aus Sicherheits- und Zulassungsgründen dürfen Sie das Produkt nicht umbauen und/oder verändern. Falls
Sie das Produkt für andere als die zuvor genannten Zwecke verwenden, könnte das Produkt beschädigt
werden. Darüber hinaus kann eine unsachgemäße Verwendung zu anderen Gefahren führen. Lesen Sie
sich die Bedienungsanleitung genau durch und bewahren Sie diese auf. Reichen Sie das Produkt nur
zusammen mit der Bedienungsanleitung an dritte Personen weiter.
Dieses Produkt erfüllt die gesetzlichen nationalen und europäischen Anforderungen. Alle enthaltenen
Firmennamen und Produktbezeichnungen sind Warenzeichen der jeweiligen Inhaber. Alle Rechte vorbehalten.
Lieferumfang
• Schlüsselfach
• 4 Schrauben
• 4 Kunststoffdübel
• Bedienungsanleitung
Aktuelle Bedienungsanleitungen
Laden Sie aktuelle Bedienungsanleitungen über den Link www.conrad.com/downloads
herunter oder scannen Sie den abgebildeten QR-Code. Befolgen Sie die Anweisungen
auf der Webseite.
Symbol-Erklärungen
Das Symbol mit dem Ausrufezeichen im Dreieck weist auf wichtige Informationen in dieser
Bedienungsanleitung hin. Lesen Sie diese Informationen immer aufmerksam.
Das Pfeilsymbol weist auf besondere Informationen und auf Ratschläge zur Bedienung hin.
Sicherheitsanweisungen
Lesen Sie die Bedienungsanleitung sorgfältig durch und beachten Sie insbesondere
die Sicherheitshinweise. Falls Sie die Sicherheitshinweise und Informationen für einen
ordnungsgemäßen Gebrauch in dieser Bedienungsanleitung nicht beachten, haften
wir nicht für möglicherweise daraus resultierende Verletzungen oder Sachschäden.
Außerdem erlischt in solchen Fällen die Gewährleistung/Garantie.
• Das Produkt ist kein Spielzeug. Halten Sie es von Kindern und Haustieren fern.
• Lassen Sie das Verpackungsmaterial nicht achtlos liegen. Dieses könnte für Kinder zu einem
gefährlichen Spielzeug werden.
• Schützen Sie das Produkt vor extremen Temperaturen, direkter Sonneneinstrahlung, starken
Erschütterungen, hoher Luftfeuchtigkeit, Feuchtigkeit, brennbaren Gasen, Dampf und
Lösungsmitteln.
• Setzen Sie das Produkt keiner mechanischen Beanspruchung aus.
• Wenn kein sicherer Betrieb mehr möglich ist, nehmen Sie das Produkt außer Betrieb und
schützen Sie es vor unbeabsichtigter Verwendung. Der sichere Betrieb ist nicht mehr
gewährleistet, wenn das Produkt:
-sichtbare Schäden aufweist,
-nicht mehr ordnungsgemäß funktioniert
-über einen längeren Zeitraum unter ungünstigen Umgebungsbedingungen gelagert wurde oder
-erheblichen Transportbelastungen ausgesetzt wurde.
• Gehen Sie vorsichtig mit dem Produkt um. Stöße, Schläge oder sogar das Herunterfallen aus
geringer Höhe können das Produkt beschädigen.
• Wenden Sie sich an eine Fachkraft, wenn Sie Zweifel über die Arbeitsweise, die Sicherheit
oder den Anschluss des Gerätes haben.
• Lassen Sie Wartungs-, Anpassungs- und Reparaturarbeiten ausschließlich von einer
Fachkraft bzw. einer Fachwerkstatt ausführen.
• Sollten Sie noch Fragen haben, die in dieser Bedienungsanleitung nicht beantwortet werden,
wenden Sie sich an unseren technischen Kundendienst oder an andere Fachleute.
Bedienelemente
1
2
3
5
6
4
1 Befestigungspunkt
2 Freigabeschalter
3 Taste RESET
4 Tresortür
5 Zifferntasten
6 Fachabdeckung
Dies ist eine Publikation der Conrad Electronic SE, Klaus-Conrad-Str. 1, D-92240 Hirschau (www.conrad.com). Alle Rechte
einschließlich Übersetzung vorbehalten. Reproduktionen jeder Art, z. B. Fotokopie, Mikroverlmung oder die Erfassung in
elektronischen Datenverarbeitungsanlagen bedürfen der schriftlichen Genehmigung des Herausgebers. Nachdruck, auch
auszugsweise, verboten. Die Publikation entspricht dem technischen Stand bei Drucklegung.
Copyright 2018 by Conrad Electronic SE. *1732742_v1_1018_02_dh_m(1)_de
Product specificaties
| Merk: | Sygonix |
| Categorie: | Kluis |
| Model: | BT-MD-914 |
Heb je hulp nodig?
Als je hulp nodig hebt met Sygonix BT-MD-914 stel dan hieronder een vraag en andere gebruikers zullen je antwoorden
Handleiding Kluis Sygonix

19 December 2023
Handleiding Kluis
Nieuwste handleidingen voor Kluis
8 Juli 2026
19 Juni 2026
16 Juni 2026
16 Juni 2026
15 Juni 2026
15 Juni 2026
15 Juni 2026
15 April 2026
6 April 2026
29 Maart 2026