Sunnydaze Decor SL-474 Handleiding


Lees hieronder de 📖 handleiding in het Nederlandse voor Sunnydaze Decor SL-474 (2 pagina's) in de categorie Waterpomp. Deze handleiding was nuttig voor 8 personen en werd door 2 gebruikers gemiddeld met 4.5 sterren beoordeeld

Pagina 1/2
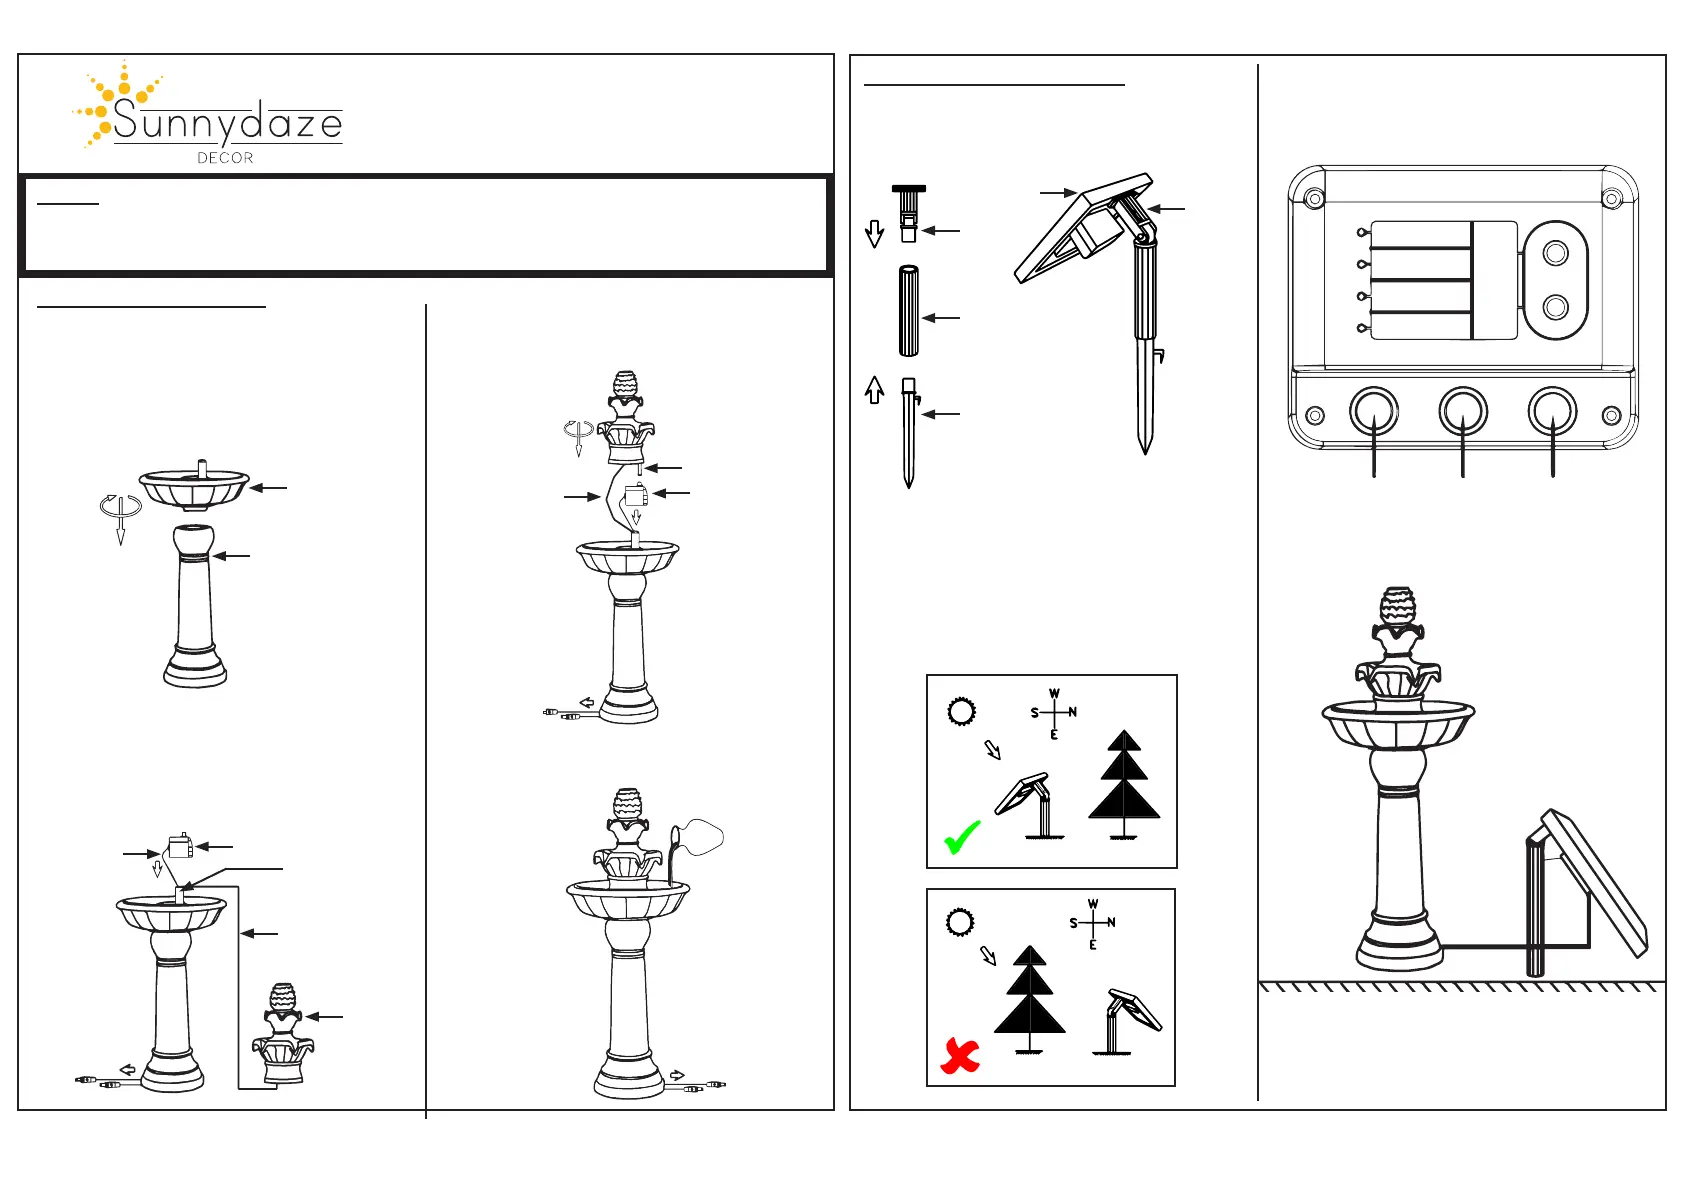
INSTRUCTIONS (PAGE 2 / 4)INSTRUCTIONS (PAGE 1 / 4)
SOLAR PANEL ASSEMBLY
6. Insert the spike into the ground. Posion the
solar panel to face south (in northern hemisphere)
to make the most of daylight hours. It is important
to angle the solar panel towards the sun when sun
is at its highest point. Ensure the solar panel is not
shaded by trees, shrubs or buildings.
8. Your new fountain is ready to use.
7. Connect the pump and LED light cables to the
solar panel (charger sold separately).
PUMP
Continual ON
until all battery power is used
LIGHTCHARGER
(sold separately)
4-Hour Timer
(on for 4 hours only)
Daily 4-Hour Timer
(on for 4 hours, off for 20 hours,
repeates daily at the same time)
Battery Low
(battery pack needs
to be charged)
Power
on/off
Timer
modes
INCORRECT
CORRECT
5. Connect the bracket, tube and spike and aach
the solar panel to the bracket as shown.
Over me, the fountain nish may gradually mellow
in color, this is part of the natural aging process.
SL-474 SL0456RSL-474 SL0456R
BRACKET
TUBE
BRACKET
SPIKE
SOLAR PANEL
10/201910/2019
4. Fill the fountain with water, ensuring the pump
is completely submersed.
3. Aach the pump to the hose, then place ornate
column onto the reservoir and twist the ornate
column to secure.
1. Place reservoir on top of the pedestal and twist
the reservoir clockwise to secure.
FOUNTAIN ASSEMBLY
Select a level locaon to place the fountain.
Assemble components on a smooth, clean surface
to avoid scratching or damaging the nish.
2. Feed the pump and LED light cables through
the plasc tube in the reservoir, and through the
channel on boom of the pedestal.
INSTRUCTIONS
SL-474
Read carefully & save instrucons for future reference.
PARTS
(1) Ornate Column
(1) Reservoir (bowl)
(1) Pedestal
(1) Pump with 5m Cable
(1) LED Light with 5m Cable (in column)
(1) Solar Panel, Bracket, Tube, Spike
RESERVOIR
PEDESTAL
PLASTIC TUBE
ORNATE
COLUMN
PUMP
PUMP
POWER
CABLE
LED LIGHT CABLE
HOSE
PUMP
LED
LIGHT
CABLE
Ensure all parts are accounted for before disposing of packaging.
INSTRUCTIONS (PAGE 4 / 4)INSTRUCTIONS (PAGE 3 / 4)
9. SOLAR PANEL OPERATION
NOTE: The LED light is designed to only work at nighme.
Connual ON Mode: Press [Power on/o] buon,
the top indicator light [connual on] will be lit the
pump will run connuously unl the baery power
runs out. The pump will automacally restart when
the solar panel baery has been suciently charged
with sunlight.
4-Hour Timer Mode: Press [Timer modes] buon unl
the second indicator light [4hrs Timer] is lit the
pump will run for 4 hours and stop. The pump will not
run again unl the solar panel is manually restarted.
Daily 4-Hour Timer Mode: Press [Timer modes]
buon unl the third indicator light [daily 4hrs Timer]
is lit the pump will run for 4 hours and shut down
(in standby) for 20 hours; this operaon will repeat
daily at the same me. You can reset the pump' s daily
start up me by switching it on at a new desired me
in this same mode. The third indicator light will NOTE:
blink slowly when the pump has reached the 4-hour
runme and be in standby for the following 20 hours.
In order to save baery power, the indicator light will
turn o but you can acvate the indicator light to
check its status with a single push of either buon, the
indicator light will be on for a while and shut o again.
BATTERY LOW [RED INDICATOR LIGHT BLINKING]:
Baery power is low and the pump will stop running
soon for protecng the baery. The red indicator light
will turn o aer the solar panel receives enough
sunlight for the baery to be recharged.
PLEASE NOTE: This model allows for the baery pack
to be charged with an electric charger (sold original
separately). Only use the original baery charger as
alternaves may damage the baery and will void the
warranty. See contact informaon under WARRANTY
to order the compable charger.
12. BATTERY INFORMATION
The Li-ion backup baery pack, like all rechargeable
baeries, has a limited life span and becomes less
ecient with repeated charge/discharge cycles. As
the capacity of the baery reduces over me, you may
not achieve the full hours of operaon.
If you nd that the baery appears less ecient try to
"boost charge" it by turning the power o for 1 to 2
sunny days to allow the baery to achieve a maximum
charge. Occasional "boost charges" will help prolong
the baery life. If aer this boost charge your baery
sll does not perform to expectaons, replace it with
a new baery.
13. BATTERY REPLACEMENT
IMPORTANT: Only use original backup baery packs,
alternaves may be incompable which may damage
the system and will void the warranty.
See contact informaon under WARRANTY to order
the compable replacement baery pack.
Remove the screws
(part 1) from the control
panel cover (part 2) using a
Phillips-head screwdriver.
Disconnect the baery
pack connector (part 3),
and remove the baery
pack (part 4) from control
panel base (part 5).
Connect the new baery pack connector to the
control panel base and insert the baery.
Replace the panel cover and ghten the screws.
14. TROUBLESHOOTING
Check all solar panel, pump, and LED light connecons.
Make sure connecons are secure and the cables are
plugged into the correct ports on the control panel.
Ensure the solar panel is correctly posioned in a full-
sun locaon and is not shaded by trees, shrubs or
buildings; refer to page 2.
Check the control panel and conrm it is set to the
preferred operaon seng; refer to page 3.
If the [Baery Low] light is blinking, the baery pack
power is crically low and requires charging. Switch o
the pump and leave the solar panel in direct sunlight
for at least 6 hours to recharge the baery pack.
Check the water level to make sure the pump is fully
submerged.
Check the fountain tubing for kinks and obstrucons.
Also check to make sure the tubing is ghtly connected
to the pump.
Check the pump to make sure it is not blocked by or
clogged with debris.
The pump may be "air locked" from water levels
geng too low or addional water being added. Turn
the pump on/o several mes to clear any air that
may be trapped inside the pump.
16. CARE INFORMATION
Fill the fountain with enough clean water to
ensure the pump is fully submersed; never allow the
fountain pump to run dry as this will cause damage
and invalidate the warranty.
Clean the fountain and add water on a regular basis.
Always shut off the power supply before cleaning
and maintaining the fountain and the recirculating
pump.
During freezing weather, drain the fountain,
disconnect the pump, cables and solar panel, and s
tore indoors; allowing ice to form inside the fountain
will damage the fountain and invalidate the
warranty.
The opmal temperature for lithium baeries is
10°C to 45°, do not use the product beyond this
temperature range.
11. MAINTENANCE OF PUMP
This solar pump is designed to last years if it is
properly cleaned and maintained. If the pump starts
losing power or stops working, clean the pump lter
and impeller with clean water.
j k l Front Case Filter Impeller Cover
m n Impeller Pump
Dispose of the baeries in accordance
with local laws and regulaons.
IMPORTANT!
Make sure the baery has been recharged before
storing. Over me, baeries will leak power so if it is
stored at no charge, there is a chance it won't accept a
charge again. To avoid this problem, turn the pump o
and leaving the solar panel out for 1 or 2 sunny days to
ensure the baery has been re-charged.
15. TECHNICAL DATA
MAX. PUMP WATER FLOW: 250LPH
MAX. PUMP WATER LIFT: 90cm
PUMP WORKING VOLTAGE: DC8.4V~DC6.5V
PUMP WORKING POWER: 1.2W~0.6W
PROTECTION GRADE OF PUMP: IP68
SOLAR PANEL: 2W-9V-0.222A
SOLAR PANEL SIZE: 213 x 202 x 20 mm
PROTECTION GRADE OF PANEL: IP44
LI-ION BATTERY PACK: 7.4V/1.5Ah
PROTECTION GRADE OF BATTERY BOX: IP44
LED LIGHT WORKING VOLTAGE: DC7.4V
LED LIGHT WORKING POWER: 0.15W
PROTECTION GRADE OF LED LIGHT: IP68
SL-474 SL0456RSL-474 SL0456R
17. WARRANTY
Thank you for choosing Sunnydaze Decor. We
stand behind our brand and the quality of the
items we sell. Replacement parts or products
will be sent at our discreon within the 1-year
warranty period. Proof of purchase, with the date
of purchase as well as photos of the merchandise
defect, must be provided. Photos are used to
determine the cause of defects and for future
quality control. Register your warranty at
www.serenityhealth.com/warranty/
If you have any quesons, comments or concerns,
feel free to contact us by phone at 888-881-4668,
by email: , or customerservice@serenityhealth.com
via our contact us page at
www.SerenityHealth.com/contact-us/
10. PERFORMANCE OF PUMP
The performance of the pump depends on the orientaon
of the solar panel being toward the sun and sunlight
strength; pump performance is not guaranteed when the
solar panel is in the shade or poor weather condions.
Max. Data is obtained during opmal condions; solar
panel performance cannot be guaranteed if placed
in the shade or during poor weather condions. The
performance of the pump also depends on the baery
power level, the pump cannot operate if baery power is
low.
10/201910/2019


Product specificaties

Merk: Sunnydaze Decor
Categorie: Waterpomp
Model: SL-474

Heb je hulp nodig?

Als je hulp nodig hebt met Sunnydaze Decor SL-474 stel dan hieronder een vraag en andere gebruikers zullen je antwoorden


Handleiding Waterpomp Sunnydaze Decor

Handleiding Waterpomp

Nieuwste handleidingen voor Waterpomp