Stinger SR-GM14H Handleiding
Bekijk gratis de handleiding van Stinger SR-GM14H (64 pagina’s), behorend tot de categorie Autoradio. Deze gids werd als nuttig beoordeeld door 22 mensen en kreeg gemiddeld 4.9 sterren uit 3 reviews. Heb je een vraag over Stinger SR-GM14H of wil je andere gebruikers van dit product iets vragen? Stel een vraag
Pagina 1/64
Stinger HEIGH10 Radio Replacement Kit
for select 2014-2019 Silverado/Sierra Truck
SR-GM14H
© 2020 AAMP Global. All rights reserved. PAC is a Power Brand of AAMP Global.
Pacific Accessory Corporation
Page 1
Rev: V1
Date: 030121
®
®
Introduction and Features
The SR-GM14H is a complete radio replacement kit for the installation of the Stinger HEIGH10
®
modular radio in Chevrolet
Silverado and GMC Sierra trucks. All modules, cables and adapters are included to retain important features of the factory system,
including: OnStar, front and rear park assist, warning chimes, factory reverse camera, steering wheel-mounted radio controls and
AM/FM reception. Plug & Play wiring harnesses allow for quick and easy installation without the need to cut or splice any wiring.
The display mounting panel allows ush mounting the 10 inch display without modifying/cutting any part of the vehicle’s sub-dash.
Important Notes
Recommended Tools
We recommend reading this manual thoroughly to familiarize yourself
with the entire process prior to beginning the installation.
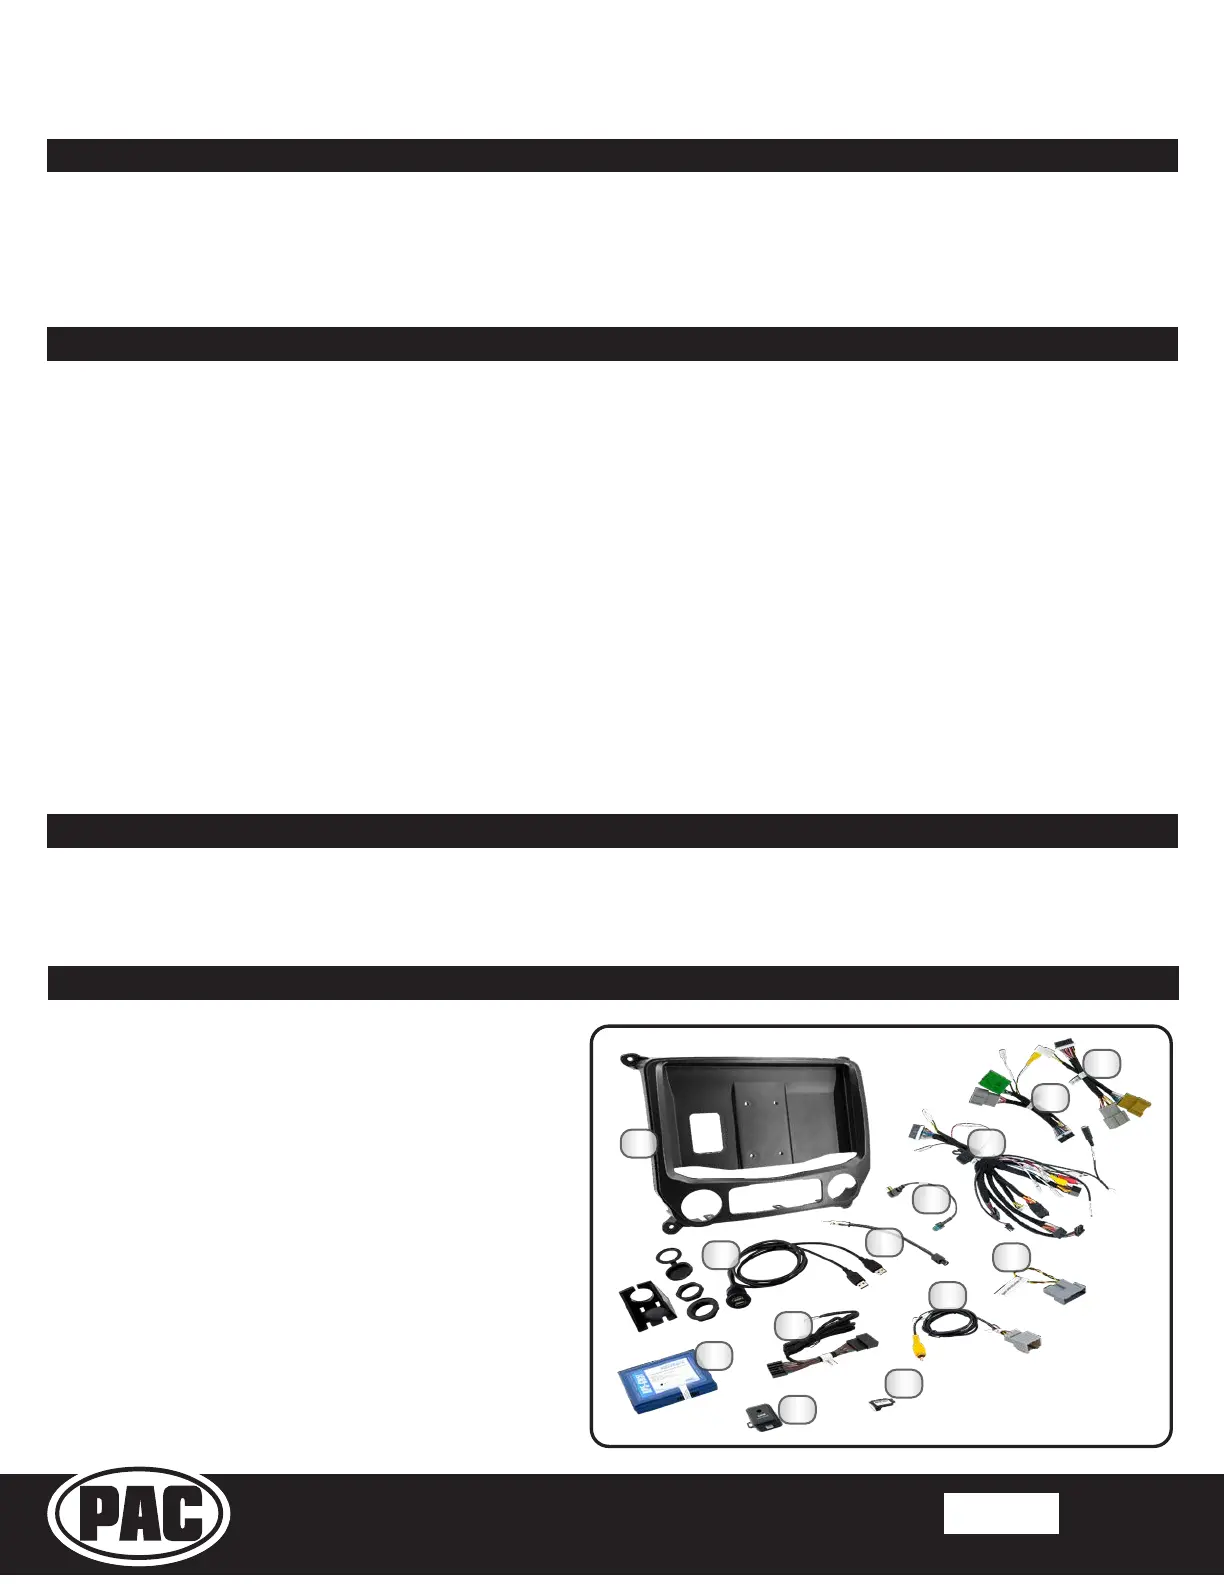
1. HEIGH10 Display Mounting Panel
2. Dual USB Extension (SSUSB2)
3. AM / FM Antenna Adapter (BAA22)
4. Satellite Antenna Adapter (SAT-01)
5. Main Harness (SR-GM14H-HAR-A)
6. Vehicle Side Harness B (SR-GM14H-HAR-B)
7. Vehicle Side Harness C (SR-GM14H-HAR-C)
8. Radio Replacement Interface (RP5-GM51)
9. Steering Wheel Control Harness (GM5LIN-SW-HAR)
10. Factory Rear Camera Adapter (CAM-GM51)
11. IOB Display Harness (GM5CAM-DIS-HAR)
12. Chime Module (CMX)
13. Dierential Video Adapter (RPA-VA1)
Included Components
1
4
6
10
8
5
2
11
3
7
9
12
13
1. Does not retain the following factory features:
2. Not compatible with vehicles equipped with Bose amplied audio system.
3. Please make your vehicle settings selections before removing the factory radio for optimal installation time. Once the radio
has been removed, the vehicle settings which are normally selected through the factory radio can be accessed and changed
by downloading and installing the PAC Vehicle Settings program from http://www.pac-audio.com/rmware
4. The Voice button can be set to activate the factory OnStar function when pressed for longer than 1.5 seconds or given
the ability to control the aftermarket radio. This option can be found in the PAC Vehicle Settings program mentioned above in
note three. The default setting for this button is to control the factory OnStar. If this button is set to control the aftermarket radio,
OnStar can still be accessed by using the mirror controls.
● Factory satellite radio
● Rear seat entertainment system (RSE)
● Steering wheel control backlighting
● Factory USB Ports
Plastic Panel Tool
7mm Socket
10mm Socket
Pick Tool
Wire Feeder
Ratchet
Torx T15 Screwdriver
Small Flat-blade Screwdriver
NOTE: Along with the SR-GM14H components,
additional hardware and wire harnesses from the
HEIGH10 (UN1810) kit will also be used in the
installation.
Product specificaties
| Merk: | Stinger |
| Categorie: | Autoradio |
| Model: | SR-GM14H |
Heb je hulp nodig?
Als je hulp nodig hebt met Stinger SR-GM14H stel dan hieronder een vraag en andere gebruikers zullen je antwoorden
Handleiding Autoradio Stinger

18 Februari 2024
18 Februari 2024
25 Augustus 2023
Handleiding Autoradio
Nieuwste handleidingen voor Autoradio
20 Juli 2026
29 Juni 2026
12 Juni 2026
27 Mei 2026
26 Mei 2026
3 Mei 2026
29 April 2026
28 April 2026
16 Maart 2026
27 Februari 2026