StarTech.com ST121USBHD Handleiding
StarTech.com AV extender ST121USBHD
Bekijk gratis de handleiding van StarTech.com ST121USBHD (2 pagina’s), behorend tot de categorie AV extender. Deze gids werd als nuttig beoordeeld door 22 mensen en kreeg gemiddeld 4.3 sterren uit 3 reviews. Heb je een vraag over StarTech.com ST121USBHD of wil je andere gebruikers van dit product iets vragen? Stel een vraag
Pagina 1/2
Quick-Start Guide
To view manuals, FAQs, videos, drivers, downloads, technical drawings, and more, visit www.startech.com/support.
Manual Revision: June 13, 2023 8:45 AM
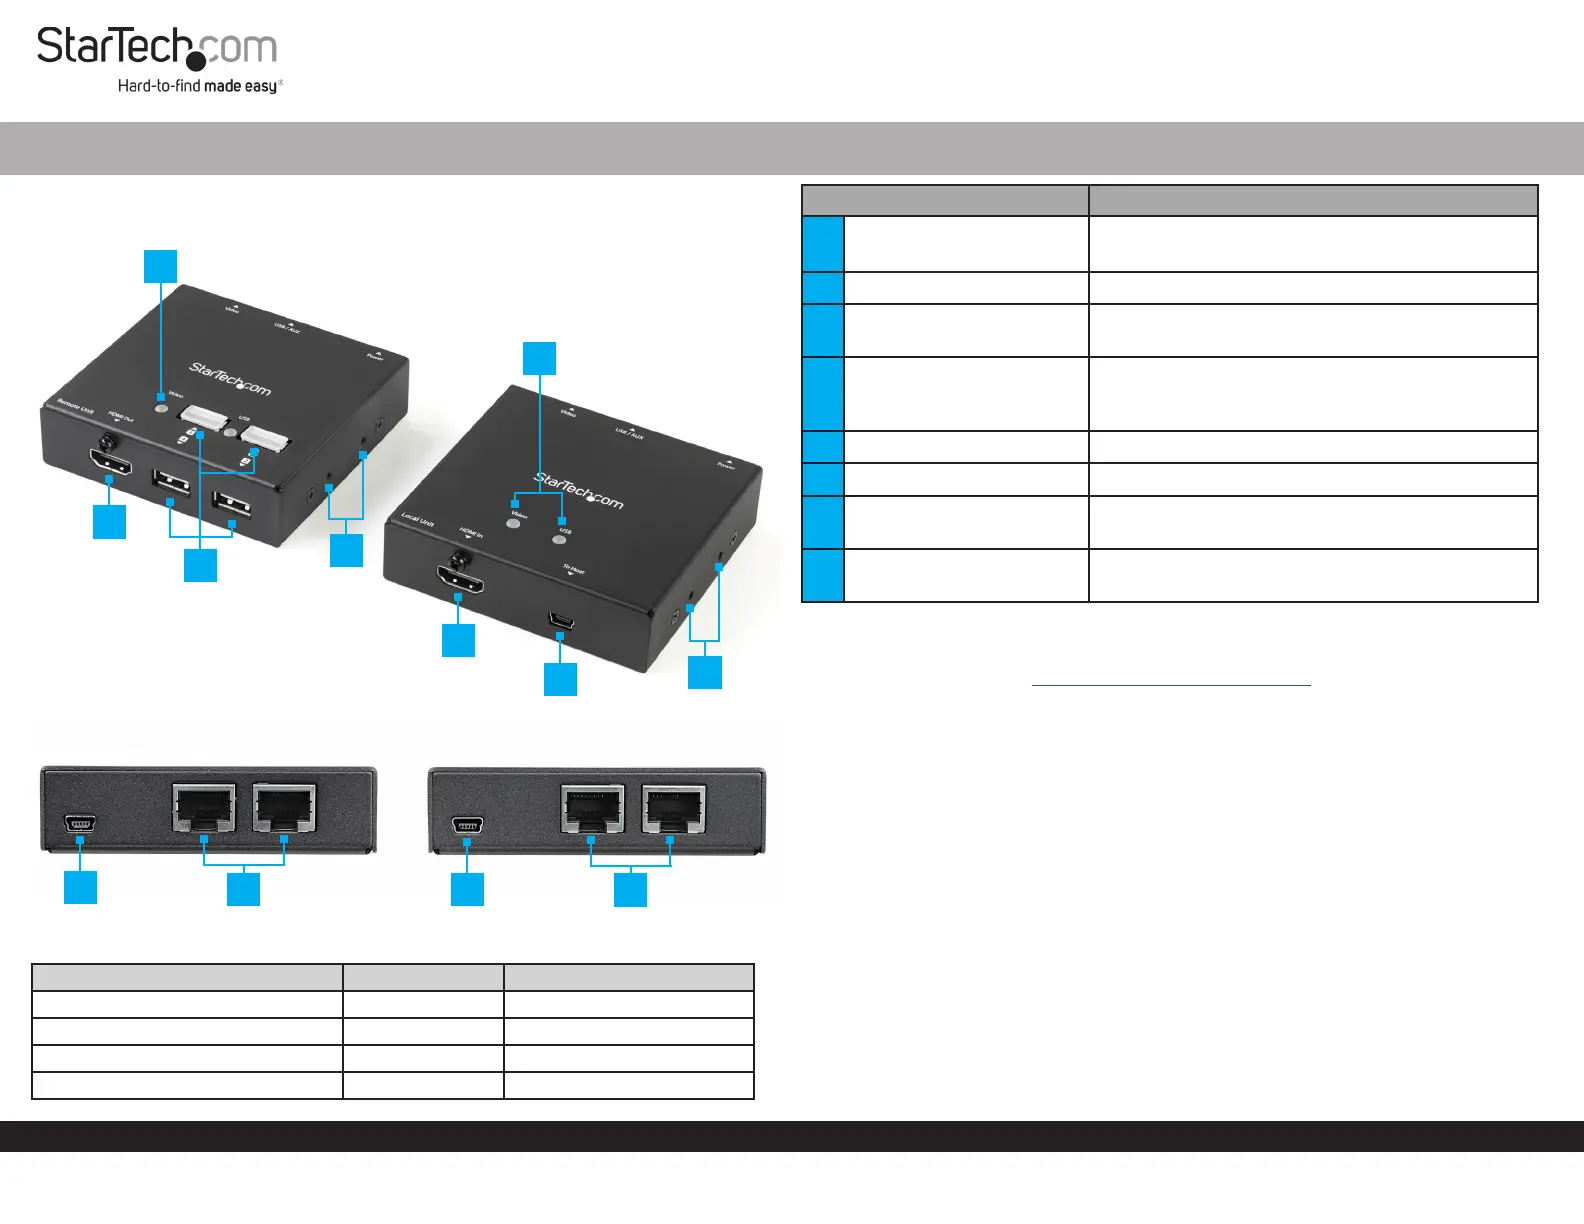
HDMI over CAT6 Extender with 4-port USB Hub
ComponentFunction
1LED Indicators
• Status Lights for Video and USB Connections
• See below for more information
2HDMI Output• Connect to an HDMI Display
3USB 2.0 Hub Ports
• Connect a Mouse, Keyboard, or other USB
Peripherals
4Mounting Holes
• Install the included Mounting Kit
• Two Holes on each side of the Transmitter
and Receiver
5HDMI Input• Connect to an HDMI Source Device
6USB Host Connection• Connect to a USB Port on the Host Device
7Mini-USB Power Input
• Connect to a USB Port on the Host Device, or to
an available USB Wall Charger
8RJ45 Ports
• Connect the Transmitter and Receiver together,
using a CAT6/5e Ethernet Cable (sold separately)
Product Information
For the latest drivers/software, technical specications, and declarations of
conformance, please visit: www.StarTech.com/ST121USBHD
Requirements
• HDMI Source Device x 1
• HDMI Display x 1
• HDMI Cables x 2
• (Optional) USB Peripherals x 4
• (Optional) USB Wall Charger x 2
• (Optional) Phillips Head Screwdriver for Mounting x 1
Package Contents
• HDMI Over CAT6 Transmitter x 1
• HDMI Over CAT6 Receiver x 1
• Ethernet Cables x 2
• USB to Mini-USB Cables x 2
• Universal Power Adapter (NA/EU/EJ/AU) x 1
• Mounting Kit x 1
• Quick-Start Guide x 1
2
3
4
5
6
1
4
7
78
8
1
Product ID
ST121USBHD
Receiver Transmitter
Receiver Transmitter
Cable Distance
Cable TypeDistanceMax Resolution
Shielded CAT650m1080i
Shielded CAT640m1080p
Unshielded CAT630m1080p
Shielded/Unshielded CAT5e15m1080p
Product specificaties
| Merk: | StarTech.com |
| Categorie: | AV extender |
| Model: | ST121USBHD |
| Kleur van het product: | Zwart |
| Gewicht: | 460 g |
| Breedte: | 82 mm |
| Diepte: | 82 mm |
| Hoogte: | 21 mm |
| Type stekker: | Type N |
| Gewicht verpakking: | 1067 g |
| Breedte verpakking: | 309 mm |
| Diepte verpakking: | 180 mm |
| Hoogte verpakking: | 71 mm |
| Soort: | AV-zender & ontvanger |
| USB-connectortype: | Mini-USB B, USB Type-A |
| Connectiviteitstechnologie: | Bedraad |
| Ondersteunde video-modi: | 1080p |
| Maximum resolutie: | - Pixels |
| Meegeleverde kabels: | LAN (RJ-45), USB |
| Snelstartgids: | Ja |
| Inclusief AC-adapter: | Ja |
| Afmetingen verpakking (BxDxH): | 175 x 306 x 74 mm |
| Aantal USB-aansluitingen: | 7 |
| Certificering: | CE, FCC, TAA, REACH |
| Maximale refresh snelheid: | 60 Hz |
| Duurzaamheidscertificaten: | RoHS |
| Kleurdiepte: | 48 Bit |
| Temperatuur bij opslag: | -10 - 60 °C |
| Externe adapter: | Ja |
| Output current: | 1 A |
| HDMI in: | 1 |
| RJ-45 uitgang ports: | 2 |
| Aantal HDMI-uitgangen: | 1 |
| RJ-45 invoer ports: | 2 |
| Operating voltage: | 5 V |
| Maximaal bereik: | 50 m |
| Stroomverbruik (typisch): | 5 W |
| Bedrijfstemperatuur (T-T): | 0 - 40 °C |
| Relatieve vochtigheid in bedrijf (V-V): | 0 - 80 procent |
| Ondersteundende kabel types: | Cat5, Cat5e, Cat6 |
| Draagfrequentie: | 38 kHz |
| Audio support: | Ja |
Heb je hulp nodig?
Als je hulp nodig hebt met StarTech.com ST121USBHD stel dan hieronder een vraag en andere gebruikers zullen je antwoorden
Handleiding AV extender StarTech.com

14 Juli 2026
9 Maart 2026
15 September 2025
30 Juni 2025
13 November 2024
13 November 2024
13 November 2024
13 November 2024
13 November 2024
13 November 2024
Handleiding AV extender
Nieuwste handleidingen voor AV extender
15 Juli 2026
9 Juli 2026
24 Juni 2026
23 Juni 2026
10 Juni 2026
10 Juni 2026
8 Juni 2026
8 Juni 2026
23 Mei 2026
20 Mei 2026