StarTech.com POESLT1G48V Handleiding


Lees hieronder de 📖 handleiding in het Nederlandse voor StarTech.com POESLT1G48V (2 pagina's) in de categorie Netwerkkaart/adapter. Deze handleiding was nuttig voor 24 personen en werd door 2 gebruikers gemiddeld met 4.5 sterren beoordeeld

Pagina 1/2
Quick-Start Guide
To view manuals, FAQs, videos, drivers, downloads, technical drawings, and more, visit www.startech.com/support.
Manual Revision: June 18, 2020
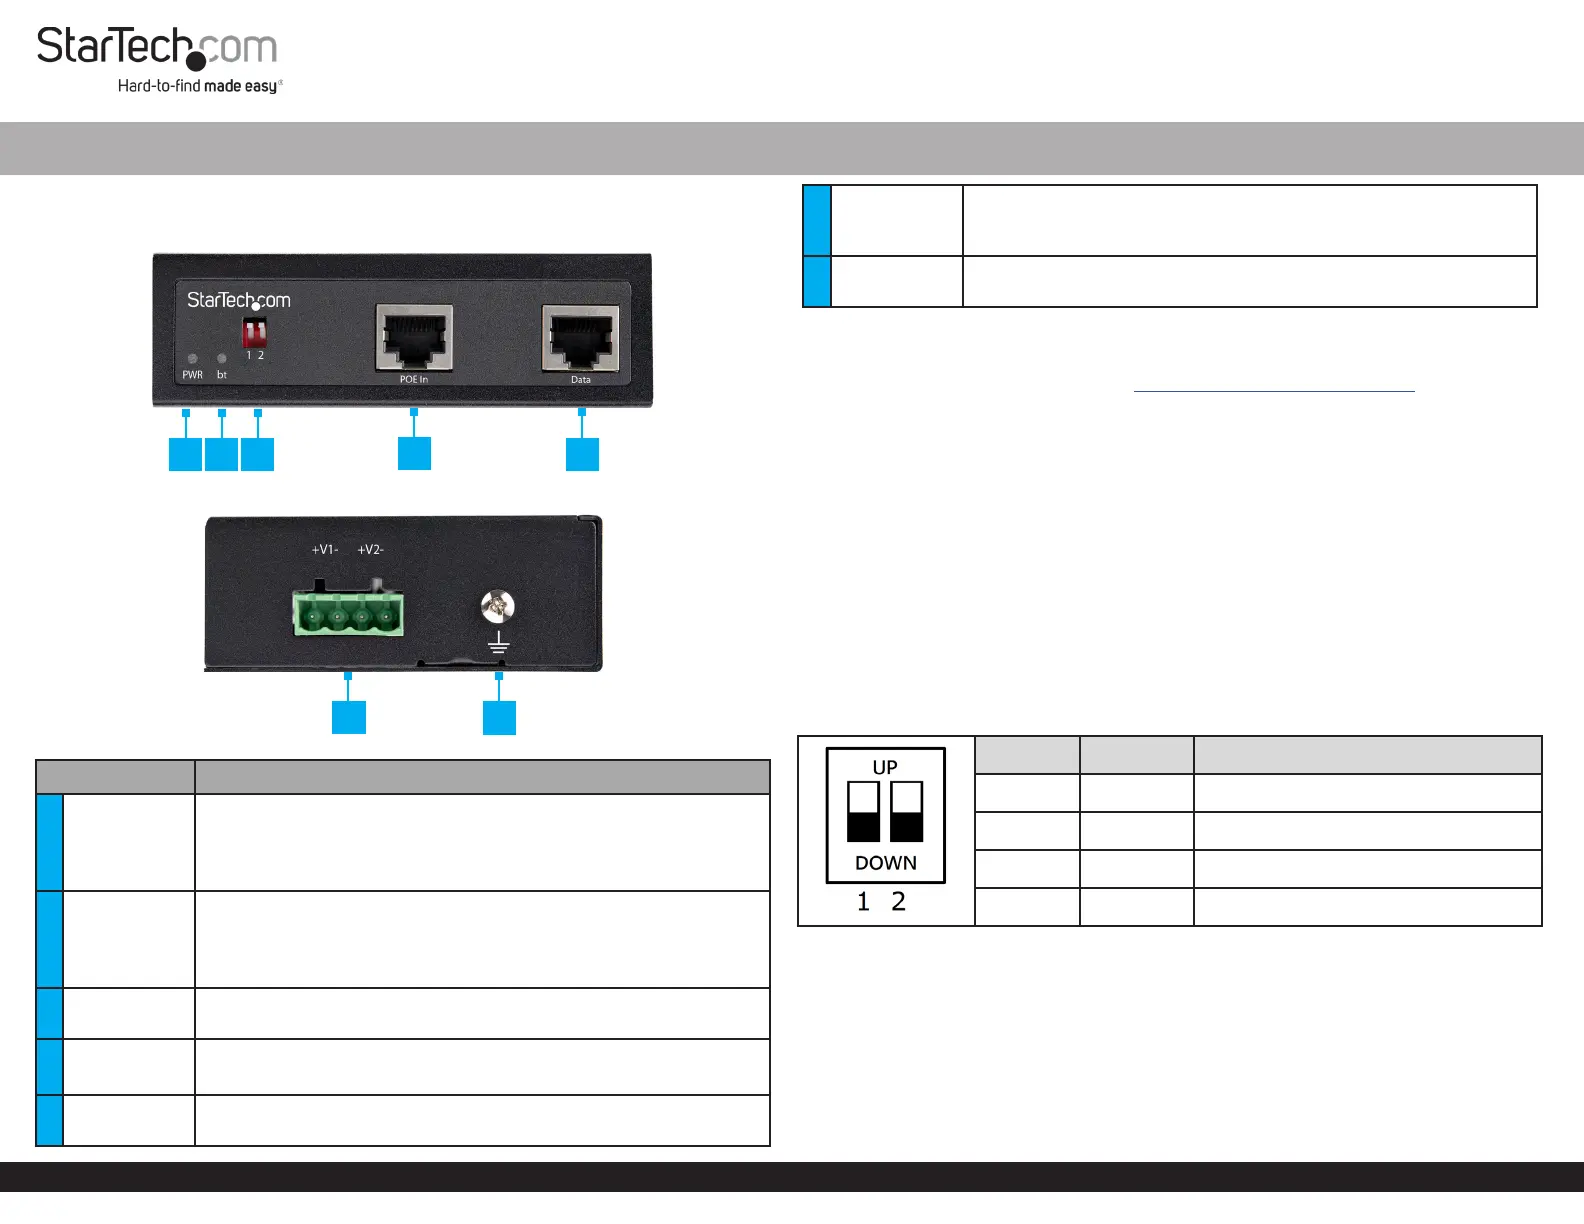
Product Diagram (POESLT1G48V)
Front View
Side View
Component Function
1PWR LED
Indicator
On Terminal Block Power - Power output is detected on
Output Port
O Terminal Block Power - Power output is not detected
Output Port
2bt LED
Indicator
On Power Source Equipment - POE IEEE 802.3bt and (PSE) is
detected on PoE Input Port
O PSE PoE Input - POE IEEE 802.3bt and is not detected on
Port
3DIP Switches
1 and 2
Select the desired output voltage for the Terminal Block Power
Output Port
4PoE Input
Port
Connect via PSE RJ45 Terminated Network Cable
Supported power input voltage range is 15W up to 90W
5Data Port Connect a via Non-PoE Device RJ45 Terminated Network
Cable
60W Industrial-Grade Hardened 802.3bt PoE Splitter 10/100/1000Mbps (48VDC Max Output)
6
Terminal
Block Power
Output Port
Provides power to Non-PoE Equipment
Supported power input voltage range is 44-57V
7Grounding
Screw Attach a to protect Grounding Wire Network Equipment
Requirements
For the latest requirements, please visit .www.startech.com/POESLT1G48V
Power Source Equipment (ex. PoE Gigabit Switch, PoE Injector) x 1
RJ45 Terminated UTP/STP Cat 5e (or better) Network Cable (sold separately) x 2
Earth Ground Connection x 1
Grounding Wire x 1
(Optional - for power) Flat Head Screwdriver x 1
(Optional - for mounting) Phillips Head Screwdriver x 1
(Optional - for mounting) Screws x 2
Installation
Select DC Output Voltage using the DIP Switches
Toggle the up and/or down to select the output voltage of the DIP Switches Terminal
Block Power Output Port.
Grounding the PoE Extender
Connect a to the on the and to the Grounding Screw Grounding Point PoE Splitter
Earth Ground Connection.
Connecting the PoE Splitter
1. Connect a to the Network Cable PoE Output Port of the Power Source Equipment
and to the on the .PoE Input Port PoE Splitter
6 7
51 4
2 3
DIP1 DIP2 Output voltage / Output current
UP UP 48VDC / 1.5A (default)
DOWN UP 24VDC / 2.3A
UP DOWN 16VDC / 2.3A
DOWN DOWN 12VDC / 2.3A
FCC Compliance Statement
This equipment has been tested and found to comply with the limits for a Class A digital device, pursuant to Part 15 of the FCC
rules. These limits are designed to provide reasonable protection against harmful interference when the equipment is operated
in a commercial environment. This equipment generates, uses and can radiate radio frequency energy and, if not installed
and used in accordance with the instruction manual, may cause harmful interference to radio communications. Operation of
this equipment in a residential area is likely to cause harmful interference in which case the user will be required to correct the
interference at his own expense.
This device complies with part 15 of the FCC Rules. Operation is subject to the following two conditions: (1) This device may not
cause harmful interference, and (2) this device must accept any interference received, including interference that may cause
undesired operation.
Changes or modications not expressly approved by StarTech.com could void the user’s authority to operate the equipment.
Industry Canada Statement
This Class A digital apparatus complies with Canadian ICES-003.
Cet appareil numérique de la classe [A] est conforme à la norme NMB-003 du Canada.
CAN ICES-3 (A)/NMB-3(A)
This device complies with Industry Canada licence-exempt RSS standard(s). Operation is subject to the following two
conditions:
(1) This device may not cause interference, and (2) This device must accept any interference, including interference that may
cause undesired operation of the device.
Le présent appareil est conforme aux CNR d’Industrie Canada applicables aux appareils radio exempts de licence. L’exploitation
est autorisée aux deux conditions suivantes:
(1) l’appareil ne doit pas produire de brouillage, et (2) l’utilisateur de l’appareil doit accepter tout brouillage radioélectrique subi,
même si le brouillage est susceptible d’en compromettre le fonctionnement.
Use of Trademarks, Registered Trademarks, and other Protected Names and Symbols
This manual may make reference to trademarks, registered trademarks, and other protected names and/or symbols of third-
party companies not related in any way to StarTech.com. Where they occur these references are for illustrative purposes only
and do not represent an endorsement of a product or service by StarTech.com, or an endorsement of the product(s) to which
this manual applies by the third-party company in question. StarTech.com hereby acknowledges that all trademarks, registered
trademarks, service marks, and other protected names and/or symbols contained in this manual and related documents are the
property of their respective holders.
PHILLIPS® is a registered trademark of Phillips Screw Company in the United States or other countries.
Warranty Information
This product is backed by a two-year warranty.
For further information on product warranty terms and conditions, please refer to .www.startech.com/warranty
Limitation of Liability
In no event shall the liability of StarTech.com Ltd. and StarTech.com USA LLP (or their ocers, directors, employees or
agents) for any damages (whether direct or indirect, special, punitive, incidental, consequential, or otherwise), loss of prots,
loss of business, or any pecuniary loss, arising out of or related to the use of the product exceed the actual price paid for the
product. Some states do not allow the exclusion or limitation of incidental or consequential damages. If such laws apply, the
limitations or exclusions contained in this statement may not apply to you.
Safety Measures
If product has an exposed circuit board, do not touch the product under power.
Mesures de sécuri
Si l’un des circuits imprimés du produit est visible, ne pas touchez le produit lorsqu’il est sous tension.
安全対策
• 製品に露出した状態の回路基盤が含まれる場合、電源が入っている状態で製品に触らないでください
Misure di sicurezza
Se il prodotto p2-ha un circuito stampato visibile, non toccare il prodotto quando è acceso.
Säkerhetsåtgärder
Rör aldrig vid enheter med oskyddade kretskort när strömmen är påslagen.
FR: startech.com/fr
DE: startech.com/de
ES: startech.com/es
NL: startech.com/nl
IT: startech.com/it
JP: startech.com/jp
StarTech.com Ltd.
45 Artisans Cres
London, Ontario
N5V 5E9
Canada
StarTech.com Ltd.
Unit B, Pinnacle 15
Gowerton Rd,
Brackmills
Northampton
NN4 7BW
United Kingdom
StarTech.com LLP
2500 Creekside
Parkwy
Lockbourne, Ohio
43137
U.S.A.
DIN Rail Mounting
1. Align the holes in the with the holes in the back of the DIN Rail Bracket PoE
Splitter.
2. Insert three through the and into the Phillips Head Screws DIN Rail Bracket PoE
Splitter.
3. Tighten the using a .Phillips Head Screws Phillips Head Screwdriver
4. Hang the top of the (the section with the two metal clips) onto a DIN Rail Bracket
Top Hat DIN Rail style .
5. Press the down and forward to lock the bottom section onto the DIN Rail Bracket
DIN Rail.
2. Connect a to the on the and to the Network Cable Data Port PoE Splitter Network
Port Non-PoE Equipment on the .
Powering the Non-PoE Equipment
Connecting and installing the Terminal Block must be completed by a licensed
Electrician.
Notes: Make sure that you turn o the Power Source before connecting the Power
Wire to the Terminal Block.
Do not exceed the recommend voltage as it may result in personal or product damage.
Connect the from a to the Power Wires DC Power Source (44 - 57V DC) Terminal
Block Connectors Switch on the . The terminals are marked on the exterior of the
Switch Positive Wire V+ Negative Wire V- (connect the to and the to ).
Secure the by tightening the in the with a Wires Screws Terminal Block Flat Head
Screwdriver
Mounting the PoE Splitter
Wall Mounting
1. Align the holes in the with the holes in the back of the Wall Mount Brackets PoE
Splitter.
2. Insert two through each and into the Phillips Head Screws Wall Mount Bracket PoE
Splitter.
3. Tighten the using a (sold Phillips Head Screws Phillips Head Screwdriver
separately).
4. Insert two (sold separately) through the and into the Screws Wall Mount Brackets
Mounting Surface.
5. Tighten the using the appropriate .Screws Screwdriver


Product specificaties

Merk: StarTech.com
Categorie: Netwerkkaart/adapter
Model: POESLT1G48V
Kleur van het product: Zwart
Gewicht: 150 g
Breedte: 81.5 mm
Diepte: 104 mm
Hoogte: 32 mm
Gewicht verpakking: 392 g
Breedte verpakking: 162 mm
Diepte verpakking: 64 mm
LED-indicatoren: Ja
Certificering: CE, FCC, UL
Duurzaamheidscertificaten: RoHS
Ethernet LAN, data-overdrachtsnelheden: 10,100,1000 Mbit/s
Bekabelingstechnologie: 10/100/1000Base-T(X)
Netwerkstandaard: IEEE 802.3, IEEE 802.3ab, IEEE 802.3af, IEEE 802.3at, IEEE 802.3u
Temperatuur bij opslag: -40 - 85 °C
Ondersteunde netwerkprotocollen: CSMA/CD
Output current: 1.5 A
Snelle installatiehandleiding: Ja
Ethernet interface type: Gigabit Ethernet
Auto MDI/MDI-X: Ja
Power over Ethernet (PoE): Ja
RJ-45 uitgang ports: 1
Maximale afstand: 100 m
Lengte van de verpakking: 211 mm
RJ-45 invoer ports: 1
Bedrijfstemperatuur (T-T): -40 - 75 °C
Relatieve vochtigheid in bedrijf (V-V): 5 - 95 procent
Code geharmoniseerd systeem (HS): 85044095
Totaal Power over Ethernet (PoE)-budget: 90 W
Duplex systeem: Volledig
Spanningsbeveiliging: Ja
Stroom via Ethernet (PoE): - V

Heb je hulp nodig?

Als je hulp nodig hebt met StarTech.com POESLT1G48V stel dan hieronder een vraag en andere gebruikers zullen je antwoorden


Handleiding Netwerkkaart/adapter StarTech.com

Handleiding Netwerkkaart/adapter

Nieuwste handleidingen voor Netwerkkaart/adapter