StarTech.com POEEXT1G60W Handleiding


Lees hieronder de 📖 handleiding in het Nederlandse voor StarTech.com POEEXT1G60W (2 pagina's) in de categorie Wifi-repeater. Deze handleiding was nuttig voor 22 personen en werd door 2 gebruikers gemiddeld met 4.5 sterren beoordeeld

Pagina 1/2
Quick-Start Guide
To view manuals, FAQs, videos, drivers, downloads, technical drawings, and more, visit www.startech.com/support.
Manual Revision: June 19, 2020
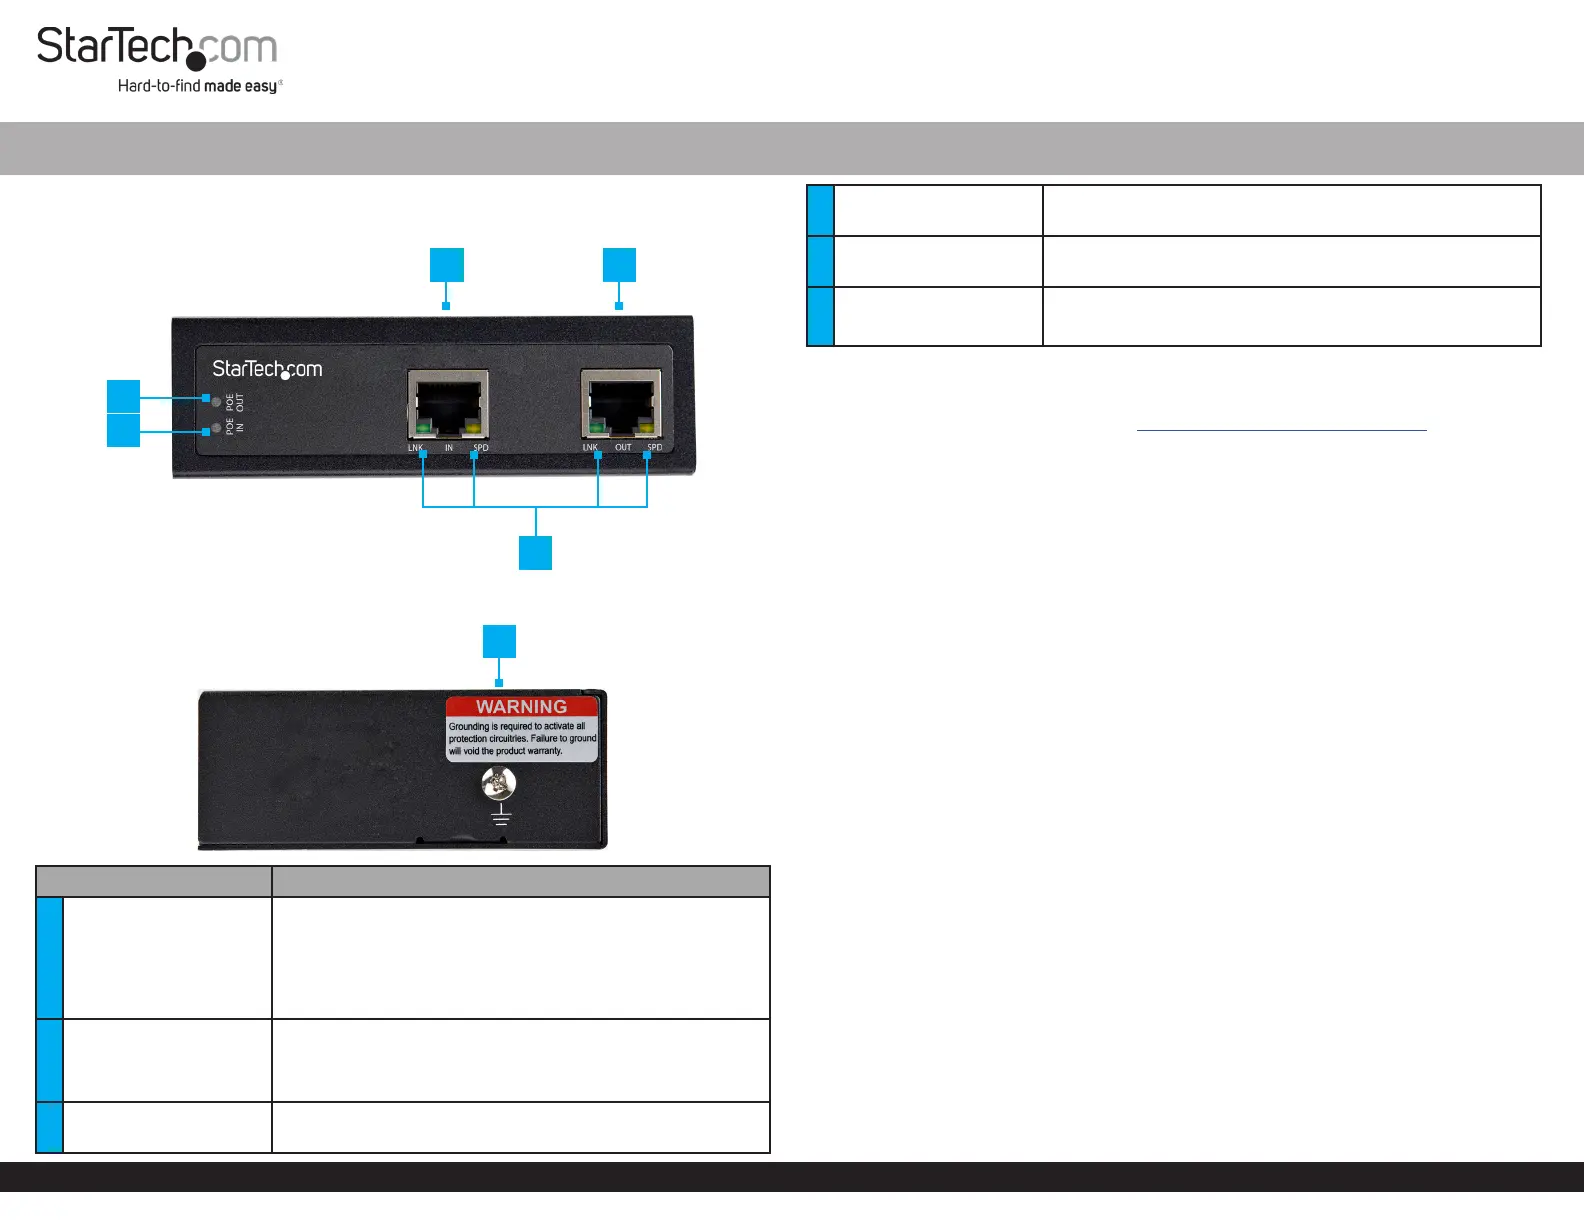
Product Diagram (POEEXT1G60W)
Front View
Side View
Component Function
1PoE Output LED
Indicator
Indicates the current status of the PoE Powered
Device (PD)
ON - is activated and Power Source Equipment (PSE)
PD is detected
OFF - is not detecting PSE PD
2PoE Input LED
Indicator
Indicates the current status of the PSE
ON - Power is detected
O - Power is not detected
3PoE Input Port PSE PoE Extender provides power and data to the
through a Network Cable
60W Industrial-Grade Hardened 802.3af/at PoE Extender 10/100/1000 Mbps
4PoE Output Port The power and data is forwarded to the through a PD
Network Cable
5PoE Input and Output
LED Indicators
Indicates the connection status and network speeds of
the and the PoE Input Port PoE Output Port
6Grounding Screw Attach a to protect Grounding Wire Network
Equipment
Requirements
For the latest requirements, please visit .www.startech.com/POEEXT1G60W
Power Source Equipment x 1
Powered Device x 1
RJ45 Terminated UTP/STP Cat 5e (or better) Network Cable (sold separately) x 2
Earth Ground Connection x 1
Ground Wire x 1
(Optional) #2 Phillips Head Screwdriver x 1
(Optional) Screws for Wall Mounting x 2
Installation
Grounding the PoE Extender
1. Using the loosen the on the Phillips Head Screwdriver Grounding Screw PoE
Extender.
2. Attach the to the . Grounding Wire Grounding Screw
3. Tighten the .Grounding Screw
4. Connect the other end of the to the .Grounding Wire Earth Ground Connection
Connecting the PoE Extender to an Existing PoE Connection
1. Connect a to the on a and to the Network Cable Output Port PSE Device PoE
Input Port PoE Extender on the .
2. Connect a to the on the and to the Network Cable PoE Output Port PoE Extender
Input Port PD on the .
Cascade PoE Extenders
1. Connect a to the on a and to the Network Cable Output Port PSE Device PoE
Input Port PoE Extender on the .
2. Connect a to the on the and to the Network Cable PoE Output Port PoE Extender
PoE Input Port PoE Extender on the next .
6
1
3 4
2
5
FCC Compliance Statement
This equipment has been tested and found to comply with the limits for a Class A digital device, pursuant to Part 15 of the FCC
rules. These limits are designed to provide reasonable protection against harmful interference when the equipment is operated
in a commercial environment. This equipment generates, uses and can radiate radio frequency energy and, if not installed
and used in accordance with the instruction manual, may cause harmful interference to radio communications. Operation of
this equipment in a residential area is likely to cause harmful interference in which case the user will be required to correct the
interference at his own expense.
This device complies with part 15 of the FCC Rules. Operation is subject to the following two conditions: (1) This device may not
cause harmful interference, and (2) this device must accept any interference received, including interference that may cause
undesired operation.
Changes or modications not expressly approved by StarTech.com could void the user’s authority to operate the equipment.
Industry Canada Statement
This Class A digital apparatus complies with Canadian ICES-003.
Cet appareil numérique de la classe [A] est conforme à la norme NMB-003 du Canada.
CAN ICES-3 (A)/NMB-3(A)
This device complies with Industry Canada licence-exempt RSS standard(s). Operation is subject to the following two conditions:
(1) This device may not cause interference, and (2) This device must accept any interference, including interference that may
cause undesired operation of the device.
Le présent appareil est conforme aux CNR d’Industrie Canada applicables aux appareils radio exempts de licence. L’exploitation
est autorisée aux deux conditions suivantes:
(1) l’appareil ne doit pas produire de brouillage, et (2) l’utilisateur de l’appareil doit accepter tout brouillage radioélectrique subi,
même si le brouillage est susceptible d’en compromettre le fonctionnement.
Use of Trademarks, Registered Trademarks, and other Protected Names and Symbols
This manual may make reference to trademarks, registered trademarks, and other protected names and/or symbols of third-
party companies not related in any way to StarTech.com. Where they occur these references are for illustrative purposes only
and do not represent an endorsement of a product or service by StarTech.com, or an endorsement of the product(s) to which
this manual applies by the third-party company in question. StarTech.com hereby acknowledges that all trademarks, registered
trademarks, service marks, and other protected names and/or symbols contained in this manual and related documents are the
property of their respective holders.
PHILLIPS® is a registered trademark of Phillips Screw Company in the United States or other countries.
Warranty Information
This product is backed by a two-year warranty.
For further information on product warranty terms and conditions, please refer to .www.startech.com/warranty
Limitation of Liability
In no event shall the liability of StarTech.com Ltd. and StarTech.com USA LLP (or their ocers, directors, employees or
agents) for any damages (whether direct or indirect, special, punitive, incidental, consequential, or otherwise), loss of prots,
loss of business, or any pecuniary loss, arising out of or related to the use of the product exceed the actual price paid for the
product. Some states do not allow the exclusion or limitation of incidental or consequential damages. If such laws apply, the
limitations or exclusions contained in this statement may not apply to you.
Safety Measures
If product has an exposed circuit board, do not touch the product under power.
Mesures de sécuri
Si l’un des circuits imprimés du produit est visible, ne pas touchez le produit lorsqu’il est sous tension.
安全対策
• 製品に露出した状態の回路基盤が含まれる場合、電源が入っている状態で製品に触らないでください
Misure di sicurezza
Se il prodotto p2-ha un circuito stampato visibile, non toccare il prodotto quando è acceso.
Säkerhetsåtgärder
Rör aldrig vid enheter med oskyddade kretskort när strömmen är påslagen.
FR: startech.com/fr
DE: startech.com/de
ES: startech.com/es
NL: startech.com/nl
IT: startech.com/it
JP: startech.com/jp
StarTech.com Ltd.
45 Artisans Cres
London, Ontario
N5V 5E9
Canada
StarTech.com Ltd.
Unit B, Pinnacle 15
Gowerton Rd,
Brackmills
Northampton
NN4 7BW
United Kingdom
StarTech.com LLP
2500 Creekside
Parkwy
Lockbourne, Ohio
43137
U.S.A.
Operation
PoE Input and Output LED Indicators
LED Type/
Color Status Indication
LNK/Green On Connection established
O No connection established
Flashing Data transmission detected
SPD/Amber On 1000 Mbps link speed detected
O 100 Mbps link speed detected
3. Repeat step 3 until a total of 4 are connected.PoE Extenders
4. Connect a to the on the last and to Network Cable PoE Output Port PoE Extender
the on the .Input Port PD
(Optional) Mounting the PoE Extender
Wall Mounting
1. Align the holes in the with the holes in the back of the Wall Mount Brackets PoE
Extender.
2. Insert two through each and into the Phillips Head Screws Wall Mount Bracket PoE
Extender.
3. Tighten the using a (sold Phillips Head Screws Phillips Head Screwdriver
separately).
Note: Be careful not to over-tighten the .Screws
4. Insert two (sold separately) through the and into the Screws Wall Mount Brackets
Mounting Surface.
5. Tighten the using the appropriate .Screws Screwdriver
DIN Rail Mounting
1. Align the holes in the with the holes in the back of the DIN Rail Bracket PoE
Extender.
2. Insert three through the and into the Phillips Head Screws DIN Rail Bracket PoE
Extender.
3. Tighten the using a .Phillips Head Screws Phillips Head Screwdriver
Note: Be careful not to over-tighten the .Screws
4. Hang the top of the (the section with the two metal clips) onto a DIN Rail Bracket
Top Hat DIN Rail style .
5. Press the down and forward to lock the bottom section onto the DIN Rail Bracket
DIN Rail.


Product specificaties

Merk: StarTech.com
Categorie: Wifi-repeater
Model: POEEXT1G60W
Kleur van het product: Zwart
Gewicht: 148 g
Breedte: 81.5 mm
Diepte: 104 mm
Hoogte: 32 mm
Gewicht verpakking: 390 g
Breedte verpakking: 211 mm
Diepte verpakking: 162 mm
Hoogte verpakking: 64 mm
Soort: Netwerkrepeater
Materiaal behuizing: Aluminium
LED-indicatoren: Ja
Snelstartgids: Ja
Certificering: CE, FCC
Duurzaamheidscertificaten: RoHS
Ethernet LAN, data-overdrachtsnelheden: 100,1000 Mbit/s
Netwerkstandaard: IEEE 802.3, IEEE 802.3ab, IEEE 802.3af, IEEE 802.3at, IEEE 802.3bt, IEEE 802.3u, IEEE 802.3x, IEEE 802.3z
Mean time between failures (MTBF): 551848 uur
Power over Ethernet (PoE): Ja
Ondersteunde network protocollen (IPv4): CSMA/CD
Datastroombeheer: Ja
Chipset: Realtek RTL8367, Microsemi PD69101
(Buitenste) hoofdverpakking hoogte: 225 mm
(Buitenste) hoofdverpakking breedte: 355 mm
(Buitenste) hoofdverpakking lengte: 345 mm
Hoeveelheid per (buitenste) hoofdverpakking: 10 stuk(s)
Maximaal bereik: 100 m
Overdrachtssnelheid: 1000 Mbit/s
Auto-negotiation: Ja
Stroomverbruik (typisch): 2.7 W
Bedrijfstemperatuur (T-T): -40 - 75 °C
Code geharmoniseerd systeem (HS): 85176990
Totaal Power over Ethernet (PoE)-budget: 60 W
Hoeveelheid Power over Ethernet (PoE) ports: 2
Ondersteundende kabel types: Cat5e, Cat6

Heb je hulp nodig?

Als je hulp nodig hebt met StarTech.com POEEXT1G60W stel dan hieronder een vraag en andere gebruikers zullen je antwoorden


Handleiding Wifi-repeater StarTech.com

Handleiding Wifi-repeater

Nieuwste handleidingen voor Wifi-repeater