StarTech.com PEX40GQSFDPI Handleiding
StarTech.com Netwerkkaart/adapter PEX40GQSFDPI
Bekijk gratis de handleiding van StarTech.com PEX40GQSFDPI (8 pagina’s), behorend tot de categorie Netwerkkaart/adapter. Deze gids werd als nuttig beoordeeld door 39 mensen en kreeg gemiddeld 4.2 sterren uit 9 reviews. Heb je een vraag over StarTech.com PEX40GQSFDPI of wil je andere gebruikers van dit product iets vragen? Stel een vraag
Pagina 1/8
Quick-start guide
FR: Guide de l’utilisateur - fr.startech.com
DE: Bedienungsanleitung - de.startech.com
ES: Guía del usuario - es.startech.com
NL: Gebruiksaanwijzing - nl.startech.com
PT: Guia do usuário - pt.startech.com
IT: Guida per l’uso - it.startech.com
Manual Revision: 10/06/2017
For the latest information, technical specications, and support for
this product, please visit www.StarTech.com/PEX40GQSFDPI.
Package contents
• 1 x network card
• 1 x low-prole bracket
• 1 x quick-start guide
Requirements
• PCI Express® enabled computer with an available PCI Express slot
(x8 or x16)
• One 40G QSFP+ transceiver module
• Any of the following operating systems:
• Windows® 10
• Windows 8.1
• Windows 8
• Windows 7
• Windows Server® 2016
• Windows Server 2008 R2
• Windows Server 2012
• Linux® kernel 2.6.32 to 4.1.1.x (64-bit) LTS Versions
• Phillips type screwdriver (optional)
Requirements are subject to change. For the latest requirements,
please visit www.StarTech.com/PEX40GQSFDPI.
PEX40GQSFDPI
Dual-Port QSFP+ Server Network Card - PCI Express - Intel Chip
*actual product may vary from photos
Install the low-prole bracket
The PEX40GQSFDPI can be mounted in both low-prole and
full-prole computer systems. The full-prole bracket comes
preinstalled in the QSFP+ network card, but you can install the
low-prole bracket instead.
1. Use a Phillips type screwdriver to remove the two bracket screws
from the PEX40GQSFDPI.
2. Remove the full-prole bracket from the QSFP+ network card.
3. Line up the low-prole bracket with the bracket holes on the back
of the QSFP+ network card.
4. Insert the two bracket screws that you removed in step 1 and
tighten them into place.
Install the network card in a computer
Warning! Network cards can be severely damaged by static
electricity. Make sure that you’re properly grounded before you
open your computer case or touch your PCIe card. You should wear
an anti-static strap when you install any computer component.
If an anti-static strap isn’t available, discharge any built-up static
electricity by touching a large, grounded metal surface for several
seconds. Only handle the PCIe card by its edges and don’t touch the
gold connectors.
1. Turn o your computer and any devices or peripherals that are
connected to it (for example, printers, external storage, and
so on).
2. Unplug the power cable from the back of your computer.
3. Disconnect any peripheral devices that are connected to your
computer.
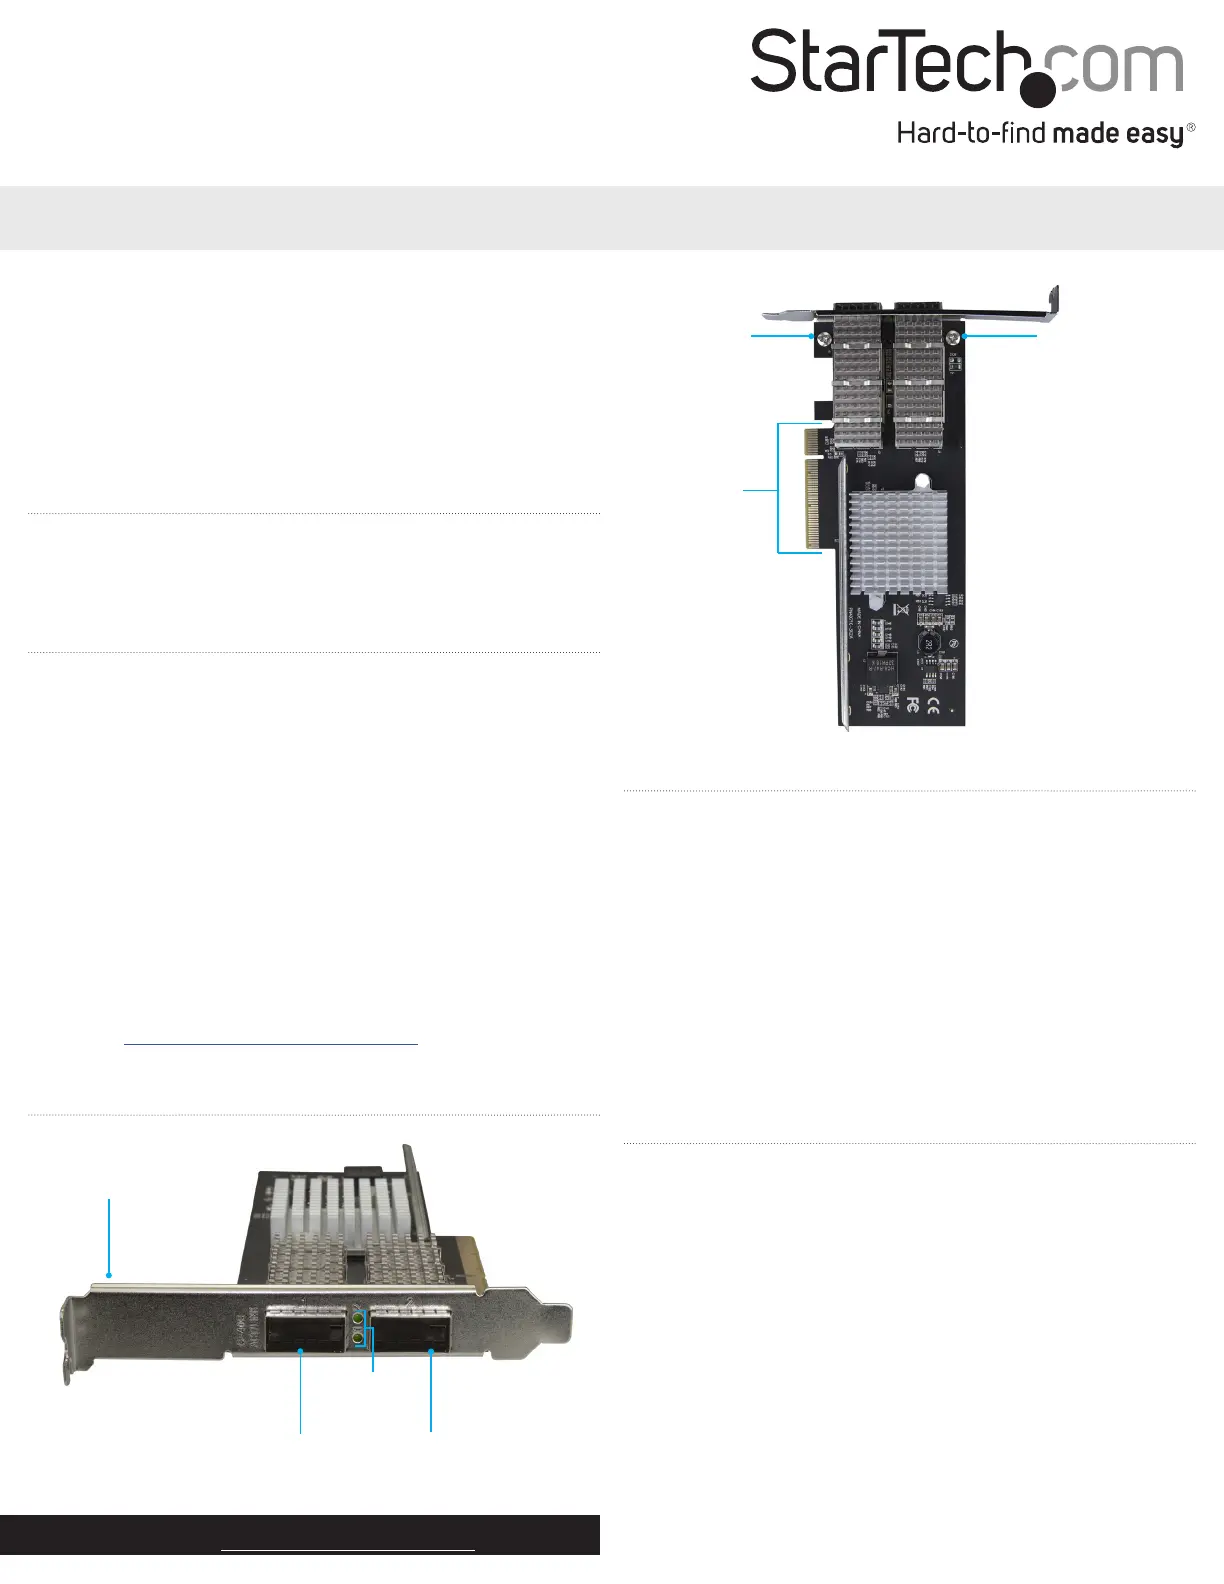
Product diagram
Mounting bracket
(full-prole pictured)
QSFP+ slot
QSFP+ slot
Link or activity
LEDs
Bracket screw
Bracket screw
PCIe p1-x8
connector
Product specificaties
| Merk: | StarTech.com |
| Categorie: | Netwerkkaart/adapter |
| Model: | PEX40GQSFDPI |
| Kleur van het product: | Zwart |
| Gewicht: | 127 g |
| Breedte: | 121 mm |
| Diepte: | 181 mm |
| Hoogte: | 21 mm |
| Gewicht verpakking: | 212 g |
| Breedte verpakking: | 145 mm |
| Diepte verpakking: | 207 mm |
| Hoogte verpakking: | 40 mm |
| LED-indicatoren: | Activity, Link |
| Connectiviteitstechnologie: | Bedraad |
| Ethernet LAN: | Nee |
| Snelstartgids: | Ja |
| Interface: | Fiber |
| Duurzaamheidscertificaten: | CE, RoHS |
| Netwerkstandaard: | IEEE 802.1Q, IEEE 802.3ad, IEEE 802.3ba, IEEE 802.3x |
| Temperatuur bij opslag: | -20 - 85 °C |
| Intern: | Ja |
| Naleving van duurzaamheid: | Ja |
| Ondersteunt Linux: | Ja |
| Hostinterface: | PCI Express |
| Maximale overdrachtssnelheid van gegevens: | 40000 Mbit/s |
| Datastroombeheer: | Ja |
| Ondersteunde server operating systems: | Windows Server 2008 R2, Windows Server 2012, Windows Server 2012 R2, Windows Server 2016, Windows Server 2019 |
| Jumbo Frames ondersteuning: | Ja |
| Full duplex: | Ja |
| Chipset: | Intel - XL710-BM2 |
| Component voor: | Pc/server |
| (Buitenste) hoofdverpakking hoogte: | 320 mm |
| (Buitenste) hoofdverpakking breedte: | 420 mm |
| (Buitenste) hoofdverpakking lengte: | 440 mm |
| Hoeveelheid per (buitenste) hoofdverpakking: | 40 stuk(s) |
| Bedrijfstemperatuur (T-T): | 0 - 57 °C |
| Relatieve vochtigheid in bedrijf (V-V): | 5 - 95 procent |
| Code geharmoniseerd systeem (HS): | 85176990 |
| Jumbo frames: | 9000 |
| Vezel-optische connector: | QSFP+ |
| Fibre channel-poorten: | 2 |
| PCI versie: | 3.0 |
| Fiber ethernet cabling technologie: | 40GBASE-LR4, 40GBASE-SR4 |
| VLAN-tagging: | Ja |
| Low-profile bracket: | Ja |
Heb je hulp nodig?
Als je hulp nodig hebt met StarTech.com PEX40GQSFDPI stel dan hieronder een vraag en andere gebruikers zullen je antwoorden
Handleiding Netwerkkaart/adapter StarTech.com

12 Maart 2026
21 November 2025
11 November 2025
30 Juni 2025
7 April 2025
17 Maart 2025
17 Maart 2025
14 Januari 2025
14 Januari 2025
30 November 2024
Handleiding Netwerkkaart/adapter
Nieuwste handleidingen voor Netwerkkaart/adapter
18 Mei 2026
12 Mei 2026
6 Mei 2026
4 Mei 2026
2 April 2026
31 Maart 2026
28 Maart 2026
27 Maart 2026
27 Maart 2026
27 Maart 2026