SSV Works RG4-US10 Handleiding
Bekijk gratis de handleiding van SSV Works RG4-US10 (2 pagina’s), behorend tot de categorie Speaker. Deze gids werd als nuttig beoordeeld door 19 mensen en kreeg gemiddeld 5.0 sterren uit 10 reviews. Heb je een vraag over SSV Works RG4-US10 of wil je andere gebruikers van dit product iets vragen? Stel een vraag
Pagina 1/2

RG4-US10
Polaris Ranger
Underseat 10” Subwoofer Enclosure
SSV WORKS, 201 N. Rice Ave Unit A, Oxnard, CA 93030
www.SSVworks.com | Phone: 818-991-1778 | Fax: 866-293-6751
!
Please read and understand these
instructions completely before
installation to avoid possible injury, or
damage to the accessory or vehicle.
WARRANTY INFORMATION:
All SSV Works enclosures are covered by a limited lifetime warranty against defects in material
or workmanship. All SSV Works Electronics are covered by a limited 1 year warranty against
defects in material or workmanship. All SSV Works Speakers are covered by a limited 1 year
warranty against defects in material or workmanship. Labor for replacement of defective
components is not covered. Contact SSV Works for further warranty information.
TOOLS NEEDED FOR INSTALLATION
PARTS LIST IMAGES
2. Enclosure Bracket A1. RG4-US10 Enclosures 2. Enclosure Bracket B
- T-30 & T-40 Torx Driver - 4mm Allen Key - Panel Removal Tool
4. M6 Flathead 4mm
Hex Screws x4
5. M6 Allen Torx
Screws x5
5. Foam Circles
x4
C. Using a panel removal tool, extract the (8) push pins to
remove the center driveline center column cover.
C
B. Flip up passenger seat and remove center tray to access
battery. Disconnect the negative battery cable from the battery.
B
A. Align bracket A’s holes with the dimples/recess’ circled in pink on the
bottom of the enclosure. Using four (4) athead 4mm screws, mount
the A bracket to the bottom of the enclosure. After the bracket is secure,
cover the screw heads with the (4) foam circles.
D. Located on the oorboard to the right of the battery
compartment, remove the (3) T40 torx screws circled in pink.
A
D
- Drill - 13/64” Drill Bit

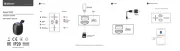
Connecting the RG4-US10 using the pre-installed, two-pin connector
will require an optional SSV Works plug-&-play harness (WP-H1151 -
sold separately). If you are not using the WP-H1151 harness, simply
cut off the two-pin connector and follow the wiring instruction.
Reattach all factory panels
© 2018 SSV Works, Oxnard, CA 93030 RG4-US10 Rev. A 7-30-18
For proper sound, ensure
the speaker polarity is
correct connect the “+” to
the “+” and the “-“to the
“-“from the speaker wire
to the amplier. If using with an SSV Works complete system refer to
the amplier wiring instructions for more detailed wiring information.
“+”
“
-
”
J. Connect sub to harness B-H1151 K. Pull the harness into the battery cavity.
J K
F. With the bracket secured to the oorboard, place the enclosure in front of
the oorboard bracket. To allow proper engagement, tilt the enclosure back
slightly and slide its bottom bracket into the oorboard bracket catch.
L. Pull all cables and wiring around battery and through the center of vehicle
away from any moving parts and sharp metal. Connect to the amplier.
G. With the brackets seated into one another,
use the front mounting tabs as a template
to mark with a scribe or punch the needed
placement to drill pilot holes.
H. Once marked, remove the enclosure. Using a
13/64” drill bit, drill pilot holes at your marked
points. Be sure to penetrate through the
chassis lying beneath the oorboard.
G
E. Place SSV bracket B over the factory screw holes and refasten
down with the (3) factory T40 torx screws removed in the
previous step.
E
I. . Re-install the sub-enclosure. Secure the front
mounting tabs with the kit provide T30 torx
self-tapping screws.
I
F
L
H
Product specificaties
| Merk: | SSV Works |
| Categorie: | Speaker |
| Model: | RG4-US10 |
Heb je hulp nodig?
Als je hulp nodig hebt met SSV Works RG4-US10 stel dan hieronder een vraag en andere gebruikers zullen je antwoorden
Handleiding Speaker SSV Works

17 Augustus 2023

16 Augustus 2023

16 Augustus 2023

16 Augustus 2023

16 Augustus 2023

16 Augustus 2023

16 Augustus 2023

16 Augustus 2023

16 Augustus 2023

16 Augustus 2023
Handleiding Speaker
- AudioSource
- BlueAnt
- Artsound
- Urban Revolt
- Teac
- Airpulse
- Eve Audio
- Argon
- IMG Stageline
- Quadral
- Tivoli Audio
- Inter-M
- Zolid
- Salora
- Edifier
Nieuwste handleidingen voor Speaker

14 September 2025

14 September 2025

14 September 2025
13 September 2025
13 September 2025
12 September 2025
12 September 2025
12 September 2025
12 September 2025

12 September 2025