Speakman S-1570 Handleiding
Bekijk gratis de handleiding van Speakman S-1570 (1 pagina’s), behorend tot de categorie Kraan. Deze gids werd als nuttig beoordeeld door 25 mensen en kreeg gemiddeld 4.0 sterren uit 8 reviews. Heb je een vraag over Speakman S-1570 of wil je andere gebruikers van dit product iets vragen? Stel een vraag
Pagina 1/1
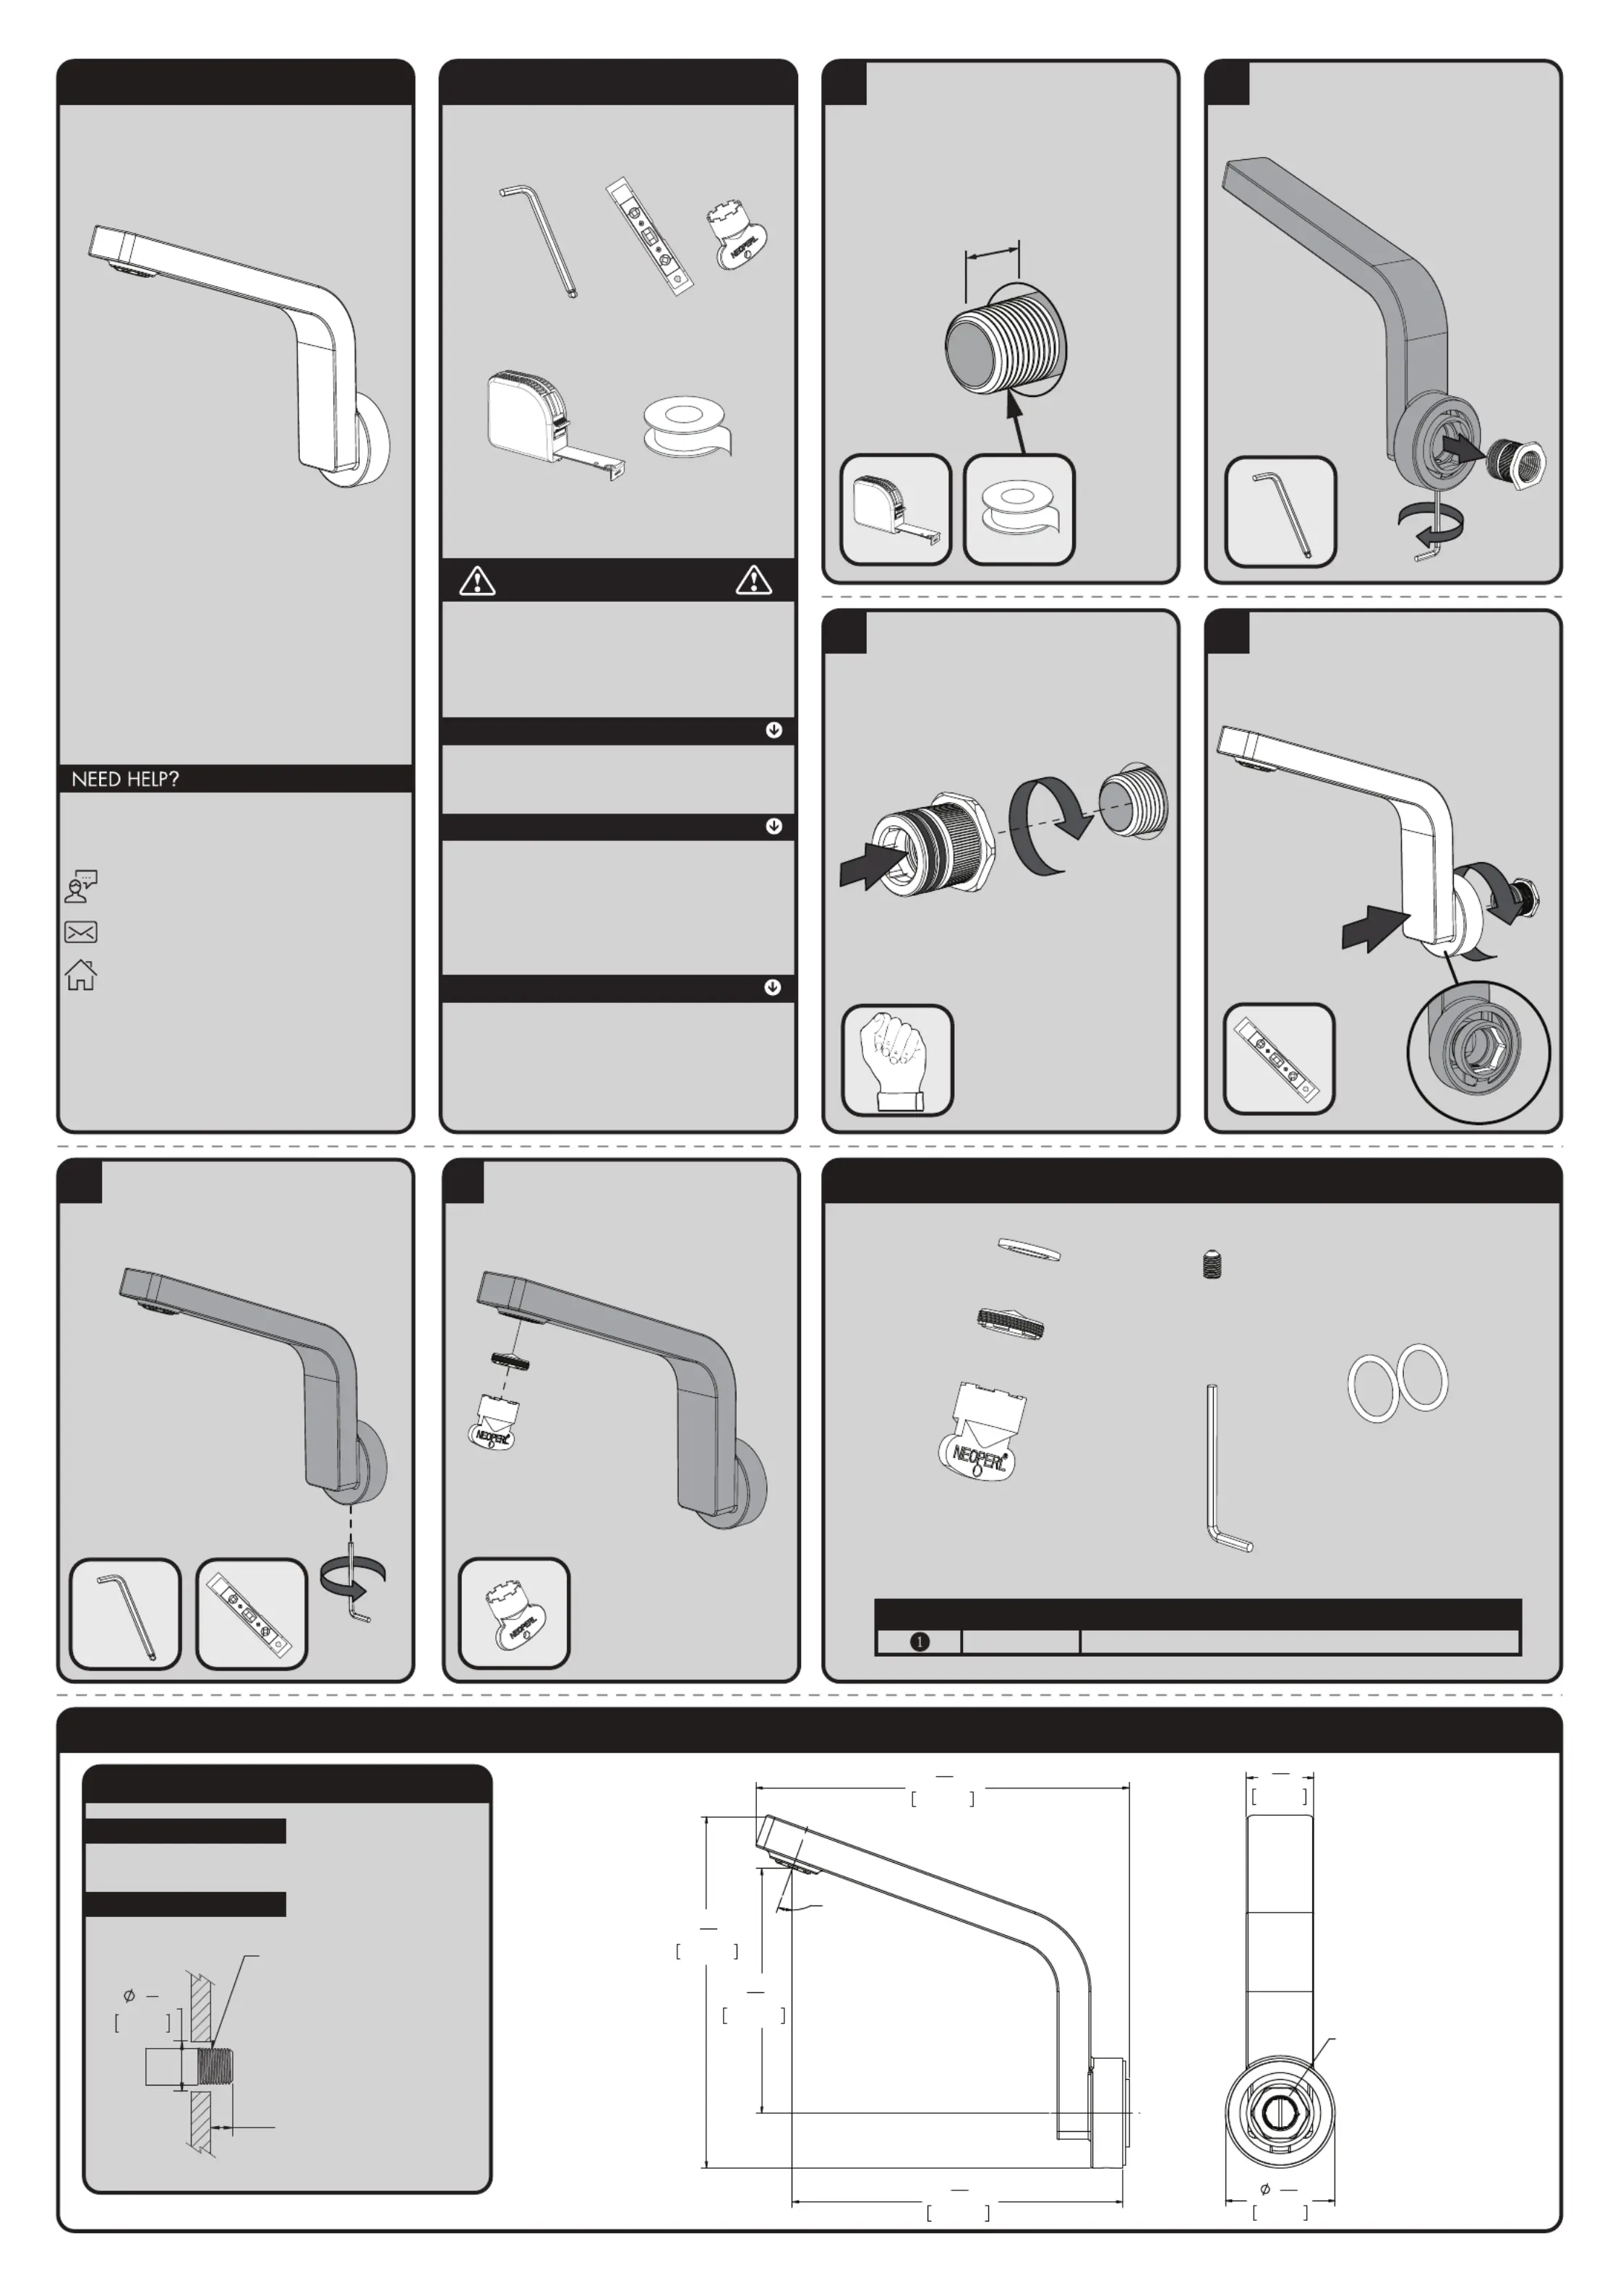
INSTRUCTIONS FOR MODELS
92-S-1570-01
For additional assistance or service please contact:
SPEAKMAN
®
800-537-2107
customerser[email protected]
www.speakman.com
S-1570
TOOLS AND SUPPLIES
IMPORTANT
SAFETY TIPS
Cover your drain to prevent loss of parts. Be sure to
wear eye protection while cutting pipe.
MAINTENANCE
WARRANTY
Additional warranty information can be found at:
www.speakman.com
2.5mm Hex Key
Wrench (included)
Level
Aerator
Wrench
(Included)
• Be sure to read instructions thoroughly before
beginning installation.
• Do not over-tighten any connections or damage
may occur.
Your new Speakman Product is designed for years of
trouble-free performance. Keep it looking new by
cleaning it periodically with a soft cloth. The use of harsh
chemicals and abrasives may damage the finish and
void the product warranty. Please be sure to only use
approved cleaners. Please contact Speakman for any
clarification of acceptable cleaners.
Measuring
Tape
Thread Seal
Tape
1
Verify that the 1/2” supply Pipe is properly
roughed-in to extend from the finished wall
between 3/8” - 1/2”. Apply Thread Seal Tape
in a clockwise direction to the threads of Pipe.
3/8”−1/2”
2
Loosen, but do not remove the Set Screw located
at the base of the Spout using the included Hex
Key Wrench. Remove Connector assembly from
the Spout.
3
Install the Connector assembly onto the rough-in
Pipe and hand tighten.
4
Position the Spout over the flats of the Connector
and use the Spout to final tighten the Connector
into position. Once completed, the Spout should
be aligned vertically as shown. Remove Spout
and readjust as needed.
5
Verify that the Spout is aligned vertically, and
that the Spout Flange is flush to the finished wall
surface. Tighten Set Screw with the included Hex
Key to secure Spout into position. Verify that the
spout is securely fastened.
6
Using the included Aerator Key, remove the
Aerator from the Spout. Turn on water supplies,
check for leaks, and flush the system with Cold
and Hot Water for 1 minute. Turn off water
supplies and reinstall Aerator.
S-1570 REPAIR PARTS
SPEAKMAN
®
RPG05-113790REPAIR GROUP
ITEM NO.PART NO.DESCRIPTION
S-1570 ROUGH-IN DIAGRAM
SPEAKMAN
®
DIMENSIONS SUBJECT TO CHANGE WITHOUT NOTICE.
NOTES:
COMPLIANCE:
CONNECTIONS:
ASME A112.18.1/CSA B 125.1
Contractor to supply necessary inlet connections.
1/2"-14NPT water inlet
(not supplied)
1
1
8
"
29mm
Supply pipe
to protrude
3/8" to 1/2”
from finished wall surface
1
9
16
"
40.0mm
2
9
16
"
65.0mm
1/2"-14 NPT
8
11
16
"
220.9mm
8
3
16
"
208.1mm
20.0°
7
11
16
"
195.7mm
5
11
16
"
145.0mm
Product specificaties
| Merk: | Speakman |
| Categorie: | Kraan |
| Model: | S-1570 |
Heb je hulp nodig?
Als je hulp nodig hebt met Speakman S-1570 stel dan hieronder een vraag en andere gebruikers zullen je antwoorden
Handleiding Kraan Speakman

30 December 2026
29 December 2026
29 December 2026
28 December 2025
28 December 2025
25 December 2025
25 December 2025
24 December 2025
24 December 2025
24 December 2025
Handleiding Kraan
Nieuwste handleidingen voor Kraan
30 Mei 2026
29 Mei 2026
29 Mei 2026
27 Mei 2026
27 Mei 2026
27 Mei 2026
26 Mei 2026
26 Mei 2026
26 Mei 2026
26 Mei 2026