Sony LMD-A180 Handleiding
Bekijk gratis de handleiding van Sony LMD-A180 (46 pagina’s), behorend tot de categorie Monitor. Deze gids werd als nuttig beoordeeld door 53 mensen en kreeg gemiddeld 4.9 sterren uit 27 reviews. Heb je een vraag over Sony LMD-A180 of wil je andere gebruikers van dit product iets vragen? Stel een vraag
Pagina 1/46

5-056-590-11(1)
Professional
Video Monitor
Operating Instructions
Before operating the unit, please read this manual thoroughly
and retain it for future reference.
LMD-A240
LMD-A220
LMD-A180
© 2013 Sony Corporation
Software Version 3.11

Table of Contents
2
Table of Contents
Precaution .......................................................3
On Safety .................................................................. 3
On Installation ......................................................... 3
Handling the Screen ............................................... 3
On Burn-in .............................................................. 3
On Image Smearing ................................................ 3
On a Long Period of Use ........................................ 4
Handling and Maintenance of the Screen ............ 4
On Dew Condensation ........................................... 4
Notes on Security .................................................... 4
Transportation of the Unit ..................................... 4
Dustproofing ............................................................ 4
Do not place this product close to medical
devices .................................................................... 5
On Repacking .......................................................... 5
Disposal of the Unit ................................................ 5
On the Software Updates ....................................... 5
Location and Function of Parts and
Controls ..........................................................6
Front Panel............................................................... 6
Input Signals and Adjustable/Setting Items......... 9
Rear Panel .............................................................. 10
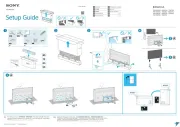
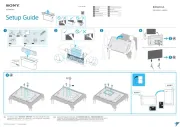
Removing the Monitor Stand
(Pre-Attached) .............................................. 12
Attaching the handle
(LMD-A220/A180 only) ................................ 12
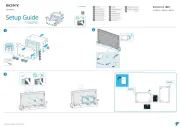
Connecting the AC Power Cord ................... 13
Initial settings ............................................... 13
Using the Menu ............................................. 14
Protection of the Setting Values ................... 15
Protecting the setting values using
[Key Inhibit] ........................................................ 15
Protecting the setting values using
[Password Lock] .................................................. 15
Adjustment Using the Menus ....................... 15
Items ........................................................................ 15
Adjusting and Changing the Settings ................. 16
[Status] menu ................................................... 16
[Color Temp/Color Space/Gamma]
menu ............................................................... 17
[User Control] menu ...................................... 19
[User Configuration] menu ........................... 19
[Remote] menu ................................................ 32
[Security] menu ............................................... 34
Troubleshooting ...........................................35
Specifications ................................................36
Dimensions ...................................................38
NOTICES AND LICENCES FOR SOFTWARE
USED IN THIS PRODUCT ..........................41
The terms HDMI and HDMI High-Definition
Multimedia Interface, and the HDMI Logo are
trademarks or registered trademarks of HDMI
Licensing Administrator, Inc. in the United States and
other countries.
Adobe is a trademark of Adobe Systems Incorporated.
Product specificaties
| Merk: | Sony |
| Categorie: | Monitor |
| Model: | LMD-A180 |
Heb je hulp nodig?
Als je hulp nodig hebt met Sony LMD-A180 stel dan hieronder een vraag en andere gebruikers zullen je antwoorden
Handleiding Monitor Sony
7 Juli 2025

7 Juli 2025

7 Juli 2025
7 Juli 2025
6 Juli 2025

6 Juli 2025

6 Juli 2025
6 Juli 2025
6 Juli 2025
6 Juli 2025
Handleiding Monitor
- TRIUMPH BOARD
- Viotek
- Emachines
- Alesis
- Plantronics
- KTC
- Japannext
- Maxell
- DataVideo
- UPERFECT
- Vorago
- Thermaltake
- Garmin
- Monoprice
- Cisco
Nieuwste handleidingen voor Monitor

15 September 2025

14 September 2025

14 September 2025
12 September 2025

11 September 2025
9 September 2025

9 September 2025
9 September 2025

8 September 2025

8 September 2025