SolarEdge Home Battery Handleiding

SolarEdge Accu Home Battery

Lees hieronder de đź“– handleiding in het Nederlandse voor SolarEdge Home Battery (2 pagina's) in de categorie Accu. Deze handleiding was nuttig voor 59 personen en werd door 2 gebruikers gemiddeld met 4.5 sterren beoordeeld

Pagina 1/2
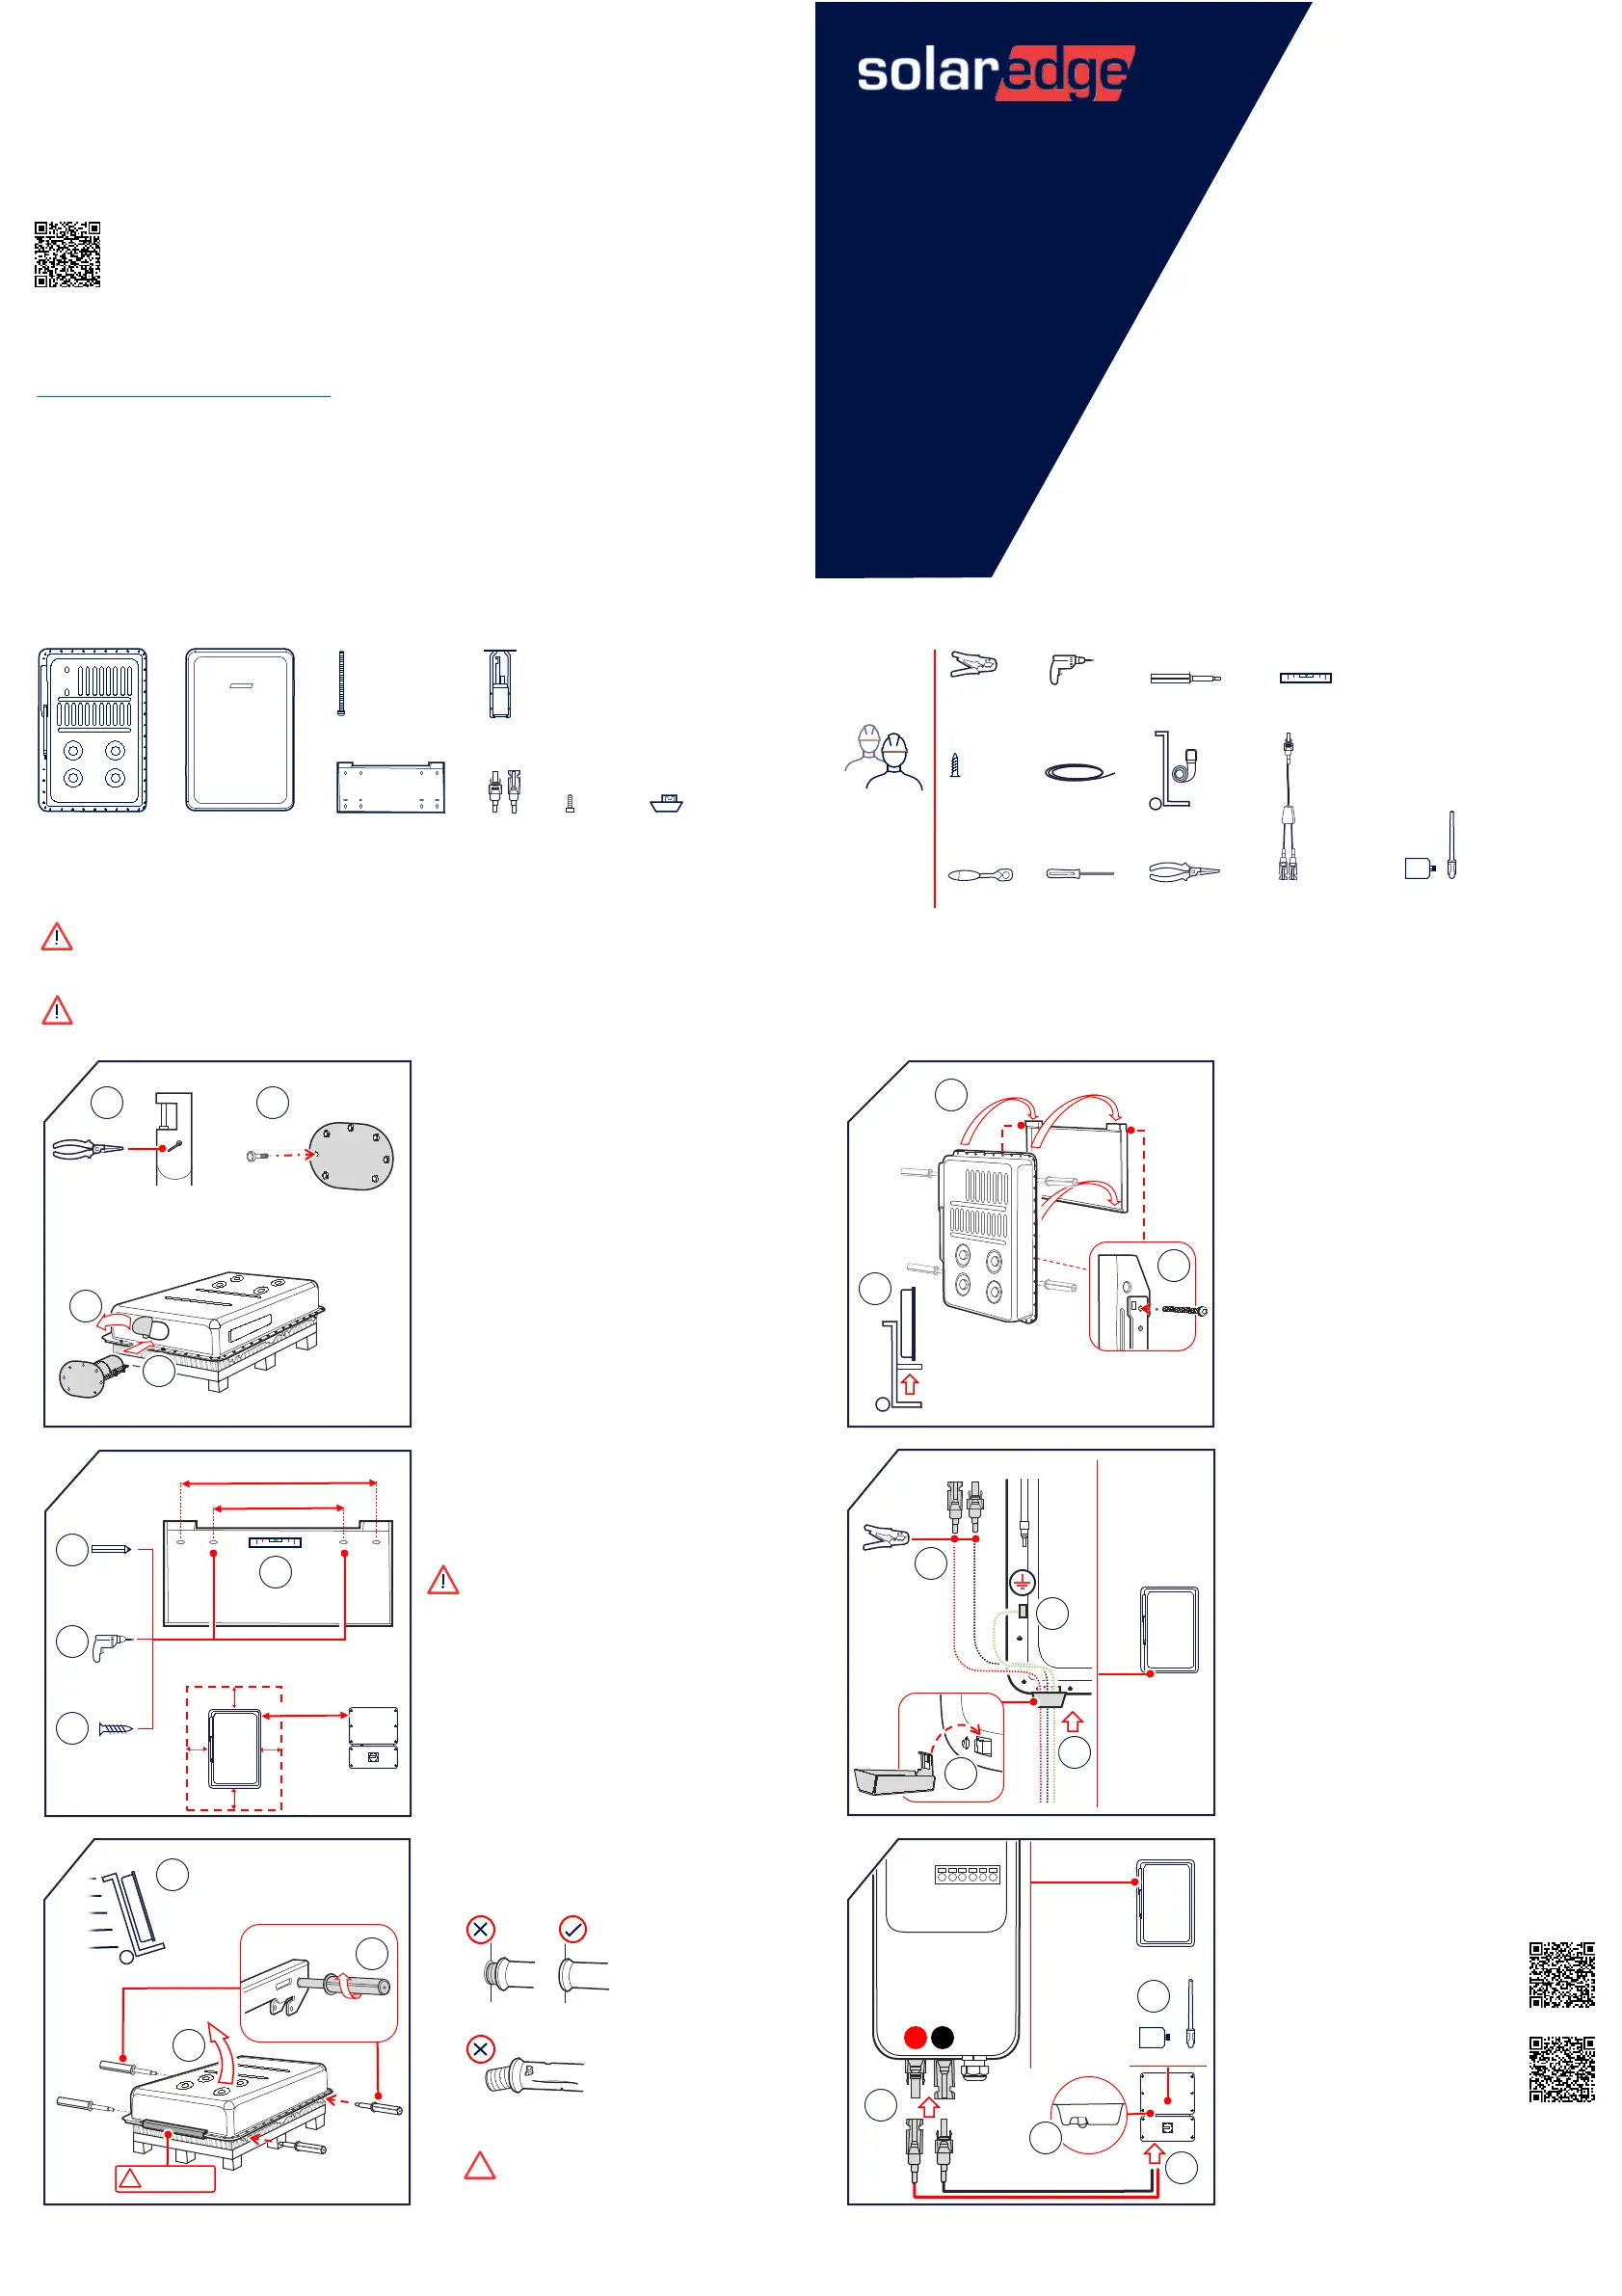
What’s in the Package
I
I
I
IIn
n
n
nns
s
s
sstallati
tallati
tallati
tallatitallation
on
on
onon nd
nd
nd
ndnd
a
a
a
a a
O
O
O
OOp
p
p
pper
er
er
ererat
at
at
atation
ion
ion
ionion G
G
G
G Guid
uid
uid
uiduide
e
e
ee
V
V
V
VVe
e
e
eer
r
r
rrsio
sio
sio
siosion
n
n
nn .5
.5
.5
.5.5
v
v
v
v v. 1
. 1
. 1
. 1. 1
S
S
S
SSo
o
o
ool
l
l
llarEdge
arEdge
arEdge
arEdgearEdge
H
H
H
HHome
ome
ome
omeome B
B
B
BBa
a
a
aatt
tt
tt
tttter
er
er
erery
y
y
yy H
H
H
HHi
i
i
iig
g
g
ggh
h
h
hh
(
(
(
( (
V
V
V
VVo
o
o
ooltage)
ltage)
ltage)
ltage)ltage)
f
f
f
ffo
o
o
oor
r
r
rr s
s
s
ss i
i
i
iith
th
th
thth olar
olar
olar
olarolarEdg
Edg
Edg
EdgEdg n
n
n
nnver
ver
ver
ververter
ter
ter
terters
s
s
ss
u
u
u
u u e w
e w
e w
e we w S
S
S
S S e i
e i
e i
e ie i
N
N
N
NNo
o
o
oor
r
r
rrth
th
th
thth m
m
m
mme
e
e
eeric
ric
ric
ricric d
d
d
dd u
u
u
uustrali
strali
strali
stralistralia
a
a
aa
A
A
A
A A a an
a an
a an
a ana an A
A
A
A A
© SolarEdge Technologies, Ltd.
All rights reserved.
Version: 1.5, March 2022
Subject to change without notice.
S
S
S
SSo
o
o
ool
l
l
ll arE
arE
arE
arEarEdg
dg
dg
dgdg om
om
om
omom
e H
e H
e H
e He H e
e
e
e e
B
B
B
BB a
a
a
aat
t
t
ttt
t
t
ttery
ery
ery
eryery
M
M
M
MMo
o
o
oo unti
unti
unti
untiunting
ng
ng
ngng ac
ac
ac
acacket
ket
ket
ketket
br
br
br
br br
D
D
D
DDe
e
e
eec
c
c
ccorativ
orativ
orativ
orativorative
e
e
ee c
c
c
c cov
ov
ov
ovove
e
e
eer
r
r
rr
Required Personnel and Tools
W
W
W
WWA
A
A
AAR
R
R
RRNI
NI
NI
NINING
NG
NG
NGNG!
!
!
!!
Before installing or operating the SolarEdge Home Battery (referred to as the “Battery”), read the Safety and Handling
instructions at the back of this page.
x 2
C
C
C
CC o
o
o
oo ver
ver
ver
verver
s
s
s
ssc
c
c
ccr
r
r
rre
e
e
eews
ws
ws
wsws
Do
Do
Do
DoDo l
l
l
llly
ly
ly
lyly w
w
w
w with
ith
ith
ithith t
t
t
tt
lif
lif
lif
lif lif
a
a
a
aan
n
n
nn d
d
d
dd atche
atche
atche
atcheatchet
t
t
tt traps
traps
traps
trapstraps
r
r
r
r r s
s
s
s s
Dr
Dr
Dr
DrDri
i
i
ii ll
ll
ll
llll
M
M
M
MMo
o
o
oounting
unting
unting
untingunting
s
s
s
ssc
c
c
ccr
r
r
rre
e
e
eews
ws
ws
wsws
-
-
-
--
m
m
m
mma
a
a
aa x
x
x
x x M10
M10
M10
M10M10
min 2
M
M
M
MMi
i
i
ii n
n
n
nn ual
ual
ual
ualualif
if
if
ifified
ied
ied
iedied
2
2
2
2 2 q
q
q
q q
i
i
i
ii n
n
n
nns
s
s
ss ta
ta
ta
tatall
ll
ll
lllle
e
e
eer
r
r
rrs
s
s
ss
MC4
MC4
MC4
MC4M C 4
c
c
c
cc r
r
r
rri
i
i
iim
m
m
mmper
per
per
perper
L
L
L
LLe
e
e
eev
v
v
vv el
el
el
elel
H
H
H
HH a
a
a
aandl
ndl
ndl
ndlndles
es
es
eses av
av
av
avavai
ai
ai
aiailabl
labl
labl
labllable
e
e
ee
(
(
(
( (
f
f
f
ffr
r
r
rr om
om
om
omom ola
ola
ola
olaolarEdge)
rEdge)
rEdge)
rEdge)rEdge)
S
S
S
S S
x 4
D
D
D
DDC
C
C
CC ab
ab
ab
abable
le
le
lele
c
c
c
c c
600V
600V
600V
600V600V n
n
n
nns
s
s
ssul
ul
ul
ulula
a
a
aated
ted
ted
tedted
i
i
i
i i
B
B
B
BBr
r
r
rra
a
a
aanc
nc
nc
ncnch c
h c
h c
h ch co
o
o
oon
n
n
nnnector
nector
nector
nectornectors
s
s
ss
(
(
(
(( o
o
o
oop
p
p
pptional,
tional,
tional,
tional,tional, ailabl
ailabl
ailabl
ailablailable
e
e
ee
av
av
av
av av
f
f
f
ffr
r
r
rr om
om
om
omom ola
ola
ola
olaolarEdge)
rEdge)
rEdge)
rEdge)rEdge)
S
S
S
S S
x 2
T
T
T
TT o
o
o
oo rque
rque
rque
rquerque
w
w
w
wwr
r
r
rre
e
e
een
n
n
nnch
ch
ch
chch
P
P
P
PPh
h
h
hh illi
illi
illi
illiillips
ps
ps
psps
s
s
s
ssc
c
c
cc r
r
r
rrewdriv
ewdriv
ewdriv
ewdrivewdriver
er
er
erer
x 2
M
M
M
MMo
o
o
oounting
unting
unting
untingunting
b
b
b
bb r
r
r
rra
a
a
aac
c
c
ccke
ke
ke
keket
t
t
tt cr
cr
cr
crcre
e
e
eew
w
w
wws
s
s
ss
s
s
s
s s
MC4
MC4
MC4
MC4M C 4
c
c
c
cco
o
o
oonnector
nnector
nnector
nnectornnectors
s
s
ss
S
S
S
SSu
u
u
uup
p
p
pppor
por
por
porport
t
t
tt C
C
C
CCon
on
on
onontac
tac
tac
tactact
t
t
tt I
I
I
IIn
n
n
nnfor
for
for
forform
m
m
mma
a
a
aation
tion
tion
tiontion
In case of any technical issues with SolarEdge
products, please contact us at:
https://www.solaredge.com/service/support
Conduit
Conduit
Conduit
ConduitConduit
h
h
h
hho
o
o
ool
l
l
ll der
der
der
derder
S
S
S
SSo
o
o
ool
l
l
llarEdge
arEdge
arEdge
arEdgearEdge
H
H
H
HH o
o
o
oo m
m
m
mm etw
etw
etw
etwetwork
ork
ork
orkork
e N
e N
e N
e Ne N
plug
plug
plug
plugplug-
-
-
--in
in
in
inin av
av
av
avavailable
ailable
ailable
ailableailable
(
(
(
( (
f
f
f
ffr
r
r
rr om
om
om
omom ola
ola
ola
olaolarEdge)
rEdge)
rEdge)
rEdge)rEdge)
S
S
S
S S
42
3
Hang battery on
mounting bracket
1. Lift the battery to the height of the mounting bracket.
2. Hang the battery on the mounting bracket, while
holding it by the handles.
3. Secure with a mounting bracket screw (supplied) on
each side. Apply a torque of 42 in lbs- /4.7N*m.
1
2
4
5Prepare cables
1. Mount the conduit holder.
2. Pass the DC cables and grounding cable through the
conduit holder at the bottom of the battery.
3. Connect the grounding cable to the grounding terminal
with a torque of 66 in*lbs/7.5 N*m.
4. Crimp the DC cables to the MC4 connectors (supplied)
and tighten the MC4 connector glands with a torque of
30 in* /3.4N*m.lbs
3
1
Connect to inverter
1. Make sure the inverter is OFF.
2. Connect the DC cables to the DC+ and DC- inputs.
Observe correct polarity.
3. Install the SolarEdge
Home Network plug-in and antenna
in the inverter.
See the installation guide:
4. Connect cables to the inverter.
See the C
C
C
CCo
o
o
oonnec
nnec
nnec
nnecnnectio
tio
tio
tiotion
n
n
nn nd
nd
nd
ndnd on
on
on
ononf
f
f
ffi
i
i
iigur
gur
gur
gurgurati
ati
ati
atiation
on
on
onon
a
a
a
a a C
C
C
C C
application note.
-
+
2
6
3
H
H
H
HH o
o
o
oo m
m
m
mm etw
etw
etw
etwetw
e N
e N
e N
e Ne N or
or
or
orork
k
k
kk
OFF
OFF
OFF
OFFOFF
4
1
W
W
W
WWA
A
A
AAR
R
R
RRNI
NI
NI
NINING
NG
NG
NGNG!
!
!
!!
This symbol on the product or in the accompanying documentation denotes a hazard. It calls attention to a procedure
that, if not correctly performed or adhered to, could result in injury or loss of life. Do not proceed beyond a warning
note until the indicated conditions are fully understood and met.
Install mounting bracket
1. Level the bracket.
2. Mark two drilling spots.
Use either the inner or outer pair of holes.
If necessary, you can use the additional holes to secure
the bracket.
3. Drill holes in the installation surface.
4. Install the mounting bracket and secure with screws.
When selecting the installation location:
•Maintain a clearance of min 8 in/20 cm from other objects.
•Make sure the max distance from the inverter is max
164 ft/50 m.
Make sure the installation surface sustains the weight of the
battery (267 121lbs/ kg).
1
1
1
116
6
6
66”
”
”
”” /
/
/
// m
m
m
mm
40.
40.
40.
40. 40.5 c
5 c
5 c
5 c5 c
2
2
2
224
4
4
44”
”
”
”” /
/
/
// m
m
m
mm
61 c
61 c
61 c
61 c 61 c
2
3
4
2
1
m
m
m
mm in
in
in
inin
8
8
8
8 8 in/
in/
in/
in/in/20
20
20
2020
cm
cm
cm
cmcm
m
m
m
mm a
a
a
aax
x
x
xx 164
164
164
164 164
ft
ft
ft
ftft/5
/5
/5
/5/50 m
0 m
0 m
0 m0 m
For the SolarEdge Home Battery – Emergency
Response guide, including emergency phone
numbers, scan the QR code:
Fi
Fi
Fi
FiFi re
re
re
rere
e
e
e
eext
xt
xt
xtxting
ing
ing
inginguishe
uishe
uishe
uisheuisher
r
r
rr
Transport battery
1. Screw in all FOUR handles to the battery frame.
2. Place the battery upright on a dolly and secure it with
straps.
C
C
C
CCa
a
a
aaut
ut
ut
ututi
i
i
iion!
on!
on!
on!on!
Stand the battery on the rubber protector only!
3. Transport the battery to the installation location.
;
1
2
3
3
CAUTION!
Make sure to screw in the handles all the way.
Do not use a bent, cracked, or otherwise damaged handle.
Install fire extinguisher
L
L
L
LLo
o
o
oong
ng
ng
ngng-
-
-
--no
no
no
nonose
se
se
sese
plie
plie
plie
plieplier
r
r
rrs
s
s
ss
1
2
3
1 4 1. Use long-nose pliers to straighten and remove the
safety pin.
2. Remove the sticker that covers the fire extinguisher’s
service hole.
3. Carefully insert the fire extinguisher into the service
hole.
4. Secure the fire extinguisher with seven Allen screws
(supplied). Apply a torque of 40 in-lbs/4.5N*m.
S
S
S
SSAF
AF
AF
AFAFE
E
E
EETY
TY
TY
TYTY A
A
A
AAND
ND
ND
NDND
H
H
H
HHA
A
A
AAN
N
N
NNDL
DL
DL
DLDLI
I
I
IING
NG
NG
NGNG
I
I
I
IINSTRU
NSTRU
NSTRU
NSTRUNSTRUCT
CT
CT
CTCTI
I
I
IIONS
ONS
ONS
ONSONS
Read this entire document before installing or operating the SolarEdge Home Battery (referred to as the “Battery”).
Failure to do so or to follow any of the instructions or warnings in this document can result in electrical shock, serious
injury, or death, or may damage the Battery and other property.
Do not discard this document! After installation, keep it adjacent to the Battery for future reference!
Installation
•Install the battery according to national and local codes and standards and in locations compliant with local building codes
and standards.
•The Battery installation must be carried out only by qualified electricians who have been trained in handling low voltage
electricity works.
•The Battery is heavy. Adhere to local regulations for material handling and heavy lifting, when installing heavy equipment.
•Do not install the Battery in habitable spaces, including sleeping rooms.
•Make sure the mounting surface can sustain the total weight of the Battery and mounting bracket.
•Do not install the Battery, if it has been dropped, crushed, or has signs of physical damage.
•Do not install the Battery near heating equipment, ignition sources, or open flames.
•Install the Battery only on surfaces made of non-combustible materials, as defined by local building codes. Such surface
should extend on both sides of the unit for 28” above the unit and for 48” below the unit to the ground surface and be
uninterrupted by gaps, openings or other breaks in the surface.
•If a soffit is above the unit within the 48” perimeter, the non-combustible surface should continue uninterrupted over the
surface of the soffit such that there are 48” of continuous length.
•Do not install the Battery within 3 feet of gas meters, valves, regulators, lines, or gas appliances.
•Avoid installing the Battery in direct sunlight.
•Install the Battery in a location protected from flooding.
•Do not install the Battery where it may be exposed to direct water spray from sources such as downspouts, sprinklers, or
faucets.
•When installing the Battery in a garage or near vehicles, keep it out of the driving path. If possible, install the Battery on a
side wall and/or above the height of vehicle bumpers.
•Before beginning the wiring, ensure that the Battery is switched off. Also, make sure that the DC safety switch of all
inverters in the PV system is turned off.
Operation
•The Battery contains rechargeable lithium-ion cells that are potentially hazardous and can present a serious fire hazard,
injury and/or property damage if damaged, defective or improperly used.
•Lithium-ion batteries and products that contain lithium-ion can expose you to chemicals, including antimony trioxide,
cobalt lithium nickel oxide, and nickel, which are known to the State of California to cause cancer and birth defects or other
reproductive harm. For more information, go to www.P65Warnings.ca.gov.
•In case of an electrolyte leak from the Battery, avoid contact with electrolyte and follow the instructions in the
SolarEdge Home Battery – Emergency Response Guide.
•Use the Battery only as directed in this document.
•Do not use the Battery if it is defective, appears cracked, broken, or otherwise damaged.
•The Battery and its components are not user-serviceable.
•The Battery cells are not replaceable. Do not attempt to open, disassemble, repair, tamper with, or modify the
Battery.
•Do not operate the Battery at ambient temperatures of above 50°C/122°F or below - °10 C/14°F.
•Do not expose the Battery or its components to direct flame.
•Do not store or use flammable liquids or gasses in the vicinity of the Battery.
•Do not place any combustible items in the vicinity of the Battery.
•If the Battery catches fire, or if fire breaks out near the Battery, call the fire department immediately and follow the
instructions in the
SolarEdge Home Battery Emergency Response Guide.–
•The Battery is prone to re-ignition after extinguishing. Use caution and follow the emergency response instructions.
•Do not immerse the Battery or its components in water or other fluids.
•Operating the Battery in temperatures outside the specified range might cause damage to the Battery.
•Do not use solvents to clean the Battery, or expose the Battery to flammable or harsh chemicals or vapors.
•Do not use fluids, parts, or accessories other than those specified in this guide, including use of non-genuine
SolarEdge parts or accessories, or parts or accessories not purchased directly from SolarEdge or a SolarEdge
certified party.
•After the installation, do not place the Battery in stand-by mode for more than one (1) month, or permit the power
feed to the Battery to be discontinued for more than one (1) month.
•Do not paint any part of the Battery, including any internal or external components such as the exterior shell or
casing.
•Ensure that snow does not accumulate around the Battery.
•A non-functioning Battery must be handled with caution. The Battery state of charge and risk of venting may be
unknown. Contact SolarEdge for assistance.
•Do not attempt to remove or transport a damaged or failed battery. Contact SolarEdge or your SolarEdge certified
installer for support.
This symbol on the product means: Do not dispose of this product with general household waste. Consult your
local regulations for proper disposal instructions.
Mount decorative cover
1. Remove the rubber protector.
2. Mount the decorative cover. Make sure the cover clips
to the battery frame, where shown.
3. Fasten the cover with two bolts (supplied).
1
2
3
10 c
c
c
ccl
l
l
llip
ip
ip
ipip
Configure installation
1. Run SetApp.
2. Scan the QR code on the inverter.
3. Follow the on-screen instructions.
For post-installation settings, see
C
C
C
CCo
o
o
oonnec
nnec
nnec
nnecnnect
t
t
ttion
ion
ion
ionion a
a
a
a a C
C
C
C C
nd
nd
nd
ndnd onf
onf
onf
onfonfigura
igura
igura
iguraiguratio
tio
tio
tiotion
n
n
nn
application note.
The battery operation is managed
by the SolarEdge inverter connected
to the battery.
3
Device Manager
Found new devices
Add New Devices
…
Finish Settings
C
C
C
CCo
o
o
oommiss
mmiss
mmiss
mmissmmissionin
ionin
ionin
ioninioning
g
g
gg
SetApp
1
2
9
I
0P
ON
2 sec
1
2
Power on and associate
1. To power on and operate the battery, turn on the DC
circuit breaker.
2. To associate with the inverter, move the battery’s
ON/OFF/P switch to P
P
P
P P for 2 seconds and then release.
8
W
W
W
WWA
A
A
AAR
R
R
RRNI
NI
NI
NINING
NG
NG
NGNG!
!
!
!!
To power off the battery in case of emergency:
Turn off the ON/OFF/P switch and DC circuit
breaker.
F
F
F
FFC
C
C
CCC
C
C
CC a
a
a
aand
nd
nd
ndnd E
E
E
EEmis
mis
mis
mismissi
si
si
sision
on
on
onon
C
C
C
CCom
om
om
omomp
p
p
ppli
li
li
lilian
an
an
anance
ce
ce
cece
The Battery has been tested and found to comply with the limits for a Class B digital device, pursuant to part 15 of the FCC
Rules in the United States, and local regulations in other countries.
The Battery contains FCC ID: 2AGPT-ENET, IC: 20916-ENET.
These limits are designed to provide reasonable protection against harmful interference in a residential installation. The Battery
generates, uses and can radiate radio frequency energy and, if not installed and used in accordance with SolarEdge’s
instructions, may cause harmful interference to radio communications. However, there is no guarantee that interference will
not occur in a particular installation. If the Battery does cause harmful interference to radio or television reception, which can
be determined by turning the Battery off and on, you are encouraged to try to correct the interference by one or more of the
following measures:
•Reorient or relocate the receiving antenna.
•Increase the separation between the Battery and the receiver.
•Consult the installer or an experienced radio/TV technician for help.
Changes or modifications not expressly approved by SolarEdge for compliance may void the user’s authority to operate the
Battery.
LED Indications
Power Comm Fault
B
B
B
BBli
li
li
lilinking
nking
nking
nkingnking
Charge/discharge
F
F
F
FFlic
lic
lic
liclick
k
k
kke
e
e
eeri
ri
ri
ririn
n
n
nng
g
g
gg
Standby/DC pairing
ON
ON
ON
ONO N
Network comm OK
B
B
B
BBli
li
li
lilinking
nking
nking
nkingnking
Searching for network
ON
ON
ON
ONO N
Fault
F
F
F
FFa
a
a
aas
s
s
sst
t
t
tt lin
lin
lin
linlinking
king
king
kingking
B
B
B
B B
FW update
A
A
A
AA E
E
E
EED
D
D
DDs
s
s
ss
ll L
ll L
ll L
ll Lll L O
O
O
O ON
N
N
NN
Boot/Reset
I
0P
7Connect additional
batteries (optional)
1. Make sure all batteries are properly grounded using the
grounding terminal.
2. Connect branch connectors to the battery’s DC inputs.
3. Connect DC cables from the inverter and the next
battery to the branch connectors.
Connect cables between the batteries , as described above.
-
+
D
D
D
DD C
C
C
CC o
o
o
oo n
n
n
nnve
ve
ve
veverte
rte
rte
rterter/
r/
r/
r/r/
t
t
t
t t i
i
i
i i
p
p
p
pp r
r
r
rre
e
e
eev
v
v
vv.
.
.
.. at
at
at
atatt
t
t
ttery
ery
ery
eryery
b
b
b
b b
D
D
D
DDC
C
C
CC o
o
o
oo
t
t
t
t t n
n
n
n nex
ex
ex
exex a
a
a
aattery
ttery
ttery
tteryttery
t b
t b
t b
t bt b
2
3
1


Product specificaties

Merk: SolarEdge
Categorie: Accu
Model: Home Battery

Heb je hulp nodig?

Als je hulp nodig hebt met SolarEdge Home Battery stel dan hieronder een vraag en andere gebruikers zullen je antwoorden


Handleiding Accu SolarEdge

Handleiding Accu

Nieuwste handleidingen voor Accu