Smartwares SH4-99652 Handleiding
Smartwares Smarth home SH4-99652
Bekijk gratis de handleiding van Smartwares SH4-99652 (4 pagina’s), behorend tot de categorie Smarth home. Deze gids werd als nuttig beoordeeld door 14 mensen en kreeg gemiddeld 4.7 sterren uit 3 reviews. Heb je een vraag over Smartwares SH4-99652 of wil je andere gebruikers van dit product iets vragen? Stel een vraag
Pagina 1/4
EN
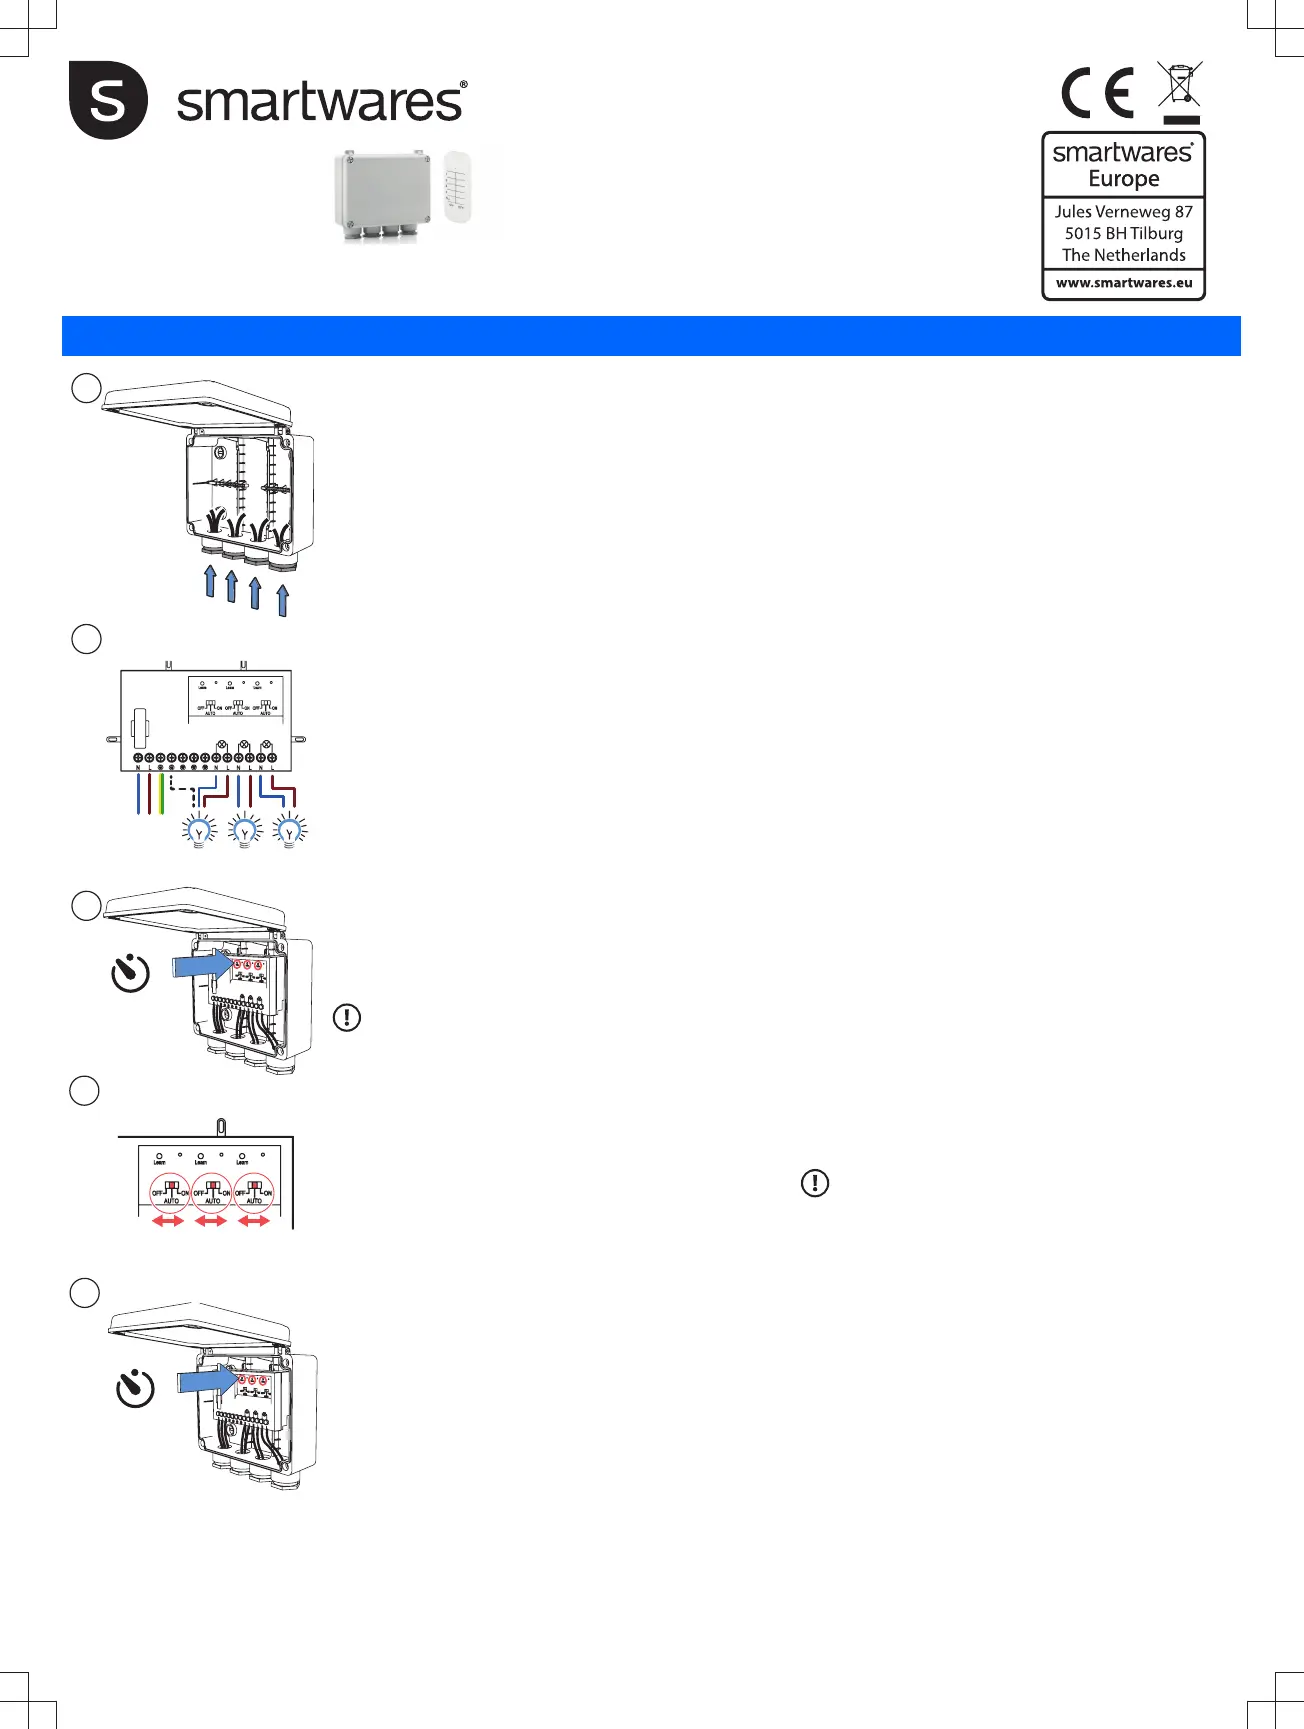
Outdoor 3-channel switch set
NL3-kanaalsschakelaarset voor buiten
DE
Außenleuchten 3-Kanal Schalter Set
FRPrises d'extérieur, boîtier 3 canaux
ESInterruptor de 3 vías para exterior
IT Interruttore da esterno a 3 vie
SV
Utomhusbrytarpaket, 3 kanaler
PL
Zewnętrzny 3-kanałowy zestaw przełącznika
SH4-99652
EN Instruction manual
PREPARATION BEFORE USE
In your electrical circuit panel, locate the circuit breaker control for the
wall switch you will be working on.
Switch the circuit off.
•Open the mounting box by loosening the screws.
•Unscrew the receiver and pull it from the mounting box.
•Puncture the slots at the back of the mounting box to create four
screw holes.
•Use screws to fix the mounting box to the desired spot. Use plugs
when the surface requires this.
•Puncture a hole in the rubber caps at the bottom of the mounting
box. (1)
•Pull the phase wire (brown), neutral wire (blue) and the ground
wire (green/yellow) of the power supply through the left hole. Pull
the black, blue and (optional) the green/yellow wires of the
devices through the remaining holes of the mounting box.
Connecting the receiver to the power supply (2)
•Connect the phase wire (brown) to L, connect the neutral wire
(blue) to N and connect the green/yellow wire to the ground
terminal.
Connecting a device to the receiver (2)
•Connect the blue wire of the device to N and connect the black
wire of the device to L. Connect other devices in the same way to
remaining terminals. If one or more devices is equipped with a
ground wire, connect it to one of the ground terminals.
Mounting the receiver
•Screw the receiver into the mounting box.
•Switch on the mains power in your electric circuit panel.
PAIRING THE RECEIVER TO A REMOTE CONTROL
Be careful when pressing the LEARN button:
- Do not use a sharp object.
- Make sure not to puncture the rubber.
- Only use a suitable tool that can push the learn button accurately.
- Avoid pushing the rubber learn button to the left or right as this will
push it off its guide.
- If the below steps are not working then please use another tool.
•Press and hold the LEARN button for 3 seconds, then release it .
•After releasing the button the LED starts to blink. Your receiver is
now switched to pairing mode.
Attention:
the LED should only blink after releasing the button. If
the LED starts to blink while holding the button, there will be no
pairing.
On the remote control:
•Within 10 seconds, press one of the “ON” buttons to pair it to the
receiver.
•The LED on the receiver turns off if the pairing is complete.
•Repeat for other channels.
Operating the devices (AUTO/ON/OFF)
•Set the switch to AUTO to operate the device with a remote
control.
•Set the switch to ON/OFF to continuously power on/off the
corresponding device.
(NOTE: device cannot be controlled by remote control in this
mode)
A.Press the ”ON” button on the remote control to turn on the
receiver.
B.Press the “OFF” button on the remote control to turn off the
receiver.
C.Press the ”ON” button beneath ALL (on the remote control) to turn
on all paired devices at the same time.
D.Press the ”OFF” button beneath ALL (on the remote control) to
turn off all paired devices at the same time.
Disconnecting all links
•Press and hold the LEARN button until the LED starts to blink
(around 10 seconds).
•While blinking, press the learn button once again and release
(DONOT HOLD). The LED will turn off and then on again. All
links areundone.
NL Gebruiksaanwijzing
VOORBEREIDING VOOR GEBRUIK
Zoek in uw stoppenkast de stroomonderbreker voor de
wandschakelaar waaraan u gaat werken.
Schakel de stroom uit.
•Open de inbouwdoos door de schroeven los te draaien.
•Schroef de ontvanger los en verwijder deze uit de inbouwdoos.
•Druk de sleuven in de bodem van de inbouwdoos door om vier
schroefgaten te creëren.
•Bevestig de inbouwdoos op de gewenste plek met schroeven.
Gebruik pluggen wanneer de ondergrond dit vereist.
•Doorboor de rubberen doppen onder aan de inbouwdoos. (1)
•Trek de fasedraad (bruin), de neutrale draad (blauw) en de
aardedraad (groen/geel) van de voeding door het linkergat.
Trek
de zwarte, blauwe en (optioneel) groene/gele draden van
deapparaten door de vrije gaten in de inbouwdoos.
De ontvanger aansluiten op de voeding (2)
•Sluit de fasedraad (bruin) aan op L, sluit de neutrale draad
(blauw) aan op N en sluit de groene/gele draad aan op de
aardklem.
Een apparaat aansluiten op de ontvanger (2)
•Sluit de blauwe draad van het apparaat aan op N en sluit de
zwarte draad van het apparaat aan op L. Sluit overige
apparatenop dezelfde manier aan op de vrije klemmen. Als
een of meerapparaten zijn voorzien van een aardedraad, sluit
u deze aan opeen van de aardklemmen.
De ontvanger bevestigen
•Schroef de ontvanger vast in de inbouwdoos.
•Schakel de stroom in met de hoofdschakelaar in uw meterkast.
DE ONTVANGER KOPPELEN AAN EEN
AFSTANDSBEDIENING
Wees voorzichtig bij het gebruik van de LEARN-knop:
- Gebruik geen scherpe voorwerpen.
- Zorg ervoor dat u het rubber niet doorboort.
- Gebruik alleen geschikte hulpmiddelen waarmee de leerknop
nauwkeurig kan worden ingedrukt.
- Druk de rubberen leerknop niet naar links of rechts; deze wordt
danvan de geleider gedrukt.
- Gebruik een ander hulpmiddel als de onderstaande stappen niet
werken.
•Houd de LEARN-knop 3 seconden ingedrukt (3).
•Nadat u de knop hebt losgelaten, gaat het ledlampje knipperen.
De koppelingsmodus van de ontvanger is nu actief.
Let op:
De led mag pas gaan knipperen nadat u de knop hebt
losgelaten. Als het ledlampje al gaat knipperen terwijl u de knop
ingedrukt houdt, wordt de koppelingsmodus niet geactiveerd.
Op de afstandsbediening:
•Druk binnen 10 seconden op een van de ON-knoppen om de
afstandsbediening te koppelen aan de ontvanger.
•Het ledlampje op de ontvanger wordt uitgeschakeld wanneer
hetkoppelen is voltooid.
•Herhaal dit voor andere kanalen.
De apparaten bedienen (AUTO/ON/OFF) (4)
•Zet de schakelaar op AUTO om het apparaat te bedienen met
eenafstandsbediening.
1
2
3
4
5
220-240 VAC
50/60Hz
3 sec
10 sec
Specifications:
Batt
ery: 1 x 3VDC, type CR 2032 (incl.)
AC input voltage: 230V, 50Hz
Maximum distance: 30 m
Maximum power output: 3 x 400 W
Water resistance: IP55
Product specificaties
| Merk: | Smartwares |
| Categorie: | Smarth home |
| Model: | SH4-99652 |
| Kleur van het product: | Wit |
| Gewicht verpakking: | 2361 g |
| Breedte verpakking: | 195 mm |
| Diepte verpakking: | 85 mm |
| Hoogte verpakking: | 205 mm |
| Soort: | Slimme schakelaar |
| Stroombron: | AC |
| Internationale veiligheidscode (IP): | IP55 |
| Connectiviteitstechnologie: | Draadloos |
| Ondersteund aantal accu's/batterijen: | 1 |
| Duurzaamheidscertificaten: | CE |
| Aantal per verpakking: | 1 stuk(s) |
| Frequentie: | 433.92 MHz |
| Op afstand bedienbaar: | Ja |
| Aantal kanalen: | 3 kanalen |
| Maximum outdoorbereik: | 30 m |
| Bruto gewicht pakket: | 1 g |
| Afstandsbediening inbegrepen: | Ja |
| (Buitenste) hoofdverpakking hoogte: | 450 mm |
| (Buitenste) hoofdverpakking breedte: | 310 mm |
| (Buitenste) hoofdverpakking brutogewicht: | 37777 g |
| (Buitenste) hoofdverpakking lengte: | 563 mm |
| Hoeveelheid per (buitenste) hoofdverpakking: | 16 stuk(s) |
| AC-ingangsspanning: | 220 - 240 V |
| AC-ingangsfrequentie: | 50 / 60 Hz |
| Batterijen inbegrepen: | Ja |
| Type batterij: | CR2032 |
| Maximaal vermogen per kanaal: | 400 W |
| Radiofrequentie: | 433.92 MHz |
Heb je hulp nodig?
Als je hulp nodig hebt met Smartwares SH4-99652 stel dan hieronder een vraag en andere gebruikers zullen je antwoorden
Handleiding Smarth home Smartwares

27 November 2025
17 Januari 2024
4 Juli 2023
5 Juni 2023
3 Juni 2023
29 Mei 2023
7 Mei 2023
6 Mei 2023
17 April 2023
15 April 2023
Handleiding Smarth home
Nieuwste handleidingen voor Smarth home
15 Juli 2026
11 Juli 2026
11 Juli 2026
9 Juli 2026
8 Juli 2026
8 Juli 2026
8 Juli 2026
7 Juli 2026
7 Juli 2026
6 Juli 2026