Samsung SlimFit TX-T2782 Handleiding
Bekijk gratis de handleiding van Samsung SlimFit TX-T2782 (25 pagina’s), behorend tot de categorie Televisie. Deze gids werd als nuttig beoordeeld door 42 mensen en kreeg gemiddeld 4.9 sterren uit 21.5 reviews. Heb je een vraag over Samsung SlimFit TX-T2782 of wil je andere gebruikers van dit product iets vragen? Stel een vraag
Pagina 1/25

COLOR TELEVISION
TX-T2781
TX-T2782
TX-T2082
Owner’s
Instructions
Register your product at www.samsung.com/global/register
Record your Model and Serial number here for future reference.
▪ Model _______________ ▪ Serial No. _______________
English - 2
© 2007 Samsung Electronics Co., Ltd. All rights reserved.
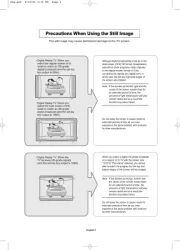
Important Warranty Information Regarding Television Format Viewing
Standard screen format televisions(4:3, the aspect ratio of the screen width to height) are primarily designed to view standard format
full-motion video. The images displayed on them should primarily be in the standard 4:3 ratio format and constantly moving. Displaying
stationary graphics and images on screen, such as the dark top and bottom letterbox bars(wide screen pictures), should be limited to no
more than 15% of the total television viewing per week.
Wide screen format televisions(16:9, the aspect ratio of the screen width to height) are primarily designed to view wide screen format
full-motion video. The images displayed on them should primarily be in the wide screen 16:9 ratio format, or expanded to fill the screen
if your model offers this feature, and constantly moving. Displaying stationary graphics and images on screen, such as the dark side-
bars on non-expanded standard format television video and programming, should be limited to no more than 15% of the total television
viewing per week.
Additionally, viewing other stationary images and text such as stock market reports, video game displays, station logos, web sites or
computer graphics and patterns, should be limited as described above for all televisions. Displaying any stationary images that
exceed the above guidelines can cause uneven aging of picture tubes(CRTs) that leave subtle, but permanent burned-in ghost
images in the television picture. To avoid this, vary the programming and images, and primarily display full screen moving
images, not stationary patterns or dark bars. On television models that offer picture sizing features, use these controls to view the
different formats as a full screen picture.
Be careful in the selection and duration of television formats used for viewing. Uneven CRT aging as a result of format selection and
use, as well as other burned-in images, is not covered by your Samsung limited warranty.
Contents
General Information
Accessories ............................................................................. 3
Viewing the Control Panel ....................................................... 3
Viewing the Connection Panel ................................................ 4
Remote Control ....................................................................... 5
Connection
Connecting VHF and UHF Antennas ...................................... 6
Connecting Cable TV .............................................................. 6
Connecting a VCR .................................................................. 7
Connecting a Camcorder ........................................................ 7
Connecting a DVD Player/Set-Top Box .................................. 8
Connecting an Amplifier/DVD Home Theater - Analog ........... 8
Operation
Plug & Play Feature ................................................................ 9
Memorizing the Channels ..................................................... 10
To Select the Source ............................................................. 11
To Edit the Input Source Name ............................................. 11
Picture Control
Using Automatic Picture Settings .......................................... 11
Changing the Screen Size .................................................... 12
Digital Noise Reduction ......................................................... 12
Tilt (TX-T2781/TX-T2782 only) ............................................. 13
Sound Control
Using Automatic Sound Settings ........................................... 13
Customizing the Sound ......................................................... 13
Choosing a Multi-Channel Sound (MTS) Track - Digital ....... 14
Choosing a Multi-Channel Sound (MTS) Track - Analog ...... 14
Automatic Volume Control .................................................... 14
Using Pseudo Stereo ............................................................ 15
Using Turbo Plus ................................................................... 15
Channel Control
Clearing Scrambled Channels - Digital ................................. 15
Adding and Erasing Channels - Analog ................................ 15
Adding and Erasing Channels - Digital ................................. 16
Fine Tuning Analog Channels - Analog ................................. 16
Labeling Channels - Analog .................................................. 16
Checking the Digital-Signal Strength - Digital ....................... 17
Using the R.Surf Feature ...................................................... 17
Function Description
Selecting a Menu Language ................................................. 17
Setting the Time .................................................................... 18
Viewing Closed Captions
(On-Screen Text Messages) - Digital .................................... 19
Viewing Closed Captions
(On-Screen Text Messages) - Analog ................................... 19
Setting the Blue Screen Mode .............................................. 20
Setting the On/Off Melody ..................................................... 20
Using the V-Chip ................................................................... 20
Upgrading the Software ........................................................ 23
Appendix
Identifying Problems ............................................................. 23
Specifications
Symbols
☛ ➢
Press
Important
Note One-Touch
Button

English - 3
Viewing the Control Panel
You can control your TV’s basic features, including the on-screen menu.
To use the more advanced features, you must use the remote control.
1
SOURCE
Toggles between all the available input sources (TV, AV1,
AV2, Component).
In the on-screen menu, use this button as you would use the
ENTER button on the remote control.
2
MENU
Press to see an on-screen menu of your TV’s features.
3
+ VOL −
Press to increase or decrease the volume.
In the on-screen menu, use the buttons as you would + VOL –
use the ◄ and ► buttons on the remote control.
4
CH
Press to change channels.
In the on-screen menu, use the buttons as you CH
would use the ▲ and ▼ buttons on the remote control.
5
Power Indicator
Lights up when you turn the power off.
- Power Off: Red
- Power On: Off
6
Remote Control Sensor
Aim the remote control towards this spot on the TV.
7
POWER
Press to turn the TV on and off.
Accessories
Please make sure the following items are included with your TV.
If any items are missing, contact your dealer.
Remote Control (AA59-00405B)/
AAA Batteries
Owner’s Instructions/
Safety Guide Manual
Warranty Cards/
Registration Card
➢ The product color and shape may vary depending on the model.
TX-T2781
TX-T2082
TX-T2782
Product specificaties
| Merk: | Samsung |
| Categorie: | Televisie |
| Model: | SlimFit TX-T2782 |
Heb je hulp nodig?
Als je hulp nodig hebt met Samsung SlimFit TX-T2782 stel dan hieronder een vraag en andere gebruikers zullen je antwoorden
Handleiding Televisie Samsung

5 Augustus 2025

4 Augustus 2025

4 Augustus 2025
4 Augustus 2025
4 Augustus 2025
4 Augustus 2025

3 Augustus 2025
3 Augustus 2025
3 Augustus 2025
3 Augustus 2025
Handleiding Televisie
- Jay-tech
- LTC
- Grundig
- Hitachi
- Abus
- QBell Technology
- ElectriQ
- Eizo
- Curtis
- AYA
- Zephir
- Kemo
- SereneLife
- JGC
- Aristona
Nieuwste handleidingen voor Televisie
6 Augustus 2025
6 Augustus 2025
6 Augustus 2025
6 Augustus 2025

6 Augustus 2025

6 Augustus 2025

6 Augustus 2025
6 Augustus 2025
5 Augustus 2025
5 Augustus 2025