Sagemcom D750 Handleiding
Bekijk gratis de handleiding van Sagemcom D750 (2 pagina’s), behorend tot de categorie Telefoon. Deze gids werd als nuttig beoordeeld door 57 mensen en kreeg gemiddeld 4.0 sterren uit 9 reviews. Heb je een vraag over Sagemcom D750 of wil je andere gebruikers van dit product iets vragen? Stel een vraag
Pagina 1/2
D750-D750A
D750-D750A
D750-D750A
D750-D750A D750-D750A
1
D EAR CUSTOMER
You have just acquired a new generation Sagemcom telephone. Thank you for placing your
confidence in us.
This device has been manufactured with the utmost care.
If you should have difficulties in operating it, we recommend that you consult this manual or
contact the Sagemcom Support Team on 0
0
0
0
0845 0900 316
845 0900 316
845 0900 316
845 0900 316845 0900 316*.
You can also find information on the following site:
www.sagemcomdigital.c
www.sagemcomdigital.c
www.sagemcomdigital.c
www.sagemcomdigital.cwww.sagemcomdigital.co.uk
o.uk
o.uk
o.uk o.uk
For your comfort and safety, we ask that you read the following section carefully:
« R
R
R
R
Recommendations and sa
ecommendations and sa
ecommendations and sa
ecommendations and saecommendations and safety instructions
fety instructions
fety instructions
fety instructions fety instructions ».
The CE marking certifies that the product meets the essential requirements of
Directive 1999/5/CE of the European Parliament and of the Council pertaining to
microwave radio equipment and telecommunication terminal equipment, for the
safety and health of users, for electromagnetic interference.
Furthermore, it efficiently uses the frequency spectrum attributed to ground and
spatial communication to prevent damaging interference.
The declaration of compliance may be looked up on the w
w
w
w
www.sagemcom.com
ww.sagemcom.com
ww.sagemcom.com
ww.sagemcom.comww.sagemcom.com
site "Support" section or can be obtained from the following address :
Sagemcom Broadband
Sagemcom Broadband
Sagemcom Broadband
Sagemcom BroadbandSagemcom Broadband SAS
SAS
SAS
SAS SAS
250, route de l'Empereur
92848 Rueil-Malmaison Cedex - France
*: 3.95 pence per minute from all fixed lines, tariff cost effective from 01/09/2009
D750-D750A
D750-D750A
D750-D750A
D750-D750A D750-D750A
2
B EFORE YOU BEGIN
Make sure your package includes the following:
this user guide
+
_
+
_
a base unit
OR
a handsetone battery compartment
cover
a telephone line cordan AC power supplytwo rechargeable
batteries
D750
D750A
If you have purchased the Duo / Trio version you will find below additional accessories per
handset:
+
_
+
_
a handset chargertwo rechargeable
batteries
one battery
compartment cover
The base
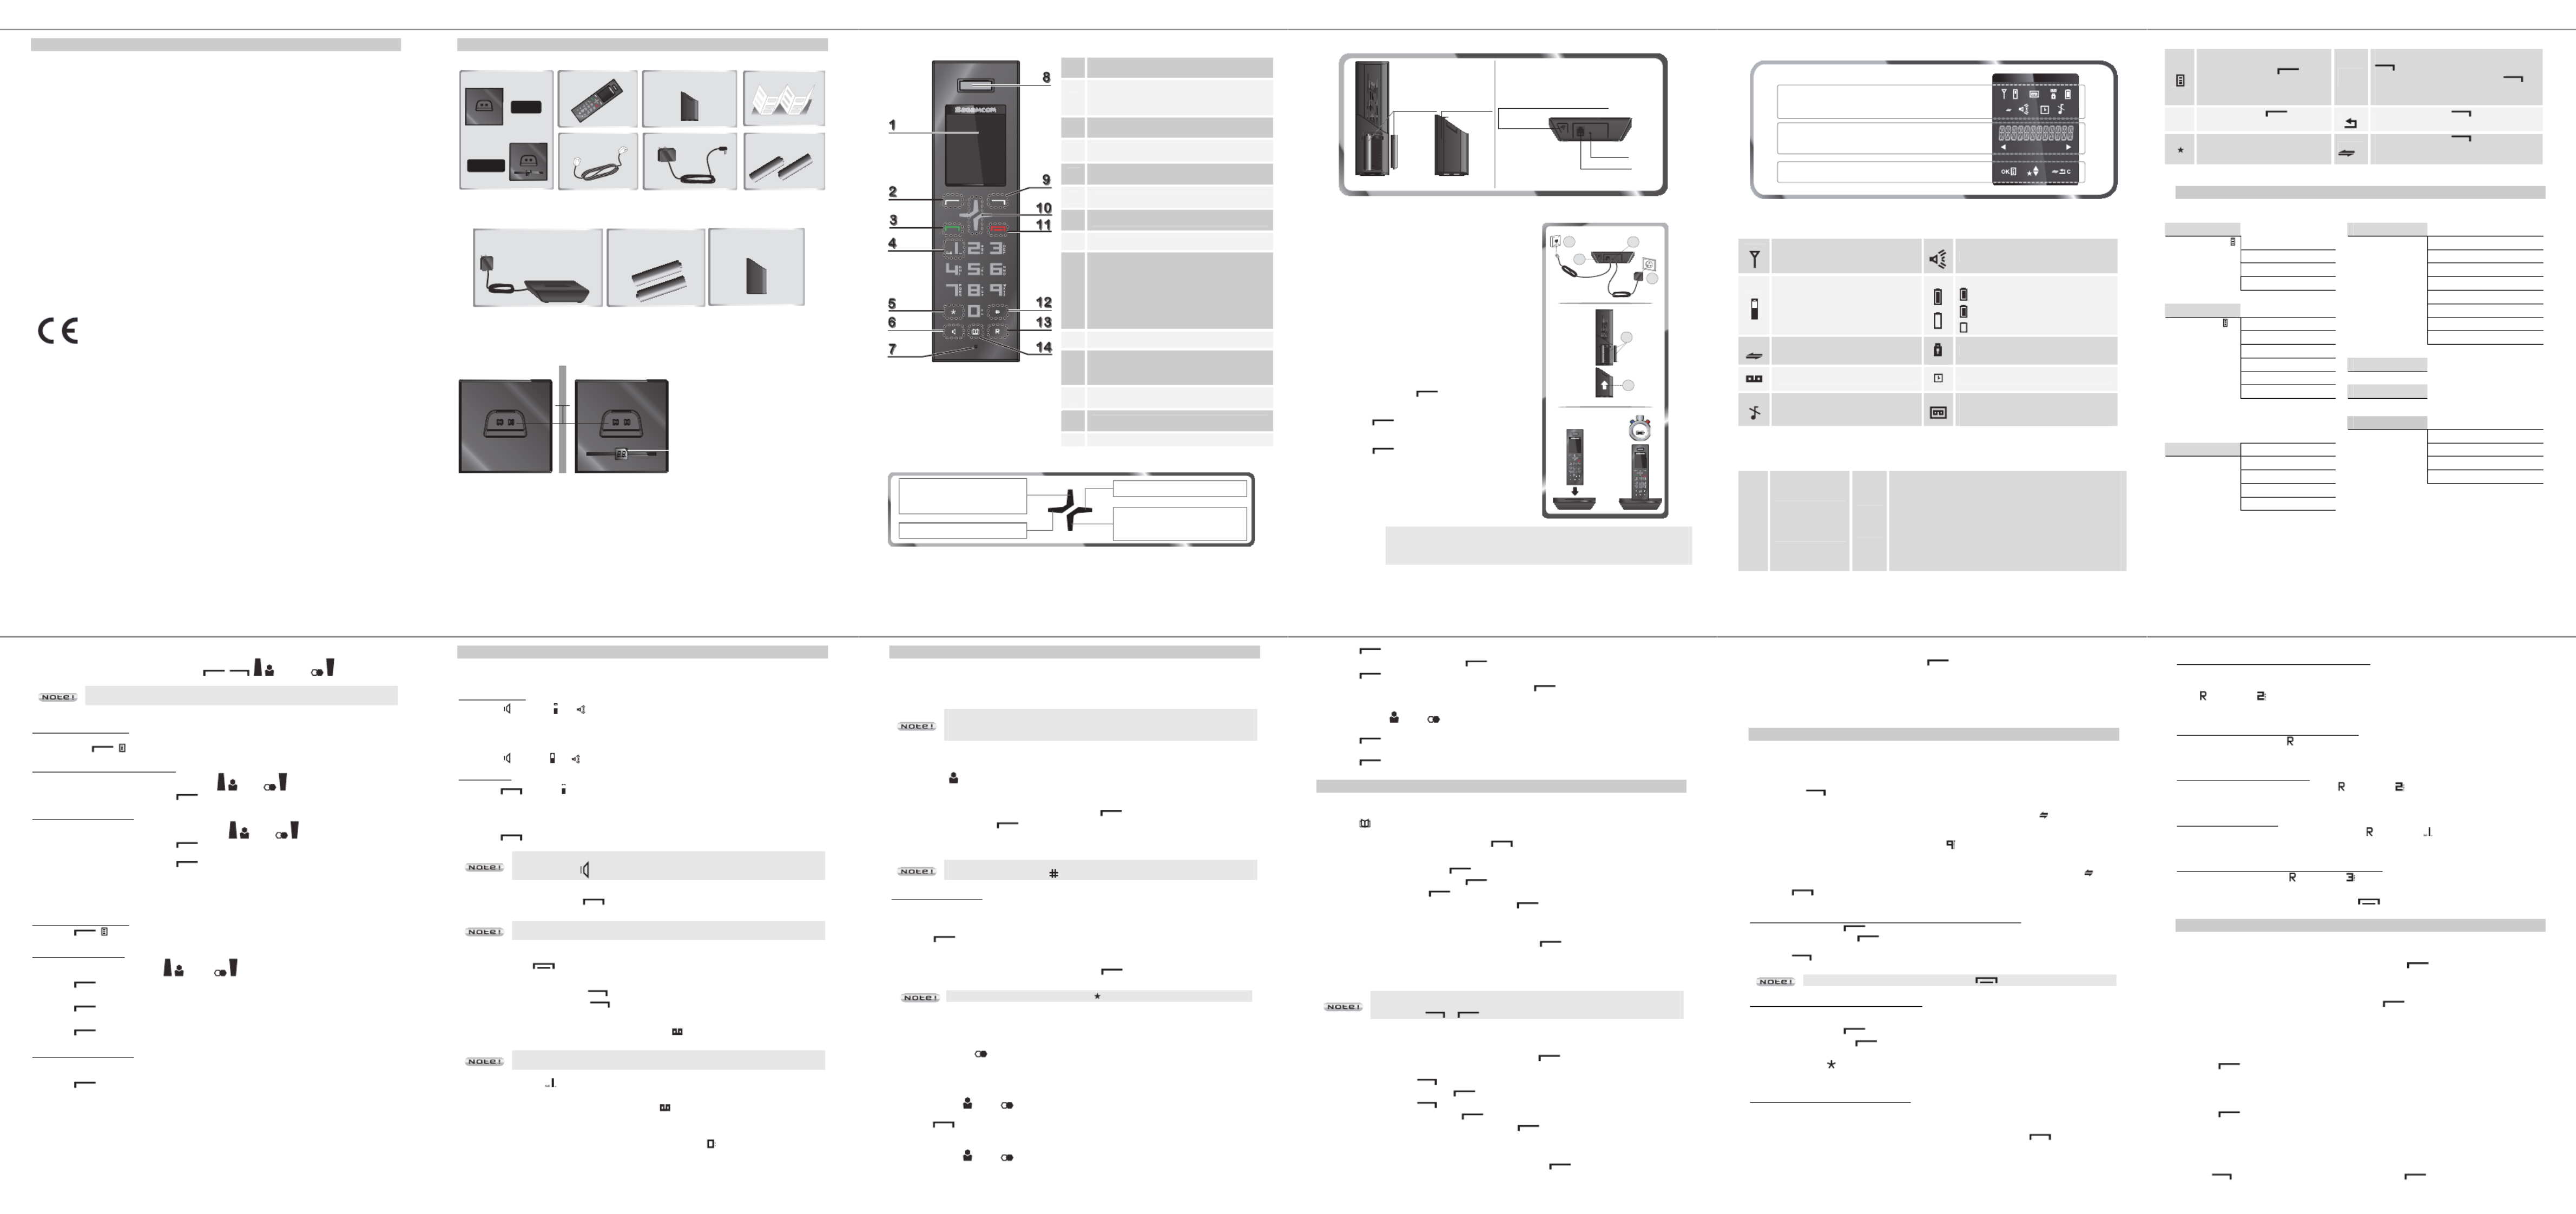
D750 D750A
2
1
1.
1.
1.
1.1. Handset port
Handset port
Handset port
Handset port Handset port
2.
2.
2.
2.2. Display
Display
Display
Display Display
(refer to paragraph «H
H
H
H
How
ow
ow
ow ow the
the
the
the the base
base
base
base base
display works
display works
display works
display worksdisplay works», page 15).
D750-D750A
D750-D750A
D750-D750A
D750-D750A D750-D750A
3
Handset keys
* The voice mail number can be programmed. To
change it refer to paragraph «
Changing
Changing
Changing
Changing Changing your
your
your
your your
voice mail number
voice mail number
voice mail number
voice mail number voice mail number », page 13.
** Only the "top" and "bottom" keys of the
navigator function. The "left" and "right" keys have
no effect on any action.
1
1
1
1 1 Screen
2
2
2
2 2
OK / Menu key:
- Validation
-Access the menu / options
3
3
3
3 3 Green key: Accept call / Make call
4
4
4
4 4 Access to voice messaging service (Press and
hold) *
5
5
5
5 5 Star key: Mute/Unmute ring tone (Press and
hold)
6
6
6
6 6 Activate / deactivate handsfree mode
7
7
7
7 7 Microphone
8
8
8
8 8 Earpiece
9
9
9
9 9
Key C / MUTE / intercom:
-Return to previous menu
-Correct the entry / cancel the action
-Activate/ Deactivate the microphone
(during a call)
-Call another handset (from the home
screen)
10
10
10
10 10 Navigator ** : Up / Down
11
11
11
11 11
Red key :
-Finish call
-Switch handset on/off (press and hold)
12
12
12
12 12 # Key : Activate / Deactivate keypad lock
(Press and hold)
13
13
13
13 13 R key : Manage multiple calls
14
14
14
14 14 Access phonebook
Navigator
- From the Home screen:
Access to the caller list
- On the menu:
Navigation key up- From the Home screen:
Access to outgoing call list (Bis)
- On the menu:
Navigation key down
No action
No action
D750-D750A
D750-D750A
D750-D750A
D750-D750A D750-D750A
4
Rear view
+
_
+
_
Rechargeable
batteries
B
attery
compartment cover
Paging button
- short press: find handset.
- long press (>4 sec): handset pairing mode
(active for 1 minute)
Handset (rear view)
Base
(rear view)
Power socket
Telephone socket
Installing the phone
1.Plug the phone cable into the socket of your D750
base.
2.Connect the other end of the cable with the phone
wall socket.
3.Connect the power adapter cord to the underside
of the base.
4.Connect the power adapter plug to the wall socket.
5.Insert the batteries according to their polarities.
6.Close the battery compartment.
«searching...» appears on the screen.
a.A welcome message in all the languages
supported by the telephone is displayed on
the screen, press
*.
b.Select the country using or keys,
press
*.
c.A screen asks you to confirm your choice.
Press
*.
You will hear a confirmation tone.
The standby screen is displayed.
7.Place the handset in the base station to charge for
15 hours
15 hours
15 hours
15 hours15 hours prior to first use.
+
_
+
_
6
1
3
4
5
2
15 H
IMPORTANT
IMPORTANT
IMPORTANT
IMPORTANT IMPORTANT
If your handset batteries are empty leave the handset in the charging unit for at
least 10 minutes. You will then be able to switch it on again.
* depending on version
D750-D750A
D750-D750A
D750-D750A
D750-D750A D750-D750A
5
Handset display
Status icons
Information field
Action icons
Status icons
Flashes when the handset is out of
range or when the base is
disconnected from power.
Hands-free activated
External call
Charging status icon
Fixed : batteries are full
Blinks : charging in progress
: Batteries are low.
Internal call
Keypad locked
New voice messages
Alarm set
Silent mode activated.
On: answering machine activated.
Blinks : new message(s) on your
answering machine.
Information field
Telephone number
longer than screen
display area
(11 digits).
88..
In standby:
the name of the handset or the time + the number of the
handset (see section "C
C
C
C
Choose the home screen
hoose the home screen
hoose the home screen
hoose the home screenhoose the home screen", page 13)
During a call:
-the caller's number
-the duration of the call
In the menu:
-the name of the menu /
of the function
D750-D750A
D750-D750A
D750-D750A
D750-D750A D750-D750A
6
Action icons
By pressing the key you
access a menu or a list of options C
While entering a n
While entering a n
While entering a n
While entering a nWhile entering a number:
umber:
umber:
umber:umber: Pressing the key
will delete the last letter / character.
During a call
During a call
During a call
During a callDuring a call: By pressing the key
you activate
/ deactivate the handset microphone.
OK
Pressing the key confirms
an action.
By pressing the key you return to the
previous menu
Missed call not consulted.
By pressing the key you can make
an internal call (see section "I
I
I
I
Intercom
ntercom
ntercom
ntercom ntercom
Call
Call
Call
CallCall", page 11).
M ENU STRUCTURE
Quick reference
call list Hs settings Alarm
Options Add to pb Ring setup
Delete Tone setup
Delete all language
details Rename hs
Hs display
phonebook Auto answer
Options add Date & time
View Mailbox
edit
delete registration
Delete all
Pb status Default
Ans. Machine* Msg playback
Delete all
Bs settings Delete hs Memo
Dial mode Tam on/off
Flash time Tam settings
Change pin
Call share
* D750A
D750-D750A
D750-D750A
D750-D750A
D750-D750A D750-D750A
7
How to navigate among the menus
To navigate among the menus, use the keys : , , . ( )and ()
Only the "up" and "down" keys of the navigator function. The "left" and "right"
keys have no effect on any action. Refer to paragraph «Navigator», page 3.
Step 1: accessing a menu
-Press ().
Step 2: selecting a menu / a sub-menu
-Select "the desired menu" use the keys ()or ().
-Confirm by pressing the key (O
O
O
O
OK
K
K
KK).
Step 3: selecting a function
-Select "the desired function" use the keys ()or ().
-Confirm by pressing the key (OK).
-Modify the parameter.
-Confirm by pressing the key (OK).
Example:
Example:
Example:
Example: Example: how to use the menu to change your handset ring tone.
Go to the menu Hs settings Æ ring setup .
Step 1: accessing a menu
1.Press ().
Step 2: selecting a menu
2.Select " hs settings " using the ( )or () key.
3.Press (O
O
O
O
OK
K
K
KK).
4.Select " ring setup " using the or key.
5.Press
(O
O
O
O
OK
K
K
KK).
6.Select "int. ring " (or "ext ring ") using the or .
7.Press (O
O
O
O
OK
K
K
KK).
Step 3: selecting a function
8.10 melodys are available: " melody 1 " " melody 10 ".
Select the desired melody using the or key.
9.Press (O
O
O
O
OK
K
K
KK) key to confirm your selection.
D750-D750A
D750-D750A
D750-D750A
D750-D750A D750-D750A
8
C ALL MANAGEMENT
Make a call
Ensure that the handset is switched on.
Hands-free mode:
1.Press . The icons and appear and you will hear the dial tone.
2.Enter the phone number.
- OR -
1.Enter the phone number.
2.Press . The icons and appears.
Normal mode:
1.Press . The icon is displayed.
2.Enter the phone number.
- OR -
1.Enter the phone number.
2.Press .
During a phone call you can activate or deactivate the handset loudspeaker by
pressing the key .
Answering a call
When the phone rings, press the key to answer the call.
You can adjust the volume of your handset earpiece by pressing or key
anytime during a conversation.
Ending a call
To end a call press .
Microphone mute function
-Enable MUTE function: press , " Muted " is displayed on the screen.
-Disable MUTE function: press , your conversation partner will be able to hear you again.
Checking your voice mailbox
If you have received a new voice mail message, the icon is displayed on the screen.
To use this feature you need to set up a voice mailbox (please refer to section
"Changing your voicemail number" on page 13)
1.Hold down the key (key 1).
2.Follow the instructions.
3.Once you have consulted the messages, the icon disappears.
Inserting a pause (in dialling)
You can insert a pause in dialling a phone number if you want to wait before actually ringing.
While dialling the number you want to call, press and hold the key
to insert the pause.
The display shows a P.
D750-D750A
D750-D750A
D750-D750A
D750-D750A D750-D750A
9
C ALL LOG
Calling Line Identification Presentation (CLIP)
This CLIP phone stores and displays CLIP information provided by your local telephone company.
If you have not subscribed to CLIP service or if the caller number is suppressed, the display
shows unknown.
Display of numbers not available:
Display of numbers not available:
Display of numbers not available:
Display of numbers not available:Display of numbers not available:
-OU
OU
OU
OUOUT
T
T
T T OF
OF
OF
OFOF A
A
A
A AR
R
R
RREA
EA
EA
EAEA: you are not in same area as your contact.
-WI
WI
WI
WIWITH
TH
TH
THTHHE
HE
HE
HEHELD
LD
LD
LDLD: your contact does not want their number to be displayed.
Received/Missed call log
The list contains the numbers of the last 10 calls received.
1.Press () .
2.The most recent name or call number is displayed (depending on whether or not your
contact is stored in your phonebook).
3.Press the or key to go through the list. Press .
4.Select " details ". Press .
5.The date and time when the selected call was received are displayed.
6.Press the or key to go through the list.
If icon is displayed the number of this caller exceeds 11 digits and cannot be
displayed onscreen. Press to view the complete number.
Consulting a missed call
When call(s) have been missed, the message " X new calls " is displayed on the screen
(X is the number of missed calls).
1.Press .
2.The most recent name or call number is displayed (depending on whether or not your
contact is stored in your phonebook).
3.Press the or key to go through the list. Press .
Missed calls are indicated by the icon in the incoming call log.
Dialled call log
The dialled call log presents the calls you made (max. 5 last calls).
To consult the list:
1.Press briefly () .
2.The last dialled number is displayed. Press the
or
key to consult the list of the last 5
numbers dialled.
Calling back a number in your call list
1.Press the ()
or
() key.
2.Press the or key to go through the list.
3.Press .
Making an entry in the phonebook from the list of calls
1.Press the ( )
or () key.
2.Use or to select the desired caller number.
D750-D750A
D750-D750A
D750-D750A
D750-D750A D750-D750A
10
3.Press key, then select " add to PB ".
4.Enter the name of the entry. Press .
5.Press
to validate the number.
6.Choose a ring tone for the contact you create. Press .
Deleting caller list record
1.Press the ( )
or () key.
2.Press or key to select a call record.
3.Press .
4.Select "delete " (or " delete all" to delete the entire Caller list).
5.Press to confirm.
P HONEBOOK
You can store 50 phonebook entries (20 digits and 12 characters) in your phonebook
Calling a contact from your phonebook
1.Press key to access to the contact list.
2.Press or to go through the list.
3.Once the contact to call is chosen, press .
Adding a contact to the phonebook
1.Go to the menu "phonebook" Æ Æ "Add ".
2.Enter the name of the entry. Press .
3.Enter the number. Press .
4.Choose a ring tone for the file you create. Press .
Display a contact
1.Go to the menu "phonebook".
2.Choose the contact to display with the or . Press .
3.Select "view".
4.The number is displayed. Use keys or to display the name of the ring tone assigned to
that file.
If icon is displayed the number of this caller exceeds 11 digits and cannot be
displayed onscreen.
Use the keys or to display all the digits.
Editing a contact
1.Go to the menu "phonebook".
2.Select the entry you want to edit using or . Press .
3.Select "edit".
4.You can now use the key to delete the entire name or individual characters.
5.Enter the new name and press
key.
6.You can now use the key to delete the entire number or individual digits
7.Enter the new number and press
key.
8.Choose a ring tone for the file you create. Press .
Deleting a contact / the entire phonebook
1.Go to the menu "phonebook".
2.Select the entry you want to delete using or . Press .
D750-D750A
D750-D750A
D750-D750A
D750-D750A D750-D750A
11
3.Select "delete" (or "delete all " to delete the entire phonebook list).
4.To confirm the deletion of the entry, Press
.
Directory capacity
Your directory has a capacity of 50 contacts.
When the memory is full, the message "pb full" is displayed and you cannot add any new
contacts.
U- SING THE MULTIHANDSET CAPABILITIES
These functions are used for handset management when two or more handsets are registered on
the same base.
Intercom Call
1.Make sure your handset is on standby mode.
2.Press the key.
-If your installation has two handsets, the second handset is directly called, and "calling hs
X" appears on the screen (x is the number of the handset called) and "" flashes.
-If your telephone installation has more than two handsets, the icon "H
H
H
HHS
S
S
S S " appears on the
screen followed by the numbers of all registered handsets.
3.Enter the desired handset number or press the key if you want to call all handsets.
Answering an internal call
1. " call fr hs " followed by the calling handset number is displayed on the screen and ""
flashes.
2.Press to accept the call.
Managing an external and an internal call
Transfering an external call to another handset registered on same base
1.During a call, press .
2.Select "intercom ", press . The incoming call is put on hold.
3.Enter the internal call number. When the user answers, you can announce the call.
4.Press key to transfer the call.
If the called handset does not answer, press to take back the call.
Making conference calls (3-way conversation)
You can connect one external call to two handsets registered at the base station. To set up a
telephone conference from an external call :
1.During a call, press .
2.Select "intercom", press . The external user is put on hold.
3.Enter the internal call number. Wait until the internal user answers.
4.Press and hold until you hear a confirmation tone to start a three-way conference.
"conference" is displayed on the handset screen.
Join in a conversation already taking place
If the share call mode is activated, you can join in a conversation from another handset registered
with the same base (refer to paragraphe « Authorise / prohibit call sharing », page 15).
From another handset (registered on the same base), press the green key . You will then
join in the conversation.
D750-D750A
D750-D750A
D750-D750A
D750-D750A D750-D750A
12
Two outside calls
Accepting a second call whilst being in another call
During a call, a beep is emitted by your operator to inform you that a second call is on hold. A
screen displays the number of this second caller on hold.
Press then the key to take back this new call.
Your first contact is put on hold and you can talk with the second caller.
Making a second call whilst being in another call
During a conversation, press then dial the number to be called.
The call in process is then put on hold and you can take the second call back.
Switching from one call to the other
To switch from one call to the other, press then the key .
The call in process is then put on hold and you can take the second call back.
Ending one of the two calls
To end one call and continue with the other, press then the key .
The call in process is then ended finally and you take the second call back.
To set up a 3-way conference (the 2 calls and yourself)
During a conversation, press then the key .
You can then talk with the 2 contacts at the same time.
To end the 3-way conference, press the red key .
C USTOMISING THE HANDSET
Select the ring tone (internal / external)
1.Go to the menu "hs settings "Æ "ring setup " Æ "ext. ring" (or "int. ring").
2.Select the ring tone of your choice using or . Press .
Handset ringer level
1.Go to the menu "hs settings "Æ "ring setup " Æ "ring volume".
2.Use or to select the volume level then press to confirm your selection.
Activating/deactivating the warning beeps
1.Go to the menu " hs settings " "Æ "tone setup " Æ " key tone or " battery tone " or
" out of range ".
2.Change the status using the keys o .
3.Press .
Modifying the language
1.Go to the menu " hs settings "Æ " language ".
2.Use or to choose the desired language.
Press key to confirm your selection.
Handset naming
The default name of the handset is " handset N " where N
is the number of the registered handsets
.
1.Go to the menu " hs settings " Æ " rename hs ".
2.Use the keypad to enter the new name (up to 10 characters).
3.Use key to delete wrong input if necessary. Press .
Product specificaties
| Merk: | Sagemcom |
| Categorie: | Telefoon |
| Model: | D750 |
| Kleur van het product: | Zwart |
| Ingebouwd display: | Ja |
| Soort: | DECT-telefoon |
| Beeldscherm: | LCD |
| Montagewijze: | Bureau |
| Microfoon mute: | Ja |
| Nummerherkenning: | Nee |
| Conferentiegesprek mogelijk: | Ja |
| Gesprekstijd timer: | Ja |
| Gewicht basisstation: | 116 g |
| Tekstregels: | 5 regels |
| Wekker: | Ja |
| Standby tijd: | 100 uur |
| Gesprekstijd: | 10 uur |
| Capaciteit telefoonboek: | 50 entries |
| Afmetingen basisstation: | 120 x 120 x 30 mm |
| Gewicht handset: | 120 g |
| Klok/Datum display: | Ja |
| Accucapaciteit: | Ja |
| Draadloze verbindingen: | Ja |
| Pager functie: | Ja |
| Maximum indoorbereik: | 50 m |
| Maximum outdoorbereik: | 300 m |
| Antwoordapparaat: | Nee |
| Frequentie microfoon: | 1.88 - 1.90 Hz |
| Compatibel met GAP:: | Ja |
| Afmetingen handset (BxDxH): | 164 x 47 x 20 mm |
| Bel-lijn identificatie presentatie (CLIP): | Ja |
Heb je hulp nodig?
Als je hulp nodig hebt met Sagemcom D750 stel dan hieronder een vraag en andere gebruikers zullen je antwoorden
Handleiding Telefoon Sagemcom

17 Juli 2023
17 Juli 2023
17 Juli 2023
17 Juli 2023
17 Juli 2023
17 Juli 2023
17 Juli 2023
17 Juli 2023
17 Juli 2023
17 Juli 2023
Handleiding Telefoon
Nieuwste handleidingen voor Telefoon
7 Juli 2026
7 Juli 2026
25 Juni 2026
23 Juni 2026
23 Juni 2026
7 Juni 2026
5 Juni 2026
3 Juni 2026
29 Mei 2026
20 Mei 2026