Rossmax SA310 Handleiding
Rossmax Bloedsuikermeter SA310
Bekijk gratis de handleiding van Rossmax SA310 (2 pagina’s), behorend tot de categorie Bloedsuikermeter. Deze gids werd als nuttig beoordeeld door 15 mensen en kreeg gemiddeld 4.6 sterren uit 5 reviews. Heb je een vraag over Rossmax SA310 of wil je andere gebruikers van dit product iets vragen? Stel een vraag
Pagina 1/2
SpO2
Meetbereik35% ~ 99% (de resolutie is 1%)
Nauwkeurigheid 70% ~99% ± 2%, onder 35 ~69%: niet gespecieerd
Hartslag
Meetbereik30 spm ~250 spm (de resolutie is 1 spm)
Nauwkeurigheid30 – 250 ± 3 spm
Sensortype
SensormodelRossmax PA100, PB100, PC100, PD100(Single Use), PF100
VerlengsnoerRossmax PE100
Optische sensorRood licht (golengte is 660 nm), infrarood (golengte is 905/880 nm)
Elektrische specicatie
BatterijenAA * 4 (Alkaline)
Levensduur batterij15 uur ononderbroken met 4 alkalinebatterijen
AC-adapterModel: HK-X205-A06, HK-XW05-A06, (W=1,2,3,4), HKKS-13116, HKKS-13117
Ingang: AC100-240V, 50/60Hz, 0,2A max; Uitgang: DC 6V, 0,8A
Omgevingscondities
BedrijfsconditiesTemperatuur: 5°C ~40°C (41°F ~104°F), Relatieve: Luchtvochtigheid: 15-95%
(niet-condenserend); Atmosferische druk: 700hPa ~1060 hPa
Opslag -/ transport-
condities
Temperatuur: -25°C ~+70°C (-13°F ~158°F), Relatieve Luchtvochtigheid: 15-
90% (niet-condenserend); Atmosferische druk: 700hPa ~1060 hPa
Opmerking: De temperatuur van -25°C of 70°C moet 3 uur bij kamertempe-
ratuur blijven.
Afmetingen14,5 (L) x 7.25 (B) x 2.25 (H) cm
GewichtOngeveer 150 g (zonder de batterijen)
NormenIEC/EN60601-1, IEC/EN60601-1-2, IEC/EN60601-1-11, ISO80601-2-61
Symbool Beschrijvingen
Fabrikant
Serienummer
EU-vertegenwoordiger
Type BF toegepaste onderdelen
IP-classicatieIP22: bescherming tegen schadelijke binnendringen van water en jnstof
CE-markering
Waarschuwing: het symbool op dit product betekent dat het een elek-
tronisch product is en volgens de Europese richtlijn 2012/19/EU moeten
elektronische producten worden ingeleverd bij uw plaatselijke recycling-
centrum voor veilige verwerking.
SymptomenControlepuntenCorrecties
Sp02 of hartslagfrequentie
worden niet weergegeven
15:36
09 / 14 / 2018
9898
8686
% SpO
2
BPM
999
M
Low
High
15:36
09 / 14 / 2018
15:36
09 / 14 / 2018
15:36
09 / 14 / 2018
15:36
09 / 14 / 2018
9898
8686
BPM
999
M
% SpO
2
15:36
09 / 14 / 2018
9898
8686
BPM
999
M
% SpO
2
15:36
09 / 14 / 2018
9898
8686
BPM
999
M
% SpO
2
15:36
09 / 14 / 2018
BPM
- -
- -
% SpO
2
15:36
09 / 14 / 2018
00
00
BPM
999
M
% SpO
2
15:36
09 / 14 / 2018
00
00
BPM
% SpO
2
Het pictogram “- -” verschijnt op
het scherm.
Plaats het instrument goed op de
vinger en probeer opnieuw
ACTPPG
Dit pictogram betekent dat de
sensor niet goed is aangesloten.
Controleer of de “Rossmax” sensor
correct is aangesloten op het
apparaat.
ACTPPG
Dit pictogram betekent dat de
sensor niet goed werkt.
Vervang door een nieuwe sensor.
Het instrument is niet goed op de vinger
geplaats
Plaats het instrument goed op de
vinger en probeer opnieuw
Sp02 of hartslagfrenkentie
worden niet stabile
weergegeven
De vinger trilt of het lichaam beweegtHoud het lichaam stil
Het instrument is niet goed op de vinger
geplaats
Plaats het instrument goed op de
vinger en probeer opnieuw
Opmerking: Na het wissen van gegevens geeft het pictogram 0 gegevens weer.
Let op: De gewiste gegevens kunnen niet worden hersteld.
Waarschuwing
Reiniging
Onderhoud
Geheugenmodus - Cyclus opslaan
Geheugenmodus - Gegevens wissen
Specificatie
Problemen Oplossen
Audiosignalen
• Dit instrument is niet bedoeld voor gebruik door mensen (waaronder kinderen) met beperkte fysieke,
zintuigijle of mentale vaardigheden of gebrek aan ervaring en/of kennis, tenzij zij onder toezicht staan
van iemand die verantwoordelijk is voor hun veiligheid of zij instructive krijgen van deze persoon over
het gebruik van het instrument. Kinderen moeten in de buurt van het instrument onder bezigt staan
om ervoor te zorgen dat ze er niet mee spelen.
• Dit apparaat is alleen bedoeld voor steekproefsgewijze controle, niet voor evaluatie van medische
resultaten.
• Dit instrument is ontworpen om het percentage van de arteriole zuurstofverzadiging van functionele
hémoglobine te bepalen. Factoren die de prestaties van de pulsoxymeter kunnen verminderen of de
nauwkeurigheid van de meting kunnen beïnvloeden, zijn onder andere:
- Breng de pulsoxymeter niet aan op dezelfde arm als met en bloeddrukmanchet, arteriële katheter
of infuuslijn.
- Overmatig licht, zoals zonlicht of directe huisverlichting.
- Instabiliteit op de meetlocatie (bijv. Beven)
- Vocht in het instrument
- Onjuist aanbrengen van het instrument
- De vinger is te groot of te klein en past daarom niet in het apparaat
- Slechte kwaliteit van de hartslagfrequentie
- Veneuze pulsaties
- Bloedarmoede of lage hemoglobineconcentraties
- Cardiogreen en andere intravasculaire kleurstoffen
- Carboxyhemoglobine
- Methemoglobin
- Disfunctioneel hémoglobine
- Kunstnagels of vingernagellak
- Vinger met anatomische afwijkingen, oedemen, littekens of brandwonden
- De sensor is aan bepaalde voorwaarden gebonden. Gebruik alleen de door Rossmax goedgekeurde
pulsoximetersensor, kabel en accessoires. Deze onderdelen worden niet opnieuw verwerkt. Gebruik
van andere sensoren, kabels en accessoires kan onnauwkeurige metingen tot gevolg hebben.
• Langdurig gebruik van dit apparaat kan pijn veroorzaken bij mensen met circulatiestoornissen. Plaats
het apparaat ten minste eenmaal per 4 uur op een ander plek om de huid van de patiënt te laten
ademen en om de toestand van de patiënt regelmatig te controleren.
• Gebruik het instrument niet in de buurt van ontvlambare of explosieve gasmengsels.
• Gebruik het apparaat niet tijdens en MRI of CT scan
• Het apparaat wordt tijdens het gebruik beïnvloed door elektromagnetische interferentie.
• Een waarschuwing dat andere kabels en accessoires de EMC-prestaties negatief kunnen beïnvloeden.
• Het apparaat werkt mogelijk niet wanner de circulatie is verminderd. Verwarm of wrijf over de vinger,
of plaats het instrument op een andere plek.
• Dit apparaat is een elektronisch precisie-instrument en moet worden gerepareerd door gekwalificeerde
technische professionals. Dit apparaat kan niet provisorisch worden gerepareerd. Doe geen poging
de behuizing te openen of de elektronica te repareren. Door het openen van de behuizing kan het
apparaat beschadigd raken en de garantie komen te vervallen.
• De veer van het instrument mag niet te ver worden uitgerekt.
• De nauwkeurigheid van een pulsoxymeter kan niet worden getest met een functionele tester
• Stel geen zelfdiagnose of schrijf uzelf geen medicatie voor op basis van de metingen zonder uw arts
te raadplegen. Begin zeker niet met het innemen van nieuwe geneesmiddelen en verander het type
en/ of de dosering van voorgeschreven geneesmiddelen niet zonder voorafgaande toestemming.
• Kijk tijdens de meting niet rechtstreeks in de binnenzijde van de behuizing.
Het rode licht en het onzichtbare infraroodlicht in de pulsoxymeter zijn schadelijk voor uw ogen.
• Houd rekening met gebruikers met een gevoelige huid.
• Zoals bij alle medische apparatuur, dient u de patiëntkabels zorgvuldig te plaatsen om de kans op
verstrikking of wurging van de patiënt te verkleinen.
• De maximale temperatuur kan oplopen tot 42,4°C bij langdurig gebruik.
• De pulsoxymeter is voor verkoop in de fabriek gekalibreerd, het is niet nodig om hem tijdens zijn
levenscyclus te kalibreren.
• Gebruik of desinfecteer de wegwerp spO2-sensor niet opnieuw. (alleen voor PD100)
• Het product heeft een levensduur van 5 jaar in de loop van regelmatig gebruik.
• Als er zich een ernstig incident (bijv. overlijden) heft voorgedaan in relatie met het apparaat moet
het worden gemeld aan de dealer, fabrikant, en de bevoegde autoriteit van de lidstaat waarin de
gebruiker en/of patiënt is gevestigd.
1. Reinig het oppervlak van het instrument voor gebruik. Veeg het apparaat eerst af met medische
alcohol (70% (w/w) Ethanol) en laat het dan aan de lucht drogen of reinig het met een droge doek.
2. Desinfecteer het instrument na gebruik met ontsmettingsalcohol om kruisbesmetting bij
een volgend gebruik te voorkomen. Het instrument kan het best worden bewaard bij een
omgevingstemperatuur van -25°C tot 70°C en een relatieve luchtvochtigheid van niet meer dan
90%.
Opmerking: 1. Dit instrument mag niet worden gesteriliseerd, geautoclaveerd of in vloeistof worden
ondergedompeld.
2. Gebruik geen bijtende of schurende reinigingsmiddelen of reinigingsmiddelen die
ammoniumchloride of isopropylalcohol bevatten
Wij adviseren om dit instrument elke 24 maanden aan de fabricant terug te bezorgen en de volgende
controles uit te voeren.
• Controleer het instrument op mechanische en functionele schade of beschadigingen.
• Controleer of alle gebruikersinterfacetoetsen en accessories normaal functioneren.
Opmerking: Manufacturer use Index2 simulator to verify operation of the pulse oximeter device.
Keuze van geheugeninterval: 60 / 30 / 10 seconden
• Druk op de knop en / om de optie “Memory (Geheugen)” te selecteren en druk dan op
de knop om de optie te selecteren.
• Druk bij het item “Memory Mode (Geheugenmodus)” op de knop / om de optie “Save Cycle
(Cyclus opslaan)” te selecteren en druk vervolgens op de knop om de optie te selecteren.
• Voer “Save Cycle (Cyclus opslaan)” in, druk op de knop / om de optie te selecteren en druk
vervolgens op de knop om de optie te selecteren.
• Druk op de knop / om de waarde te wijzigen; druk op de knop om de gewenste
waarde op te slaan.
• Druk op de knop / en de knop om “Back/Exit (Terug/Afsluiten)” te selecteren om terug
te keren.
• Druk op de knop en de knop / om de optie “Clear Data (Gegevens wissen)” te selecteren
en druk vervolgens op de knop om de optie te selecteren.
• Voer “Clear Data (Gegevens wissen)” in, druk op de knop / om de optie “Sure (Zeker)” te
selecteren en druk vervolgens op de knop om de optie te selecteren.
• Druk op de knop / en de knop om “Back/Exit (Terug/Afsluiten)” te selecteren om terug
te keren.
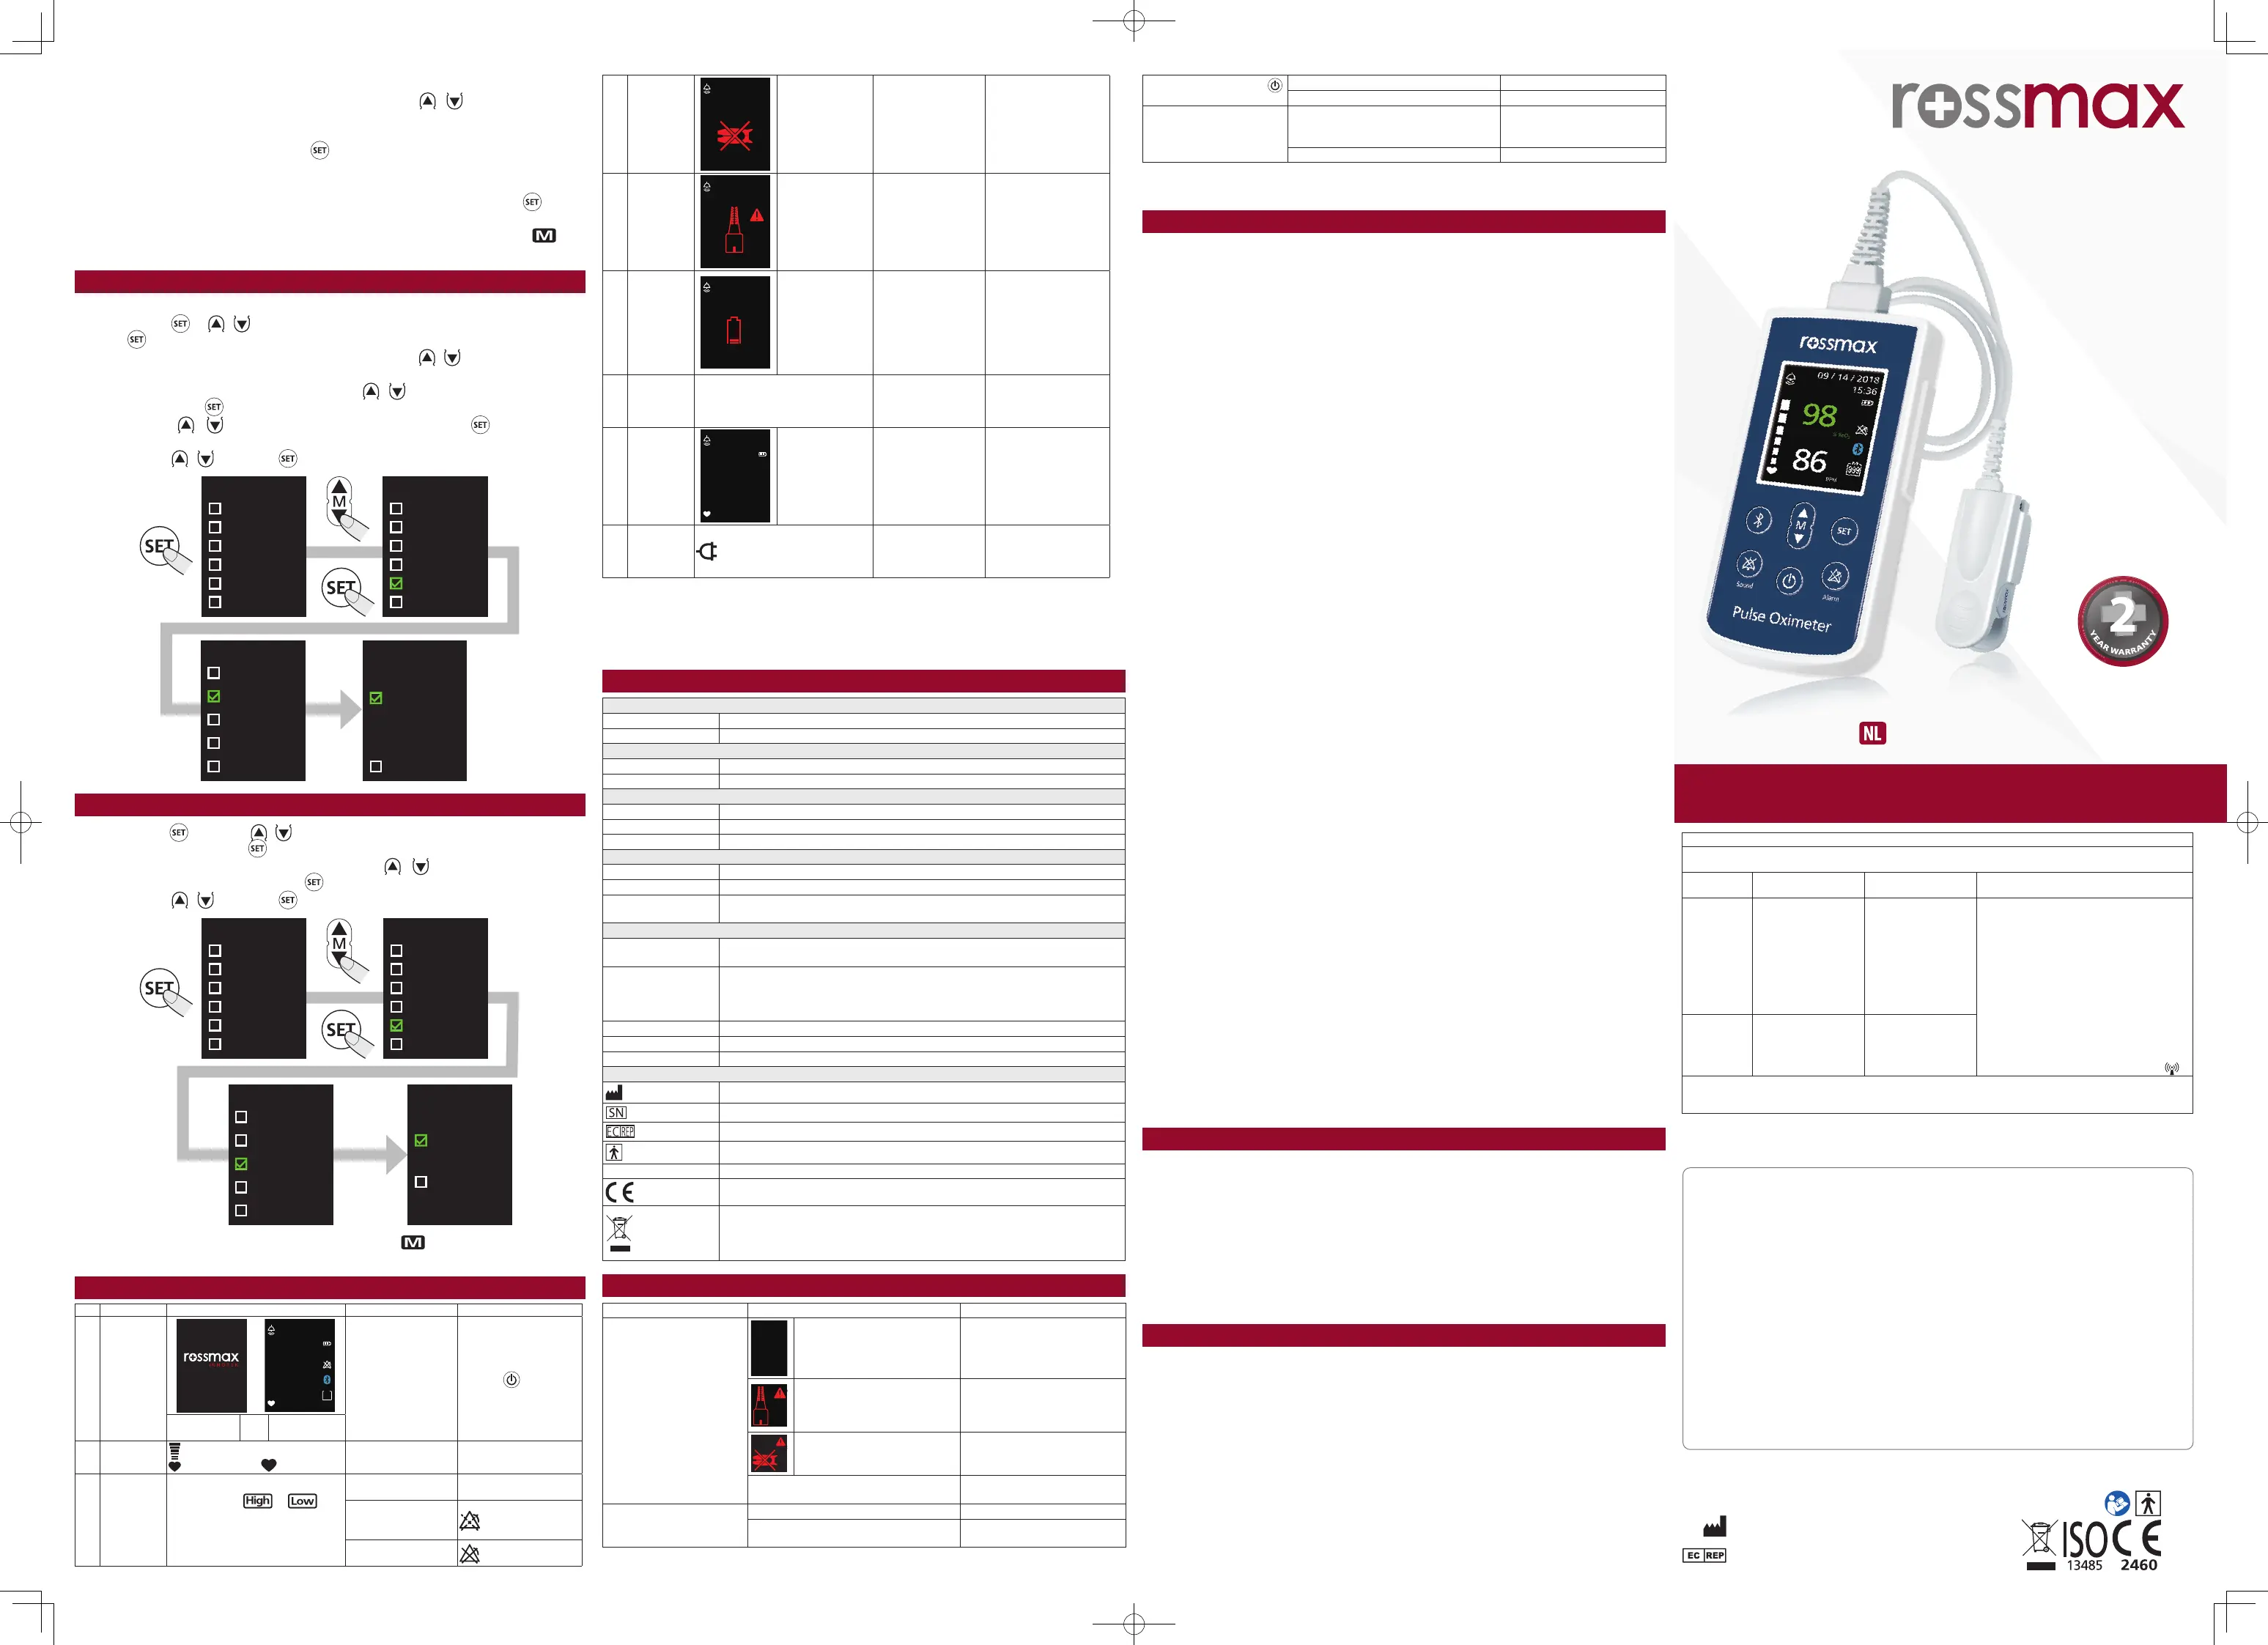
Nr.NaamL CD-schermGeluidBediening
1Inschakelen
V0.00
15:36
09 / 14 / 2018
9898
8686
% SpO
2
BPM
999
M
Low
High
15:36
09 / 14 / 2018
15:36
09 / 14 / 2018
15:36
09 / 14 / 2018
15:36
09 / 14 / 2018
9898
8686
BPM
999
M
% SpO
2
15:36
09 / 14 / 2018
9898
8686
BPM
999
M
% SpO
2
15:36
09 / 14 / 2018
9898
8686
BPM
999
M
% SpO
2
15:36
09 / 14 / 2018
BPM
- -
- -
% SpO
2
15:36
09 / 14 / 2018
0
0
0
0
BPM
999
M
% SpO
2
15:36
09 / 14 / 2018
00
00
BPM
% SpO
2
Pieptoon gedurende
2 seconden
Druk op knop
Software-
versie
meting
starten
2
Polsslag
zoeken
Het pictogram knippert
XX
3
Max./min
SpO2 en
hartslag-
waarschu-
wing
Weergegeven of in
rood pictogram.
Geeft de bovenste of onderste
alarmgrenzen weer.
Pieptoon klinkt
herhaaldelijk
Standaard
Tijdelijk dempen, na
twee minuten klinkt
een pieptoon.
modus
Dempen voor
uitschakelen
modus
Staafdiagram
• Voer “Data History (Gegevensgeschiedenis)” in, druk op de knop / om de optie “Bar Chart
(Staafdiagram)” te selecteren voor het bekijken van de SpO2-statistieken en druk vervolgens op
de knop om de optie te selecteren.
• Voer “SpO2 Memory Data”, druk op de knop om terug te gaan naar het monitoringscherm.
Geheugenoverdracht naar ROSSMAX-software
• Ga naar “Data History (Gegevensgeschiedenis)”, druk op de knopvom de optie “Memory
Transfer (Geheugenoverdracht)” te selecteren en druk vervolgens op de knop om de
gegevensoverdracht enkele seconden te starten.
Opmerking: Voordat u naar de modus Gegevensgeschiedenis gaat, moet het pictogram meer
dan 1 gegevens verzamelen.
4
Waar-
schuwing
storing
sensor
15:36
09 / 14 / 2018
98
98
86
86
% SpO
2
BPM
999
M
Low
High
15:36
09 / 14 / 2018
15:36
09 / 14 / 2018
15:36
09 / 14 / 2018
15:36
09 / 14 / 2018
98
98
86
86
BPM
999
M
% SpO
2
15:36
09 / 14 / 2018
98
98
86
86
BPM
999
M
% SpO
2
15:36
09 / 14 / 2018
98
98
86
86
BPM
999
M
% SpO
2
15:36
09 / 14 / 2018
BPM
- -
- -
% SpO
2
15:36
09 / 14 / 2018
0
0
0
0
BPM
999
M
% SpO
2
15:36
09 / 14 / 2018
0
0
0
0
BPM
% SpO
2
Het pictogram
verschijnt op het
scherm
Pieptoon klinkt
herhaaldelijk
X
5
Alarm sto-
ring sensor-
verbinding
15:36
09 / 14 / 2018
98
98
86
86
% SpO
2
BPM
999
M
Low
High
15:36
09 / 14 / 2018
15:36
09 / 14 / 2018
15:36
09 / 14 / 2018
15:36
09 / 14 / 2018
98
98
86
86
BPM
999
M
% SpO
2
15:36
09 / 14 / 2018
98
98
86
86
BPM
999
M
% SpO
2
15:36
09 / 14 / 2018
98
98
86
86
BPM
999
M
% SpO
2
15:36
09 / 14 / 2018
BPM
- -
- -
% SpO
2
15:36
09 / 14 / 2018
0
0
0
0
BPM
999
M
% SpO
2
15:36
09 / 14 / 2018
0
0
0
0
BPM
% SpO
2
Het pictogram
verschijnt op het
scherm
Pieptoon klinkt
herhaaldelijk
x
6
Alarm Bat-
terij bijna
leeg
15:36
09 / 14 / 2018
98
98
86
86
% SpO
2
BPM
999
M
Low
High
15:36
09 / 14 / 2018
15:36
09 / 14 / 2018
15:36
09 / 14 / 2018
15:36
09 / 14 / 2018
98
98
86
86
BPM
999
M
% SpO
2
15:36
09 / 14 / 2018
98
98
86
86
BPM
999
M
% SpO
2
15:36
09 / 14 / 2018
98
98
86
86
BPM
999
M
% SpO
2
15:36
09 / 14 / 2018
BPM
- -
- -
% SpO
2
15:36
09 / 14 / 2018
0
0
0
0
BPM
999
M
% SpO
2
15:36
09 / 14 / 2018
0
0
0
0
BPM
% SpO
2
Het pictogram
verschijnt op het
scherm
Er klinkt gedurende
1 minuut herhaalde-
lijk een pieptoon en
het apparaat wordt
uitgeschakeld
x
7
Automa-
tisch uit-
schakelen
X
Pieptoon klinkt en
schakelt uit
Nadat de polsslag
gedurende ongeveer
1 minuut niet waar-
neembaar is.
8
Kan niet
meten
15:36
09 / 14 / 2018
98
98
86
86
% SpO
2
BPM
999
M
Low
High
15:36
09 / 14 / 2018
15:36
09 / 14 / 2018
15:36
09 / 14 / 2018
15:36
09 / 14 / 2018
98
98
86
86
BPM
999
M
% SpO
2
15:36
09 / 14 / 2018
98
98
86
86
BPM
999
M
% SpO
2
15:36
09 / 14 / 2018
98
98
86
86
BPM
999
M
% SpO
2
15:36
09 / 14 / 2018
BPM
- -
- -
% SpO
2
15:36
09 / 14 / 2018
0
0
0
0
BPM
999
M
% SpO
2
15:36
09 / 14 / 2018
0
0
0
0
BPM
% SpO
2
Bloedsaturatie en
hartslag worden
weergegeven
als “- -”.
Er klinkt herhaaldelijk
een pieptoon.
x
9AC-stroom
pictogram
X
Verwijder de
AC-stroomkabel uit het
apparaat of sluit deze
aan.
Opmerking: Beschrijving van het effect op de weergegeven en verzonden SpO2 en hartslag:
• Gemiddelde waarden: 4 seconden voor SpO2; 8 seconden voor polsfrequentie.
• Vertraging gegevensupdate: Minder dan 2 seconden.
• Alarmvertraging: Minder dan 8 seconden voor SpO2; Minder dan 16 seconden voor polsfrequentie.
• Vertraging bij genereren alarmsignaal: Minder dan 1 seconde voor SpO2 en hartslag.
Geen scherm wanneer de
onderkant wordt ingedrukt
De batterijen raken leegPlaats nieuwe batterijen
De batterijen zijn niet correct geplaatsPlaats de batterijen terug
Er wordt plotseling niets meer
weergeven
Het instrument wordt automatisch
uitgeschakeld wanneer er geen signaal
wordt ontvangen
Normaal
De batterijen zijn bijna leegPlaats nieuwe batterijen
Opmerking: Stuur het instrument terug naar uw dealer als het niet werkt. U mag het instrument in
geen geval zelf demonteren en repareren.
Rossmax InnoTek Corp.
12F., No. 189, Kang Chien Rd., Taipei, 114, Taiwan.
CMC Medical Devices & Drugs S.L.
C/Horacio Lengo N° 18, CP 29006, Málaga, Spain
Model: SA310
www.rossmax.com
Handmatige pulsoxymeter
Settings
Date
Time
Alarm SpO
Alarm PR
Memory
Memory
Exit
2
Memory Mode
Back
Clear Data
Save Cycle
Save Cycle
Data History
Memory Off
Save Cycle
60
Sec
Back
Save Cycle
30
Sec
Back
Save Cycle
10
Sec
Back
Save Cycle
10
Sec
Back
Back
Settings
Date
Time
Alarm SpO
Alarm PR
Memory
Exit
2
Settings
Date
Time
Alarm SpO
Alarm PR
Memory
Memory
Exit
2
Clear Data
Back
Sure
Sure
Clear Data
Back
Back
Sure
Memory Mode
Back
Clear Data
Clear Data
Save Cycle
Data History
Memory Off
Settings
Date
Time
Alarm SpO
Alarm PR
Memory
Exit
2
Settings
Date
Time
Alarm SpO
Alarm PR
Memory
Memory
Exit
2
Memory Mode
Back
Clear Data
Save CycleSave Cycle
Data History
Memory Off
Save Cycle
60
Sec
Back
Save Cycle
30
Sec
Back
Save Cycle
10
Sec
Back
Save Cycle
10
Sec
BackBack
Settings
Date
Time
Alarm SpO
Alarm PR
Memory
Exit
2
Settings
Date
Time
Alarm SpO
Alarm PR
Memory
Memory
Exit
2
Clear Data
Back
SureSure
Clear Data
BackBack
Sure
Memory Mode
Back
Clear DataClear Data
Save Cycle
Data History
Memory Off
Settings
Date
Time
Alarm SpO
Alarm PR
Memory
Exit
2
Settings
Date
Time
Alarm SpO
Alarm PR
MemoryMemory
Exit
2
Memory Mode
Back
Clear Data
Save Cycle
Save Cycle
Data History
Memory Off
Save Cycle
60
Sec
Back
Save Cycle
30
Sec
Back
Save Cycle
10
Sec
Back
Save Cycle
10
Sec
BackBack
Settings
Date
Time
Alarm SpO
Alarm PR
Memory
Exit
2
Settings
Date
Time
Alarm SpO
Alarm PR
MemoryMemory
Exit
2
Clear Data
Back
SureSure
Clear Data
BackBack
Sure
Memory Mode
Back
Clear Data
Clear Data
Save Cycle
Data History
Memory Off
Settings
Date
Time
Alarm SpO
Alarm PR
Memory
Exit
2
Settings
Date
Time
Alarm SpO
Alarm PR
MemoryMemory
Exit
2
Memory Mode
Back
Clear Data
Save CycleSave Cycle
Data History
Memory Off
Save Cycle
60
Sec
Back
Save Cycle
30
Sec
Back
Save Cycle
10
Sec
Back
Save Cycle
10
Sec
BackBack
Settings
Date
Time
Alarm SpO
Alarm PR
Memory
Exit
2
Settings
Date
Time
Alarm SpO
Alarm PR
MemoryMemory
Exit
2
Clear Data
Back
Sure
Sure
Clear Data
BackBack
Sure
Memory Mode
Back
Clear DataClear Data
Save Cycle
Data History
Memory Off
Settings
Date
Time
Alarm SpO
Alarm PR
Memory
Exit
2
60/30/10
seconden
Informatie over elektromagnetische compatibiliteit
1. Dit apparaat moet worden geïnstalleerd en in gebruik worden genomen volgens de informatie in de
gebruikershandleiding.
2. WAARSCHUWING: Draagbare RF-communicatieapparatuur (inclusief randapparatuur zoals antennekabels en
externe antennes) mag niet dichter dan 30 cm (12 inch) bij enig deel van de SA310 worden gebruikt.
Anders kan de werking van dit apparaat afnemen.
Als er hogere IMMUNITIETESTNIVEAUS worden gebruikt dan aangegeven in de tabel, mag de minimale
scheidingsafstand worden verlaagd. Lagere minimale scheidingsafstanden moeten worden berekend met
behulp van de formule.
IN0SA310000000150
RI_IB_SA310_2Yr_
NL_TPCMC_ver2403
Warranty Card
This instrument is covered by a 2 years guarantee from the date of purchase, batteries and
accessories are not included. The guarantee is valid only on presentation of the guarantee
card completed by the dealer confirming date of purchase or the receipt. Opening or altering
the instrument invalidates the guarantee. The guarantee does not cover damage, accidents or
non-compliance with the instruction manual. Please contact your local seller/dealer or www.
rossmax.com.
Customer Name: __________________________________________________________
Address: _________________________________________________________________
Telephone: _______________________________________________________________
E-mail address: ____________________________________________________________
Product Information:
Date of purchase: _________________________________________________________
Store where purchased:
__________________________________________________________________________
Verklaring van de fabrikant - elektromagnetische immuniteit
De SA310 is bestemd voor gebruik in de hieronder gespeciceerde elektromagnetische omgeving. De klant
of de gebruiker van de SA310 moet ervoor zorgen dat deze in een geschikte omgeving wordt gebruikt.
Immuniteits-
test
IEC 60601 testniveauConformiteitsniveauElektromagnetische omgeving - richtlijnen
Geleid RF IEC
61000-4-6
3 Vrms:
0,15 MHz – 80 MHz
6 Vrms: in ISM- en
amateurradiobanden
tussen 0,15 MHz en
80 MHz
80 % AM bij 1 kHz
3 Vrms:
0,15 MHz – 80 MHz
6 Vrms: in ISM- en
amateurradiobanden
tussen 0,15 MHz en
80 MHz
80 % AM bij 1 kHz
Draagbare en mobiele RF-communicatieap-
paratuur mag niet dichter bij enig onderdeel
van de SA310, inclusief kabels, worden ge-
bruikt dan de aanbevolen scheidingsafstand
berekend op basis van de formule die van
toepassing is op de frequentie van de zender.
Aanbevolen scheidingsafstand:
d = 1,2 √P, d = 1,2 √P 80MHz to 800 MHz, d =
2,3 √P 800MHz naar 2,7 GHz
Waarbij P het maximale uitgangsvermogen
van de zender is in watt (W) volgens de fa-
brikant van de zender en d de aanbevolen
scheidingsafstand in meter (m).
Er kan interferentie optreden in de buurt van
apparatuur met het volgende symbool:
RF-straling IEC
61000-4-3
10 V/m
80 MHz – 2,7 GHz
80 % AM bij 1 kHz
10 V/m
80 MHz – 2,7 GHz
80 % AM bij 1 kHz
OPMERKING1: Bij 80 MHz en 800 MHz is het hogere frequentiebereik van toepassing.
OPMERKING2: Deze richtlijnen zijn mogelijk niet in alle situaties van toepassing. Elektromagnetische voort-
planting wordt beïnvloed door absorptie en reectie van structuren, objecten en mensen.
Meer informatie over EMC-conformiteit van het apparaat kunt u opvragen bij Rossmax via de contactpersonen
in deze handleiding.
De tekst kan zonder verdere kennisgeving worden gewijzigd.
Product specificaties
| Merk: | Rossmax |
| Categorie: | Bloedsuikermeter |
| Model: | SA310 |
Heb je hulp nodig?
Als je hulp nodig hebt met Rossmax SA310 stel dan hieronder een vraag en andere gebruikers zullen je antwoorden
Handleiding Bloedsuikermeter Rossmax

11 Februari 2023
11 Februari 2023
11 Februari 2023
11 Februari 2023
11 Februari 2023
Handleiding Bloedsuikermeter
Nieuwste handleidingen voor Bloedsuikermeter
28 September 2023
28 September 2023
28 September 2023
28 September 2023
20 Augustus 2023
28 April 2023
27 Februari 2023
20 Februari 2023
20 Februari 2023