Rossmax MW701F Handleiding


Lees hieronder de 📖 handleiding in het Nederlandse voor Rossmax MW701F (4 pagina's) in de categorie Bloeddrukmeter. Deze handleiding was nuttig voor 27 personen en werd door 2 gebruikers gemiddeld met 4.5 sterren beoordeeld

Pagina 1/4
Русский Язык
Введение
Точность измерений артериального давления с помощью прибора MW701f эквивалента
точности таких измерений, производимых лицом, прошедшим соответствующее обучение, с
помощью манжеты и стетоскопа, в пределах, соответствующим требованиям национального
стандарта США «Электронные и автоматические сфигмоманометры». Этот прибор может ис-
пользоваться взрослыми потребителями в домашних условиях. Пациент является предпо-
лагаемым оператором. Не используйте это устройство на младенцах или новорожденных.
Отсутствие дефектов изготовления в приборе MW701f гарантируется Международной про-
граммой гарантии. За подробной информацией о гарантии обращайтесь к производителю
- Rossmax International Ltd.
Внимание: Ознакомьтесь с сопутствующей документацией. Перед использованием
тщательно прочтите это руководство. За конкретной информацией об артериальном
давлении обращайтесь к своему врачу. Сохраните данное руководство для использо-
вания в будущем.
Измерительная технология Real Fuzzy
Для определения артериального давления в данном приборе используется осциллометри-
ческий метод. Перед началом подачи воздуха в манжету прибор определяет отправное зна-
чения давления в манжете, равное давлению воздуха. Прибор определяет уровень давления
в манжете, необходжимый для измерения, учитывая осцилляции (колебания) давления. По-
сле достижения максимального давления воздух из манжеты стравливается.
Во время стравливания воздуха прибор определяет амплитуду и наклон осцилляций дав-
ления и вычисляет значения систолического и диастолического артериального давления,
а также частоту пульса.
Предварительные замечания
Данный прибор для измерения артериального давления отвечает требованиям европей-
ских стандартов, что подтверждается знаком «CE 1639». Качество прибора проверено на
соответствие требованиям директивы EC 93/42/EEC (Директива по приборам медицинского
назначения) Приложение 1.
EN 1060-1: 1995/A2: 2009 Неинвазивные сфигмоманометры - Часть 1 - Общие требования
EN 1060-3: 1997/A2: 2009 Неинвазивные сфигмоманометры - Часть 3 - Дополнительные тре-
бования для электромеханических систем для измерения артериального давления
EN 1060-4: 2004 Неинвазивные сфигмоманометры - Часть 4: Процедуры испытаний для опре-
деления полной системной точности автоматических неинвазивных сфигмоманометров.
ISO 81060-2: 2013 Неинвазивные сфигмоманометры. -- Часть 2: Клинические исследования
типа автоматизированного измерения.
Этот измеритель кровяного давления рассчитан на продолжительный срок службы. Для
обеспечения постоянной точности измерений рекомендуется периодически проводить
повторную калибровку всех цифровых приборов для измерения артериального давления.
При нормальном использовании (примерно 3 измерения в день) данный прибор не требует
проведения повторной калибровки в течение 2 лет. Если требуется проведение повторной
калибровки, на дисплее прибора появляется символ . Следует также проводить повтор-
ную калибровку, если прибор получил механически повреждения (например, при падении)
или подвергся действию жидкостей и/или значительных перепадов температуры или влаж-
ности. При появлении символа следует обратиться в сервисный центр для проведения
повторной калибровки прибора.
Уровень артериального давления
Обратитесь к данным Всемирной организации здравоохранения, диапазоны кровяного
давления могут быть классифицированы на 6 классов. (Ссылка. 1999 ВОЗ Международное
общество гипертонии Руководства по исследованию гипертонии). Такая классификация
артериального давления основана на результатах проведенных исследований, она может
не быть непосредственно применимой к определенному пациенту. Очень важно регулярно
посещать своего врача. Он пояснит Вам, какие значения артериального давления являются
нормальными, а какие могут быть опасными для Вашего здоровья. Для надежного контроля
величины артериального давления и для сравнения рекомендуется сохранять записи из-
меренных значений артериального давления в течение длительного времени. На нашем
вебайте www.rossmax.com можно загрузить бланк страницы журнала для ведения таких
записей.
Символы, отображаемые на дисплее
EE / Ошибка измерения: Убедитесь, что коннектор плотно вставлен в гнездо, повторите
процедуру измерения. Правильно наложите манжету и не двигайте рукой во время измере-
ния. Если ошибка продолжает повторяться, обратитесь в сервисный центр.
E1 / Ошибка циркуляции воздуха: Убедитесь, что коннектор плотно вставлен в гнездо, и
повторите процедуру измерения снова. Если ошибка продолжает повторяться, обратитесь
в сервисный центр.
E2 / Давление превышает 300 мм рт. ст.: Выключите прибор и повторите измерение.
Если ошибка продолжает повторяться, обратитесь в сервисный центр или к продавцу.
E3 / Ошибка данных: Выньте и снова установите батареи. Если ошибка продолжает повто-
ряться, обратитесь в сервисный центр или к продавцу.
Er/ Превышение диапазона измерений: Повторите измерение. Если ошибка продолжа-
ет повторяться, обратитесь в сервисный центр или к продавцу.
Система определения правильности одетой манжеты
Если манжета обернута слишком свободно, это может привести к неверным результатам
измерений. « Система определения правильности одетой манжеты» может помогает опре-
делить, если манжета обернута не достаточно плотно. Специальный значок появляется в
случае «не туго затянутой манжеты» во время измерения. В ином случае отображается специ-
альный значок , если манжета одета правильно во время измерения.
Детектор движения
«Детектор движения» помогает пользователю контролировать свои движения и оставаться
на месте, а также указывает любое движение тела во время измерения. Значок «движение
тела» появляется при каждом измерении, но только тогда, когда был обнаружено движение
тела.
Примечание: Настоятельно рекомендуется, повторить измерения, если появился значок .
Режим пользователя
Данный прибор имеет функцию памяти для одного измерения Нажмите Переключатель
Пользователя для выбора зоны памяти пользователя и следуйте процедуре измерения
для правильного проведения измерения. После того, как измерение завершено, показатель
не будет сохранен в памяти.
Индикатор риска выявления гипертонии
Всемирная организация здравоохранения, классифицирует 6 классов артериального давле-
ния. Это устройство оснащено инновационным индикатором риска повышенного артери-
ального давления, который визуально указывает допустимый уровень рисков (оптимальный
/ нормальный / высокий нормальный / 1-й класс гипертонии / гипертония 2-го класса / 3-й
класс гипертонии) показывает результат после каждого измерения.
Указатель наличия аритмии
Данный прибор имеет функцию определения аритмии, позволяющую проводить точные из-
мерения при наличии аритмии. Прибор предупреждает пользователя, если при измерении
выявлена аритмия.
Примечание: Если символ аритмии ( ) появляется часто, настоятельно рекомендуется
обратиться к врачу.
Использование блока питания переменного тока (поставляется отдельно)
1. Подсоедините блок питания переменного тока к соответствующему гнезду на правой сто-
роне.
2. Вставьте вилку блока питания переменного тока в розетку. (Требуемые значения выходно-
го напряжения и тока блока питания указаны вблизи гнезда для подключения.)
Внимание:
1. При использовании блока питания переменного тока в течение длительного вре-
мени из прибора следует вынуть батареи. Если неиспользуемые батареи находятся
в приборе в течение длительного времени, это может привести к их протеканию и
повреждению прибора.
2. При применении блока питания батареи не используются.
3. Блоки питания от сети переменного тока поставляются отдельно. По вопросам приобрете-
ния соответствующего блока питания обращайтесь к продавцу.
4. С данным измерителем артериального давления можно использовать только блок пита-
ния, одобренный производителем. Информация об одобренных производителем блоках
питания переменного тока приводится в ПРИЛОЖЕНИИ 1.
Установка батарей
1. Чтобы открыть батарейный отсек, нажмите на его крышку и поднимите ее в направлении
стрелки.
2. Установите в батарейный отсек 4 новые батареи размера “АА” в соответствии с обозначе-
ниями внутри отсека, при необходимости вынув перед этим старые батареи.
3. Установите на место крышку батарейного отсека: сначала установите на место выступы на
нижней части крышке, затем защелкните ее верхнюю часть.
4. Попарно замените батареи. Замену всех элементов питания необходимо делать одновре-
менно.
Необходимо заменить элементы питания, если
1. на дисплее появляется символическое изображение батареи.
2. при нажатии на Кнопка ВКЛ./ВЫКЛ./ПУСК прибор не включается.
Внимание!
1. Использованные батареи относятся к категории опасных отходов. Не утилизируйте их вме-
сте с бытовым мусором.
2. Внутри прибора нет деталей, требующих обслуживания потребителем. Гарантия не рас-
пространяется на батареи и ущерб, причиненный их протеканием.
3. При замене необходимо использовать только совершенно новые батареи. Всегда заме-
няйте все батареи вместе. Используйте батареи одинакой марки и типа.
Наложение манжеты
1. Разверните манжету, пропустив свободный конец через D-образное кольцо на манжете.
2. Наденьте манжету на левую руку. Цветная полоска на манжете должна быть обращена к
пользователю, а трубка направлена параллельно руке (рис. ). Разверните руку ладонью
вверх и расположите манжету так, чтобы ее край располагался на расстоянии 1,5-2,5 см
выше локтевого сгиба. (рис. ). Потянув за край манжеты, затяните ее на руке.
3. Расположите воздушную трубку по центру руки. Нажмите на застежку и плотно застегни-
те манжету. Оставьте немного свободного пространства между манжетой и рукой при-
мерно столько, чтобы можно было засунуть под манжету 2 пальца. Расположите значок
артерии (Ø) над главной артерией (на внутренней стороне руки) (рис. ). Примечание:  ,
чтобы найти главную артерию, прижмите 2 пальца примерно в 2 сантиметрах над локте-
вым сгибом на внутренней стороне руки. Определите, где пульс прощупывается лучше
всего – это место прохождения главной артерии.
4. Подсоедините воздушную трубку манжеты к прибору с помощью коннектора. (рис. ).
5. Положите руку на стол ладонью вверх так, чтобы манжета располагалась на уровне сердца.
Убедитесь, что трубка не пережата. (рис. )
6. Манжета подходит по размеру, если стрелка располагается в пределах цветной полоски,
как показано на рис. . Если стрелка лежит за пределами цветной полоски, необходимо
использовать манжету другого размера. Необходимо, чтобы трубка шла вдоль середины
руки. Свяжитесь с вашим местным дилером для получения дополнительных размеров
манжеты.
Методика измерений
Несколько полезных советов для получения более точных результатов:
Артериальное давление меняется с каждым ударом сердца и постоянно колеблется в те-
чение дня.
На результат измерения артериального давления могут влиять положение тела пользова-
теля прибора, его физиологическое состояние и другие факторы. Для более точного из-
мерения артериального давления его следует производить не ранее чем через час после
физических нагрузок, принятия ванны, принятия пищи, употребления напитков, содержа-
щих алкоголь или кофеин, и курения.
Перед проведением измерения рекомендуется спокойно посидеть на месте в течение не
менее 5 минут, поскольку измерения, проводимые в расслабленном состоянии, являются
более точным. Не следует проводить измерение давления в состоянии физической уста-
лости или изнеможения.
Не следует проводить измерение давления в состоянии стресса или напряжения.
Сядьте прямо на стуле, и сделайте 5-6 глубоких вдохов. Не откидывайтесь назад при про-
ведении измерения.
Не скрещивайте ноги во время сидения и держите ноги на полу во время измерения.
При проведении измерения не следует говорить и двигать рукой или ее кистью.
Артериальное давление необходимо измерять при нормальной температуре тела. При жаре
или ознобе следует отложить проведение измерения на некоторое время.
Если прибор хранился при очень низкой температуре (примерно при температуре замерза-
ния или ниже), перед использованием его следует выдержать в теплом помещении в тече-
ние не менее одного часа.
Перед проведением повторного измерения необходимо подождать 5 минут.
1. Нажмите кнопку выбора пользователя, чтобы выбрать зону памяти 1 или зону памяти 2. По-
сле выбора нужной зоны памяти нажмите кнопку ON/OFF/START для подготовки прибора
для начала измерения с использованием выбранной зоны памяти.
2. Нажмите кнопку ON/OFF/START. При этом для проверки функций дисплея на нем отобража-
ются все символы. Эта проверка продолжается 2 секунды.
3. После отображения всех символов на экране дисплея отображается мигающая цифра “0”.
После того, как прибор подготовлен к проведению измерения, производится медленное
автоматическое нагнетание воздуха в манжету, чтобы начать измерение.
4. После завершения измерения давление в манжете полностью стравливается. Одновремен-
но на экране ЖК-дисплея появляются значения систолического давления, диастолического
давления и частоты пульса. Результаты измерения автоматически сохраняются в выбранной
ранее зоне памяти.
Этот тонометр будет автоматически накачиваться до более высокого давления, если система
выявит, что для измерения артериального давления требуется большее давление.
Примечание: 1. Данный прибор автоматически отключается примерно через 1 минуту после
последнего нажатия кнопки.
2. Чтобы прервать измерение, достаточно нажать кнопку ON/OFF/START или кнопку Memory.
После этого сразу начинается стравливание воздуха из манжеты.
Отображение значений из памяти
1. Данный прибор имеет две независимые зоны памяти (1 и 2). В каждой зоне может хранить-
ся до 60 результатов измерений.
2. Для считывания значений, хранящихся в определенной зоне памяти, выберите эту зону с
помощью кнопки переключения между зонами (1 или 2). Нажмите кнопку памяти (М). Вна-
чале отображается среднее значение из всех утренних измерений за последние 7 дней.
3. Продолжайте нажимать кнопку Память для просмотра среднего значения всех вечерних
измерений за последние 7 дней.
4. Нажмите кнопку Память снова, чтобы посмотреть среднее значение за последние 3 из-
мерения, сохраненных в памяти, и последнее сохраненное ранее измерение. Каждому
измеренному значению соответствует номер, под которым оно хранится в памяти.
Примечание: В каждой зоне памяти может храниться до 60 результатов измерений. Когда чис-
ло измерений превышает 60, при записи результата нового измерения из памяти удаляются
данные самого старого измерения.
Примечание: Утреннее время (AM) определяется как 4:00 – 11:59
Примечание: Вечернее время (PM) определяется как 18:00 – 2:00
Удаление сохраненных в памяти значений
1. Нажмите кнопку выбора пользователя, чтобы выбрать зону памяти 1 или зону памяти 2.
2. Чтобы автоматически стереть все данные в выбранной зоне памяти, нажмите клавишу
Memory и удерживайте ее нажатой в течение примерно 5 секунд.
Установка времени
1. Для корректировки даты/времени на мониторе после установки или смены батареек. На
дисплее отобразится число, показывающее год.
2. Измените год, нажав клавишу Память, каждое нажатие будет увеличивать значение на одну
еденицу. Нажмите ON / OFF / START клавишу для подтверждения ввода и на экране отобра-
зится мигающее число, показывающее дату.
3. Что бы изменить дату, час и минуты, следуйте указанием описанным выше в шаге 2, исполь-
зуя кнопку Памяти для изменения и кнопку Вкл/Выкл/Старт для подтверждения вводов.
4. «0» снова появится, когда тонометр будет готов снова к измерению.
Передача данных на ПК
Компания Rossmax предоставляет простую в использовании бесплатную компьютерную про-
грамму для работы с данными измерений артериального давления, которую потребитель
может загрузить и установить на своем компьютере. Также можно приобрести специальный
USB-кабель для подключения измерителя артериального давления компании Rossmax к ком-
пьютеру. Посетите наш веб-сайт http://www.rossmax.com, чтобы загрузить и установить эту
программу.
Устранение неисправностей
Если при работе с прибором возникают неисправности, обратитесь к описанию возможных
неисправностей, приведенному ниже.
Неисправность Что следует проверить Исправление неисправности
При нажатии кнопки
ВКЛ./ВЫКЛ./ПУСК
прибор не вклю-
чается.
Достаточный ли уровень заряда
батарей? Заменить старые батареи на
новые.
Правильно ли установлены
батареи (соблюдена ли их поляр-
ность)?
Установите батареи в правиль-
ном положении.
На дисплее появля-
ются буквы EE, или
измеренное значе-
ние артериального
давления чрезмерно
высокое или низкое.
Правильно ли наложена ман-
жета? Правильно наложите манжету.
Во время измерения Вы говори-
ли или двигались? Повторите измерения.
Во время измерения запястье
не должно двигаться.
Во время измерения Вы встрях-
нули запястьем с манжетой?
Внимание: Если прибор по-прежнему не функционирует нормально, обратитесь в сервисный
центр. Ни при каких обстоятельствах не разбирайте прибор и не пытайтесь самостоятельно
его починить!
Замечания
1. Прибор содержит высокоточные узлы и детали. Не подвергайте его влиянию слишком вы-
соких или слишком низких температур,действию высокой влажности и прямых солнечных
лучей. Прибор следует оберегать от падения, ударов и пыли.
2. Чистку измерителя артериального давления следует проводить с осторожностью, исполь-
зуя слегка влажную мягкую ткань. При этом не следует сильно давить на прибор. Нельзя
мыть манжету в воде или применять для ее чистки химические очистители. Для чистки нель-
зя использовать растворители, спирт или бензин.
3. Протекающие батареи могут повредить прибор. Если прибор не используется в течение
длительного времени, необходимо вынуть из него батареи.
4. Для предотвращения опасных ситуаций данный прибор не должен использоваться детьми.
5. Если прибор хранился при низкой температуре (примерно при температуре замерзания
или ниже), перед использованием его необходимо выдержать в течение часа при комнат-
ной температуре.
6. Техническое обслуживание данного прибора потребителем не производится. Не следует
пытаться открыть прибор с использованием инструментов или производить настройку
узлов и деталей внутри прибора. При возникновении проблем обращайтесь в сервисный
центр, к продавцу или непосредственно в компанию Rossmax International Ltd.
7. Общей проблемой для всех измерителей артериального давления, использующих осцил-
лометрический метод, является возникновение трудностей при определении точного ар-
териального давления при аритмии (преждевременное сокращение предсердий или желу-
дочков, мерцательная аритмия), диабете, плохом кровообращении, заболеваниях почек, а
также у пациентов после инсульта или в бессознательном состоянии.
8. Чтобы прекратить измерение в любое время, нажмите кнопку ON/OFF/START, после чего
начинается быстрое стравливание воздуха из манжеты.
9. Если давление в манжете превышает 300 мм. рт. ст., автоматически начинается быстрое
стравливание воздуха из манжеты для обеспечения безопасности.
10. Данный прибор, предназначенный для использования в домашних условиях, не может за-
менить обследование у врача.
11. Не используйте прибор для диагностики и лечения каких-либо заболеваний. Результаты
измерений имеют исключительно ознакомительный характер. Для интерпретации резуль-
татов измерений следует обратиться к врачу. Если у Вас возникла какие-либо проблема со
здоровьем или Вы подозреваете ее наличие, обращайтесь к своему врачу. Не изменяйте
схему лечения, не проконсультировавшись с врачом.
12. Электромагнитные помехи: прибор содержит чувствительные электронные узлы. Не раз-
мещайте прибор вблизи от сильных электрических или электромагнитных полей (возле
мобильных телефонов, микроволновых печей и пр.) Это может привести к временным
сбоям в работе прибора.
13. Утилизируйте прибор, его батареи, узлы и дополнительные приспособления в соответ-
ствии с местным законодательством.
14. Не гарантируется правильная работа прибора, если он используется или хранится при
температуре и влажности, не соответствующим указанным в инструкции.
15. Обратите внимание на то, что во время накачивания может быть нарушена подвижность
соответствующей части тела.
16. Во время измерения кровяного давления не допускается прерывание циркуляции крови
на длительное время. При сбое в работе прибора снимите манжету с руки.
17. Избегайте механического сужения, сдавливания или сги-бания шланга манжеты.
18. Избегайте длительного давления в манжете и частых из-мерений. Нарушение кровообра-
щения может привести к повреждениям.
19. Убедитесь в том, что к кровеносным сосудам руки, на ко-торую накладывается манжета, не
подсоединено медицинское оборудование (через внутрисосудистый доступ, арте-риове-
нозный шунт или при внутрисосудистой терапии).
20. Не используйте манжету у лиц с ампутированной грудью.
21. Во избежание дальнейших повреждений не кладите манжету поверх ран.
22. Используйте только входящие в объем поставки или оригинальные запасные манжеты. В
противном случае получаются неверные результаты измерений.
23. Проглатывание батареек может приводить к опасности для жизни. Поэтому храните бата-
рейки и изделия в не-доступном для детей месте. В случае проглатывания батарейки неза-
медлительно обратитесь к врачу.
24. Не используйте шнуры и / или адаптер переменного тока для любых других целей, кроме
указанных, так как они могут вызвать риск удушения.
25. Не используйте и не держите устройство и манжету во время использования.
Технические характеристики
Метод измерения Осциллометрический
Диапазон измерений 30-260 мм. рт. ст.; частота пульса: 40~199 уд./минДавление:
Датчик давления полупроводниковый
Погрешность измерений давление ± 3 мм. рт. ст.; пульс ± 5 %
Нагнетание воздуха с помощью насоса
Стравливание воздуха автоматическое
Емкость памяти 60 ячеек для каждой зоны x 2 зоны
Автоматическое отключение через 1 минуту после последнего нажатия кнопки
Допустимая рабочая темпера-
тура и Влажность воздуха 10°C~40°C (50°F~104°F), относительная влажность воздуха
15%~85%; 700~1060 hPa
Допустимая температура при
транспортировке и хранении.
Допустимая влажность при
транспортировке и хранении.
-10°C~60°C (14°F~140°F), относительная влажность воздуха
10%~90%; 700~1060 hPa
Источник питания пост. тока 6 В пост. тока, четыре батареи типа (АА)
Источник питания перем. тока В пост. тока, ток 600 мА (размер вилки: внешний (-) Ø6 4,0,
внутренний (+) 7)Ø1,
Размеры 160 120 81(Д) X (Ш) X (В) мм
Вес 400g (брутто, без батарей)
Плечесая манжета 24~40 см(9.4”~15.7”)
Группа пользователей взрослые
Конструкция прибора и манжеты защищают от поражения
электрическим током.
IP Классификация IP21: Защита от вредных попаданий воды и пылевидных
частиц
* Производитель оставляет за собой право изменять технические характеристики без
предупреждения.
Język Polski
Wstęp
Dziękujemy za dokonanie zakupu ciśnieniomierza Rossmax MW701f. Pomiary ciśnienia tętni-
czego przeprowadzone za pomocą MW701f wykonane są z dokładnością zbliżoną do wyników
uzyskiwanych w badaniu specjalistycznym przy użyciu ciśnieniomierza i metody osłuchowej
z zastosowaniem stetoskopu, zgodnie z normami American National Standard zawartymi w
informatorze „Elektroniczne lub automatyczne manometry do pomiaru ciśnienia tętniczego”.
Prezentowane urządzenie przeznaczone jest dla osób dorosłych do użytku domowego. Pacjent
jest domyślnym operatorem. Nie wolno urządzenia stosować do wykonywania badań u no-
worodków i niemowląt. Urządzenie MW701f jest objęte gwarancją dotyczącą wad fabrycznych
zgodnie z postanowieniami Międzynarodowego Programu Gwarancyjnego. Informacje doty-
czące gwarancji mogą zostać uzyskane od producenta, czyli rmy Rossmax International Ltd.
Uwaga: Należy zapoznać się z dokumentactowarzyszącą. Przed rozpoczęciem użytko-
wania produktu należy dokładnie przeczytać niniejszą instrukcję. Szczegółowe informacje
dotyczące ciśnienia krwi należy uzyskać od lekarza. Należy zachowinstrukcje do wglądu.
Technologia pomiarowa Real Fuzzy
Pomiar ciśnienia tętniczego jest wykonywany przez urządzenie przy użyciu metody oscylo-
metrycznej. Przed rozpoczęciem pompowania mankietu, urządzenie określa ciśnienie podsta-
wowe w mankiecie, odpowiadające ciśnieniu otaczającego powietrza. Następnie urządzenie
określa odpowiedni poziom pompowania powietrza na podstawie oscylacji ciśnienia, po czym
całkowicie odprowadza powietrze z mankietu.
Podczas wypuszczania powietrza, urządzenie wykrywa amplitudę i nachylenie oscylacji ciśnie-
nia, określając na tej podstawie ciśnienie skurczowe i rozkurczowe użytkownika oraz jego tętno.
Uwagi wstępne
Niniejsze urządzenie przeznaczone do pomiaru ciśnienia krwi spełnia wszystkie wymogi obo-
wiązujących przepiw europejskich i zostało opatrzone oznakowaniem „CE 1639”. Jakość
urządzenia została poddana kontroli i spełnia wszystkie wymagania Załącznika I europejskiej
dyrektywy 93/42/EWG, dotyczącej urządzeń medycznych oraz obowiązujących norm zharmo-
nizowanych.
EN 1060-1: 1995/A2: 2009 Nieinwazyjne sgmomanometry - Część 1 – Wymagania ogólne
EN 1060-3: 1997/A2: 2009 Nieinwazyjne sgmomanometry - Część 3 - Dodatkowe wymagania
dotyczące elektro-mechanicznych systemów pomiaru ciśnienia krwi
EN 1060-4: 2004 Nieinwazyjne sgmomanometry - Część 4: Metody badań w celu wyznaczenia
ogólnej dokładności układu automatycznych nieinwazyjnych sgmomanometrów.
ISO 81060-2: 2013 Nieinwazyjne sgmomanometry - Część 2: Badanie kliniczne zautomatyzo-
wanego pomiaru.
Ten ciśnieniomierz został zaprojektowany, aby służyć przez wiele lat. Dla zapewnienia utrzy-
mania precyzji pomiaru, w przypadku wszystkich ciśnieniomierzy cyfrowych zalecane jest
przeprowadzanie ich ponownej kalibracji. Niniejszy produkt (pod warunkiem standardowego
wykorzystywania, czyli ok. 3 pomiarów dziennie) nie wymaga ponownej kalibracji przez 2 lata.
Kiedy urządzenie musi zostpoddane ponownej kalibracji, wyświetlony będzie odpowiedni
komunikat . Ponowna kalibracja urządzenia powinna być przeprowadzona równiw przy-
padku, jeśli monitor zostanie uszkodzony wskutek nagłego uderzenia (np, upuszczenia), bądź
też narażanie na działanie cieczy i/lub ekstremalnie wysokich lub niskich temperatur / zmian
wilgotności. Kiedy wyświetlony zostanie komunikat , należy przekazać urządzenie do najbliż-
szego sprzedawcy w celu przeprowadzenia ponownej kalibracji.
Standardowe ciśnienie krwi
Odnosząc się do denicji Światowej Organizacji Zdrowia zakresy ciśnienia można podziel
na 6 klasykacji (Ref. 1999 WHO wytyczne Polskiego Towarzystwa Nadciśnienia Tętniczego
dotyczące walki z nadciśnieniem. Klasykacja dotycząca ciśnienia krwi została opracowana na
podstawie danych historycznych i może nie być odpowiednia dla konkretnego pacjenta. Waż-
ne jest, aby regularnie konsultować się ze swoim lekarzem. Lekarz udzieli pacjentowi informacji
dotyczących jego normalnego ciśnienia krwi oraz wartci ciśnienia, przy krej pacjent może
być zagrożony. Dla zapewnienia niezawodnego i wiarygodnego diagnozowania ciśnienia krwi,
należy prowadzić rejestr, w którym zapisywanewartości pomiarów w dłuższym okresie czasu.
Specjalny rejestr do zapisywania wyników pomiaru ciśnienia może zostać pobrany na stronach
internetowych www.rossmax.com.
Objaśnienia symboli stosowanych na wyświetlaczu
EE / Błąd pomiaru: Należy upewnić się, że wtyczka L jest prawidłowo podłączona do gniazda
powietrza i wykonać pomiar ponownie. Założyć prawidłowo mankiet i nie zmieniać położenia
ramienia podczas pomiaru. Jeżeli błąd występuje nadal, należy zwrócić urządzenie do miejsco-
wego dystrybutora lub punktu serwisowego.
E1 / Nieprawidłowy obieg powietrza: Należy upewnić się, że wtyczka L jest prawidłowo
podłączona do gniazda powietrza i wykonać pomiar ponownie. Jeżeli błąd występuje nadal,
należy zwrócić urządzenie do miejscowego dystrybutora lub punktu serwisowego.
E2 / Ciśnienie przekraczające 300 mmHg: Należy wyłączyć urządzenie i wykonać pomiar
ponownie. Jeżeli błąd występuje nadal, należy zwrócurządzenie do miejscowego dystrybu-
tora lub punktu serwisowego.
E3 / Błąd danych: Należy wyjąć baterie, odczekać 60 sekund i włożyć je ponownie. Jeżeli błąd
występuje nadal, należy zwrócić urządzenie do miejscowego dystrybutora lub punktu serwi-
sowego.
Er / Przekroczenie zakresu pomiaru: Należy wykonać pomiar ponownie. Jeżeli błąd wystę-
puje nadal, należy zwrócić urządzenie do miejscowego dystrybutora lub punktu serwisowego.
Wykrywanie poprawnego założenia mankietu
Jeżeli mankiet został założony zbyt luźno, wyniki pomiaw ciśnienia mogą być niemiarodajne.
Detektor poprawnego założenia mankietu może pomóc ustalić czy mankiet jest wystarczająco
zaciśnięty. Jeśli podczas pomiaru na wyświetlaczu pojawi się komunikat ,,luźny mankiet”
mankiet należy założyć ponownie prawidłowo. Jeśli mankiet jest poprawnie założony pojawi się
ikona mankietu z inskrypcją OK .
Czujnik ruchu
„Czujnik ruchu” pomaga poprzez przypominanie użytkownikowi o konieczności pozostawania
w ciąym bezruchu podczas pomiaru. Ikona „ruch ciałazostanie wyświetlona gdy został wy-
kryty ruch w trakcie pomiaru.
Uwaga: Jest wysoce zalecane, aby powtórzyć pomiar ponownie w wypadku pojawienia się iko-
ny „ ruch ciała”.
Tryb gościa (pomiary przygodne)
Ciśnieniomierz może wykonywać pomiary pojedyncze nie zapisując ich w pamięci. Naciśnij
przycisk przełączającyytkowniw wybierając strefę pamięci dla gościa. Następnie postę-
puj wg wskazówek, aby prawidłowo wykonać pomiar. Po wykonaniu pomiaru wartość wyniku
nie zostanie zapisana w pamięci.
Wskaźnik ryzyka nadciśnienia (HRI)
Światowa Organizacja Zdrowia klasykuje ciśnienie krwi na 6 poziomów. Urządzenie jest wypo-
sażone w innowacyjny wskaźnik wartości ciśnienia krwi, który wizualnie wskazuje poziom ci-
śnienia (optymalny / normalny / podwyższony / 1 stopień nadciśnienia / 2 stopień nadciśnienia
/ 3 stopień nadciśnienia) po każdym pomiarze.
Wskaźnik nieregularnego rytmu serca (IHB)
Ciśnieniomierz został wyposażony w funkcję wykrywania zaburzeń rytmu serca (IHB), co po-
zwala na uzyskanie prawidłowych pomiarów u osób, u których pojawi się nierówna praca serca.
Jednocześnie aparat informuje użytkownika o wykryciu nieregularności rytmu serca.
Uwaga: Jeśli ikona IHB ( ) pojawia się często na ekranie należy skonsultować się z lekarzem.
Korzystanie z zasilacza sieciowego (opcja)
1. Podłącz zasilacz sieciowy do gniazda zasilacza po prawej stronie urządzenia.
2. Włóż wtyczkę zasilacza do ściennego gniazdka zasilania. (dane dotyczące wymaganych dla
zasilaczy parametrów napięcia i mocy w sieci zasilania zostały umieszczone obok gniazda.)
Ostrzeżenie:
1. Jeżeli urządzenie ma być przez uższy czas używane z zasilaczem, należy wyjąć baterie.
Pozostawienie baterii w urządzeniu przez dłuższy czas może spowodować wyciek, który
grozi uszkodzeniem ciśnieniomierz.
2. Kiedy używany jest zasilacz, korzystanie z baterii nie jest konieczne.
3. Użycie zasilacza sieciowego stanowi opcję. Szczegółowe informacje dotyczące kompatybil-
nych zasilaczy sieciowych są dostępne u dystrybutorów.
4. Z ciśnieniomierzem należy używać wyłącznie zatwierdzonych, kompatybilnych zasilaczy sie-
ciowych. Informacje dotyczące zatwierdzonych zasilaczy sieciowych zostały zamieszczone w
ZAŁĄCZNIKU 1.
Zakładanie baterii
1. Aby otworzyć komorę baterii należy wcisnąć i podnieść pokrywę baterii zgodnie z kierunkiem
wskazanym strzałką.
2. Włoż lub wymienić 4 baterie AA zgodnie z oznakowaniem wewnątrz komory.
3. Aby założyć pokrywę najpierw należy wsunąć zaczepy dolnej części, a następnie przesunąć
rną część pokrywy komory.
4. Baterie należy wymieniać parami. Jeżeli ciśnieniomierz nie będzie używany przez dłuższy czas,
należy wyjąć baterie.
Baterie należy wymienić na nowe jeśli:
1. Na wyświetlaczu pojawi się symbol słabej baterii.
2. Po wciśnięciu przycisku ON/OFF/START nic nie pojawia się na wyświetlaczu.
Ostrzeżenie
1. Baterie to odpady niebezpieczne. Nie należy ich wyrzucać ze zwykłymi śmieciami.
2. Wewnątrz urządzenia nie ma części obsługiwanych przez użytkownika. Gwarancja nie obej-
muje baterii ani szkód powstałych na skutek używania starych baterii.
3. Należy stosować wyłącznie markowe rodzaje baterii. Należy zawsze wymieniać baterie rów-
nocześnie. Należy używać baterii tej samej marki i typu.
Zakładanie mankietu
1. Rozłóż mankiet pozostawiając jego końcówkę w kształcie D w pętelce.
2. óż mankiet na lerękę. Oznaczony kolorem pasek powinien znajdować się bliżej ciebie, a
przewód ma być skierowany w dół ręki (Rys. ). Obróć wewnętrzną część lewej dłoni do góry
i przesuń krawędź mankietu na odległość ok. 1,5 - 2,5 cm powyżej zgięcia w łokciu (Rys. ).
Zapnij mankiet pociągając jego końcówkę.
3. Ustaw przewód centralnie wzdłuż ręki. Wciśnij haczyk i dokładnie owiń materiał. Pomiędzy
mankietem a ramieniem powinno pozostawać miejsce na 2 palce. Oznaczenie (Ø) należy uło-
żyć na wysokości głównej tętnicy (po wewnętrznej stronie ręki) (Rys. ). Uwaga: Znajdź ,
swogłówną tętnicę naciskając dwoma palcami miejsce na wewnętrznej stronie ręki ok. 2
cm powyżej zgięcia w łokciu. Znajdź miejsce, w którym puls jest najlepiej odczuwalny. Jest
to Twoja główna tętnica.
4. Podłącz przewód mankietu do urządzenia (Rys. ).
5. Oprzyj ramię na stole (otwardłonskierowaną do góry) w taki sposób, aby mankiet znajdo-
wał s na wysokości serca. Upewnij się, że przewód nie jest skręcony (Rys. ).
6. Mankiet jest odpowiedni, jeśli strzałka znajduje się wewnątrz obszaru oznaczonego ciągłą
kolorolinią, jak pokazano z prawej strony (Rys. ). Jeżeli strzałka wychodzi poza ciągłą kolo-
rową linię, musisz używać mankietu o innym obwodzie. Aby uzyskać informacje dotyczące in-
nych dostępnych rozmiarów mankietów, należy skontaktować się z miejscowym sprzedawcą.
Procedury pomiaru
Poniżej zamieszczono kilka ytecznych porad umożliwiających zapewnienie odpowiedniej
dokładności pomiaru:
Ciśnienie tętnicze zmienia się przy każdym uderzeniu serca i podlega ciągłym wahaniom pod-
czas dnia.
Wynik pomiaru ciśnienia może być uzależniony od pozycji użytkownika, jego stanu zjolo-
gicznego i innych czynników. Dla zapewnienia optymalnej dokładności, przed rozpoczęciem
pomiaru ciśnienia tętniczego należy odczekać jedną godzinę po wykonywaniu ćwiczeń -
zycznych, kąpieli, spożywaniu posiłków lub napojów zawierających alkohol bądź kofeioraz
paleniu tytoniu.
Przed rozpoczęciem pomiaru należy siedzieć w wygodnej pozycji przez co najmniej 5 minut,
ponieważ dla zapewnienia odpowiedniej precyzji pomiar powinien być wykonywany w sta-
nie odpoczynku. Podczas wykonywania pomiaru użytkownik nie powinien być zmęczony lub
wyczerpany.
Nie należy wykonywać pomiaru, kiedy użytkownik znajduje się w stanie stresu lub napięcia
nerwowego.
Usiądź prosto na krześle i weź 5-6 głębokich oddechów. Podczas wykonywania pomiaru nie
należy odchylać się do tyłu.
Podczas pomiaru nie naly krzyżować nóg, a stopy utrzymywać płasko na podłodze.
Podczas pomiaru nie naly mówić ani poruszać ramieniem lub ręką.
Ciśnienie powinno być mierzone przy normalnej temperaturze ciała. Jeżeli ytkownik od-
czuwa szczelne gorąco lub zimno, powinien odczekać chwilę przed wykonaniem pomiaru.
Jeżeli urządzenie jest przechowywane w niskiej temperaturze (bliskiej zera), przed użyciem
należy umieścić go na co najmniej godzinę w temperaturze pokojowej.
Przed wykonaniem kolejnego pomiaru należy zaczekać 5 minut.
1. Wciśnij przycisk zmiany użytkownika, aby wybrobszar pamięci 1 lub 2. Po wybraniu obszaru
pamięci, wciśnij przycisk ON/OFF/START, aby zresetować urządzenie i rozpocząć pomiar w
wybranym obszarze pamięci.
2. Wciśnij przycisk ON/OFF/START. Wszystkie cyfry zaświecą się w celu sprawdzenia prawiowej
pracy wyświetlacza. Procedura kontrolna trwa przez 2 sekundy.
3. Po wyświetleniu wszystkich symboli, na wyświetlaczu zacznie migać cyfra „0”. Urządzenie jest
gotowe do wykonania pomiaru i zacznie powoli napompowywać mankiet, aby rozpocząć
pomiar.
4. Kiedy pomiar zostanie zakończony, ciśnienie powietrza zostanie spuszczone z mankietu. Na
wyświetlaczu LCD pokazana zostanie równocześnie wartość ciśnienia skurczowego i rozkur-
czowego oraz tętna. Wynik pomiaru zostanie automatycznie zapisany w wybranym wcześniej
obszarze pamięci.
Ciśnieniomierz posiada funkcję automatycznego dopompowania mankietu. W przypadku
niedostatecznego ciśnienia, rękaw zostanie automatycznie dopompowany do odpowiedniej
wartci.
Uwaga: 1. Urządzenie wyłącza się automatycznie po upływie mniej więcej 1 minuty od ostat-
niego wciśnięcia przycisku.
2. Aby przerwać pomiar, wystarczy wcisnąć przycisk ON/OFF/START lub Pamięć powietrze
zostanie natychmiast wypuszczone z mankietu.
Wywoływanie wartości z pamięci
1. Urządzenie posiada dwa obszary pamięci (1 i 2). W każdym obszarze może zostać zapamię-
tane maksymalnie 60 wyniw pomiaru.
2. Aby odczytać wyniki zapisane w określonym obszarze pamięci, należy najpierw wybrać
obszar pamięci (1 lub 2) za pomocą przycisku zmiany użytkownika. Wcisnąć przycisk Pamięć.
Pierwsza wyświetlana jest średnia ze wszystkich odczytów porannych z ostatnich 7 dni.
3. Kontynuując, naciśnij przycisk pamięci, aby sprawdzić średnią wszystkich nocnych odczytów
z ostatnich 7 dni.
4. Ponownie naciśnij klawisz pamięci, aby sprawdzić średnz 3 ostatnich pomiarów przecho-
wywanych w pamięci i ostatni, wcześniej zapisany pomiar. Każdy pomiar jest oznaczony
kolejnym numer zapisu w pamięci.
Uwaga: W każdym obszarze pamięci może zostać zapisane maksymalnie 60 wyników. Kiedy
liczba zapisanych wyników dojdzie do 60, najstarsze dane będą zastępowane przez nowe
wyniki pomiarów.
Uwaga: AM jest zdeniowany jako 04:00 - 11:59
Uwaga: PM jest zdeniowany jako 18:00 - 02:00
Usuwanie wartości z pamięci
1. Wciśnij przycisk zmiany użytkownika, aby wybrać obszar pamięci 1 lub 2.
2. Wciśnij i przytrzymaj przycisk Pamięć przez mniej więcej 5 sekund - dane w wybranym obsza-
rze pamięci zostaną automatycznie usunięte.
Ustawianie czasu
1. Ustawianie daty i godziny w urządzeniu po wymianie lub instalacji baterii. Na wyświetlaczu
pojawi się migający numer pokazujący rok „year”.
2. Zmień rok, naciskając przycisk pamięci, każde naciśnięcie przycisku zwiększy liczbę. Naciśnij
przycisk ON / OFF / START aby potwierdzić wpis i na ekranie pojawi się migająca liczba ozna-
czająca datę „date”.
3. Zmień datę, godzinę i minuty, tak jak opisano to powyżej w punkcie 2. Używając przycisku
pamięci zmieniamy wartość i zatwierdzamy go przyciskiem ON/OFF/START.
4. „0” na wyświetlaczu oznacza, że ciśnieniomierz jest gotowy do kolejnego pomiaru.
Przesyłanie danych do komputera (opcja)
Firma Rossmax zapewnia bezpłatne, zintegrowane i przyjazne dla użytkownika oprogramo-
wanie do pomiaru ciśnienia, które może zostać pobrane i zainstalowane w komputerze yt-
kownika. Aby podłączyć ciśnieniomierz Rossmax z komputerem, należy zakupić specjalny kabel
USB. Oprogramowanie przeznaczone do instalacji może zostać pobrane ze strony internetowej
http://www.rossmax.com.
Rozwiązywanie problemów
W razie stwierdzenia jakichkolwiek nieprawidłowości w czasie pomiaru, należy sprawdzić wy-
mienione poniżej punkty.
Symptomy KorektaPunkty kontrolne
Po wciśnięciu przycisku
ON/OFF/START nic nie jest
wyświetlane na ekranie
Czy baterie nie są wyczerpane? Załóż cztery nowe baterie.
Czy baterie zostały włożone z pra-
widłową biegunowością? Włóż ponownie baterie w
prawidłowym położeniu.
Na wyświetlaczu pojawia
się symbol EE lub poka-
zywana wartość ciśnienia
jest zdecydowanie za niska
(wysoka).
Czy mankiet jest założony prawi-
dłowo?
Owiń mankiet raz jeszcze w
taki sposób, aby znajdował się
we właściwej pozycji.
Czy podczas pomiaru nie mówił(-
-aś) i nie poruszałeś(-aś) się? Wykonaj pomiar ponownie.
Podczas pomiaru nadgarstek
musi być utrzymywany nie-
ruchomo.
Czy nie potrząsałeś(-aś) nadgarst-
kiem z założonym mankietem?
Uwaga: Jeżeli urządzenie nadal nie działa, należy zwrócić je do sprzedawcy. W żadnym przypad-
ku nie należy próbować demontować i naprawiać urządzenie na własną rękę.
Ostrzeżenia
1. Urządzenie jest wyposażone w podzespoły o wysokiej precyzji. Należy więc unikać ekstremal-
nych temperatur, wilgotności oraz bezpośredniego działania promieni słonecznych. Uważać,
aby nie upuścić urządzenia i nie narażać go na nagłe uderzenia, chronić przed kurzem.
2. Obudowa ciśnieniomierza i mankiet powinny być czyszczone lekko nawilżoną, miękście-
reczką. Nie dociskać zbyt mocno. Nie prać mankietu i nie czyścić go żadnymi produktami
chemicznymi. Do czyszczenia urządzenia nie wolno używać rozcieńczalnika, alkoholu ani
benzyny.
3. Wyciek z baterii może spowodować uszkodzenie urządzenia. Jeżeli urządzenie nie będzie
używane przez dłuższy czas, należy wyjąć baterie.
4. Dla uniknięcia zagrożeń, urządzenie nie może być obsługiwane przez dzieci.
5. Jeżeli urządzenie jest przechowywane w temperaturze bliskiej zera, przed użyciem należy
umieścić go na pewien czas w temperaturze pokojowej.
6. Urządzenie nie może być naprawiane przez użytkownika. Nie wolno w żadnym wypadku
usiłować otwierać urządzenie za pomocą jakichkolwiek narzędzi. Żadne elementy wewnętrz-
ne nie mogą być naprawiane przez użytkownika. W razie jakichkolwiek problemów, należy
skontaktować się ze sprzedawcą lub lekarzem, u którego urządzenie zostało zakupione, bądź
też z rmą Rossmax International Ltd.
7. W przypadku wszystkich ciśnieniomierzy, w których wykorzystywana jest funkcja pomiaru
oscylometrycznego, możliwe jest wystąpienie problemów dotyczących określenia prawidło-
wego poziomu ciśnienia u użytkowników cierpiących na arytmię (przedwczesne migotanie
przedsionków lub komór), cukrzycę, zaburzenia schorzenia krwi, choroby nerek, a także u pa-
cjentów po wylewie lub osób nieprzytomnych.
8. Aby w dowolnej chwili wyłączyć urządzenie, należy wcisnąć przycisk ON/OFF/START powie-
trze zostanie szybko usunięte z mankietu.
9. Kiedy ciśnienie w nadmuchiwanym mankiecie przekroczy 300 mmHg, ze względów bezpie-
czeństwa zostanie on szybko opróżniony.
10. Należy pamiętać, że urządzenie jest przeznaczone wyłącznie do użytku domowego i w żad-
nym wypadku nie zastępuje porady lekarskiej.
11. Urządzenie nie może być wykorzystywane w celu diagnozowania lub leczenia jakichkol-
wiek problemów zdrowotnych. Wyniki pomiaw posiadają jedynie znaczenie informacyjne.
Interpretacja wyników pomiaru ciśnienia tętniczego może być przeprowadzana wyłącznie
przez lekarza. W razie jakichkolwiek podejrzeń dotyczących problemów zdrowotnych należy
skontaktować się z lekarzem. Nie należy w żadnym wypadku zmieniać zażywanych lekarstw
bez wcześniejszego uzgodnienia tego z lekarzem.
12. Zakłócenia elektromagnetyczne: Urządzenie jest wyposażone w delikatne komponenty
elektroniczne. Urządzenie nie powinno być używane w pobliżu silnych pól elektrycznych
lub elektromagnetycznych (np. wytwarzanych przez telefony komórkowe lub kuchenki mi-
krofalowe). Może to spowodować tymczasowe zakłócenie dokładności pomiaru.
13. Urządzenie, baterie, komponenty i akcesoria powinny być przeznaczone do utylizacji zgod-
nie z obowiązującymi przepisami miejscowymi.
14. Urządzenie może nie spełniać wymogów specykacji w przypadku, jeżeli jest przechowywa-
ne lub wykorzystywane w warunkach wykraczających poza zakres temperatury i wilgotno-
ści, określony w Specykacjach.
15. Podczas pompowania urządzenia może dojść do zaburzenia sprawności danej kończyny.
16. Nie wolno zakłocać cyrkulacji krwi przez zbyt długi pomiar ciśnienia. W przypadku błędnego
działania urządzenia należy zdjąć mankiet z ramienia.
17. Unikaj mechanicznego zwężania, ściskania lub zaginania wężyka mankietu.
18. Unikaj utrzymywania ciśnienia w mankiecie oraz częstych pomiarow. Spowodowane tym
zaburzenie przepływu krwi może spowodować uszczerbek na zdrowiu.
19. Mankietu nie należy zakładna ram, w ktorym leczone sątnice i żyły, np. angioplastyka/
terapia naczyń krwionośnychczy przetoka tętniczo-żylna (AV).
20. Nie zakładać mankietu osobom po amputacji piersi.
21. Nie zakładać mankietu na rany, ponieważ może dojść do dalszych obrażeń.
22. Używać jedynie dostarczonej lub orginalnej opaski nadgarstkowej. W innym przypadku uzy-
skuje się błędne dane pomiarowe.
23. Batermogą być niebezpieczne dla zdrowia, należy przechowywać je w miejscu niedo-
stępnym dla dzieci. Jeśli nastąpiło już połknięcie baterii, należy zgłosić się natychmiast po
pomoc medyczną.
24. Nie używaj przewodu i/lub zasilacza sieciowego do jakichkolwiek innych celów niż określo-
ne, ponieważ mogą one powodować ryzyko uduszenia.
25. Nie próbuj naprawiać urządzenia lub mankietu w trakcie użytkowania.
Specykacje
Metoda pomiaru Oscylometryczna
Zakres pomiaru Ciśnienie: 30-260 mmHg; Tętno: 40~199 uderzeń na
minutę
Czujnik ciśnienia Półprzewodnikowy
Dokładność Ciśnienie: ±3 mmHg; Tętno: ±5% odczytu
Pompowanie Za pomocą pompy
Wypuszczanie powietrza Automatyczny zawór spustowy
Pojemność pamięci 60 zapisów w każdym obszarze x 2 obszary
Automatyczne wyłączanie 1 minuta po ostatnim wciśnięciu przycisku
Dopuszczalna temperatura i
wilgotność powietrza podczas pracy 10°C~40°C (50°F~104°F); 15%~85% wilgotności
względnej ; 700~1060 hPa
Dopuszczalna temperatura podczas
transport i przechowywania.
Dopuszczalna wilgotność powietrza
podczas transportu i przechowywania.
-10°C~60°C(14°F~140°F); 10%~90% wilgotności
względnej; 700~1060 hPa
Zasilanie prądem stałym 6 V DC, 4 baterie (AA)
Zasilanie prądem zmiennym DC6V, ≥600 mA (wymiary wtyczki: średnica zewnętrzna
(-) wynosi 4,0, a średnica wewnętrzna (+) to 1,7)
Wymiary 160 (dł.) X 120 (szer.) X 81 (wys.) mm
Ciężar 400g (brutto) (bez baterii)
Obwód ramienia Osoba dorosła: 24~40 cm (9.4”~15.7”)
Użytkownik Osoba dorosła
Typ BF: Urządzenie i mankiet posiadaspecjalne
zabezpieczenie przed porażeniem prądem.
Klasyfikacja IP IP21: Rodzaj ochrony przed wodą i pyłami
* Dane techniczne mogą ulec zmianie bez uprzedniej notyfikacji.


               
        
 





.) (Rossmax International Ltd


)

 






 CE
  EEC/ / 
    : / : EN
    : / : EN

  : EN

  : ISO


 



 









.www.rossmax.com


LEE


 L









 
 

    

. 


 





 IHB
 IHB

 ( IHB





 AC





.



 AA“
       
     














.D



 




 Ø
  .) . 



.)

.)
 


























             









   
         LCD
 

            














  AM
  PM

.














  USB
         http://www.rossmax.com 


  
  






  EE





 
















.)Rossmax International Ltd












           













  



         







~~

  







~hPa    




~hPa    
)AA
 
)

 ~~

BF

IP








 Rossmax











   CE CE
AnnexEC council
I
  / : EN
  / : EN

 EN

  : ISO





 

 







.www.rossmax.com

 L:) EE



 L













  




. 




)HRI


.)
)IHB
 IHB


 


 AC
  AC AC
AC AC AC  


AC


 AC

AC AC
AC

AC


 AA 






ON/OFF/START







 D

 
 


 Ø
   .) 


.)

.)

 





















ON/OFF/START

ON/OFF/START










MemoryON/OFF/START




 Memory 


Memory


AM AM AM  
AM PM PM  


 Memory




 ON/OFF/START 




Rossmax

USBRossmax
 http://www.rossmax.com





ON/OFF/
START









EE











 

















 Rossmax






ON/OFF/START

  

































 




 
 
hPa ~ 



hPa ~ 
DC)AA DC
AC    Ø : > DC V

 


 BF

IP

IN0MW701f000000XX
OBM_IB_MW701f(2)
NA9_V9_SW_ver2014
Warranty Card
This instrument is covered by a 5 year guarantee from the date of purchase. The guarantee is valid only on presentation
of the warranty card completed or stamped by the seller/dealer confirming date of purchase or the receipt. Batteries, cuff
and accessories are not included. Opening or altering the instrument invalidates the guarantee. The guarantee does not
cover damage, accidents or non-compliance with the instruction manual. Please contact your local seller/dealer or www.
rossmax.com.
Customer Name: _________________________________________________________________________________
Address: ________________________________________________________________________________________
Telephone: _______________________________________________________________________________________
E-mail address: ___________________________________________________________________________________
Product Information
Date of purchase: ________________________________________________________________________________
Store where purchased:
_________________________________________________________________________________________________
Model: MW701f
www.rossmax.com
Артериального давления прибор
Blutdruckmessgerät
Blood Pressure Monitor
Monitor de pressão arterial
Tensiomètre
Monitor de presión arterial
 
 
Rossmax Swiss GmbH,
Widnauerstrasse 1, CH-9435 Heerbrugg, Switzerland
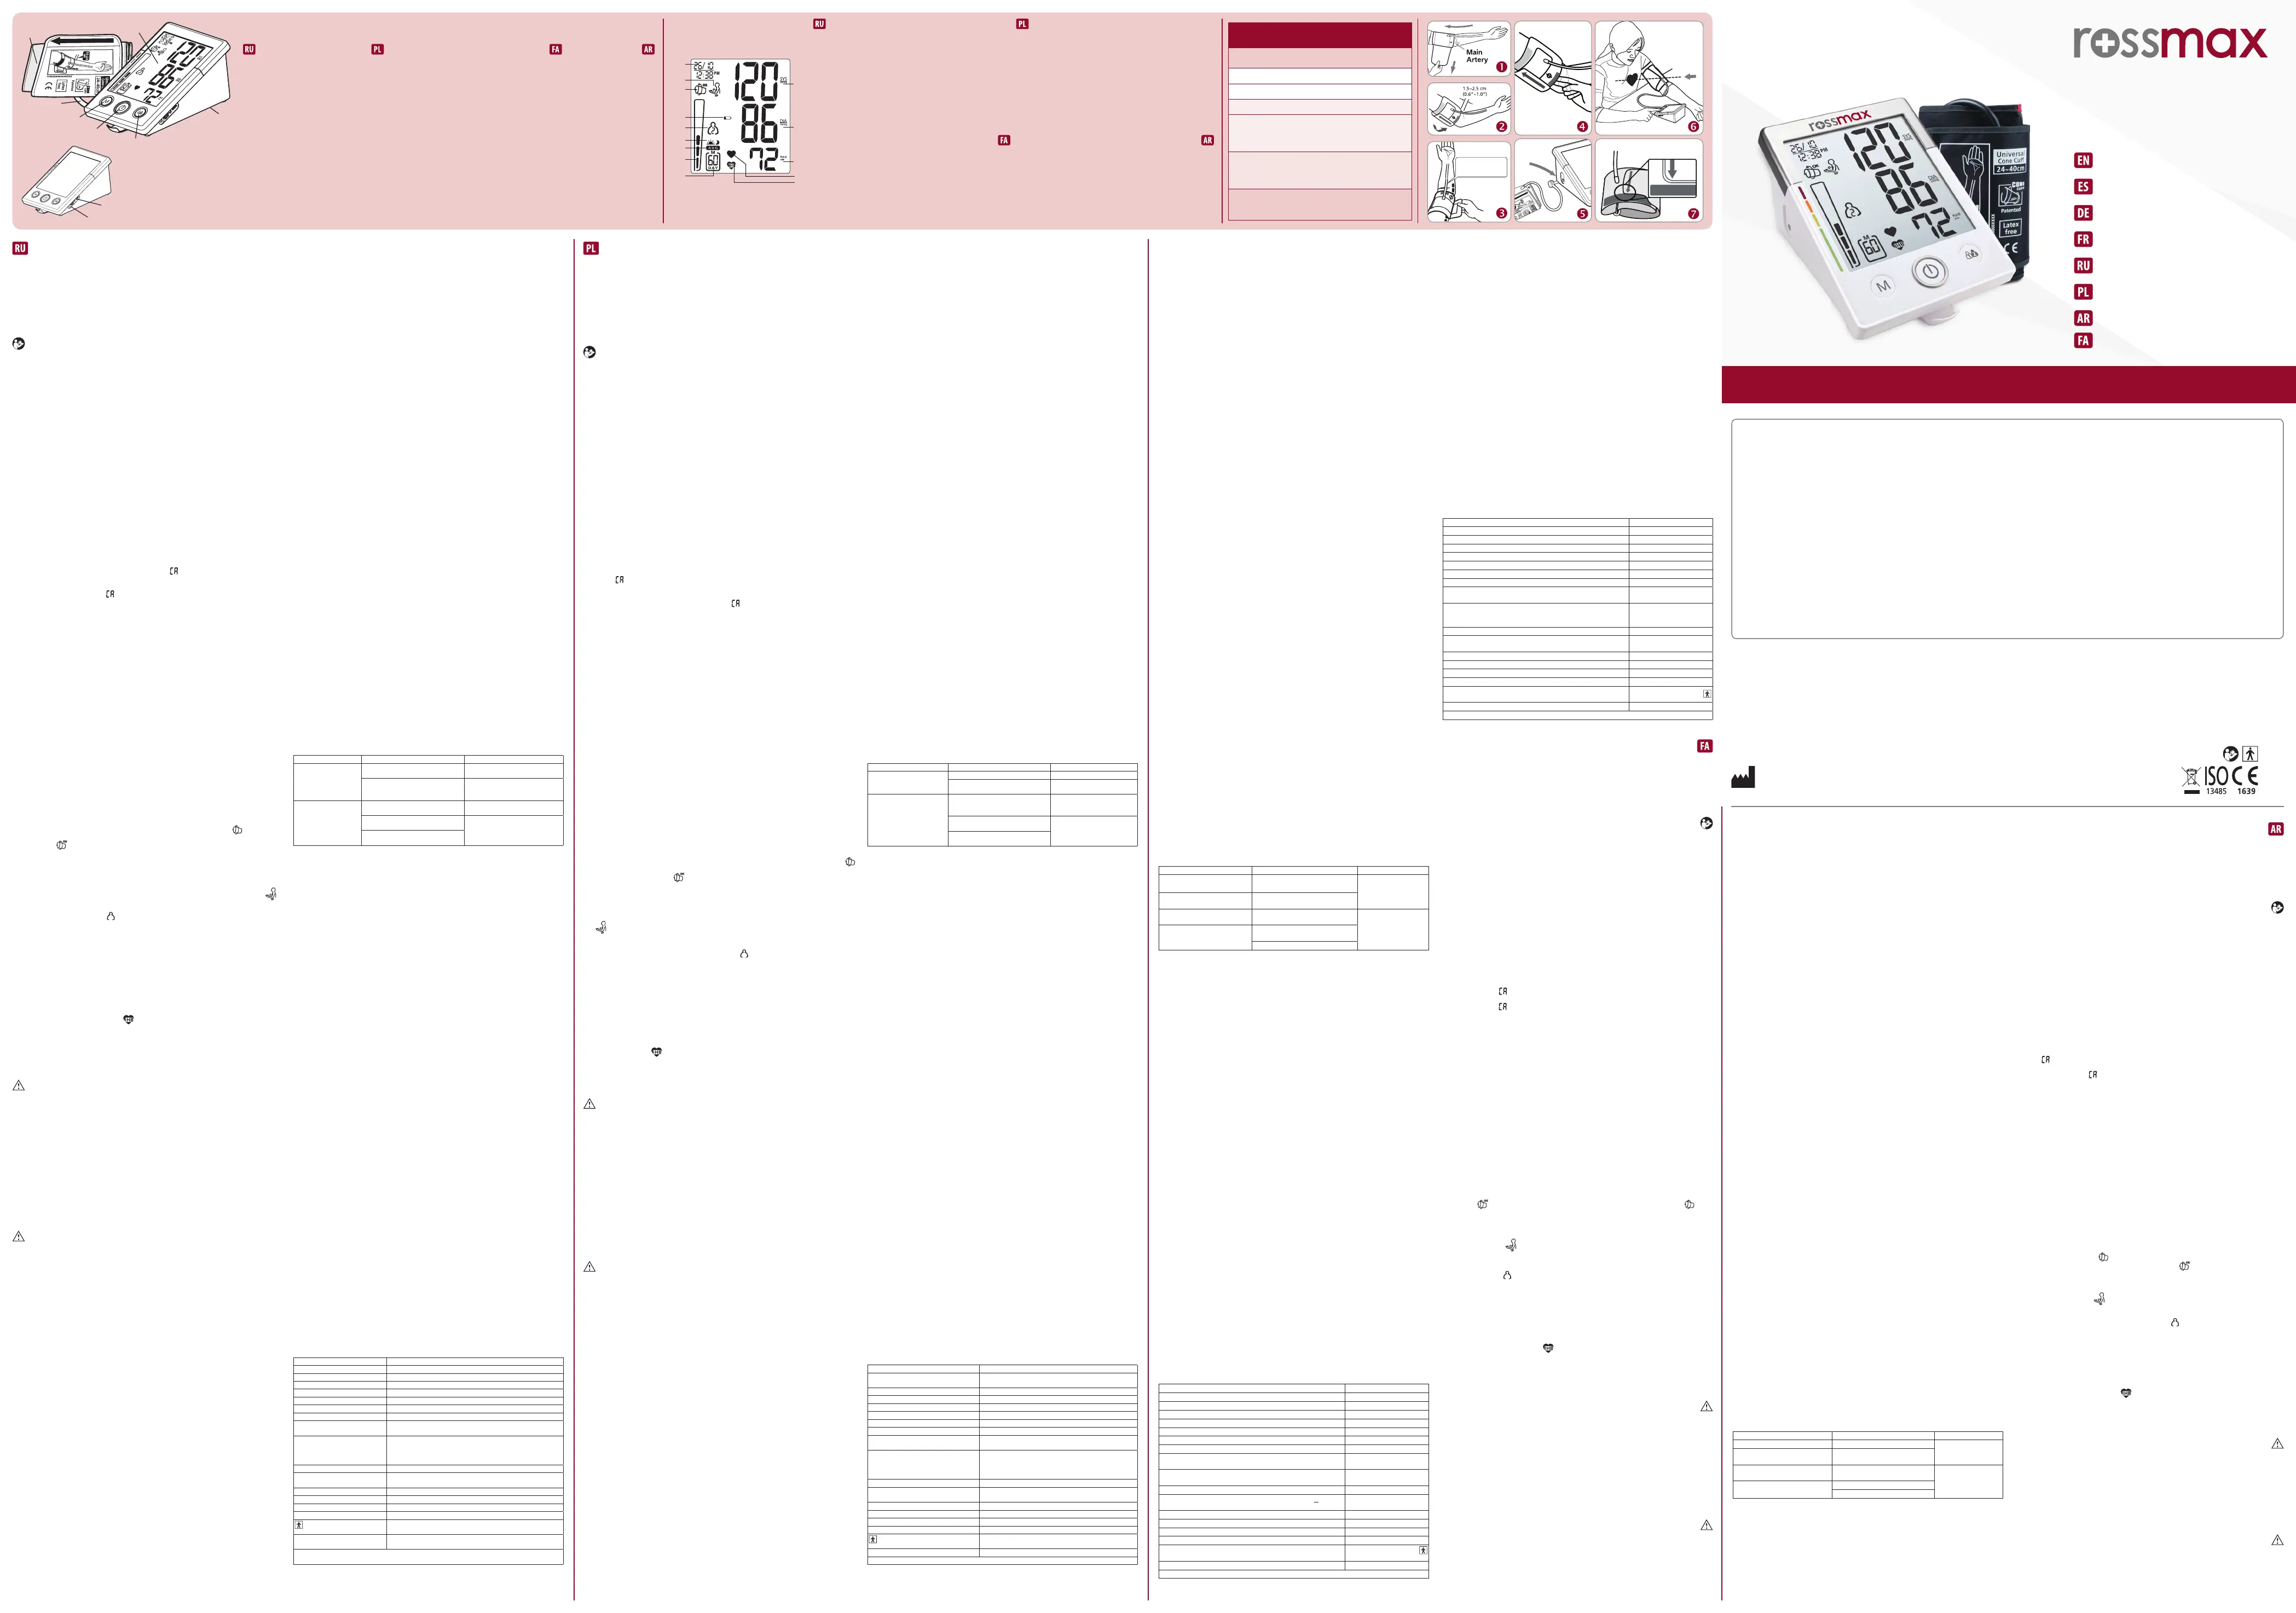
1. Wskazanie daty/godziny
2. Czujnik ruchu
3. Wykrywanie poprawnego
założenia mankietu
4. Wskazanie niskiego
poziomu naładowania
baterii
5. Obszary pamci
6. Znacznik pomiarów
porannych i wieczornych
7. Zapamtana wartć
średnia
8. Wsknik ryzyka
nadciśnienia
9. Numer zapisu w pamci/
daty
10. Ciśnienie skurczowe
11. Ciśnienie rozkurczowe
12. Tętno
13. Symbol pulsu
14. Wsknik nieregularnego
rytmu serca (IHB)
1. Плечевая манжета
2. ЖК-дисплей
3. Воздушная трубка и
коннектор
4. кнопка «Память»
5. Кнопка ВКЛ./ВЫКЛ./ПУСК(ON/
OFF/START)
6. Кнопка выбора пользователя
7. Крышка батарейного отсека
8. Гнездо для передачи данных
9. Гнездо для подключения
блока питания
1. Mankiet
2. Wyświetlacz LCD
3. Przewód powietrza i
łącznik
4. Przycisk pamięci
5. Przycisk ON/OFF/START
6. Przycisk zmiany
ytkownika
7. Pokrywa baterii
8. Gniazdo transmisji
danych
9. Gniazdo zasilacza
sieciowego

LCD











)Memory

ON/OFF/
)STRAT

) (


AC














)IHB















)IHB
1. Указатель даты и времени
2. Метка движения
3. Система определения
правильности одетой
манжеты
4. Низкий уровень заряда
батарей
5. Зоны памяти
6. Переключатель на
Утренние и Вечерние
показатели
7. Среднее значение
8. Указатель степени риска
гипертонии
9. Память / дзень знак
10. Систолическое
давление
11. Диастолическое
давление
12. Частота пульса
13. Пульс
14. Указатель наличия
аритмии
Center tube over
middle of arm
1
5
4
2
3
7
6
Blood Pressure Standard
World Health Organization (WHO) : 1999
Systolic Pressure
(mmHg)
Diastolic Pressure
(mmHg)
Optimal
<120 <80and
Normal
120~129 80~84or
High-normal
130~139 85~89or
Grade 1
hypertension
(mild)
140~159 90~99or
Grade 2
hypertension
(moderate)
160~179 100~109or
Grade 3
hypertension
≥180 ≥110or
8
9
210
11
12
1
6
7
5
4
3
8
913
14
WARNING: The symbol on this product means that it's an electronic product and following the European directive
2012/19/EU the electronic products have to be dispose on your local recycling centre for safe treatment.
ACHTUNG: Das Symbol auf diesem Produkt bedeutet, dass es sich um ein elektronisches Gerät entsprechend
der europäischen Richtlinie 2012/19/EU handelt, und dass das elektronische Gerät über das lokale Recyclingzentrum
sicher entsorgt werden muss.
OSTRZEŻENIE: Symbol umieszczony na urządzeniu oznacza, że stanowi ono produkt elektroniczny spniający wszystkie
wymogi europejskiej Dyrektywy 2012/19/EU. Dla zapewnienia odpowiedniej utylizacji, produkty elektroniczne musbyć
przekazywane do miejscowych punktów zbiórki w celu przeznaczenia ich do recyklingu.
ADVERTENCIA: Este símbolo en el producto signica que se trata de un producto electrónico y, en conformidad con
la Directiva Europea 2012/19/EU, los productos electrónicos deberán desecharse en su centro de reciclaje local para un tra-
tamiento seguro.
ПРЕДУПРЕЖДЕНИЕ: Данный символ на изделии означает, что это электронный продукт и, в соответствии с
европейской директивой 2012/19/EU, должен быть утилизирован в местном центре утилизации.
AVERTISSEMENT: le symbole gurant sur ce produit signie quil s’agit d’un produit électronique et, conformément à
la directive européenne 2012/19/EU, les produits électroniques usagés doivent être apportés dans un point de collecte pour
leur recyclage.
/ /EU  


  EU/ /

Deutsch
Einführung
Mit dem Gerät MW701f ermittelte Blutdruckmesswerte sind mit denen vergleichbar, die ein
geschulter Beobachter mit der auskultatorischen Blutdruckmessmethode mit Manschette und
Stethoskop ermittelt. Dabei gelten die Grenzwerte des amerikanischen nationalen Standardi-
sierungsinstituts für elektronische bzw. automatische Sphygmomanometer. Dieses Gerät ist für
erwachsene Verbraucher in häuslicher Umgebung vorgesehen. Der Patient ist der bestimm-
te Bediener. Das Gerät nicht bei Neugeborenen oder Kleinkindern anwenden. Das Modell
MW701f ist durch ein etabliertes internationales Garantieprogramm gegen Herstellungsfehler
geschützt. Für Garantieinformationen wenden Sie sich bitte an den Hersteller Rossmax Inter-
national Ltd.
Achtung: Beachten Sie die beiliegenden Dokumente. Lesen Sie diese Bedienanleitung
vor Verwendung sorgfältig durch. Spezische Informationen zu Ihrem eigenen Blutdruck
erhalten Sie von Ihrem Arzt. Bitte bewahren Sie diese Bedienanleitung auf.
Real-Fuzzy-Messtechnologie
Dieses Gerät nutzt zur Erkennung Ihres Blutdrucks die oszillometrische Methode. Bevor die
Manschette aufgepumpt wird, ermittelt das Gerät ein Manschettendruckäquivalent für den
Luftdruck. Das Gerät entscheidet anhand der Druckschwankungen über den Aufpumpdruck
und führt danach eine Druckentlastung der Manschette durch.
Während der Druckentlastung erkennt das Gerät Amplitude und Flanken der Druckschwan-
kungen und ermittelt daraus für Sie den systolischen Blutdruck, den diastolischen Blutdruck
und den Puls.
Vorläuge Anmerkungen
Dieses Blutdruckmessgerät erfüllt die europäischen Vorschriften und trägt das CE-Kennzeichen
„CE 1639“. Die Qualität des Geräts wurde überprüft und entspricht den Forderungen der Richt-
linie des EU-Rates 93/42/EEC (Medizingeräterichtlinie) Anhang I, wesentliche Anforderungen,
sowie den entsprechend harmonisierten Normen.
EN 1060-1: 1995/A2: 2009 Nichtinvasive Blutdruckmessgeräte - Teil 1 Allgemeine Anforde-
rungen
EN 1060-3: 1997/A2: 2009 Nichtinvasive Blutdruckmessgeräte - Teil 3 Zusätzliche Anforderun-
gen für elektromechanische Blutdruckmesssysteme
EN 1060-4: 2004 Nichtinvasive Blutdruckmessgeräte - Teil 4: Testprozeduren zur Bestimmung
der Gesamtsystemverlässlichkeit automatischer, nichtinvasiver Blutdruckmessgeräte
ISO 81060-2: 2013 Nicht invasive Sphygmomanometer Teil 2: Klinische Untersuchung der
automatisierten Messungs-Art.
Dieses Blutdruckmessgerät ist für eine lange Nutzungsdauer ausgelegt. Um die ständige Ver-
lässlichkeit zu gewährleisten, empfehlen wir, alle digitalen Blutdruckmessgeräte regelmässig zu
kalibrieren. Dieses Messgerät erfordert nach 2 Jahren (bei normaler Nutzung, das heisst, etwa 3
Messungen pro Tag) eine Neukalibrierung. Wenn das Gerät neu kalibriert werden sollte, zeigt
das Gerät Folgendes an: . Das Gerät sollte auch neu kalibriert werden, wenn das Messge-
rät aufgrund grober Gewalt beschädigt wurde (beispielsweise herunterel) oder Flüssigkeiten
bzw. extrem hoher oder tiefer Temperatur bzw. Änderungen der Luftfeuchtigkeit ausgesetzt
war. Wenn erscheint, bringen Sie es einfach zur Neukalibrierung zu Ihrem Händler.
Der Blutdruck Standard
Bezieht sich auf die Scala der Weltgesundheitsorganisation welche in 6 Klassen unterteilt wer-
den. (Gem. 1999 WHO Internationale Gesellschaft für Bluthochdruck Richtlinien für das Blut-
hochdruck-Management. Diese Blutdruckklassikation stützt sich auf Daten der Vergangen-
heit und muss nicht in jedem Fall für jeden Patienten zutreen. Es ist wichtig, dass Sie Ihren Arzt
regelmässig konsultieren. Ihr Arzt wird Ihnen Ihren normalen Blutdruckschwankungsbereich
sowie den Punkt mitteilen, an dem für Sie ein Risiko besteht. Zur zuverlässigen Überwachung
und Bezugnahme auf den Blutdruck empfehlen wir, langfristig Protokoll zu führen. Laden Sie
das Blutdruckprotokoll von unserer Website www.rossmax.com herunter.
Anzeigeerklärungen
EE / Messfehler: Prüfen Sie, ob der Winkelstecker sicher mit dem Druckluftanschluss verbun-
den ist, und führen Sie erneut eine Messung durch. Ziehen Sie die Manschette korrekt stra,
und halten Sie den Arm während der Messung ruhig. Sollte der Fehler wiederholt vorkommen,
bringen Sie das Gerät zu Ihrem lokalen Händler oder Service-Center.
Störung E1/Störung des Druckluftkreises: Prüfen Sie, ob der Winkelstecker sicher an dem
Druckluftanschluss an der Seite des Messgeräts angeschlossen ist, und führen Sie erneut eine
Messung durch. Sollte der Fehler wiederholt vorkommen, bringen Sie das Gerät zu Ihrem loka-
len Händler oder Service-Center.
E2 / Druck übersteigt 300 mmHg: Schalten Sie das Messgerät aus, und messen Sie danach
erneut. Sollte der Fehler wiederholt vorkommen, bringen Sie das Gerät zu Ihrem lokalen Händ-
ler oder Service-Center.
E3 / Datenfehler: Nehmen Sie die Batterien heraus, warten Sie 60 Sekunden, und legen Sie
diese wieder ein. Sollte der Fehler wiederholt vorkommen, bringen Sie das Gerät zu Ihrem lo-
kalen Händler oder Service-Center.
Er / Überschrittener Messbereich: Führen Sie erneut eine Messung durch. Sollte der Fehler
wiederholt vorkommen, bringen Sie das Gerät zu Ihrem lokalenndler oder Service-Center.
Erkennung der Manschette
Wenn die Manschette zu lose um den Arm gewickelt ist, kann dies zu unzuverlässigen Mess-
resultaten führen. Die Funktion „Manschetten Erkennung“ hilft diesem Problem vorzubeugen
in dem angezeigt wird, ob die Manschette eng genug um den Arm anliegt. Das Symbol
erscheint, wenn die Manschette während der Messung zu lose sitzt. Hingegen erscheint dieses
Symbol , wenn die Manschette richtig anliegt.
Bewegungs-Anzeiger
Der “Bewegungs-Anzeiger” hilft den Benutzer daran zu erinnern, dass er sich während der Blut-
druck-Messung nicht bewegen darf. Das dazu gehörige Logo erscheint, sobald eine Körper-
Bewegung während oder nach jeder Messung festgestellt worden ist.
Achtung: Es empehlt sich, die Messung zu wiederholen, falls das Logo angezeigt wurde.
Gast-Modus
Dieses Gerät verfügt über eine Einzelmessungs-Funktion welche nicht gespeichert wird. Drü-
cken Sie die Benutzer-Wechsel-Taste um einen Speicherbereich für einen Gast auszuwählen.
Folgen Sie den Messrichtlinien um eine korrekte Messung zu erhalten. Wenn die Messung ab-
geschlossen ist , wird der Messwert nicht gespeichert.
Hypertonie-Risikoanzeige (HRI)
Die Weltgesundheitsorganisation gliedert den Bluthochdruck in 6 verschieden Klassen. Dieses
Gerät ist mit einer innovativen Blutdruck-Risikoanzeige ausgestattet, welche verdeutlicht in
welcher Risiko-Klasse (optimal / normal / erhöht / Hypertonie Klasse 1 / Hypertonie Klasse 2 /
Hypertonie Klasse 3) sich der Blutdruck bendet nach Abschluss jeder Messung.
Indikator für unregelmässigen Herzschlag (IHB)
Dieses Gerät ist mit einem Indikator für unregelmässigen Herzschlag (IHB) ausgestattet, so dass
auch Personen mit unregelmässigem Herzschlag exakte Messergebnisse erhalten, da das Gerät
den Benutzer warnt, wenn während der Messung ein unregelmässiger Herzschlag festgestellt
wird.
Hinweis: Wenn das IHB-Symbol ( ) häug angezeigt wird, sollten Sie unbedingt Ihren Arzt
aufsuchen.
Verwendung des Netzadapters (Optional)
1. Schliessen Sie den Netzadapter an der Netzadapterbuchse auf der rechten Seite des Geräts
an.
2. Stecken Sie den Netzadapter in eine Steckdose. (Bei Netzadaptern sind die Netzspannung
und der Strom neben der Buchse des Netzadapters angegeben).
Vorsicht:
1. Nehmen Sie die Batterien heraus, wenn Sie ngere Zeit im Netzbetrieb arbeiten. Wer-
den die Batterien lange Zeit nicht aus dem Batteriefach entfernt, kann es zum Austritt
von Batterieüssigkeit kommen, welche das Gerät beschädigen kann.
2. Bei Netzbetrieb sind keine Batterien erforderlich.
3. Netzteiladapter sind optional. Wenden Sie sich wegen kompatibler Netzadapter an den Ver-
triebspartner.
4. Verwenden Sie nur den für dieses Blutdruckmessgerät zugelassenen Netzadapter.
Einlegen der Batterien
1. Drücken Sie auf den Batteriefachdeckel in Pfeilrichtung, um den Deckel abzunehmen und
das Batteriefach zu önen.
2. Legen Sie 4 Batterien der Grösse “AA” wie im Batteriefach angegeben in das Batteriefach ein
bzw. ersetzen Sie diese.
3. Setzen Sie den Batteriefachdeckel wieder auf, lassen Sie zuerst die unteren Haken einrasten,
und drücken Sie dann auf das obere Ende des Batteriefachdeckels.
4. Ersetzen Sie die Batterien paarweise. Nehmen Sie die Batterien heraus, wenn Sie das Gerät
längere Zeit nicht verwenden.
Sie müssen die Batterien ersetzen, wenn:
1. Das Symbol für niedrigen Batteriestand auf der Anzeige erscheint.
2. Sie die Taste ON/OFF/START drücken und auf dem Display nichts angezeigt wird.
Vorsicht
1. Batterien sind Sondermüll. Nicht gemeinsam mit dem Haushaltsmüll entsorgen.
2. In dem Gerät benden sich keine vom Benutzer reparierbaren Teile. Batterien oder Schäden,
die durch alte Batterien verursacht werden, sind nicht durch die Garantie abgedeckt.
3. Verwenden Sie nur Markenbatterien. Wechseln Sie neue Batterien immer gemeinsam. Ver-
wenden Sie Batterien der gleichen Marke und des gleichen Typs.
Anlegen der Manschette
1. Packen Sie die Oberarmmanschette aus, und führen Sie das Ende der Manschette durch den
D-Ring der Manschette.
2. Legen Sie Ihren linken Arm in die Manschettenschlaufe. Der Farbstreifen sollte zu Ihrem
Körper zeigen und der Schlauch in Richtung Ihres Armes (siehe Abbildung ). Drehen Sie
Ihre linke Handäche nach oben, und legen Sie den Rand der Oberarmmanschette etwa 1,5
bis 2,5 cm über der Innenseite des Ellbogengelenks an (siehe Abbildung ). Ziehen Sie die
Oberarmmanschette fest, indem Sie am Ende der Manschette ziehen.
3. Zentrieren Sie den Schlauch über der Mitte des Armes. Drücken Sie den Haken und das
Schlaufenmaterial fest zusammen. Zwischen Manschette und Arm müssen noch zwei Finger
Platz haben. Positionieren Sie die Arterienmarkierung über der Hauptarterie (an der Armin-
nenseite) (siehe Abbildung ). Hinweis: Suchen Sie die Hauptarterie, indem Sie mit zwei  ,
Fingern etwa zwei Zentimeter über dem Ellbogengelenk an der linken Arminnenseite drü-
cken. Suchen Sie die Stelle, wo der Puls am stärksten fühlbar ist. Dies ist Ihre Hauptarterie.
4. Schliessen Sie den Verbindungsschlauch der Manschette an dem Gerät an (siehe Abbildung
).
5. Legen Sie Ihren Arm auf einen Tisch mit der Handäche nach oben ab, so dass die Man-
schette sich in Herzhöhe bendet. Stellen Sie sicher, dass der Schlauch nicht abgeknickt ist
(Abbildung ).
6. Die Manschette ist für Sie geeignet, wenn der Pfeil, wie auf der rechten Abbildung rechts,
innerhalb der durchgehenden Farblinie liegt. Wenn der Pfeil ausserhalb der durchgehenden
Farblinie liegt, benötigen Sie eine Oberarmmanschette mit anderem Umfang. Wenden Sie
sich für Manschetten in anderen Grössen an Ihren lokalen Händler.
Messverfahren
Hier einige Hinweise für genauere Messungen:
Der Blutdruck ändert sich mit jedem Herzschlag und schwankt während des Tages laufend.
Die Blutdruckmessung kann durch die Körperhaltung des Benutzers, seinen physiologischen
Zustand und andere Faktoren beeinträchtigt werden. Um die grösstmögliche Verlässlichkeit
zu erzielen, warten Sie eine Stunde nach dem Sport, Baden, Essen, dem Genuss alkoholischer
oder koeinhaltiger Getränke, sowie dem Rauchen, bevor Sie mit der Messung beginnen.
Vor der Messung sollten Sie sich mindestens fünf Minuten ruhig hinsetzen, da Messungen in
entspanntem Zustand genauer sind. Sie sollten nicht körperlich ermüdet oder erschöpft sein,
wenn Sie eine Messung durchführen.
hren Sie keine Messungen durch, wenn sie angespannt sind oder unter Stress stehen.
Setzen Sie sich in einem Sessel aufrecht hin, und arbeiten Sie nf- bis sechsmal tief ein. Leh-
nen Sie sich nicht zurück, während die Messung vorgenommen wird.
Behalten Sie während der Messung im Sitzen ihre Füsse ach auf dem Boden und überschla-
gen Sie nicht Ihre Beine.
Sprechen und beanspruchen Sie die Arm- oder Handmuskeln während der Messung nicht.
Messen Sie Ihren Blutdruck bei normaler Körpertemperatur. Wenn Ihnen warm oder kalt ist,
warten sie noch etwas, bevor Sie die Messung durchführen.
Wenn das Blutdruckmessgerät bei sehr niedriger Temperatur, (nahe des Gefrierpunkts) gela-
gert wurde, bringen Sie es mindestens eine Stunde vor Verwendung an einen warmen Ort.
Warten Sie fünf Minuten, bevor Sie die nächste Messung durchführen.
1. Wählen Sie mit der Benutzerumschalttaste den Speicherbereich 1 bzw. Speicherbereich 2.
Drücken Sie nach Auswahl eines Speicherbereichs die Taste ON/OFF/START, um das Mess-
gerät zurückzusetzen, so dass Sie die Messung in dem gewählten Speicherbereich beginnen
können.
2. Drücken Sie die Taste ON/OFF/START. Zur Überprüfung der Anzeigefunktionen leuchten alle
Ziern auf. Das Messgerät wird innerhalb von 2 Sekunden überprüft.
3. Nachdem alle Symbole angezeigt wurden, blinkt auf dem Display eine „0“. Das Blutdruck-
messgerät ist einsatzbereit und pumpt automatisch langsam die Manschette auf, um die
Messung zu beginnen.
4. Wenn die Messung abgeschlossen ist, wird der Druck in der Manschette abgebaut. Der sys-
tolische Druck, der diastolische Druck und der Puls werden gleichzeitig auf dem LCD-Display
angezeigt. Die Messung wird dann automatisch in dem ausgewählten Speicherbereich ge-
sichert.
Dieses Blutdruckmessgerät wird automatisch auf einen höheren Druck aufgepumpt, wenn das
System feststellt, dass für eine Blutdruckmessung mehr Druck erforderlich ist.
Hinweis: 1. Dieses Messgerät schaltet eine Minute nach dem letzten Tastendruck automatisch
ab.
2. Um die Messung zu unterbrechen, drücken Sie einfach die Taste ON/OFF/START oder die
“Speicher”-Taste.; die Manschette wird automatisch druckentlastet.
Abrufen von Werten aus dem Speicher
1. Das Messgerät besitzt zwei Speicherbereiche (1 und 2). Jeder Bereich kann bis zu 60 Mes-
sungen speichern.
2. Wählen Sie zum Auslesen der Speicherwerte aus einem ausgewählten Speicherbereich mit
der Benutzerumschalttaste einen Speicherbereich (1 oder 2), aus dem Sie Werte abrufen
wollen. Drücken Sie die «Speicher»-Taste. Das erste angezeigte Resultat ist der Durchschnitt
von allen morgendlichen Messungen während der letzten 7 Tage.
3. Halten Sie die Speichertaste gedrückt um den Durchschnitt aller nächtlichen Messungen der
letzten 7 Tage anzuzeigen.
4. Drücken Sie die Speichertaste erneut, um den Durchschnittswert der letzten 3 Messungen zu
ermitteln. Jede Messung beinhaltet eine zugewiesene Speichersequenznummer.
Hinweis: Der Speicher kann bis zu 60 Messungen pro Speicherbereich enthalten. Wenn be-
reits 60 Messungen gespeichert sind, werden bei der nächsten Messung die alten Daten über-
schrieben.
Hinweis: AM ist als 4:00 AM deniert - 11:59
Hinweis: Uhr als 6:00 Uhr deniert - 2:00 AM
Löschen der Werte aus dem Speicher
1. Wählen Sie mit der Benutzerumschalttaste den Speicherbereich 1 bzw. Speicherbereich 2.
2. Halten Sie die «Speicher»-Taste etwa 5 Sekunden gedrückt: danach können die Daten im
ausgewählten Speicherbereich automatisch gelöscht werden.
Zeiteinstellung
1. Nach der Installation bzw. Beim Ersetzen der Batterien wird auf Das Display zeigt eine blin-
kende Zahl welche das Jahr kennzeichnet.
2. Ändern Sie das Jahr, indem sie die Speichertaste mehrmals drücken. Drücken Sie den ON/
OFF/START Knopf um die Auswahl zu bestätigen. Das Display wird nun eine weitere blinken-
de Zahl anzeigen, welche das Datum repräsentiert.
3. Ändern Sie das Datum, die Stunden und Minuten wie oben erklärt im 2. Schritt., benutzen Sie
dazu die Memory-Taste und danach die ON/OFF/START-Taste zur Bestätigung.
4. “0” erscheint im Display wenn das Blutdruckmessgerät bereit zur Messung ist.
Datentransfer zum PC (optional)
Rossmax bietet eine kostenlose integrierte und benutzerfreundliche Blutdruckmanagement-
software, die Sie herunterladen und auf Ihrem Computer installieren können. Um das Blut-
druckmessgerät von Rossmax mit Ihrem PC zu verbinden, können Sie ein spezielles USB-Kabel
erwerben. Informationen zum Herunterladen und zur Installation nden Sie auf der Website
http://www.rossmax.com.
Fehlerbehebung
Wenn während der Verwendung Störungen auftreten, prüfen Sie bitte die folgenden Punkte.
Symptome Prüfpunkte Berichtigung
Keine Anzeige bei
Betätigung der Taste
ON/OFF/START
Sind die Batterien leer? Ersetzen Sie die Batterien durch
vier neue Batterien.
Sind die Batterien mit falscher Polari-
tät eingesetzt? Setzen Sie die Batterien mit der
richtigen Polarität wieder ein.
Auf dem Display
erscheint das Symbol
EE oder es wird ein
besonders niedriger
(hoher) Blutdruckwert
angezeigt.
Wurde die Manschette korrekt
angelegt?
Legen Sie die Manschette richtig
an, so dass sie korrekt positio-
niert ist.
Haben Sie während der Messung
gesprochen oder sich bewegt? Führen Sie erneut eine Messung
durch.
Halten Sie während der Messung
ihr Handgelenk ruhig.
Haben Sie das Handgelegt mit ange-
legter Manschette geschüttelt?
Hinweis: Wenn das Gerät nicht funktioniert, bringen Sie es zu Ihrem Händler zurück. Das Mess-
gerät sollten Sie unter keinen Umständen zerlegen und selbst reparieren.
Sicherheitshinweise
1. Das Messgerät enthält hoch genaue Bauteile. Vermeiden Sie daher extreme Temperatu-
ren, extreme Luftfeuchtigkeit und direkte Sonneneinstrahlung. Lassen Sie das Gerät nicht
herunterfallen, und vermeiden Sie starke Stossbelastungen des Grundgeräts und schützen
Sie es vor Staub.
2. Reinigen Sie das Gehäuse des Blutdruckmessgeräts und die Manschette vorsichtig mit
einem feuchten, weichen Tuch. Üben Sie keinen Druck aus. Waschen Sie die Manschette
nicht und behandeln Sie sie nicht mit chemischen Reinigern. Verwenden Sie niemals Ver-
dünnungsmittel, Alkohol oder Benzin als Reinigungsmittel.
3. Ausgelaufene Batterien können das Gerät beschädigen. Nehmen Sie die Batterien heraus,
wenn Sie das Gerät längere Zeit nicht verwenden.
4. Um Gefahren zu vermeiden, sollte das Gerät nicht von Kindern bedient werden.
5. Wenn das Gerät bei einer Temperatur nahe des Gefrierpunkts gelagert wurde, warten Sie vor
Verwendung bis das Gerät sich an die Zimmertemperatur angepasst hat.
6. Dieses Gerät kann nicht vor Ort gewartet werden. Sie sollten das Gerät weder mit Werk-
zeugen önen, noch versuchen, etwas in dem Gerät selbst einzustellen. Wenn Probleme
auftreten, wenden Sie sich bitte an den Händler oder Arzt, von dem Sie dieses Gerät gekauft
haben, oder an Rossmax International Ltd.
7. Ein häuges Problem bei allen Blutdruckmessgeräten mit oszillometrischer Messung ist die
Bestimmung des korrekten Blutdrucks bei Benutzern, bei denen eine normale Arrhythmie
(atriale oder ventrikuläre vorzeitige Herzschläge oder Herzkammerimmern), Diabetes,
schlechter Blutkreislauf oder Nierenprobleme diagnostiziert wurden oder bei Benutzern, die
einen Schlaganfall hatten oder bewusstlos sind.
8. Sie können mit der Taste ON/OFF/START die Funktion jederzeit stoppen, der Druck in der
Manschette wird dann schnell abgelassen.
9. Sobald der Druck der Druckluft 300 mmHg erreicht, beginnt das Messgerät aus Sicherheits-
gründen mit einer schnellen Druckentlastung.
10. Bitte beachten Sie, dass dieses Blutdruckmessgerät nur für den Heimgebrauch vorgesehen
ist und kein Ersatz für die Beratung durch einen Arzt oder eine medizinische Fachkraft ist.
11. Verwenden Sie dieses Gerät nicht zur Diagnose oder Behandlung von Gesundheitsproble-
men und Erkrankungen. Die Messergebnisse dienen nur der Orientierung. Konsultieren Sie
bei der Interpretation von Blutdruckmessungen einen Gesundheitsexperten. Gehen Sie
zum Arzt, wenn Sie ein medizinisches Problem haben oder vermuten! Ändern Sie Ihre Me-
dikation nicht ohne Konsultation Ihres Arztes bzw. Mediziners.
12. Elektromagnetische Störungen: Das Gerät enthält empndliche elektronische Komponen-
ten. Vermeiden Sie starke elektrische oder elektromagnetische Felder in direkter Nähe des
Geräts (beispielsweise durch Mobiltelefone und Mikrowellengeräte). Diese können zur zeit-
weiligen Beeinträchtigung der Messgenauigkeit führen.
13. Entsorgen Sie das Gerät, die Batterien, Komponenten und Zubehörteile entsprechend den
lokalen Bestimmungen.
14. Die technischen Daten dieses Blutdruckmessgeräts sind nur gewährleistet, wenn es inner-
halb der in den technischen Daten angegebenen Grenzwerte für Temperatur und Luft-
feuchtigkeit gelagert bzw. verwendet wird.
15. Beachten Sie, dass es während des Aufpumpens zu einer Funktionsbeeinträchtigung des
betroenen Gliedmaßes kommen kann.
16. Die Blutzirkulation darf durch die Blutdruckmessung nicht unnötig lange unterbunden wer-
den. Bei einer Fehlfunktion des Gerätes nehmen Sie die Manschette vom Arm ab.
17. Vermeiden Sie das mechanische Einengen, Zusammendrucken oder Abknicken des Man-
schettenschlauches.
18. Verhindern Sie einen anhaltenden Druck in der Manschette sowie häuge Messungen. Eine
dadurch resultierende Beeinträchtigung des Blutusses kann zu Verletzungen führen.
19. Achten Sie darauf, dass die Manschette nicht an einem Arm angelegt wird, dessen Arterien
oder Venen in medizinischer Behandlung sind, z.B. intravaskulärer Zugang bzw. eine intra-
vaskuläre Therapie oder ein arteriovenöser (A-V-) Nebenschluss.
20. Legen Sie die Manschette nicht bei Personen an, die eine Brustamputation hatten.
21. Legen Sie die Manschette nicht über Wunden an, da dies zu weiteren Verletzungen führen
kann.
22. Verwenden Sie nur die mitgelieferte oder originale Ersatz-Manschetten. Ansonsten werden
falsche Messwerte ermittelt.
23. Batterien können bei Verschlucken lebensgefährlich sein. Bewahren Sie Batterien und
Produkte daher an einem für Kleinkinder unzugänglichen Ort auf. Wenn eine Batterie ver-
schluckt wurde, rufen Sie sofort einen Arzt an.
24. Benutzen Sie den Schlauch und/oder den Netzadapter nur für die dafür vorgesehene be-
schriebene Anwendung, ansonsten besteht die Gefahr von Strangulation.
25. Benutzen Sie die Service- und Wartungsvorrichtung und Manschette nicht während der
Anwendung.
Technische Daten
Messmethode Oszillometrisch
Messbereich Druck: 30 - 260 mmHg; Puls: 40~199 Schläge/ Minute
Drucksensor Halbleiter
Messgenauigkeit Druck: ± 3 mmHg; Puls: ± 5 % des Messwerts
Ination Durch Pumpe
Deation Automatisches Entlastungsventil
Speicherkapazität 60 Speicherplätze je Bereich x 2 Bereiche
Auto-Abschaltfunktion 1 Minute nach dem letzten Tastendruck
Zulässige Betriebstem-
peratur und luftfeuch-
tigkeit
10° C ~ 40° C (50° F ~ 104° F); 15% ~85% RH; 700~1060hPa
Zulässige Lagerung
Temperatur und luft-
feuchtigkeit
-10° C~60° C (14° F~140° F); 10 % ~90 % RH; 700~1060hPa
Gleichstromquelle Vier Batterien 6 V (AA)
Netzteil DC6 V, 600 mA (Steckergrösse: AussenØ (-) 4,0 mm; InnenØ (+) 1,7
mm
Abmessungen 160 (L) X 120 (B) X 81 (H) mm
Gewicht 400g (Bruttogewicht ohne Batterien)
Armumfang Erwachsene: 24~40 cm (9,4”~15,7”)
Benutzergruppe Erwachsene Anwender
Typ BF: Gerät und Manschette sollen einen besonderen konstruktiven
Schutz gegen elektrische Schläge gehrleisten.
IP Klassizierung IP21, Schutz gegen schädliches Eindringen von Wasser und Staub
* Bei technischen Daten sind Änderungen jederzeit vorbehalten.
Française
Introduction
Les mesures de pression artérielle réalisées avec l’MW701f sont équivalentes à celles obte-
nues par un observateur expérimenté utilisant un brassard/stéthoscope, dans les limites
prescrites par la norme nationale américaine sur les sphygmomanomètres électroniques
ou automatiques. Cet instrument est réservé à un usage domestique par des adultes. Le
patient est un orateur prévu. Ne l’utilisez pas pour relever la pression artérielle d’enfants
ou de bébés. L’MW701f est garanti contre les défauts de fabrication par un programme de
garantie internationale. Pour plus d’informations sur la garantie, contactez le fabricant: Ross-
max International Ltd.
Attention: Consultez les documents d’accompagnement. Veuillez lire ce manuel atten-
tivement avant l’emploi. Pour obtenir des informations spéciques sur la pression arté-
rielle, contactez votre médecin. Veillez à conserver ce manuel.
Technologie de mesure Real Fuzzy
Cet instrument utilise la méthode oscillométrique pour détecter la pression artérielle. Avant
le gonage du brassard, l’instrument établit une pression de base équivalente à la pression
de l’air. Il détermine le niveau de gonage approprié sur la base des oscillations de pression,
puis le dégonage du brassard.
Pendant le dégonage, l’instrument détecte l’amplitude et la pente des oscillations de pres-
sion. Ce faisant, iltermine les pressions artérielles systolique et diastolique, et le pouls.
Remarques préliminaires
Ce tensiomètre est conforme aux réglementations européennes et présente le marquage
CE «CE1639». La qualité de l’instrument a été contrôlée et est conforme aux dispositions de
la directive européenne 93/42/CEE (appareils médicaux), annexe 1, exigences fondamen-
tales et normes harmonisées appliquées:
EN 1060-1: 1995/A2: 2009 Sphygmomanomètres pour mesures non invasives - Partie 1 -
Exigences générales
EN 1060-3: 1997/A2: 2009 Sphygmomanomètres pour mesures non invasives - Partie 3 - Exi-
gences supplémentaires pour systèmes de mesure de pression artérielle électromécaniques
EN 1060-4: 2004 Sphygmomanomètres pour mesures non invasives - Partie 4: Procédures
d’essai pour déterminer la précision système globale de sphygmomanomètres automa-
tiques à mesure non invasive.
ISO 81060-2: 2013 Sphygmomanomètres non invasifs - Partie 2: Investigation clinique du
type de mesure automatisée.
Ce tensiomètre a été conçu pour une utilisation de longue durée. Pour maintenir la pré-
cision spéciée, prévoyez un réétalonnage de tous les tensiomètres numériques. Ce ten-
siomètre n’exige pas de réétalonnage avant 2 ans (dans un cas d’utilisation normale avec
env. 3 mesures par jour). Quand un réétalonnage est nécessaire, l’instrument ache . Un
réétalonnage est aussicessaire si l’instrument subit des dommages dus à un choc violent
(chute) ou à une exposition aux liquides ou à des variations d’humidité ou de température
basses ou élevées extrêmes. Quand s’ache, renvoyez l’instrument au revendeur local
en vue du réétalonnage.
Norme de pression artérielle
Reportez-vous aux dénitions de l’Organisation mondiale de la Santé, les plages de pres-
sion artérielle peuvent être classées en 6 catégories. (Réf. 1999, OMS-Directives de la Société
Internationale de l’Hypertension Lignes directrices pour la gestion de l’hypertension). Cette
classication de la pression artérielle se base sur des données historiques et ne peut être
appliquée telle quelle à un patient donné. Veuillez consulter votre médecin régulièrement.
Il vous indiquera votre plage de pression artérielle normale de même que les valeurs consi-
dérées comme un risque. Pour une surveillance et une documentation ables de la pression
artérielle, conservez des enregistrements à long terme. Veuillez télécharger votre carnet de
pression artérielle sur le site www.rossmax.com.
Description de l’écran
EE / Erreur de mesure: Assurez-vous que la che L est bien branchée sur la prise d’air et
refaites la mesure. Ajustez correctement le brassard et gardez votre bras immobile pendant
la mesure. Si l’erreur persiste, renvoyez l’instrument au distributeur ou centre SAV local.
E1 / Défaut du circuit d’air: Assurez-vous que la che L est bien branchée sur la prise d’air
sur le côté de l’instrument et refaites la mesure. Si l’erreur persiste, renvoyez l’instrument au
distributeur ou centre SAV local.
E2 / Pression dépassant 300 mmHg: Eteignez l’instrument et refaites une mesure. Si
l’erreur persiste, renvoyez l’instrument au distributeur ou centre SAV local.
E3 / Erreur de données: Enlevez les piles, attendez 60 secondes, puis reinserez-les. Si l’er-
reur persiste, renvoyez l’instrument au distributeur ou centre SAV local.
Er / Mesure hors plage: Refaites la mesure. Si l’erreur persiste, renvoyez l’instrument au
distributeur ou centre SAV local.
Détection de l’enroulement du brassard
Si le brassard a été enroulé de fon trop lâche, cela peut provoquer des résultats de mesure
non ables. La « tection de l’enroulement du brassard » peut vous aider à terminer si
le brassard est assez serré. L’icône indiquée apparaît lorsqu’un « brassard lâche » a été
détecté lors de la mesure. Sinon, l’icône indiquée apparaît si le brassard était enroulé
correctement pendant la mesure.
Détecteur de mouvement
Le “Détecteur de mouvementpermet de rappeler à l’utilisateur de rester immobile et in-
dique tout mouvement du corps pendant la mesure. L’icône spéciée s’ache une fois “le
mouvement du corps” a ététectée pendant et après chaque mesure.
Remarque: Il est fortement recommandé que vous mesure à nouveau si l’icône apparaît.
Mode Invite
Ce moniteur est dod’une fonction non-store seule mesure. Appuyez sur la touche de
commutation par l’utilisateur pour sélectionner la zone de mémoire de l’invi , et suivez
la procédure de mesure pour eectuer une mesure correcte. Lorsque la mesure est termi-
née, la valeur de mesure ne sera pas stockée dans la zone mémoire.
Indication des risques d’hypertension artérielle (HRI)
L’Organisation mondiale de la Santé classe les plages de pression sanguine en 6 niveaux.
Cet appareil est équipé d’un indicateur innovant de risque de pression artérielle, qui indique
visuellement le niveau supposé de risque (optimal / normal / normal élevé / hypertension
de niveau 1 / hypertension de niveau 2 / hypertension de niveau 3) du résultat après chaque
mesure.
Détecteur de trouble du rythme cardiaque (IHB)
Cet instrument est équipé d’un détecteur de trouble du rythme cardiaque (IHB) permettant
aux personnes qui sourent de battements deur irréguliers d’obtenir une indication pré-
cise sur une éventuelle arythmie cardiaque pendant la mesure.
Remarque: Nous vous recommandons vivement de consulter votre médecin si l’icône IHB
( ) apparaît souvent.
Utilisation du bloc secteur CA (en option)
1. Raccordez le bloc secteur CA à la prise jack CA sur le côté droit l’instrument.
2. Branchez le bloc secteur CA sur la prise. (Les blocs secteur CA nécessaires sont indiqués à
té de la prise jack CA.)
Attention:
1. Veuillez enlever les piles si vous opérez en mode CA pendant une longue période.
Un long séjour des piles dans le logement peut provoquer des fuites susceptibles
d’endommager l’instrument.
2. Pas de piles nécessaires en mode CA.
3. Les blocs secteur CA sont optionnels. Contactez le distributeur pour plus d’informations
sur les blocs secteur CA compatibles.
4. Utilisez seulement le bloc secteur CA autorisé avec ce tensiomètre. Pour plus d’informa-
tions sur le bloc secteur CA autorisé, référez-vous à l’ANNEXE 1.
Insertion des piles
1. Pressez et relevez le couvercle du logement des piles dans le sens de la èche pour ouvrir
le logement.
2. Insérez ou remplacez 4 piles «AA» dans le logement conformément aux indications si-
tuées à l’intérieur.
3. Reposez le couvercle du logement en engageant d’abord les crochets du bas, puis l’extré-
mité supérieure.
4. Remplacez les piles par paire. Enlevez les piles avant une longue période d’inutilisation
de l’instrument.
Vous devez remplacer les piles quand
1. l’icône «Faible état de charge» s’ache
2. vous pressez la Touche ON/OFF/DEMARRAGE et que l’écran reste noir.
Attention: 1. Les piles font partie des chets spéciaux. Ne les jetez pas avec les ordures
ménagères.
2. L’instrument ne contient pas de pièces réparables par l’utilisateur. Les piles ou dommages
résultant de piles usagées sont exclus de la garantie.
3. Utilisez exclusivement des piles de marque. Remplacez toujours les piles en bloc. Utilisez
des piles de même marque et de même type.
Mise en place du brassard
1. Déroulez le brassard en laissant l’extrémité du brassard passer à travers la bague D.
2. Passez votre bras gauche à travers le brassard. Orientez le repère de couleur vers vous,
le tuyau suivant la direction du bras (g. ). Votre paume gauche étant en haut, placez
le bord du brassard environ 1,5 à 2,5 cm au-dessus du creux du coude (g. ). Serrez le
brassard en tirant sur son extrémité.
3. Centrez le tuyau sur le bras. Appuyez sur le crochet et xez l’ensemble. Vous devez pouvoir
placer 2 doigts entre le brassard et votre bras. Placez le repère de l’artère (Ø) sur l’artère
principale (à l’inrieur du bras) (g. ). Remarque: Localisez l’artère principale en  .
appuyant avec 2 doigts environ 2 cm au-dessus du coude, à l’intérieur du bras gauche.
Repérez l’endroit où le pouls est le plus fort. C’est l’artère principale.
4. Branchez le tuyau de connexion du brassard sur le tensiomètre (g. ).
5. Posez le bras sur une table (paume en haut) de sorte que le brassard se trouve à hauteur
duur. Assurez-vous que le tuyau n’est pas plié (g. ).
6. Ce brassard convient à votre bras si la èche coïncide avec la ligne continue en couleur
illustrée à droite (g. ). Si la èche se trouve en dehors de cette ligne, vous avez besoin
d’un brassard d’un autre périmètre. Contactez le revendeur local pour obtenir des bras-
sards d’autres tailles.
Procédures de mesure
Voici quelques conseils utiles pour obtenir des mesures plus précises:
La pression artérielle change à chaque battement de cœur et varie constamment pendant
la journée.
La mesure de la pression artérielle peut être aectée par la position de l’utilisateur, son état
physiologique et d’autres facteurs. En vue d’une précision maximale, ne mesurez pas la
pression artérielle moins d’une heure après avoir fait du sport, pris un bain, mangé, bu des
boissons alcoolisées ou de la caféine, ou fumé.
Nous vous recommandons de vous asseoir au moins 5 minutes dans un lieu calme, étant
donné qu’un état détendu augmente la précision. Vous ne devriez pas être épuisé pendant
la prise d’une mesure.
Ne faites pas de mesures quand vous êtes stressé ou tendu.
Asseyez-vous droit sur une chaise. Respirez profondément 5-6 fois. Évitez de vous adosser
contre la chaise pendant la mesure.
Ne pas croiser les jambes en position assise et garder les pieds à plat sur le sol pendant la
mesure.
Evitez de parler et de bouger les muscles de votre main ou bras pendant la mesure.
Mesurez la pression artérielle à une température corporelle normale. Si vous avez froid ou
chaud, attendez un peu avant de faire une mesure.
Si le tensiomètre est stocké à très basse température (près de 0°), mettez-le dans un endroit
tempéré au moins une heure avant de l’utiliser.
Attendez 5 minutes avant de prendre la prochaine mesure.
1. Pressez la touche de sélection d’utilisateur pour choisir la zone de moire 1 ou 2. Après
la sélection d’une zone de mémoire, pressez la Touche ON/OFF/DEMARRAGE pour réini-
tialiser le tensiomètre et démarrer les mesures dans la zone choisie.
2. Pressez la Touche ON/OFF/DEMARRAGE. Tous les chires s’illuminent et l’achage est
contrôlé. La procédure de contrôle dure 2 secondes.
3. Après l’achage de tous les symboles, l’écran ache un “0” clignotant. Le tensiomètre
est prêt à mesurer et gone automatiquement le brassard pour démarrer une mesure.
4. A la n de la mesure, le brassard évacue la pression emmagasinée. Les pressions artérielles
systolique et diastolique ainsi que le pouls sont simultanément achés. La mesure est
alors automatiquement enregistrée dans la zone de mémoire prédénie.
Ce tensiomètre se regone automatiquement à un niveau plus élevé de pression. Si le sys-
me détecte qu‘il est nécessaire d‘avoir plus de pression pour prendre une mesure de la
pression artérielle.
Remarque: 1. Ce tensiomètre s’arrête automatiquement 1 minute après la dernière pression
de touche.
2. Pour interrompre la mesure, pressez la Touche ON/OFF/DEMARRAGE ou Mémoire. Le
brassard se dégone tout de suite.
Rappel de valeurs enregistrées
1. Le tensiomètre a deux zones de mémoire (1 et 2). Chaque zone peut enregistrer 60
mesures.
2. Pour visualiser les valeurs enregistrées dans une zone de mémoire choisie (1 ou 2), utilisez
la touche de sélection d’utilisateur. Pressez la touche Mémoire. La première valeur a-
chée est la moyenne de toutes les mesures du matin sur les 7 derniers jours.
3. Continuez à appuyer sur la touche Mémoire pour acher la moyenne de toutes les lec-
tures nocturnes sur les 7 derniers jours.
Espol
Introducción
Las mediciones de presión arterial determinadas con MW701f son equivalentes con aquellas
obtenidas por un observador entrenado usando el método de auscultacn con brazalete/
estetoscopio dentro de los límites especicados en la norma ANSI para esgmomanóme-
tros electrónicos o automatizados. Esta unidad se p2-ha concebido para ser usada por adultos
en un entorno doméstico. El paciente es el operador previsto. No use este aparato para
niños o recién nacidos. El MW701f está protegido contra defectos de fabricación mediante
un programa de garantía internacional. Para una información acerca de la garantía, usted
puede contactar al fabricante, Rossmax International Ltd.
Atención: Consulte los documentos anexos. Por favor, lea este manual cuidadosamente
antes del uso. Para una información especíca acerca de su propia presión arterial, con-
tacte a su médico. Por favor, fíjese en guardar este manual.
Tecnología de medición real fuzzy
Esta unidad usa el todo oscilométrico para detectar su presión arterial. Antes de que el
brazalete comience con el inado, el aparato establecerá una presión de referencia del bra-
zalete equivalente a la presión del aire. Esta unidad determinará el nivel de inado apropiado
basándose en oscilaciones de la presión seguida por el desinado del brazalete. Durante el
desinado, el aparato detectará la amplitud y la pendiente de las oscilaciones de presión y,
de este modo, determinará su presn arterial sistólica, la presión arterial diastólica y el pulso.
Notas preliminares
El monitor de presión arterial está conforme con las disposiciones europeas y lleva la mar-
ca CE “CE 1639”. La calidad del aparato p2-ha sido vericada y está conforme con la Directiva
93/42/CEE (Directiva de Productos Sanitarios) del Consejo de la CE, Anexo I requerimientos
esenciales y normas armonizadas aplicadas.
EN 1060-1: 1995/A2: 2009 Esgmomanómetros no invasivos - Parte 1 - Requisitos generales.
EN 1060-3: 1997/A2: 2009 Esgmomanómetros no invasivos - Parte 3 - Requisitos suple-
mentarios aplicables a los sistemas electromecánicos de medición de la presión sanguínea.
EN 1060-4: 2004 Esgmomanómetros no invasivos - Parte 4: Procedimientos de ensayo para
determinar la exactitud del sistema total de esgmomanómetros no invasivos automati-
zados.
ISO 81060-2: 2013 esgmomanómetros no invasivos - Parte 2: investigación clínica sobre
dispositivos de medición automatizada.
Este monitor de presión arterial p2-ha sido diseñado para una larga vida útil. Para garantizar una
exactitud permanente, se recomienda que todos los monitores digitales de presión arterial
requieran recalibraciones. Este monitor (con un uso normal de aprox. 3 mediciones al a) no
requerirá ninguna recalibración durante 2 años. En el momento en el que la unidad debería
ser recalibrada, el aparato visualizará . La unidad también debería ser recalibrada si el mo-
nitor es dañado por algún golpe (como una caída) o la exposición a líquidos y / o tempera-
turas extremadamente calientes o frías / cambios de humedad. Si aparece , simplemente
devuélvalo al distribuidor más cercano para el servicio de recalibración.
Presión sanguínea standard
Según la denición de la OMS, (WHO), los niveles de la presión sanguínea pueden estar clasi-
cados en 6 grados. (Ref. 1999 WHO, International Society of Hypertension Guidelines for the
management of Hypertension). Esta clasicación de la presión arterial está basada en datos
históricos, y es posible que no se pueda emplear directamente para cualquier paciente in-
dividual. Es importante que consulte a su médico periódicamente. Su dico le informará
acerca de su rango de presión arterial personal normal, así como acerca del límite a partir
del cual representará un riesgo para usted. Para un monitoreo y una referencia ables de la
presión arterial, recomendamos que mantenga registros a largo plazo. Por favor, descargue
el diario de presión arterial de nuestro Sitio Web www.rossmax.com.
Explicación de la pantalla
EE / Error de medición: Asegúrese de que el conector L esté conectado rmemente en
la toma de aire. Enrolle el brazalete correctamente y mantenga el brazo inmóvil durante
la medición. Si el error sigue ocurriendo, devuelva el aparato a su distribuidor o centro de
servicio posventa locales.
E1 / Anomalía del circuito de aire: Asegúrese de que el conector L esté conectado rme-
mente en la toma de aire en el lado de la unidad y vuelva a medir. Si el error sigue ocurrien-
do, devuelva el aparato a su distribuidor o centro de servicio posventa locales.
E2 / Presión sobrepasa 300 mmHg: Apague la unidad y vuelva a medir. Si el error sigue
ocurriendo, devuelva el aparato a su distribuidor o centro de servicio posventa locales.
E3 / Error de datos: Saque y vuelva a meter las pilas. Si el error sigue ocurriendo, devuelva
el aparato a su distribuidor o centro de servicio posventa locales.
Er / Exceso del rango de medición: Vuelva a medir. Si el error sigue ocurriendo, devuelva
el aparato a su distribuidor o centro de servicio posventa locales.
Detección colocación manguito
Si el manguito está colocado demasiado ojo, puede dar lugar a resultados poco ables en
la medición. La función de “Detección colocación del manguito” puede ayudar a determi-
nar si el manguito está sucientemente bien ajustado. El icono aparece una vez se p2-ha
detectado durante la medición que el manguito está colocado ojo. Si el manguito se p2-ha
colocado correctamente ajustado el icono aparece durante la medición.
Detector de movimiento
El “detector de movimiento” recuerda al usuario que debe permanecer quieto p2-ya que indi-
cará cualquier movimiento realizado durante la medición.
El ícono especicado aparece cuando se p2-ha detectado movimiento corporal durante y des-
pués de cada medición.
NOTA: Es muy recomendable que rse repita la medición si el icono aparece .
Modo invitado
Este monitor tiene una función para medida única sin almacenamiento de valores. Presione
el botón de selección de usuario para elegir la zona de memoria del invitado, y prosiga con
la medición como habitualmente. Cuando la medición se haya completado , el valor
medido no se almacenará en la memoria
Indicador de riesgo de hipertensión (HRI)
La OMS, clasica la presión sanguínea en 6 grados. Esta unidad está equipada con un in-
novador indicador de riesgo en la presión sanguínea, el cual indica de forma visual cual es
presunto nivel de riesgo (optimo/ normal/ normal-alta/ hipertensn grado 1/ hipertensn
grado 2/ hipertensión grado 3), resultado que podrá ver después de cada medición.
Detector de arritmia cardiaca
Esta unidad está equipada con un detector de arritmia cardiaca, el cual permite que las per-
sonas con una arritmia cardiaca obtengan mediciones exactas advirtiéndoles la presencia de
una arritmia cardiaca durante la medición.
Nota: Le recomendamos encarecidamente que consulte a su médico si el icono de arritmia
cardiaca ( ) aparece frecuentemente.
Uso del adaptador AC (opcional)
1. Conectar el adaptador AC en el jack para adaptador AC en el lado derecho de la unidad.
2. Enchufar el adaptador AC en la toma de corriente. (Los adaptadores AC requieren el voltaje
y la corriente indicados cerca del jack para adaptador AC.)
Precaución:
1. Por favor saque las pilas al operar en el modo AC por un período de tiempo prolonga-
do. Dejando las pilas en el compartimiento por un tiempo prolongado podrá causar
fugas, las cuales podrán dañar la unidad.
2. No se necesitan pilas al estar operando en el modo AC.
3. Los adaptadores AC son opcionales. Por favor, contacte al distribuidor con respecto a
adaptadores AC compatibles.
4. Use sólo el adaptador AC autorizado con este monitor de presión arterial. Para informarse
acerca del adaptador AC autorizado, por favor consulte ANEXO 1.
Instalación de las pilas
1. Presione la tapa de pilas hacia abajo y levántela en dirección de la echa para abrir el
compartimiento de pilas.
2. Meta o sustituya 4 pilas “AA” en el compartimiento de baterías conforme a las indicaciones
en el interior del compartimiento.
3. Vuelva a poner la tapa de pilas engatillando primero los ganchos inferiores y después
empujando el borde superior de la tapa de pilas.
4. Sustituya pares de pilas. Saque las pilas si la unidad va a estar fuera de uso por períodos
prolongados.
Deberá sustituir las pilas si:
1. Aparece el icono de pila baja en la pantalla.
2. Se aprieta el botón de ENCENDIDO/APAGADO/INICIO y no aparece nada en la pantalla.
Precaución
1. Las pilas son residuos peligrosos. No las tire junto con la basura doméstica.
2. En el interior no existe ninguna pieza que requiera mantenimiento. La garantía no cubre
las pilas o los daños causados por pilas viejas.
3. Use únicamente pilas de marca. Sustituya siempre todas las pilas juntas. Use pilas de la
misma marca y del mismo tipo.
Empleo de la muñequera
1. Desenrolle el brazalete, dejando el extremo del brazalete dentro del anillo en D del bra-
zalete.
2. Pase el brazo izquierdo a través del ojal del brazalete. El indicador de cinta de color deberá
estar posicionado más cerca de usted, con el tubo mostrando hacia el brazo (Fig. ). Gire
su brazo izquierdo hacia arriba y posicione el borde del brazalete a aprox. 1,5 a 2,5 cm
encima del lado interior de la articulación del codo (Fig. ). Apriete el brazalete tirando
del extremo del brazalete.
3. Centre el tubo sobre el centro del brazo. Presione el material del gancho rmemente
contra el del ojal. Provea suciente espacio para 2 dedos entre el brazalete y su brazo.
Posicione la marca de arteria (Ø) sobre la arteria principal (en el interior de su brazo) Fig.
 , ). Nota: Localice la arteria principal presionando con 2 dedos en el interior del brazo
izquierdo a aprox. 2 cm encima del codo doblado. Identique el lugar en el que el pulso
se puede percibir más intensamente. Ésta es su arteria principal.
4. Conecte el tubo de conexión de brazalete en la unidad (Fig. ).
5. Ponga su brazo sobre una mesa (con la palma de la mano hacia arriba) de tal modo que
el brazalete esté a la misma altura que su corazón. Fíjese en que el tubo no esté retorcido
(Fig. ).
6. Este brazalete será apropiado para usted si la echa se encuentra dentro de la línea sólida
de color del modo mostrado a la derecha (Fig. ). Si la echa se queda afuera de la línea
sólida de color, necesitará un brazalete de otra circunferencia. Contacte a su distribuidor
local para brazaletes de tamaños adicionales.
Procedimientos de medición
Algunas sugerencias útiles para ayudarle a obtener lecturas más exactas:
La presión arterial cambia con cada latido y está sometida a una constante uctuación
durante el día.
El registro de la presión arterial puede ser afectado por la posición del usuario, su condi-
ción siológica y otros factores. Para máxima exactitud, espere una hora desps de hacer
ejercicio, bañarse, comer, tomar bebidas con alcohol o cafeína, o fumar, antes de medir la
presión arterial.
Antes de la medición, se recomienda que esté sentado tranquilamente por un mínimo de 5
minutos, p2-ya que una medición realizada en un estado relajado será más exacta. No debería
estar físicamente cansado o exhausto al realizar una medición.
No realice mediciones si está estresado o bajo tensión.
Sientese de modo erguido en una silla y respire hondo 5-6 veces. Evite recargarse mientras
que se este realizando la medicion.
Durante la medición, no cruce las piernas y mantenga los pies planos sobre el suelo.
Durante la medición, no hable ni mueva los músculos del brazo o la mano.
Mida su presión arterial a una temperatura corporal normal. Si tiene frío o calor, espere
antes de realizar una medición.
Si el monitor es guardado a temperaturas muy bajas (cerca de congelación), colóquelo en
un lugar caliente por lo menos una hora antes de usarlo.
Espere 5 minutos antes de realizar la siguiente medición.
1. Pulse el botón de cambio de usuario para seleccionar la zona de memoria 1 ó 2. Después
de haber seleccionado una zona de memoria, pulse el botón de ENCENDIDO/APAGADO/
INICIO para restablecer el monitor de modo que pueda comenzar la medición en la zona
de memoria elegida.
2. Pulse el botón de ENCENDIDO/APAGADO/INICIO. Todos los gitos se encenderán veri-
cando las funciones de la pantalla. El proceso de vericación habrá nalizado después
de 2 segundos.
3. Después de haber aparecido todos los iconos, la pantalla mostrará un “0” parpadeante.
El monitor estará listo para medir y automáticamente inará el brazalete para iniciar la
medición.
4. Cuando la medición p2-ha terminado, el brazalete evacuará la presión del interior. La presión
sistólica, la presión diastólica y el pulso se visualizarán simultáneamente en la pantalla LCD.
La medicn será guardada automáticamente en la zona de memoria preseleccionada.
Este monitor de presión arterial volvea hinchar hasta una presión superior si el sistema
detecta que se necesita una mayor presión para realizar la medición de la presión arterial.
Nota: 1. Este monitor se apagará automáticamente después de 1 minuto después de la últi-
ma operacn de algún botón.
2. Para interrumpir la medición, simplemente pulse el botón de ENCENDIDO/APAGADO/
INICIO o el de memoria. El brazalete se desinará inmediatamente.
Revisión de los valores en la memoria
1. El monitor dispone de dos zonas de memoria (1 y 2). Cada zona puede almacenar hasta
60 mediciones.
2. Para leer los valores guardados en una zona de memoria seleccionada, use el botón de
cambio de usuario para elegir la zona de memoria (1 ó 2) de la que desea revisar los
valores. Pulse el botón de memoria. La primera lectura mostrada es la media de todas las
mediciones matutinas de los últimos 7 dias.
3. Continúe presionando la tecla de memoria para ver la media de todas las mediciones
realizadas vespertinas durante los últimos 7 días
4. Presione la tecla de memoria otra vez para ver el promedio de las tres últimas mediciones
almacenadas en la memoria, y la última de las mediciones guardadas. Siga pulsando el
botón de memoria para ver la medición guardada más recientemente.
Nota: En la memoria se pueden guardar hasta 60 lecturas por zona de memoria. Cuando
la cantidad de lecturas sobrepasa 60, el nuevo registro sustituirá los datos más antiguos.
Nota: AM se dene como 4 AM-11:59 AM
Nota: PM se dene las 6:00 - 2:00
Eliminación de los valores en la memoria
1. Pulse el botón de cambio de usuario para seleccionar la zona de memoria 1 ó 2.
2. Mantenga el botón de memoria pulsado por aprox. 5 segundos. A continuación, los datos
en la zona de memoria preseleccionada podrán ser borrados automáticamente.
Ajuste de la hora
1. Para ajustar el día y la hora en el monitor después de instalar o reemplazar las baterías. La
pantalla mostrará un número parpadeante indicando el año.
2. Cambie el año presionando el botón de memoria. Cada pulsación incrementará el nú-
mero. Presione el botón ON/ OFF/ Start para conrmar el valor y la pantalla mostrará un
número intermitente indicando la fecha.
3. Cambie la fecha, la hora y los minutos tal y como se p2-ha descrito en el paso 2 anterior,
usando la tecla de memoria para cambiar y la tecla ENCENDIDO/APAGADO/INICIO para
conrmar las entradas
4. “0” aparecerá en la pantalla cuando el monitor de presión este preparado para realizar
mediciones
Transferencia de datos al PC
Rossmax ofrece un software de administración de presión arterial gratuito, integrado y
amigable para el usuario, que se puede descargar e instalar en su computadora. Usted po-
drá comprar un cable USB de diseño especial para conectar el monitor de presn arterial
Rossmax en su PC. Por favor, visite el Sitio Web http://www.rossmax.com para el proceso de
descarga e instalación.
Localización de fallas
Si se presenta cualquier anomalía durante el uso, por favor compruebe los siguientes pun-
tos.
ntomas CorrecciónPuntos de verificación
Ninguna visualización
al pulsar el bon de
ENCENDIDO/APAGA-
DO/INICIO
¿Están vacías las pilas? Sustitúyalas con cuatro pilas
nuevas.
¿Están lo polos de las pilas en
la posición correcta? Vuelva a meter las pilas en las
posiciones correctas.
Se muestra la marca EE
en la pantalla o el valor
de presión arterial es
visualizado extremada-
mente bajo (alto)
¿Está correctamente el brazale-
te la muñequera?
Enrolle la muñequera adecua-
damente, de modo que esté
posicionada correctamente.
¿Habló durante la medición? Vuelva a medir.
Permanezca quieto durante la
medición.
¿movió el brazo teniendo
puesto el brazalete?
Nota: Si la unidad todavía no funciona, devuélvala a su distribuidor. De ninguna manera
deberá desensamblar o reparar la unidad usted mismo.
Notas de precaución
1. La unidad contiene ensambles de alta precisión. Por lo tanto, evite temperaturas y hu-
medad extremas, y la exposición directa al sol. Evite caídas y golpes intensos de la unidad
principal, y protéjala de polvo.
2. Limpie el cuerpo del monitor de presión arterial y el brazalete cuidadosamente con un
trapo suave ligeramente húmedo. No ejerza presión. No lave el brazalete ni use productos
de limpieza químicos. Nunca use diluyentes, alcohol o petróleo (gasolina) para limpiar.
3. Pilas con fugas pueden dañar la unidad. Saque las pilas si la unidad va a estar fuera de uso
durante un tiempo prolongado.
4. La unidad no deberá ser operada por niños para evitar situaciones peligrosas.
5. Si la unidad estará guardada a temperaturas muy bajas, deberá poder aclimatizarse antes
del uso.
6. Esta unidad no es reparable in situ. No deberá usar ninguna herramienta para abrir el apa-
rato ni debetratar de ajustar alguna cosa en el interior del aparato. Si tiene problemas,
por favor contacte a la tienda o al doctor del que p2-ha adquirido esta unidad, o por favor
contacte a Rossmax International Ltd.
7. Un asunto común de todos los monitores de presión arterial que usan la función de
medición oscilométrica es que el aparato podrá tener dicultades determinando la pre-
sión arterial correcta de usuarios con un diagnóstico de arritmia (latidos auriculares o
ventriculares prematuros o brilación auricular), diabetes, escasa circulación sanguínea,
problemas renales, o usuarios apopléjicos o inconscientes.
8. Para parar el funcionamiento en cualquier momento, pulse el botón de ENCENDIDO/
APAGADO/INICIO, y el aire dentro del brazalete será purgado rápidamente.
9. Una vez que el inado alcance 300 mmHg, la unidad comenzará a desinarse rápidamen-
te por razones de seguridad.
10. Por favor observe que éste es un producto sanitario doméstico, y no se p2-ha concebido
para sustituir el consejo de un médico o servicio médico profesional.
11. No use este aparato para el diagnóstico o el tratamiento de algún problema de salud o
alguna enfermedad. Los resultados de medicn sólo sirven de referencia. Consulte a un
profesional de atención a la salud para la interpretación de las mediciones de presión.
Contacte a su médico si tiene o sospecha algún problema médico. No cambie su medi-
cacn sin consultar a su médico o profesional de atención a la salud.
12. Interferencia electromagnética: El aparato contiene componentes electrónicos sensibles.
Evite campos eléctricos o electromagnéticos intensos en las inmediaciones del aparato
(p. ej. teléfonos celulares, hornos microondas). Podrían afectar temporalmente la exac-
titud de la medición.
13. Deseche el aparato, las pilas, los componentes y accesorios conforme a las disposiciones
locales.
14. Es posible que este monitor no cumpla con las especicaciones de funcionamiento si
es guardado o usado fuera de los rangos de temperatura o humedad especicados en
Especicaciones.
15. Tenga en cuenta que durante el inado puede sufrir cierta limitacion funcional en la
extremidad en cuestion.
16. La medicion de la presion sanguinea no debe interrumpir la circulacion sanguinea mas
tiempo del necesario. En caso de que el aparato no funcione correctamente, retire el
brazalete del brazo.
17. Evite apretar, estrangular o doblar el tubo exible del brazalete mediante medios me-
canicos.
18. Evite exponerse a la presion continuada del brazalete y no realice mediciones frecuentes.
La disminucion del ujo sanguineo que se produce puede causar lesiones.
19. Cerciorese de que no p2-ha colocado el brazalete en un brazo cuyas arterias o venas estan
sometidas a algun tipo de tratamiento medico, p. ej. acceso por via endovascular, admi-
nistracion de tratamiento por via endovascular o un shunt arteriovenoso (A-V-).
20. No coloque el brazalete a personas a las que se les haya practicado una mastectomia.
21. No coloque el brazalete sobre heridas, p2-ya que pueden producirse mas lesiones.
22. Utilice exclusivamente los brazaletes de repuesto originales adjuntos. De lo contrario los
valores medidos serán erróneos.
23. Las pilas pueden signicar peligro mortal, si se tragan. Por esta razon, guarde las pilas y
productos en lugares inaccesibles para los ninos. Si se p2-ha tragado una pila, sera necesario
consultar inmediatamente a un medico.
24. No usar el tubo del manguito y el adaptador de CA para ningún otro propósito que no
sean los especicados, p2-ya que pueden causar riesgo de estrangulamiento.
25. No intente hacer ninguna tarea de mantenimiento del dispositivo ni del manguito mien-
tras esté en uso.
Especicaciones
Método de medición Oscilométrico
Rango de medición - 0 mmHg; pulso: 40 - 199 latidos/Presn: 30 26
minuto
Sensor de presión Semiconductor
Exactitud Presión: ± 3mmHg; pulso: ± 5% de la lectura
Inflado Accionado por bomba
Desinflado Válvula de purga de aire automática
Capacidad de memoria 60 memorias para cada zona x 2 zonas
Apagado automático 1 minuto desps de última operación de
botón
Temperatura y humedad relativa de
funcionamiento admisibles
10°C - 4C (50°F - 104°F); 15% - 85% HR;
700~1060 hPa
Temperatura de transporte y almacena-
miento admisible. Humedad relativa de
almacenamiento y transporte admisible.
-10°C - 60°C (14°F - 14F); 10% - 90% HR;
700~1060 hPa
Fuente de alimentación DC DC 6V, cuatro pilas AA
Fuente de alimentación AC DC6V, exterior(-) >600mA(tamaño de conector:
es Ø , interior(+) es Ø1.4.0 7)
Dimensiones 160 120 81 (L) X (A) X (H) mm
Peso 400g (P.B.) (sin pilas)
Circunferencia del brazo Adulto: 24 - 40 cm (9.4” - 15.7”)
Usuarios limitados Usuarios adultos
Tipo BF: el diseño del aparato y del brazalete
proporcionan protección especial contra cho-
ques eléctricos.
Clasificación IP Proteccn contra proyecciones de agua IP21:
y partículas
* Las especificaciones están sujetas a cambios sin notificación.
4. Appuyez de nouveau sur la touche Mémoire pour acher la moyenne des 3 dernières
mesures mémorisées, et la dernière mesure mémorisée auparavant. Chaque mesure est
identiée par un numéro d’enregistrement.
Remarque: La base peut enregistrer 60 mesures par zone de mémoire. S’il y a plus de 60
mesures, les plus vieilles données seront remplaes par les nouvelles données enregis-
trées.
Remarque: AM correspond à la plage horaire 4:00 – 11:59
Remarque: PM correspond à la plage horaire 18:00 – 02:00
Suppression de valeurs enregistrées
Pressez la touche de sélection d’utilisateur pour choisir la zone de mémoire 1 ou 2. Mainte-
nez la touchemoire enfoncée pendant environ 5 secondes. Les données de l’utilisateur
sélectionné seront eacées automatiquement.
Réglage de l’heure
1. Pour régler la date / heure sur l’écran après l’installation ou rem place les batteries. L’écran
ache un nombre clignotant indiquant l’année.
2. Modiez l’année en appuyant sur la touche Mémoire, chaque pression augmentant le
nombre. Appuyez sur la touche ON/OFF/START pour conrmer l’entrée et l’écran ache
un nombre clignotant représentant la date.
3. Modiez la date, les heures et les minutes, comme décrit à l’étape 2 ci-dessus, en utilisant
la touche mémoire à changer et le bouton ON/OFF/START pour conrmer les entrées..
4. “0” réapparaît comme le tensiomètre est prêt pour la mesure.
Transfert de données au PC
Rossmax procure un logiciel de gestion de pression artérielle gratuit, intégré et convi-
vial, que vous pouvez télécharger et installer sur votre ordinateur. Vous avez la possibi-
lité d'acheter un câble USB spécial pour raccorder le tensiomètre Rossmax au PC. Veuillez
consulter le site http://www.rossmax.com pour le téléchargement et l'installation.
Dépannage
En cas d’anomalie pendant l’utilisation, veuillez contrôler les points suivants.
Symptôme Points à contrôler Correction
Pas d'affichage à la
pression de la touche
ON/OFF/DEMARRAGE
Les piles sont-elles déchargées? Remplacez-les par des piles
neuves.
Les polarités de pile ont-elles
été inversées? insérez les piles correcte-
ment.
Le texte EE est affiché
ou la valeur de pres-
sion artérielle affichée
est excessivement
basse levée)
Le brassard a-t-il été mis correc-
tement? Ajustez le brassard correcte-
ment.
Avez-vous parlé ou bougé pen-
dant la mesure? Refaites la mesure.
Gardez le poignet immobile
pendant la mesure.
Avez-vous agité le poignet
pourvu du brassard?
Remarque: Si l’instrument ne fonctionne toujours pas, renvoyez-le au revendeur. Ne dé-
montez et ne réparez en aucun cas vous-même l’instrument.
Précautions
1. L'instrument contient des éléments de haute précision. Evitez par conséquent des tem-
ratures extrêmes, l'humidité et un rayonnement solaire direct. Evitez de faire tomber
l'instrument ou de l'exposer à des chocs violents et protégez-le de la poussière.
2. Nettoyez le boîtier du tensiomètre et le brassard avec précaution avec un chion doux
légèrement humide. N'appuyez pas. Ne lavez pas le brassard et ne le nettoyez pas avec
un détergent chimique. N'utilisez jamais de diluant, d'alcool ou d'essence comme net-
toyant.
3. Les coulures de piles peuvent endommager l'instrument. Enlevez les piles avant une
longue période d'inutilisation de l'instrument.
4. Conservez l'instrument hors de portée des enfants pour éviter des situations dange-
reuses.
5. Si l'instrument est stocké dans un endroit proche de 0°, prévoyez une période d'acclima-
tation à la température ambiante avant l'emploi.
6. Cet instrument n'est pas réparable par l'utilisateur. N'ouvrez pas l'instrument avec un ou-
til et n'essayez pas de leparer. Si vous rencontrez des problèmes, contactez le magasin
ou le médecin chez qui vous avez acheté cet instrument ou Rossmax International Ltd.
7. Comme tous les tensiomètres utilisant la fonction de mesure oscillométrique, l'instru-
ment peut avoir des dicultés à mesurer correctement la pression artérielle d'utilisa-
teurs sourant d'une arythmie cardiaque courante (battements atriaux ou ventriculaires
prématurés ou brillation atriale), de diabète, d'une faible circulation sanguine, de pro-
blèmes rénaux ou ayant eu une attaque ou étant inconscients.
8. Vous pouvez arrêter la mesure à tout moment avec la Touche ON/OFF/DEMARRAGE.
L'air du brassard sera rapidement évac.
9. Une fois que le gonage a atteint 300 mmHg, le brassard se gone rapidement par
mesure de sécurité.
10. Veuillez noter qu'il s'agit d'un produit de surveillance médicale à usage domestique qui
ne se substitue pas à l'avis d'un médecin ou d'un professionnel de la san.
11. N'utilisez pas cet instrument pour le diagnostic ou le traitement d'un problème de santé
ou d'une maladie. Les résultats de mesure sont une simple référence. Consultez un pro-
fessionnel de la santé pour l'interprétation des mesures de pression. Contactez votre
médecin si vous avez ou supposez avoir un problème de santé. Ne modiez pas vos
médicaments sans recueillir l'avis de votre médecin ou d'un professionnel de la santé.
12. Interférences électromagnétiques: L'appareil contient des éléments électroniques sen-
sibles. Evitez des champs électriques ou électromagnétiques intenses près de l'instru-
ment (téléphones mobiles, fours micro-ondes, etc.). Ces interférences peuvent altérer
temporairement la précision des mesures.
13. Eliminez l'instrument, les piles, les composants et les accessoires selon la réglementa-
tion locale.
14. Ce tensiomètre ne fournit pas la performance spéciée s'il est stocou utilisé en de-
hors des plages de température et d'humidité spéciées.
15. Veuillez noter que la fonction du membre concerné peut être entravée lors du gonage.
16. Il ne faut pas bloquer la circulation sanguine plus longtemps que nécessaire au cours
de la prise de tension. Si l’appareil ne fonctionne pas bien, retirez le brassard du bras.
17. Évitez de presser, d’aplatir ou de plier le tuyau du brassard en le manipulant.
18. Évitez des mesures trop fréquentes ou une pression continue du brassard. Elles en-
traînent une réduction de la circulation sanguine et constituent un risque de blessure.
19. Veillez à ne pas placer le brassard sur un bras, dont les artères ou les veines sont sou-
mises à un traitement dical, par exemple en présence d’un dispositif d’accès intra-
vasculaire destiné à un traitement intravasculaire ou en cas de shunt artérioveineux.
20. N’utilisez pas le brassard sur des personnes qui ont subi une mastectomie.
21. Ne placez pas le brassard sur des plaies, son utilisation peut les aggraver.
22. Utilisez uniquement les brassards de rechange fournis ou d’origine. Dans le cas contraire,
vous obtiendrez des valeurs mesurées erronées.
23. L’ingestion de piles peut se révéler mortelle. Laissez par conséquent les piles et les pro-
duits hors de portée des jeunes enfants. Au cas une pile a été avalée, faites immédia-
tement appel à un médecin.
24. N’utilisez pas la tubulure et / ou l’adaptateur secteur à d’autres objectifs que celles spé-
ciées, car ils peuvent entraîner un risque de strangulation.
25. Ne pas entretenir ni entretenir l’appareil et le brassard pendant son utilisation.
Caractéristiques
Méthode de mesure Oscillométrique
Plage de mesure 30-260 mmHg; pouls: 40~199 batt./minutePression:
Capteur de pression Semi-conducteur
Précision Pression: ± 3 mmHg; pouls: ± 5 % de la lecture
Gonflage A pompe
gonflage Valve de libération d air automatique
Capacité de stockage 0 mémoires pour chacune des 2 zones6
Arrêt automatique 1 minute après la dernière pression de touche
Temperature et taux d’humidite
d’utilisation admissible.
10°C~40°C (50°F~104°F); 15%~85% ~1060 hPaHR; 700
Temperature de transport et de stoc-
kage admissible. Humidite de trans-
port et de stockage admissible.
-10°C~60°C(1F~140°F); 10%~90% ~1060 hPa HR; 700
Alimentation CC Quatre piles CC (AA) de 6 V
Alimentation CA 600 mA (taille de fiche: (-) Ø CC V, 6 4,0 ext., (+) Ø
1,7 int.)
Dimensions 160 120 81 (L) X (W) X (H) mm
Poids 400g (P.B.) (sans piles)
Périmètre du bras Adulte: 24~40 cm (9.4”~15.7“)
Utilisateurs autorisés Adultes
Type BF: instrument et brassard procurant une protec-
tion spéciale contre l’électrocution.
Classification IP IP21: Protection contre la pénétration nuisible de l’eau
et les matières particulaires
* Caractéristiques modifiables sans préavis.
English
Introduction
Blood pressure measurements determined with MW701f are equivalent to those obtained
by a trained observer using cu/stethoscope auscultation method, within the limits pre-
scribed by the American National Standard, Electronic or Automated Sphygmomanom-
eters. This unit is to be used by adult consumers in a home environment. The patient is
an intended operator. Do not use this device on infants or neonates. MW701f is protected
against manufacturing defects by an established International Warranty Program. For war-
ranty information, you can contact the manufacturer, Rossmax International Ltd.
Attention: Consult the accompanying documents. Please read this manual carefully
before use. For specic information on your own blood pressure, contact your physi-
cian. Please be sure to keep this manual.
Real Fuzzy Measuring Technology
This unit uses the oscillometric method to detect your blood pressure. Before the cu starts
inating, the device will establish a baseline cu pressure equivalent to the air pressure. This
unit will determine the appropriate ination level based on pressure oscillations, followed
by cu deation.
During the deation, the device will detect the amplitude and slope of the pressure oscil-
lations and thereby determine for you the systolic blood pressure, diastolic blood pressure,
and pulse.
Preliminary Remarks
This Blood Pressure Monitor complies with the European regulations and bears the CE mark
“CE 1639”. The quality of the device has been veried and conforms to the provisions of the
EC council directive 93/42/EEC (Medical Device Directive), Annex I essential requirements
and applied harmonized standards.
EN 1060-1: 1995/A2: 2009 Non-invasive sphygmomanometers - Part 1 - General require-
ments
EN 1060-3: 1997/A2: 2009 Non -invasive sphygmomanometers - Part 3 - Supplementary
requirements for electro-mechanical blood pressure measuring systems
EN 1060-4: 2004 Non-invasive sphygmomanometers - Part 4: Test Procedures to determine
the overall system accuracy of automated non-invasive sphygmomanometers.
ISO 81060-2:2013 Non-invasive sphygmomanometers - Part 2: Clinical investigation of au-
tomated measurement type.
This blood pressure monitor was designed for long service time. Ensure continued accu-
racy, it’s recommended that all digital blood pressure monitors require re-calibration. This
monitor (under normal usage with approx. 3 measurements a day) does not require re-
calibration for 2 years. Once the unit should be re-calibrated the device will display . The
unit should also be re-calibrated if the monitor sustains damage due to blunt force (such
as dropping) or exposure to uids and / or extreme hot or cold temperature / humidity
changes. When appears, simply return to your nearest dealer for re-calibration service.
Blood Pressure Standard
Refer to the denitions of the World Health Organization, the blood pressure ranges can be
classied into 6 grades. (Ref. 1999 WHO-International Society of Hypertension Guidelines
for the management of Hypertension). This blood pressure classication are based on his-
torical data, and may not be directly applicable to any particular patient. It is important that
you consult with your physician regularly. Your physician will tell you your normal blood
pressure range as well as the point at which you will be considered at risk. For reliable
monitoring and reference of blood pressure, keeping long- term records is recommended.
Please download the blood pressure log at our website www.rossmax.com.
Display Explanations
EE / Measurement Error: Make sure the L-plug is securely connected to the air socket and
measure again quietly. Wrap the cu correctly and keep arm steady during measurement.
If the error keeps occurring, return the device to your local distributor or service center.
E1 / Air Circuit Abnormality: Make sure the L-Plug is securely connected to the air socket
on the side of the unit and measure again quietly. If the errors still occur, return the device
to your local distributor or service center for help.
E2 / Pressure Exceeding 300 mmHg: Switch the unit oand measure again quietly. If
the error keeps occurring, return the device to your local distributor or service center.
E3 / Data Error: Remove the batteries, wait for 60 seconds, and reload. If the error keeps
occurring, return the device to your local distributor or service center.
Er / Exceeding Measurement Range: Measure again quietly. If the error keeps occurring,
return the device to your local distributor or service center.
Cu Wrap Detection
If the cu was wrapped too loosely, it may cause unreliable measurement results. The “Cu
Wrap Detection” can help to determine if the cu is wrapped snugly enough. The specied
icon appears once a “loosen cu” has been detected during measurement. Otherwise
the specied icon appears if the cu is wrapped correctly during measurement.
Movement Detection
The “Movement Detection” helps reminding the user to remain still and is indicating any
body movement during measurement. The specied icon appears once a “body move-
ment” has been detected during and after each measurement.
Note: It’s highly recommended that you measure again if the icon appears.
Guest Mode
This monitor has a non-stored single measurement function. Press the User-Switching key
to select the memory zone of guest , and follow the Measurement Procedure to take a
measurement correctly. When the measurement is completed, the measurement value will
not be stored in memory zone.
Hypertension Risk Indication (HRI)
The World Health Organization, classifying blood pressure ranges into 6 grades. This unit
is equipped with innovative blood pressure risk indication, which visually indicates the as-
sumed risk level (optimal / normal / high-normal/ grade1 hypertension / grade 2 hyperten-
sion / grade 3 hypertension) of the result after each measurement.
Irregular Heartbeat (IHB) Detection
This unit is equipped with an Irregular Heartbeat (IHB) Detection which allows those who
have an irregular heartbeat to obtain accurate measurements alerting the user of the pres-
ence of an irregular heart beat during the measurement.
Note: It is strongly recommended that you consult your physician if the IHB icon
( ) appears often.
Using the AC Adaptor (Optional)
1. Connect the AC adaptor with the AC adaptor jack on the right side of the unit.
2. Plug the AC adaptor into the socket. (AC adaptors with required voltage and current indi-
cated near the AC adaptor jack.)
Caution:
1. Please unload the batteries when operating with the AC mode for a longer period of
time . Leaving the batteries in the compartment for a long time may cause leakage,
which may lead to damage of the unit.
2. No batteries are needed when operating with the AC mode.
3. AC adaptors are optional. Please contact the distributor for the compatible AC adaptors.
4. Use only the authorized AC Adaptor with this blood pressure monitor. Information for the
authorized AC adaptor, please refer to APPENDIX 1.
Installing Batteries
1. Press down and lift the battery cover in the direction of the arrow to open the battery
compartment.
2. Install or replace 4 “AA” sized batteries in the battery compartment according to the
indications inside the compartment.
3. Replace the battery cover by clicking in the bottom hooks rst, then push in the top end
of the battery cover.
4. Replace the batteries in pairs. Remove batteries when unit is not in use for extended
periods of time.
You need to replace the batteries when
1. low battery icon appears on display.
2. the ON/OFF/START key is pressed and nothing appears on display.
Caution:
1. Batteries are hazardous waste. Do not dispose them together with the household gar-
bage.
2. There are no user serviceable parts inside. Batteries or damage from old batteries are not
covered by warranty.
3. Use exclusively brand batteries. Always replace with new batteries together. Use batteries
of the same brand and same type.
Applying the Cu
1. Unwrap the arm cu, leaving the end of the cu through the D-ring of the cu.
2. Put your left arm through the cu loop. The color strip indication should be positioned
closer to you with the tube pointing in the direction of your arm (Fig. ). Turn your left
palm upward and place the edge of the arm cuat approximately 1.5 to 2.5 cm above
the inner side of the elbow joint (Fig. ). Tighten the cu by pulling the end of the cu.
3. Center the tube over the middle of the arm. Press the hook and loop material to-
gether securely. Allow room for 2 ngers to t between the cuand your arm. Posi-
tion the artery mark (Ø) over the main artery (on the inside of your arm) (Fig.  , ).
Note: Locate the main artery by pressing with 2 ngers approximately 2 cm above the
bend of your elbow on the inside of your left arm. Identify where the pulse can be felt the
strongest. This is your main artery.
4. Plug in the cu connecting tube into the unit (Fig. ).
5. Lay your arm on a table (palm upward) so the cuis at the same height as your heart.
Make sure the tube is not kinked (Fig. ).
6. This cu is suitable for your use if the arrow falls within the solid color line as shown on the
right (Fig. ). If the arrow falls outside the solid color line, you will need a cu with other
circumferences. Contact your local dealer for additional size cus.
Measurement Procedures
Here are a few helpful tips to help you obtain more accurate readings:
Blood pressure changes with every heartbeat and is in constant uctuation throughout
the day.
Blood pressure recording can be aected by the position of the user, his or her physi-
ological condition and other factors. For greatest accuracy, wait one hour after exercising,
bathing, eating, drinking beverages with alcohol or caeine, or smoking to measure blood
pressure.
Before measurement, it’s suggested that you sit quietly for at least 5 minutes as measure-
ment taken during a relaxed state will have greater accuracy. You should not be physically
tired or exhausted while taking a measurement.
Do not take measurements if you are under stress or tension.
Sit upright in a chair, and take 5-6 deep breaths. Avoid leaning back while the measure-
ment is being taken.
Do not cross the legs while sitting and keep the feet at on the oor during measurement.
During measurement, do not talk or move your arm or hand muscles.
Take your blood pressure at normal body temperature. If you are feeling cold or hot, wait
a while before taking a measurement.
If the monitor is stored at very low temperature (near freezing), have it placed at a warm
location for at least one hour before using it.
Wait 5 minutes before taking the next measurement.
1. Press the User-Switching key to select memory zone 1, memory zone 2 or guest mode.
After a memory zone is selected, press the ON/OFF/START key to reset the monitor so it
can start measurement in the chosen memory zone.
2. Press the ON/OFF/START key. All digits will light up, checking the display functions. The
checking procedure will be completed in 2 seconds.
3. After all symbols appear, the display will show a blinking “0”. The monitor is ready to meas-
ure and will automatically inate the cu slowly to start measurement.
4. When the measurement is completed, the cu will exhaust the pressure inside. Systolic
pressure, diastolic pressure and pulse will be shown simultaneously on the LCD screen.
The measurement is then automatically stored into the pre-designated memory zone.
This blood pressure monitor will re-inate automatically to higher pressure if the system
detects that more pressure is needed to take a blood pressure measurement.
Note: 1. This monitor automatically switches o approximately 1 minute after last key opera-
tion.
2. To interrupt the measurement, simply press the Memory or ON/OFF/START key; the cu
will deate immediately.
Recalling Values from Memory
1. The monitor has two memory zones (1 and 2). Each zone can store up to 60 measure-
ments.
2. To read memory values from a selected memory zone, use the User-Switching key to
select a memory zone (1 or 2) from which you want to recall values. Press the Memory
key. The rst reading displayed is the average of all morning readings from the last 7 days.
3. Continue to press the Memory key to view the average of all nighttime readings from
the last 7 days.
4. Press the Memory key again to view the average of the last 3 measurements stored in
memory, and the last previously stored measurement. Every measurement comes with an
assigned memory sequence number.
Note: The memory bank can store up to 60 readings per memory zone. When the number of
readings exceeds 60, the oldest data will be replaced with the new record.
Note: AM is dened as 4:00 AM – 11:59 AM
Note: PM is dened as 6:00 PM – 2:00 AM
Clearing Values from Memory
1. Press the User-Switching key to select memory zone 1 or memory zone 2.
2. Press and hold the Memory key for approximately 5 seconds, then the data in the memory
zone can be erased automatically.
Time Adjustment
1. To adjust the date/time in the monitor after installing or replaces batteries. The display will
show a blinking number showing the year.
2. Change the year by pressing the Memory key, each press will increase the number. Press
the ON/OFF/START key to conrm the entry and the screen will show a blinking number
representing the date.
3. Change the date, the hour and the minute as described in Step 2 above, using the Mem-
ory key to change and the ON/OFF/START key to conrm the entries.
4. “0” will reappear as the Blood Pressure Monitor is ready for measurement again.
Data Transfer to PC
Rossmax provides a free, integrated and user-friendly blood pressure management software
which can be downloaded and installed on your computer. You may purchase a special
designed USB cable in order to connect Rossmax’s blood pressure monitor and your PC.
Please visit the website at http://www.rossmax.com for proceeding the downloading and
installation process.
Troubleshooting
If any abnormality will arise during use, please check the following points.
Symptoms CorrectionCheck Points
No display when
the ON/OFF/START
key is pressed
Have the batteries run
down?
Replace them with four new bat-
teries.
Have the batteries' polarities
been positioned incorrectly?
Re-insert the batteries in the correct
positions.
EE mark shown
on display or the
blood pressure
value is displayed
excessively low
(high)
Is the cuff placed correctly? Wrap the cuff properly so that it is
positioned correctly.
Did you talk or move during
measurement? Measure again. Keep wrist steady
during measurement.
Did you vigorously shake the
cuff during measurement?
Note: If the unit still does not work, return it to your dealer. Under no circumstance should
you disassemble and repair the unit by yourself.
Cautionary Notes
1. The unit contains high-precision assemblies. Therefore, avoid extreme temperatures,
humidity, and direct sunlight. Avoid dropping or strongly shocking the main unit, and
protect it from dust.
2. Clean the blood pressure monitor body and the cu carefully with a slightly damp, soft
cloth. Do not press. Do not wash the cu or use chemical cleaner on it. Never use thinner,
alcohol or petrol (gasoline) as cleaner.
3. Leaky batteries can damage the unit. Remove the batteries when the unit is not used for
a long time.
4. The unit should not be operated by children so to avoid hazardous situations.
5. If the unit is stored near freezing, allow it to acclimate at room temperature before use.
6. This unit is not eld serviceable. You should not use any tool to open the device nor
should you attempt to adjust anything inside the device. If you have any problems, please
contact the store or the doctor from whom you purchased this unit or please contact
Rossmax International Ltd.
7. As a common issue for all blood pressure monitors using the oscillometric measurement
function, the device may have diculty in determining the proper blood pressure for us-
ers diagnosed with common arrhythmia (atrial or ventricular premature beats or atrial -
brillation), diabetes, poor circulation of blood, kidney problems, or for users suered from
stroke, or for unconscious users.
8. To stop operation at any time, press the ON/OFF/START key, and the air in the cuwill
be rapidly exhausted.
9. Once the ination reaches 300 mmHg, the unit will start deating rapidly for safety rea-
sons.
10. Please note that this is a home healthcare product only and it is not intended to serve as
a substitute for the advice of a physician or medical professional.
11. Do not use this device for diagnosis or treatment of any health problem or disease.
Measurement results are for reference only. Consult a healthcare professional for inter-
pretation of pressure measurements. Contact your physician if you have or suspect any
medical problem. Do not change your medications without the advice of your physician
or healthcare professional.
12. Electromagnetic interference: The device contains sensitive electronic components.
Avoid strong electrical or electromagnetic elds in the direct vicinity of the device (e.g.
mobile telephones, microwave ovens). These may lead to temporary impairment of
measurement accuracy.
13. Dispose of device, batteries, components and accessories according to local regulations.
14. This monitor may not meet its performance specication if stored or used outside tem-
perature and humidity ranges specied in Specications.
15. Please note that when inating, the functions of the limb in question may be impaired.
16. During the blood pressure measurement, blood circulation must not be stopped for an
unnecessarily long time. If the device malfunctions, remove the cu from the arm.
17. Avoid any mechanical restriction, compression or bending of the cu line.
18. Do not allow sustained pressure in the cuor frequent measurements. The resulting
restriction of the blood ow may cause injury.
19. Ensure that the cu is not placed on an arm in which the arteries or veins are undergoing
medical treatment, e.g. intravascular access or therapy, or an arteriovenous (AV) shunt.
20. Do not apply the cu on the side, where a mastectomy has been performed in your
patient history.
21. Do not place the cu over wounds as this may cause further injury.
22. Only ever use the cus provided with the monitor or original replacement cus. Other-
wise erroneous results will be recorded.
23. Batteries can be fatal if swallowed. You should therefore store the batteries and products
where they are inaccessible to small children. If a battery has been swallowed, call a doc-
tor immediately.
24. Do not use the tubing and/or AC adaptor for any other purpose than those specied, as
they can cause risk of strangulation.
25. Do not service or maintain device and cu while in use.
Specications
Measurement Method Oscillometric
Measurement Range Pressure: 30~260 mmHg; Pulse: 40~199 beats/ minute
Pressure Sensor Semi conductor
Accuracy Pressure: ± 3 mmHg; Pulse: ± 5% of reading
Inflation Pump Driven
Deflation Automatic Air Release Valve
Memory capacity 60 memories for each zone x 2 zones
Auto-shut-off 1 minute after last key operation
Permissible Operating
Temperature and Humidity 10°C~40°C (50°F~104°F); 15%~85% RH; 700~1060 hPa
Permissible Transport and
Storage Temperature and
Humidity
-10°C~60°C (14°F~140°F); 10%~90% RH; 700~1060 hPa
DC Power Source DC 6V four AA Batteries
AC Power Source DC 6V, (Plug size: outer(-) is Ø4.0, inner(+) is Ø1.7)≥600mA
Dimensions 160 120 81 (L) X (W) X (H) mm
Weight 400g (G.W.) (w/o Batteries)
Arm circumference Adult: 24~40 cm (9.4”~15.7”)
Limited Users Adult users
Type BF: Device and cuff are designed to provide special
protection against electrical shocks.
IP Classification IP21: Protection against harmful ingress of water and par-
ticulate matter
* Specifications are subject to change without notice.
Electromagnetic Compatibility Information
1. This device needs to be installed and put into service in accordance with the information provided in
the user manual.
2. WARNING: Portable RF communications equipment (including peripherals such as antenna cables and
external antennas) should be used no closer than 30 cm (12 inches) to any part of the MW701f, includ-
ing cables specied by the manufacturer. Otherwise, degradation of the performance of this device
could result.
If higher IMMUNITY TEST LEVELS than those specied in Table 9 are used, the minimum separation dis-
tance may be lowered. Lower minimum separation distances shall be calculated using the equation speci-
ed in 8.10.
Manufacturer’s declaration-electromagnetic immunity
The MW701f is intended for use in the electromagnetic environment specied below. The customer or
the user of the MW701f should assure that is used in such and environment.
Immunity
test IEC 60601 test level Compliance level Electromagnetic environment-
guidance
Conducted
RF IEC
61000-4-6
3 Vrms:
0,15 MHz – 80 MHz
6 Vrms: in ISM and
amateur radio bands
between
0,15 MHz and 80 MHz
80 % AM at 1 kHz
3 Vrms:
0,15 MHz – 80 MHz
6 Vrms: in ISM and
amateur radio bands
between
0,15 MHz and 80 MHz
80 % AM at 1 kHz
Portable and mobile RF communica-
tions equipment should be used no
closer to any part of the MW701f in-
cluding cables, than the recommended
separation distance calculated from the
equation applicable to the frequency of
the transmitter. Recommended separa-
tion distance:
d = 1,2 √P, d = 1,2 √P 80MHz to 800 MHz,
d = 2,3 √P 800MHz to 2,7 GHz
Where P is the maximum output power
rating of the transmitter in watts (W)
according to the transmitter manu-
facturer and d is the recommended
separation distance in metres (m). Field
strengths from xed RF transmitters, as
determined by an electromagnetic site
survey, a should be less than the com-
pliance level in each frequency range. b
Interference may occur in the vicinity of
equipment marked with the following
symbol:
Radiated RF
IEC 61000-
4-3
10 V/m
80 MHz – 2,7 GHz
80 % AM at 1 kHz
10 V/m
80 MHz – 2,7 GHz
80 % AM at 1 kHz
NOTE1: At 80 MHz and 800 MHz, the higher frequency range applies.
NOTE2: These guidelines may not apply in all situations. Electromagnetic propagation is aected by ab-
sorption and reection from structures, objects and people.
More information on EMC compliance of the device can be obtained from Rossmax website: www.ross-
max.com.
1. Indicador de fecha/hora
2. Marca de movimiento
3. Detección colocación
manguito
4. Marca de pila baja
5. Zonas de memoria
cardiaca
6. Marca mañana tarde
7. Memoria Promedio
8. Indicador de riesgo de
hipertensión
9. Número consecutivo de
memoria
10. Presn sistólica
11. Presn diaslica
12. Frecuencia del pulso
13. Marca del pulso
14. Detector de arritmia
1. Datums-/Uhrzeit-Anzeige
2. Bewegungs-Markierung
3. Erkennung der Manschette
4. Symbol für erschöpfte
Batterie
5. Speicherzonen
6. Morgen- und Nachtzeit
Symbol
7. Mittelwert des Speichers
8. Hypertonie-Risikoanzeige
9. Speicher / Datum Mark
10. Systolischer Druck
11. Diastolischer Druck
12. Pulsfrequenz
13. Pulsmarkierung
14. Indikator für unregelmässi-
gen Herzschlag (IHB)
1. Date/Time Indication
2. Movement Mark
3. Cuff Wrap Detection
4. Weak Battery Mark
5. Memory Zone
6. Morning and Nighttime
Mark
7. Memory Average Mark
8. Hypertension Risk
Indication
9. Memory/Date Mark
10. Systolic Pressure
11. Diastolic Pressure
12. Pulse Rate
13. Pulse Mark
14. Irregular Heartbeat
Detection (IHB)
1. Arm Cu
2. LCD Display
3. Air Tube and
Connector
4. Memory Key
5. ON/OFF/START key
6. User-Switching key
7. Battery Cover
8. Data Link Socket
9. AC Adaptor Jack
1. Oberarmmanschette
2. LCD-Anzeige
3. Luftschlauch und An-
schluss
4. Speicher-Taste
5. Taste ON/OFF/START
6. Benutzerumschalttaste
7. Batteriefachdeckel
8. Datenübertragungs-
buchse
9. Netzteilbuchse
1. Brazalete
2. Pantalla LCD
3. Tubo de aire y conector
4. Bon de memoria
5. Bon de ENCENDIDO/
APAGADO/INICIO
6. Bon de cambio de
usuario
7. Tapa de pilas
8. Jack para enlace de datos
9. Jack para adaptador AC
1. Indication de date/d’heure
2. Mouvement marque
3. tection de l’enroulement
du brassard
4. Icône faible état de charge
5. Zones demoire
6. Matin et nuit Note
7.moire mark moyenne
8. Indicateur de risque
d’hypertension
9.moire / date d marquez
10. Pression systolique
11. Pression diastolique
12. Pouls
13. Icône du pouls
14. tecteur de trouble du
rythme cardiaque (IHB)
1. Brassard pour bras
2. Ecran LCD
3. Tuyau d’air et connecteur
4. Touche Mémoire
5. Touche ON/OFF/DEMARRAGE
6. Touche de lection
d’utilisateur
7. Couvercle du logement des
piles
8. Prise pour connexion données
9. Prise jack pour bloc secteur CA
Blood Pressure Standard
World Health Organization (WHO) : 1999
Systolic Pressure
(mmHg) Diastolic Pressure
(mmHg)
Optimal
<120 <80and
Normal
120~129 80~84or
High-normal
130~139 85~89or
Grade 1
hypertension
(mild)
140~159 90~99or
Grade 2
hypertension
(moderate)
160~179 100~109or
Grade 3
hypertension
≥180 ≥110or
210
11
12
1
6
7
5
4
3
8
913
14
1
5
4
2
3
7
6
8
9
Center tube over
middle of arm


Product specificaties

Merk: Rossmax
Categorie: Bloeddrukmeter
Model: MW701F

Heb je hulp nodig?

Als je hulp nodig hebt met Rossmax MW701F stel dan hieronder een vraag en andere gebruikers zullen je antwoorden


Handleiding Bloeddrukmeter Rossmax

Handleiding Bloeddrukmeter

Nieuwste handleidingen voor Bloeddrukmeter