Roland DH-10 Handleiding
Roland Niet gecategoriseerd DH-10
Bekijk gratis de handleiding van Roland DH-10 (1 pagina’s), behorend tot de categorie Niet gecategoriseerd. Deze gids werd als nuttig beoordeeld door 62 mensen en kreeg gemiddeld 5.0 sterren uit 3 reviews. Heb je een vraag over Roland DH-10 of wil je andere gebruikers van dit product iets vragen? Stel een vraag
Pagina 1/1
*5100092208-01*
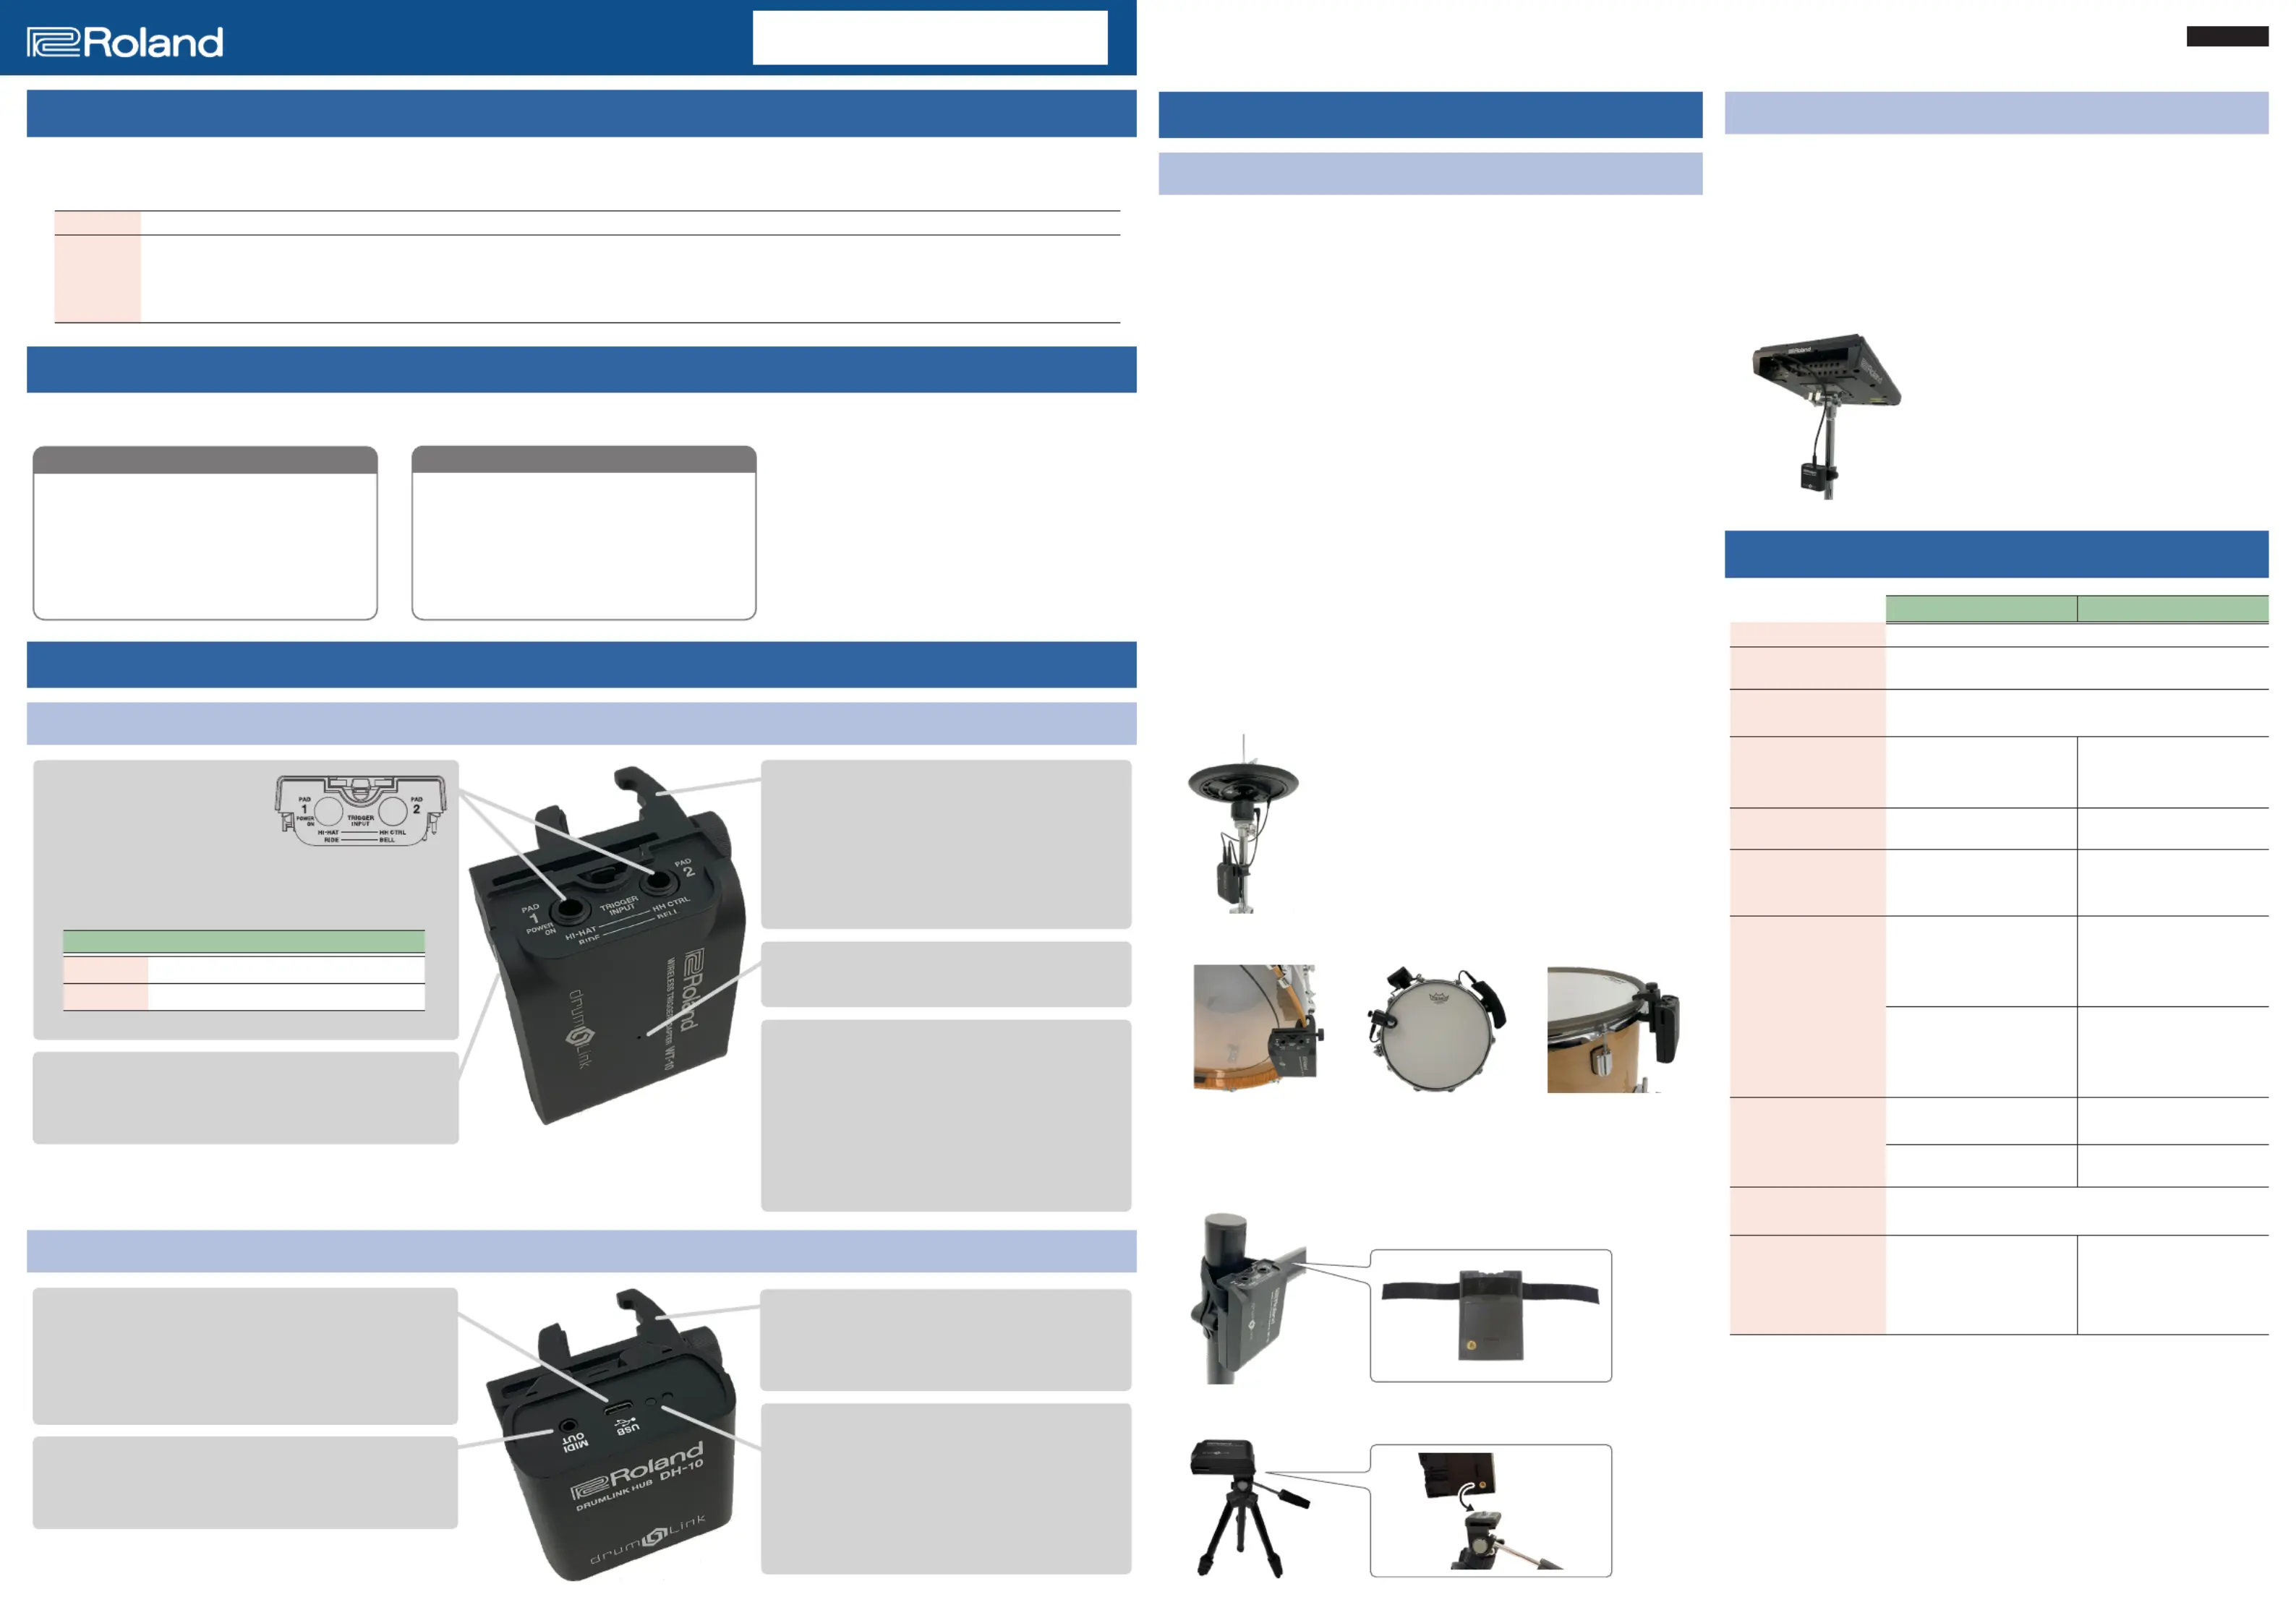
Setup
WT-10
1. Insert two alkaline batteries (AA, LR6) into the WT-10.
2. Attach the clamp to the WT-10 as necessary.
3. Connect the cables to the PAD1/PAD2 jacks.
The power turns on when you insert a plug into the PAD1 jack (the indicator
briey lights up blue).
* When connecting only one pad, use the PAD1 jack.
* When connecting the Roland VH-10 hi-hat (sold separately) or CY-16R-T
cymbal (sold separately), use both jacks.
4. Congure the drum pad/cymbal triggers.
Congure the triggers on the computer or electronic musical instrument to
which the DH-10 is connected via USB. See the “DWe Control Setting Guide”
(Roland website) for details on how to congure the triggers.
https://www.roland.com/manuals/
5. Attach the WT-10 onto the stand or pad.
Attach this unit to a stand or pad using clamps, commercially available
hook-and-loop fastener belts, or 1/4 inch nuts.
To attach this unit to a stand or pad with the clamp, use these steps:
(1) loosen the clamp screw (2) fasten the clamp onto the stand or drum
hoop (3) tighten the screw to lock the clamp in place.
Example 1: Use the clamp to attach the unit to a hi-hat stand
Example 2: Use the clamp to use this unit with a drum or drum trigger
Mounted onto a bass
drum hoop
Attached to a snare hoop
(RT-30, WT-10, BT-1)
Mounted onto a hoop
with rubber rim
Example 3: Mount the unit onto a drum stand with a commercially available
hook-and-loop fastener belt
Example 4: Use a 1/4-inch nut to mount the unit onto a camera tripod
DH-10
1. Attach the clamp to the DH-10 as necessary.
2. Attach the DH-10 to your electronic musical instrument or
stand near the computer.
Use the included USB Type-C® cable and USB Type-C® to A adaptor, or a
commercially available TRS-MIDI cable, according to the shape of the jack or
connector you’re connecting to.
Example: Attaching to an SPD-SX PRO
Main specications
WT-10DH-10
Wireless FormatProprietary Protocol
Wireless Carrier
Frequency
2.4–2.485 GHz ISM Band
Transmission Range
10 m (32 feet) line-of-sight
* May vary due to local conditions
Connectors
Trigger input jacks
(PAD1, PAD2)
USB Port: USB
Type-C®
MIDI OUT connector: TRS
mini type
Power Supply
Alkaline battery (AA, LR6)
x 2
Supplied from via USB
Battery Life
Approx. 6 months
* This can vary depending
on the conditions of use.
–
Dimensions
Body:
70 (W) x 31 (D) x 98 (H) mm
2-13/16 (W) x 1-1/4 (D) x
3-7/8 (H) inches
Body:
70 (W) x 45 (D) x 58 (H) mm
2-13/16 (W) x 1-13/16 (D) x
2-5/16 (H) inches
Includes horizontal clamp:
84 (W) x 73 (D) x 98 (H) mm
3-5/16 (W) x 2-7/8 (D) x
3-7/8 (H) inches
Includes horizontal clamp:
84 (W) 88 (D) x 58 (H) mm
3-5/16 (W) x 3-1/2 (D) x
2-5/16 (H) inches
Weight
170 g / 6 oz (including
batteries)
65 g / 3 oz
225 g / 8 oz (including
batteries and clamp)
120 g / 5 oz
(including clamp)
Clamp Mountable
Diameter Size
Φ4.5–Φ32 mm
Φ3/16–1-5/16 inches
Accessories
Clamp, Connection cables
(0.4 m / 15 inches) x 2,
Owner’s Manual, Leaet
“USING THE UNIT SAFELY”
Clamp, USB
Type-C® cable
(0.5 m / 19 inches), Type-C®
to A adaptor, Owner’s
Manual, Leaet “USING THE
UNIT SAFELY”
* This document explains the specications of the product at the time that the
document was issued. For the latest information, refer to the Roland website.
Overview
¹The WT-10 and DH-10 are ultra low-latency wireless systems that operate on Roland’s proprietary transmission/reception algorithms.
¹With the WT-10 or DH-10, you can wirelessly connect your drum pads/cymbals to your drum sound module or computer, without the trouble of messing
around with cables.
WT-10Receives signals from the drum pads/cymbals and transmits them wirelessly as performance data. You can connect up to two pads to the WT-10.
DH-10
Receives wireless performance data and converts this into MIDI signals, which are transmitted to your electronic musical instrument or computer.
¹This transmits the setting data (trigger and MIDI settings) from your electronic musical instrument or computer to the WT-10.
¹You can use a USB cable to connect the unit to your computer or to an electronic musical instrument, or transmit MIDI signals to your instrument via
the MIDI OUT connector.
Checking what’s included
Once you’ve opened the package, make sure that nothing is missing. If any of the included items are missing, consult with the dealer from which you purchased
this product.
WT-10
¹WT-10
¹Clamp
¹Two connection cables (0.4 m
/ 15 inches)
¹Owner’s Manual (this document)
* Batteries are not included.
DH-10
¹DH-10
¹Clamp
¹USB Type-C® cable (0.5 m
/ 19 inches)
¹USB Type-C® to A adaptor
¹Owner’s Manual (this document)
Panel descriptions
WT-10
Slit for belt
Pass a hook-and-loop fastener belt (commercially available) on either
end through the slits to ax the WT-10 to your stand or similar gear.
PAD1/PAD2 jacks
Use the included connection cables to
connect these jacks to your drum pads,
cymbals and so on.
* The power turns on when you insert a plug into the PAD1 jack.
* When connecting only one pad, use the PAD1 jack.
* When connecting the Roland VH-10 hi-hat (sold separately) or CY-
16R-T cymbal (sold separately), use both jacks.
PAD1PAD2
VH-10HI-HAT plugHH CONTROL plug
CY-16R-TRIDE plugBELL plug
Battery housing (back of unit)
Insert two alkaline batteries (AA, LR6).
* Batteries are not included with this unit.
* Rechargeable batteries cannot be used.
* If you handle batteries improperly, you risk explosion
and uid leakage. Make sure that you carefully observe
all of the items related to batteries that are listed in
the leaet “USING THE UNIT SAFELY” and “IMPORTANT
NOTES”.
Indicator (blue)
Lights up when the power is on and when a pad is struck.
Clamp
This can be used to attach the unit to a stand or similar gear.
Insert the clamp into the groove on the back of the WT-10.
You can attach the unit in any of four directions.
* When you operate the clamp, please be careful not to get
your ngers pinched between the movable part and the
panel. In places where small children are present, make
sure that an adult provides supervision and guidance.
DH-10
USB port
Use the included USB Type-C® cable to connect this unit to your
computer or to an electronic musical instrument that has a USB Digital
Trigger INPUT port.
* Do not use a USB cable that is designed only for charging a device.
Charge-only cables cannot transmit data.
Clamp
This can be used to attach the unit to a stand or similar gear.
Insert the clamp into the groove on the back of the DH-10.
You can attach the unit in any of four directions.
Indicator (red)
This lights up red when the power is on.
The indicator blinks when a signal is received from a pad (WT-10).
Indicator (blue)
When the unit is connected to an electronic musical
instrument or computer via USB, this blinks until the
connected device is recognized, and stays lit afterwards.
MIDI OUT connector
Use a commercially available TRS-MIDI cable to transmit MIDI signals to
an electronic musical instrument that has a MIDI IN connector.
©2025 Roland Corporation
Before using this unit, carefully read the leaet “USING THE UNIT SAFELY” and “IMPORTANT NOTES”.
After reading, keep the document(s) where it will be available for immediate reference.
Owner’s Manual
WT-10 / DH-10
English
Product specificaties
| Merk: | Roland |
| Categorie: | Niet gecategoriseerd |
| Model: | DH-10 |
Heb je hulp nodig?
Als je hulp nodig hebt met Roland DH-10 stel dan hieronder een vraag en andere gebruikers zullen je antwoorden
Handleiding Niet gecategoriseerd Roland

21 Juni 2026
15 Mei 2026
14 Mei 2026
13 Mei 2026
13 Mei 2026
12 Mei 2026
12 Mei 2026
12 Mei 2026
12 Mei 2026
12 Mei 2026
Handleiding Niet gecategoriseerd
Nieuwste handleidingen voor Niet gecategoriseerd
25 Juni 2026
25 Juni 2026
25 Juni 2026
25 Juni 2026
25 Juni 2026
25 Juni 2026
25 Juni 2026
25 Juni 2026
25 Juni 2026
24 Juni 2026