Roberts Revival Petite 2 Handleiding
Bekijk gratis de handleiding van Roberts Revival Petite 2 (2 pagina’s), behorend tot de categorie Radio. Deze gids werd als nuttig beoordeeld door 104 mensen en kreeg gemiddeld 4.1 sterren uit 4 reviews. Heb je een vraag over Roberts Revival Petite 2 of wil je andere gebruikers van dit product iets vragen? Stel een vraag
Pagina 1/2
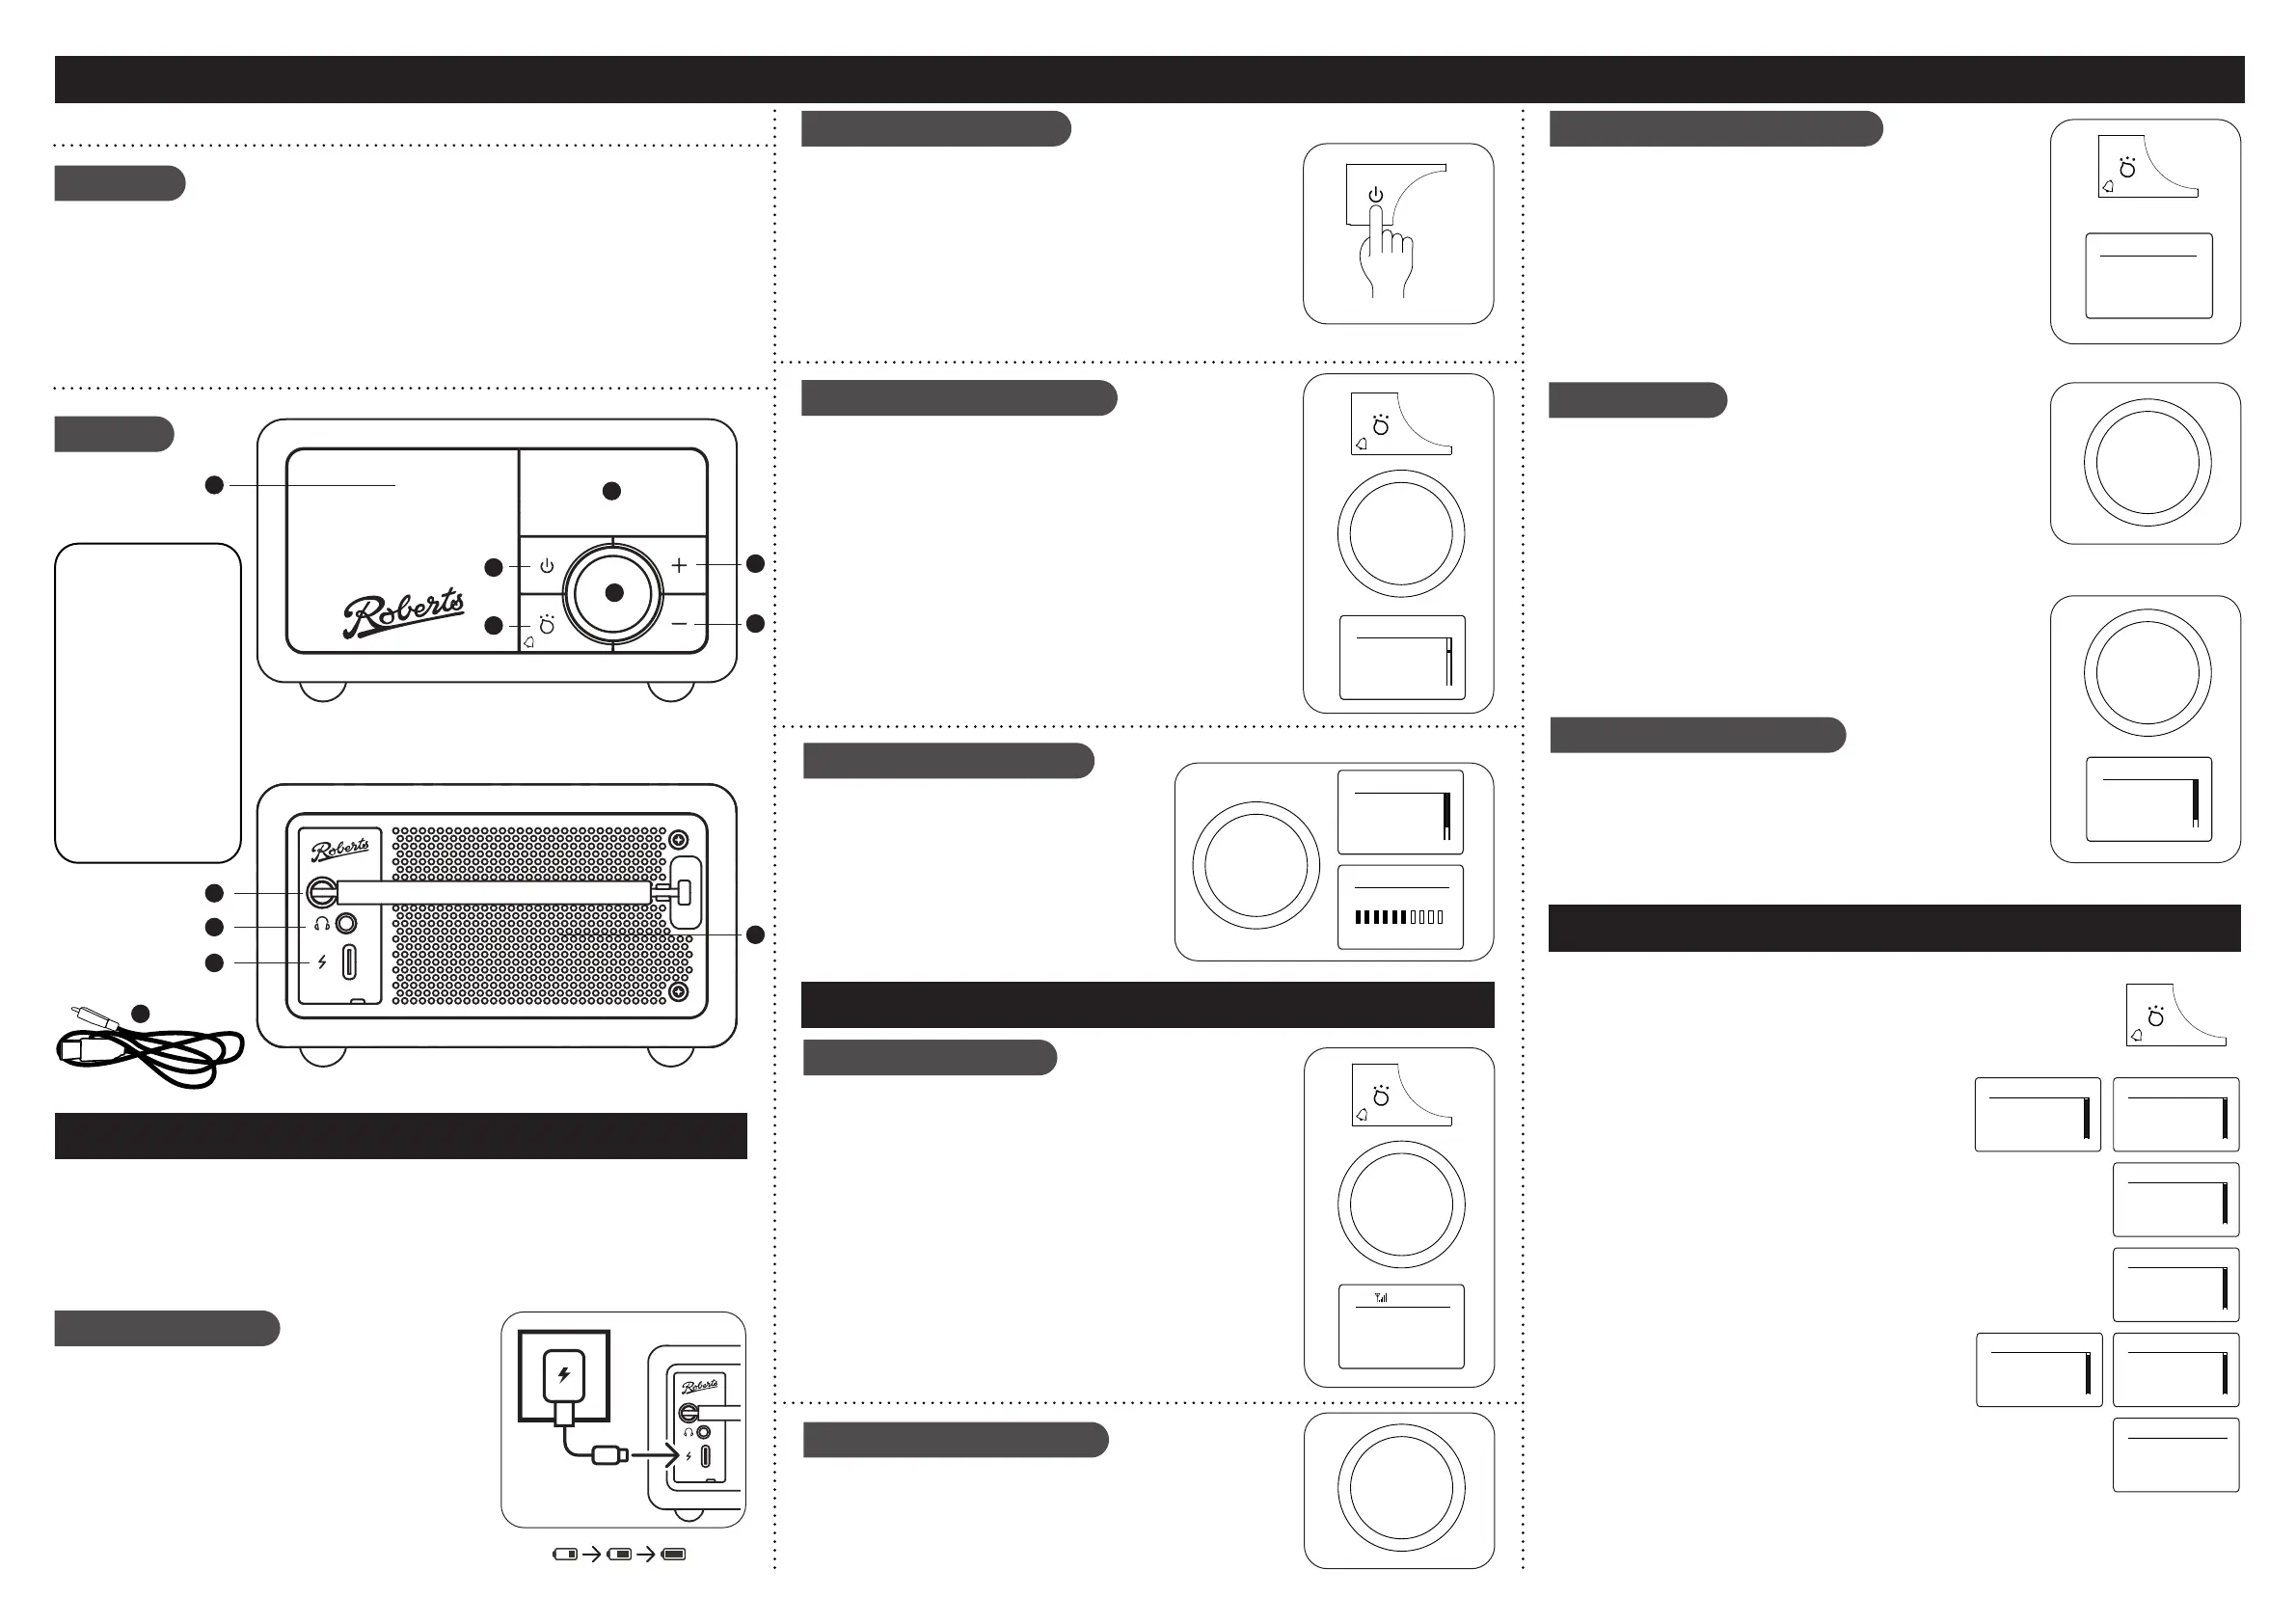
Radio | USB-C lead | quick start guide | safety/warranty leaet.
Features
Controls
continued overleaf...
STEP 2 - Play DAB Radio
Step 1 - Charge your Radio
Step 3 - Play FM Radio
What is in the Box?
• DAB / DAB+ / FM RDS digital radio
• Bluetooth audio streaming from
smartphone, tablet or laptop
• Built-in rechargeable battery -
up to 20 hours of play time
• Stores Bluetooth pairings for up to 8 devices
• 20 radio station presets (10 DAB and 10 FM)
• Telescopic aerial
• Battery charge time - approx. 6 hours
• 40mm loudspeaker with passive radiator
• Clock
• Alarm
• Adjustable display brightness
• Search / manual tuning
• Headphone input 3.5mm jack
• Included USB-C lead (to charge the battery)
Charging your radio
To enjoy uninterrupted listening for a long period
without connection to DC power, make sure to fully
charge the battery rst.
1 Place your radio on a at surface.
2 Connect the USB-C plug to the USB-C charging
socket on the rear of the radio as shown.
3 Connect the standard USB plug (the other end of
the lead) to a USB power outlet.
4 When the battery is charging, the battery indicator
icon on the display will ash.
1 Speaker
2 Power button
3 Mode button /
Alarm (on/off)
4 OLED display
5 Volume Up button
6 Volume Down button
7 Tuning / Select /
Info / Menu control
8 Telescopic aerial
9 Headphone socket
10 DC in 5V/1A USB-C
charging socket
11 Passive radiator
12 USB-C to USB-A
charging lead
8
9
STEP 4 - Bluetooth
Please read the safety leaet provided before charging your radio.
Your radio operates on a built-in Lithium-ion battery that can be recharged either using a USB charging
port or from a USB power adaptor (not included) with a rated output of DC5V, 1000mA.
Note: You can begin using the radio whilst charging. Make sure the USB power source can provide
5V 1A of electrical current. If not, it may damage the USB power source.
When connected to DC power and in standby mode, the display will show a large
clock, along with the battery (if charging) and alarm state.
Apply a long press to the Mode button when the radio is in standby or turned on
to toggle the alarm on/off.
STEP 5 - Alarm
10
11
12
A - Switch on your radio
C - Scan for DAB stations
As time passes new stations may become available or
you may have moved to a different part of the country.
1 When in DAB mode, apply a long press on the
Tuning control to enter the DAB menu.
2 Rotate the Tuning control and select ‘Scan’.
3 Press Tuning. Your radio will perform a scan of
the Band III DAB channels. As new stations are
found, they will be added to the list stored in the
radio.
B - Select a DAB radio station
1 If needed, press and release the Mode button until the DAB mode
is selected.
2 Rotate the Tuning control to step through the list of available DAB
stations.
3 Press the Tuning control to select the station.
4 Press the Volume Up or Down buttons to adjust the Volume.
5 Some radio stations may have one or more additional broadcasts
associated with them. If these are available they will appear
immediately after the main station.
• Press and release the Tuning / Info control to cycle through the
various DAB display options. Choose from, scrolling text, program
type, multiplex name, date, frequency, bit rate, audio type, coding
information and signal strength.
BBC Radio 2
BBC Radio 3
BBC Radio 4
Station List
Recall Preset
Save Preset
Scan
Menu
Scanning...068
DAB
09:00
1 Extend the telescopic aerial, then press and release the Power
button to switch on the radio. A start up screen will be displayed
after a short delay and a station scan will be performed.
2 If this is the rst time the radio is used a scan of the Band III DAB
channels will be carried out. After each use the radio will remember
the mode used and then switch on in that mode the next time it is
used. To switch off your radio, press and release the Powerbutton.
• Note: If no signals are found it may be necessary to relocate your
radio to a position giving better reception and carry out a scan for
new stations.
A - Search tuning - FM
B - Manual ne tuning - FM
1 Extend the telescopic aerial.
2 Press and release the Mode button until FM is selected.
3 Rotate the Tuning control clockwise or anti-clockwise one click to
scan upwards (low to high frequency) or downwards (high to low
frequency). The scan will stop automatically when it nds a station
of sufcient strength.
4 When the end of the waveband is reached your radio will
recommence tuning from the opposite end of the waveband. If the
signal is strong enough and there is RDS data present then the
radio will display the station name.
5 Adjust the Volume.
• Press and release the Tuning / Info control to cycle through the
various FM display options. The display options are station name,
scrolling text, program type, date and frequency.
1 Turning the Tuningcontrol starts auto scan. To stop the scan in
the desired area, turn the control one more step.
2 To change the frequency a small amount, rst press the Tuning
control, then turn. Each click changes 50 kHz.
3 After a few seconds the control will return to auto scan mode.
Scanning...
FM
09:00
87.50 MHz
Connecting Bluetooth devices
Playing audio
1 Ensure Bluetooth is enabled on your smart device.
2 With your radio switched on, press and release the Mode button
until the Bluetooth mode is selected on your radio.
3 The display will say ‘Looking for Device’.
4 On your smart device select ‘Revival Petite 2’. Once the connection
is established you may play your music.
5 Adjust the volume using the volume controls on the radio and on
the connected Bluetooth device.
1 The audio player in your smart device may be able to respond
to the Play/Pause, Next track or Previous track controls on the
radio.
2 Press the Tuningcontrol to pause playback. Press the control
again to resume playback.
3 Rotate the Tuning control clockwise or anti-clockwise to skip to
the next or previous track.
Note: Not all player applications or devices may respond to all of
these controls.
• Displayed information such as title, artist and album will cycle
periodically.
Connect a different device
1 To connect a different device, apply a long press on the Tuning
control. Choose ‘Disconnect’. Your radio will become discoverable
by other devices.
2 To clear all Bluetooth pairings, apply a long press on the Tuning
control. Choose ‘Clear Pairing’.
1 Apply a long press on the Tuning / Menu controlto
access the current menu options. Rotate the control
and press to select Alarm (In standby mode, Alarm is
selected directly by applying a long press to the Tuning
/ Menu).
2 Press ‘On’ to access the ‘Alarm days’. Choose to set
the days from ‘Off’, ‘Daily’, ‘Once’. ‘Weekedays’ or
‘Weekends’.
3 Press ‘Time’ to set the alarm time. Use the Tuning
control to rst set the hour, pressing to select. Repeat
for setting the minutes.
4 Press ‘Mode’ to set whether the alarm is to be ‘DAB’,
‘FM’ or ‘Buzzer’.
5 If ‘Alarm mode’ is set to either ‘DAB’ or ‘FM’, an option to
set the ‘Preset’ is available. Select either ‘Last listened’
or one of the saved presets ‘01-10’ (‘Empty’ cannot be
selected).
6 Press ‘Volume’ to set the alarm volume level from 1-20.
The alarm is cancelled by pressing the Mode button.
Snooze the alarm for 9 minutes by pressing the Tuning / Menu control.
Press the Tuning / Menu control when snoozing to cancel the alarm
If the radio is turned off and not connected to DC power, an enabled alarm
will trigger the radio to turn on and sound the alarm.
Pause
BT
09:00
Tristian’s iPhone
Disconnect
Clear Pairing
Info Scroll
Menu
2
3
5
6
7
4
1
Sleep Timer
Brightness
Alarm
Menu
On: Off
Time: 08:00
Mode: DAB
Alarm
Preset: Last listened
Volume 13
Back
Alarm
Off *
Daily
Once
Alarm days
DAB *
FM
Buzzer
Alarm mode
Last listened
01: BBC R2
02: Empty
Alarm preset
Volume 13
Alarm volume
Product specificaties
| Merk: | Roberts |
| Categorie: | Radio |
| Model: | Revival Petite 2 |
Heb je hulp nodig?
Als je hulp nodig hebt met Roberts Revival Petite 2 stel dan hieronder een vraag en andere gebruikers zullen je antwoorden
Handleiding Radio Roberts

29 December 2026
28 Juli 2025
26 Maart 2025
25 Maart 2025
23 Februari 2025
3 December 2024
24 November 2024
15 November 2024
24 Oktober 2024
23 Mei 2024
Handleiding Radio
Nieuwste handleidingen voor Radio
26 Mei 2026
22 Mei 2026
22 Mei 2026
22 Mei 2026
20 Mei 2026
20 Mei 2026
20 Mei 2026
20 Mei 2026
20 Mei 2026
20 Mei 2026